What just changed?! Resulting images with same prompt and seed are now terrible. #6217
Replies: 18 comments 56 replies
-
|
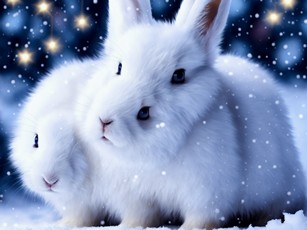
yes, I have horrible results too, double / triple head, etc... thanks |
Beta Was this translation helpful? Give feedback.
-
|
Hi res fix is downgraded, that's why |
Beta Was this translation helpful? Give feedback.
-
|
just type "git pull" to your webui-user.bat |
Beta Was this translation helpful? Give feedback.
-
|
No, type "git checkout master", then "git pull" and run it. |
Beta Was this translation helpful? Give feedback.
-
|
oh, sorry, yes that |
Beta Was this translation helpful? Give feedback.
-
|
just git checkout COMMIT. There's no need to DL a zip. here : |
Beta Was this translation helpful? Give feedback.
-
|
thanks!
thanks a lot!! before doing that, I'll try the webui-user.bat solution. |
Beta Was this translation helpful? Give feedback.
-
|
I can confirm this. Results are now bad, ugly images. If I use exactly same prompt, seed and model which gave me beautiful photos. Now I get ugly images, double bodies, double heads etc. |
Beta Was this translation helpful? Give feedback.
-
|
I have tested every upscaler and every width and height and still results are quite bad, older was much better :/ |
Beta Was this translation helpful? Give feedback.
-
|
try different upscalers :) |

Beta Was this translation helpful? Give feedback.
-
|
Which one do you suggest? Latent is giving bad results. Thanks @fractal-fumbler ! |
Beta Was this translation helpful? Give feedback.
-
|
These all are horrible in my opinion, results are simply bad compared to older version |
Beta Was this translation helpful? Give feedback.
-
|
lol |
Beta Was this translation helpful? Give feedback.
-
give it a try :) |
Beta Was this translation helpful? Give feedback.
-
|
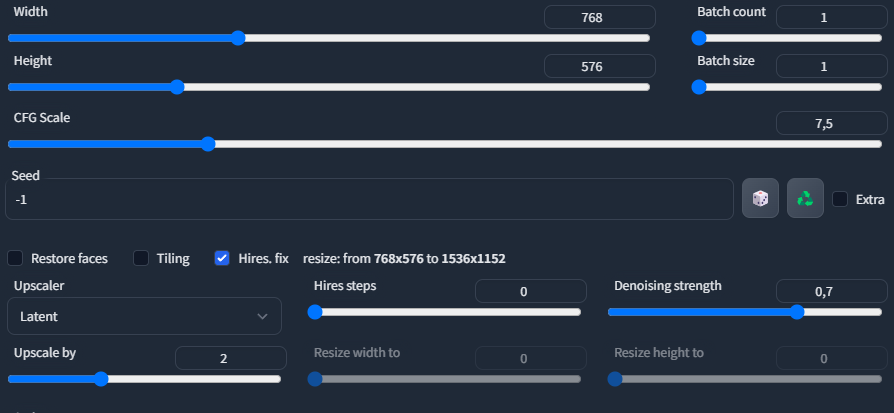
The new Highres. Fix mode is actually pretty simple. Previously, width * height represented the final canvas size, and we've been working backwards. Using Highres. fix properly meant doing math if you wanted to preserve the aspect ratio. It was very easy to select nonsensical settings like e.g. a final canvas width of 512 with an initial generation width of larger than 512, or just selecting Highres. Fix when you had a canvas size of 512x512 on a 512x512 model. "Upscale by." just does what it says: It multiplies your initial width * height settings by the specified multiplier. That's why the new mode seems strangely slow - you're probably selecting a high width * height and then scaling more on top of that. You'll have to play with the denoising attribute to get results you want. Latent scaling was the old default and now you have the ability to go directly to the other scaler modes without doing img2img, which is also neat. So the new Highres. Fix actually does what I wanted it to, but all the changes made it initially hard to understand what's going on. Giving independent scaling for x and y axes would be welcome for the rare cases people want that. |
Beta Was this translation helpful? Give feedback.
-
yeah because you're genning at a static 1:1 small resolution. Try genning anything outside of that, like 16:9 for example lmfao. |
Beta Was this translation helpful? Give feedback.
-
|
Hires fix is definitely broken, getting the same as people above. I've rolled back to e672cfb Everything has been fine up this this git pull today. On my 3080 generating a 1280x720 simple prompts occasionally gives cuda memory errors, which shouldn't be happening on a 12gb gpu, never had them before. When I can generated a 1280x720 image, it has all the signs of the Hires fix not working on this build |
Beta Was this translation helpful? Give feedback.
-
|
This is true but previously we were able to set the target resolution, now we cant do that anymore. |
Beta Was this translation helpful? Give feedback.
-
roll back to previous hires fix or make a pull request, which allow to make target resolution |
Beta Was this translation helpful? Give feedback.
-
Was this change documented in detail anywhere? It's hard to understand without context. excuse my ignorance, but please let me know if I have this correct: Under the old model, I could make an image of, say 1025x1536 and just click Highres fix and select the default. I made mine default to 768x768 for SD2.1 checkpoints. In my head, this means an initial 768x768 image was created and then upscaled to 1024x1536. Is that right? For the new model, if I want a 1024x1536 image, do I set the the HxW to 512x768 and the highres upscale to "x2"? I tried this and the output image is indeed 1024x1536 but the info text is incorrect:
Seems to work, will have to test more |

Beta Was this translation helpful? Give feedback.
-
|
Before: if any of the firstpass sliders = 0, the image was always generated at 512x512 then resized to the resolution set on the regular width and height sliders, which caused the image to get cropped if it tried to fit non square ratios Old example with 1280x768: Alternatively, need to use an external calculator to calculate better firstpass values, https://preyx.github.io/sd-scale-calc/ To prevent cropping, set firstpass to half the target res, which can cause images to get generated even further below 512 and is less optimal tl;dr it was a hassle Now: the image gets generated at the resolution set by the regular width and height sliders, then multiplied by the Upscale by slider = final resolution One new example with 1280x768: Basically the regular width and height are now what the old firstpass sliders were. It's much simpler. However, yes, this does mean it "negates" some of the original point of high res fix to prevent double bodies and weird generations with resolutions higher than 512x512, and is now more of an upscaler, but the fix is simple by setting your res to 512x512 then adjusting the Upscale by slider, or sticking closer to 512 for non square ratios. The benefit of this is that there's more freedom of experimenting with different resolutions and ratios, or at least the same freedom that the old firstpass sliders provided really, with the added benefit of the multiplier. If you don't have If you didn't mind or liked the cropping on non square ratios, you could set your res to 512x512, Upscale by 2 or a bit above 2.1 depending on your VRAM, then use img2img to resize that, or manually crop and resize it externally. It is more of a hassle, but you'll at least get more controlled cropping than the old method did. If you only do 1024x1024 images or square ratios then you only need to set your res to 512x512 and Upscale by 2 or above depending. tl;dr the old firstpass sliders are now the regular width and height sliders. The one thing that would be cool, is if the Upscale by slider showed the actual final resolution below it, just to make it more clear. I'm nowhere near a real coder, but this is how the old code looked like when I made #5382. It shows that firstpass = 0 was hardcoded to generate 512x512 images and then scaled those. |
Beta Was this translation helpful? Give feedback.
-
|
Since most models were and still are trained at 512x512, anything above it can cause the samplers to get confused, which can create double bodies and other abnormalities. It doesn't entirely negate the fix since double bodies don't always appear above 512x512 and not in every model, though the further you get away from 512 the more chances of weird details or doubles. The original fix was to hardcode everything getting generated at 512x512 then scale that, since it guarantees to stay within the original training res. However with 768x768 starting to slowly become more common, it means that the old method with firstpass = 0 was still generating at 512x512 even for 768 models. As better models get released and VRAM optimizations are added, a fix will technically no longer be needed, or rather it might need to constantly get hard capped at whatever the new limit is, but also keep in mind the older limits for older models. The new method makes it easier to adjust the firstpass by basically merging it to the regular height and width sliders, and more importantly (at least to me and I agree it's not the same for everyone) is it prevents the random cropping that happened before. |
Beta Was this translation helpful? Give feedback.
-
|
Thanks for the detailed response! Now I just have to figure out how to get it working properly, or if it's even possible, with a non-square image if I want to recreate it and the highres itself was square. I have an image that is 768x1152, and the HR was set to 512x512. Trying an HR of 384x576 and scale of 2 does not work, nor does 512x576 with scale of 2. Using 512x512 and scale of 2.25 gives me a 1152x1152that is 90% accurate at replicating the original 768x1152 image but still "off" or so it seems because now facial features are wider in this one example I am playing with. This will be fun as the scaling cannot be set independently :) |
Beta Was this translation helpful? Give feedback.
-
point is that for non-square resolution first pass resoluton wasnt 512x512. |
Beta Was this translation helpful? Give feedback.
-
|
i tested the new feature very heavily and i can assure that is nowhere near the old one. The noise reduction slider is pretty much pointless now if you set it to values lower then 0,5, with the old settings if you set the denoise to 0.1 the image looked clean and sharp just very similar to the one generated first. If you set the value to 0.9 the first image generated would have been the same, but the "fixed" one would have looked very different. with the new settings if you set the highres fix to 0.1 it generates a very blurry image that is useless and worse than the first generated image. Also, it doesn't do lesser steps as it used to be, with 30 steps it should do 33 steps total, but it does 60 steps, regardless of the option in the settings. |
Beta Was this translation helpful? Give feedback.
-
The HR fix was really just a badly hardcoded fix, which was fine months ago, but now it made no sense. |
Beta Was this translation helpful? Give feedback.
-
|
With latest commit: |
Beta Was this translation helpful? Give feedback.
-
|
Yup, just tested, the denoising strength now works, but the denoising steps are very random, the slider works 1 out of five times |
Beta Was this translation helpful? Give feedback.
-
|
I would like to just use the old highres fix without reverting to an older version. My extensions update themselves and some included the mess of a fix in it and I cannot replicate my old good results. Now reverting to an older version isnt even an option anymore because the extensions just went with the chaos and integrated it, resulting in very poor performance and quality |
Beta Was this translation helpful? Give feedback.
-
|
Changes are great, now you can auto resize and crop from the highres fix option if you want to.
What you could do reproduce the old behavior:
https://preyx.github.io/sd-scale-calc/
That should pretty much reproduce the old behavior, if you want to generate new images using the old method anyway. The UI already auto imports values from older generations and auto converts them properly. |
Beta Was this translation helpful? Give feedback.
-
Are these new features documented anywhere? The commit has no real useful notes. i see there are now about ten options to upscale, but without knowing that they do, it's gonna be a crapshoot |
Beta Was this translation helpful? Give feedback.
-
|
What does "high res steps do" is there an explanation of this new method? |
Beta Was this translation helpful? Give feedback.
-
From what I can tell, and i am not sure, but it appears you can run the images at the resolution you set, so let's say 512512 for 20 steps, and then run the upscaler independently, so at 2X for only 10 steps if you want... or 30. Leaving it at zero will run it the same number of steps as your initial image. |
Beta Was this translation helpful? Give feedback.
-
|
After today's upgrade the AI was generating different pics even though I'm using same prompts, model and seed, same everying. Infact I'm using PNG Info to analyze pics then sent to txt2img but it still generate different pics. e672cfb Was there any older branch like one week earlier available? |
Beta Was this translation helpful? Give feedback.
-
|
SAME! It's killing me! Every generation on same settings gives different details! :-( |
Beta Was this translation helpful? Give feedback.
-
|
KINDA FIGURED IT OUT. Basically you have to set your starting width/height to something that the model was trained on ie 1.5 model (512/512) you don't want to go far beyond that aspect. Then you set your high-res fix width/height to what you want the final result to be. If you're using latent option then set your steps to around .5-.7 (anything less or more) seems to produce either very blurry images or double heads etc. Now it seems to work... Although I'm not sure why they re-wrote it this way, b/c this seems just MORE work. |
Beta Was this translation helpful? Give feedback.
-
|
You're just being exposed to settings that were always there in the Settings page and now are in the front or were hardcoded and had no way of changing them without directly editing the code, you might have been using the defaults all along. Latent upscale was the old Upscale using latent in settings, it already needed high denoise above 0.5 to prevent blurry images. I also explained how the old method used 512x512 as a base in a post a bit above and how to reproduce the old method for new images if you really wanted to. Basically options were just reordered better and the old functionality is all there. |
Beta Was this translation helpful? Give feedback.
-
|
Okay, so beyond the settings I posted why on earth would you want to mess with them to create blurry and or garbled images? |
Beta Was this translation helpful? Give feedback.
-
|
The benefit of Latent upscaling is sort of "brute forcing" more detail into a generation, but it does need higher denoise above 0.5, that's the way it always worked when it was sort of hidden in the Settings page. A really nice thing is now the upscalers are right there in the high res fix menu without needing to change them in Settings, you can download a variety of them and try them out by extracting them in models/ESRGAN each in their own folder. https://upscale.wiki/wiki/Model_Database There's far more freedom and far more control now with high res fix, just need to be familiarized and experiment with the settings beyond the defaults. You're no longer limited to everything just being generated at 512x512 then scaled and randomly cropped in case of non square ratios. Everything being hardcoded to be generated at 512x512 was especially bad for 768 models, now you can easily pick your base res and resize from that either with Upscale by or the Resize to sliders. I think the misunderstanding comes from maybe not fully knowing what a firstpass is, from the old sliders. A firstpass is simply an image generated without the high res fix option enabled. When you enable highres fix, it generates an image normally, then that image gets put through img2img at a higher res, which is a secondpass, and gives the final image. Now you can also specify the steps for that secondpass, lower steps than the firstpass for faster secondpass processing but lower detail, higher steps than the firstpass for more details but slower secondpass processing. Before, the secondpass always only used half the steps of the firstpass IIRC. |
Beta Was this translation helpful? Give feedback.
-
|
Helpful reply, thanks for clearing this up! |
Beta Was this translation helpful? Give feedback.
-
|
Ok, after some more tinkering and experiments, I think, in general, the new new Highres fix, that has the "Resize to" sliders is actually superior, but it needs a lot more manual work from the user to the point of being impractical for most scenarios. I don't think it's possible that new users will figure out how to use it properly, and an automatic mode that sets the original resolution for the user or emulates the old "one checkbox wonder" behavior would be cool. Here's how you use the new Hirgres. Fix:
Using these settings I get decent results most of the time, sometimes better, sometimes worse. The worst thing about this new Highres fix. is that from the UX perspective it's just a mix of parts pulled from the extras and img2img tabs that is impossible to figure out without a guide. More or less advanced users were always able to do exactly all of this using the Extras tab and ing2img. Generate - resize - refine in img2img. Less experienced users will click the Highres fix checkbox, see that it doesn't do anything with the default settings, see a lot of settings and nope out. Some will figure out that they have to set the steps to a non-zero value and will see that now it takes several times as long to generate an image and the result is still bad and then nope out. In my opinion, the txt2img tab is not the best place for all of this as it just duplicates the functionality present somewhere else in the ui. As I mentioned in the opening paragraph, a one button solution that figures out the settings for the user that work most of the time would suffice. If you want it to work with models of different picture sizes, just make a single field for entering the model base size and let the computer do the rest of the math. |
Beta Was this translation helpful? Give feedback.
-
|
I talked to the creators of openOutpaint and they implemented a fallback solution for everyone reverting to an older version because of this new implementation. I tested it and openOutpaint works as expected again with an older version of this repo. They responded quickly to this issue and are really professional about it. Premium extension right there. edit: Clarification: everyone on an older version can just ignore the new settings and it will work like before |
Beta Was this translation helpful? Give feedback.
-
|
If anyone's wondering what's been working for me is this: If I set my original image higher than the standard for the model, like, 512x1080 etc, it seems to always fail. I heard in a forum that setting below the standard works fine, if you want better aspect ratio handling, i.e. 384x512, etc. |
Beta Was this translation helpful? Give feedback.
-
|
I can't seem to reproduce my non hires fix generations too, I double checked my prompt, seeds, hash model, samplers, steps, clip skip, ensd but the newer output is different from the old one. |
Beta Was this translation helpful? Give feedback.
-
|
Wanted to give new hires try but no matter what prompt + negative prompt I get often screwed images (doubled body parts)
Bring old Hires.Fix back - it was working! |
Beta Was this translation helpful? Give feedback.
-
|
Use 0.5 denoise and less. It helped me. I used to put 0.7-0.9 before and it worked fine, now it is ok only on low denoise. There are also couple upscalers that were buggy as I remember from my tests. Maybe it were latent and second latent. |
Beta Was this translation helpful? Give feedback.
-
|
I also don't fully grasp the new settings or the point when so many times I'm getting double yes, mouth's noses, weird shit that actually never used to occur before. |
Beta Was this translation helpful? Give feedback.
-
OLD VERSION
OR
TO RETURN TO NORMAL VERSION
|
Beta Was this translation helpful? Give feedback.
-
|
I tried to turn off and on the "old karras" setting but it still didn't help. All other settings I guess are irrelevant cuz I get different results even without hires fix on 512x512 simple generation. I also don't use "extra" square near seed. I do indeed use xformers but I don't think it should be that way with it, cuz I used it before updates and it worked just fine. I think that there are some new settings or new values that changed during the update. Any more guesses what can cause it? |
Beta Was this translation helpful? Give feedback.
-
|
And about VRAM, I get it all the time, even on same settings. One time it works, another time it shows error. Very unstable. And it also runs 2 progress bars before the error, and runs out of memory on third procedure. So much time wasted every time for first two passes. |
Beta Was this translation helpful? Give feedback.
-
yeah this is why i went back to older version, its just not worth the time investment to work around it, just too many things are broken. |
Beta Was this translation helpful? Give feedback.
-
That's the point! +1 |
Beta Was this translation helpful? Give feedback.
-
I've noticed this as well after using the upscaler in extras. Ooms a lot more frequently til the server is restarted |
Beta Was this translation helpful? Give feedback.
-
|
To bring old Hires.Fix and move "new buggy" as extension script pls vote/comment for: |
Beta Was this translation helpful? Give feedback.
-
|
Go in settings, compatibility, and make sure the 1 about hires fix is checked |
Beta Was this translation helpful? Give feedback.
-
It is now the same as "old Hires.Fix" because it uses "...set final resolution..." and old HiRes.Fix was working in other way (initial resolution) so still is not the same algorithm as it was where you have set initial resolution which was later used to denoise to new one. |
Beta Was this translation helpful? Give feedback.
-
|
Also make sure if you're using high res fix to not use the Latant upscaler or really any of the others besides the 2 R-ESRGAN 1s are garbage but default is latant. |
Beta Was this translation helpful? Give feedback.
-
|
I like LDSR more. It's more VRAM eating one, but gives cool result with great background. |
Beta Was this translation helpful? Give feedback.
-
|
Sounds like a placebo effect, honestly. Does the upscaler even matter at all if the image goes through additional diffusion after the upscaling? Using the DSLR upscaler, which is hella slow definitely sounds like a waste of time in this particular scenario. Unless you're setting your denoise strength or higres steps to 0 a.k.a not using the actual highres fix. |
Beta Was this translation helpful? Give feedback.
-
|
I made generation with all the upscalers and I liked LDSR the most. And yes it is a bit slower and more VRAM eating than others. |
Beta Was this translation helpful? Give feedback.
-
|
I'll check it out later. I think that was one of the others I didn't mind as much. Lanzcos and latent are just bad tho lol |
Beta Was this translation helpful? Give feedback.
Uh oh!
There was an error while loading. Please reload this page.
Uh oh!
There was an error while loading. Please reload this page.
-
Just updated to commit 4dbde22 and not getting good results. Exactly the same prompts, settings and seed are not giving the same as before, and I'm getting a lot of body horrors.
Edit: I think it may be related to the hires fix. I'm making 1024x768 images and hires fix used to get rid of body distortions...it's not any more. No distortions with lower res images.
Beta Was this translation helpful? Give feedback.
All reactions