Tutorial
Let's learn how to develop simple pieces of the website to prepare you for coding the actual site!
Lost? Make sure to read the README.md first!
Stuck? Check out branch
tut-kdofor reference!
- Pull the branch called
tutorial - Create a branch
tut-<First Name Initial + Last Name>from the tutorial branch
First Name: Kevin (k)
Last Name: Do (do)
Branch name: tut-kdo
- With VSCode open, open the terminal and type
yarn(You should be in the AztecGameLaboratory directory!)
C:\Users\YOUR_COMPUTER_NAME\WHERE_THE_REPO_WAS_CLONED\AztecGameLaboratory> yarn
- Start your development locally on your computer with
yarn start - Open the
tutorialfolder located insrc/ - Create your own folder as
tut-<First Name Initial + Last Name>within thetutorialfolder
First Name: Andrew (a)
Last Name: De Leon (deleon)
Folder name: tut-adeleon
- Change directory to the folder you just created
- Create a file named
Tutorial.js - Create a class component within the file you just made
<First Name + Last Name> + Tutorial
import React, { Component } from "react";

class KevinDoTutorial extends Component {
  render() {
    return ();
  }
}

export default KevinDoTutorial;
- Create a functional component and add it to your class component
import React, { Component } from "react";

class KevinDoTutorial extends Component {
  state = {
    count: 0
  };

  onClickHandleCount = e => {
    this.setState({
      count: (this.state.count += 1)
    });
  };

  render() {
    return (
      <React.Fragment>
        <FunctionalComponent />
        <button onClick={this.onClickHandleCount}>Click me to increase count!</button>
        <p>Count: {this.state.count}</p>
      </React.Fragment>
    );
  }
}

const FunctionalComponent = () => {
  return <h1>Hi, I am a FunctionalComponent</h1>;
};

export default KevinDoTutorial;
- Import that component you just made in
App.js
import KevinDoTutorial from "./tutorial/tut-kdo/Tutorial";

...

class App extends Component {
  render() {
    return (
      <div className="App">
        ...
        <KevinDoTutorial />
      </div>
    );
  }
}

export default App;
- Import
react-reduxtoTutorial.js
import { connect } from "react-redux";
- Connect your component and replace the previous export in
Tutorial.js
export default connect(mapStateToProps)(KevinDoTutorial);
- Add
mapStateToPropsright above the export
const mapStateToProps = state => {
  return {
    testData: selectTestData(state)
  };
};
- Use a selector to retrieve
testData
import { selectTestData } from "../../redux/testSelector";
- Display
testData.testwithin in yourTutorial.js
...

render() {
  return (
    <React.Fragment>
      <FunctionalComponent />
      <p>Redux Data: {this.props.testData.test}</p>
      <button onClick={this.onClickHandleCount}>Click me to increase count!</button>
      <p>Count: {this.state.count}</p>
    </React.Fragment>
  );
}

...
- Import testAction to
Tutorial.js
import { bindActionCreators } from "redux";
import { testAction } from "../../redux/testActions";
- Add a
mapDispatchToPropsand reconfigure theexport default connect
...

const mapDispatchToProps = dispatch =>
  bindActionCreators(
    {
      testAction
    },
    dispatch
  );

export default connect(
  mapStateToProps,
  mapDispatchToProps
)(KevinDoTutorial);
- Create a button to use the
testAction
...
render() {
return (
<React.Fragment>
<FunctionalComponent />
<p>Redux Data: {this.props.testData.test}</p>
<button onClick={this.onClickHandleCount}>Click me to increase count!</button>
<p>Count: {this.state.count}</p>
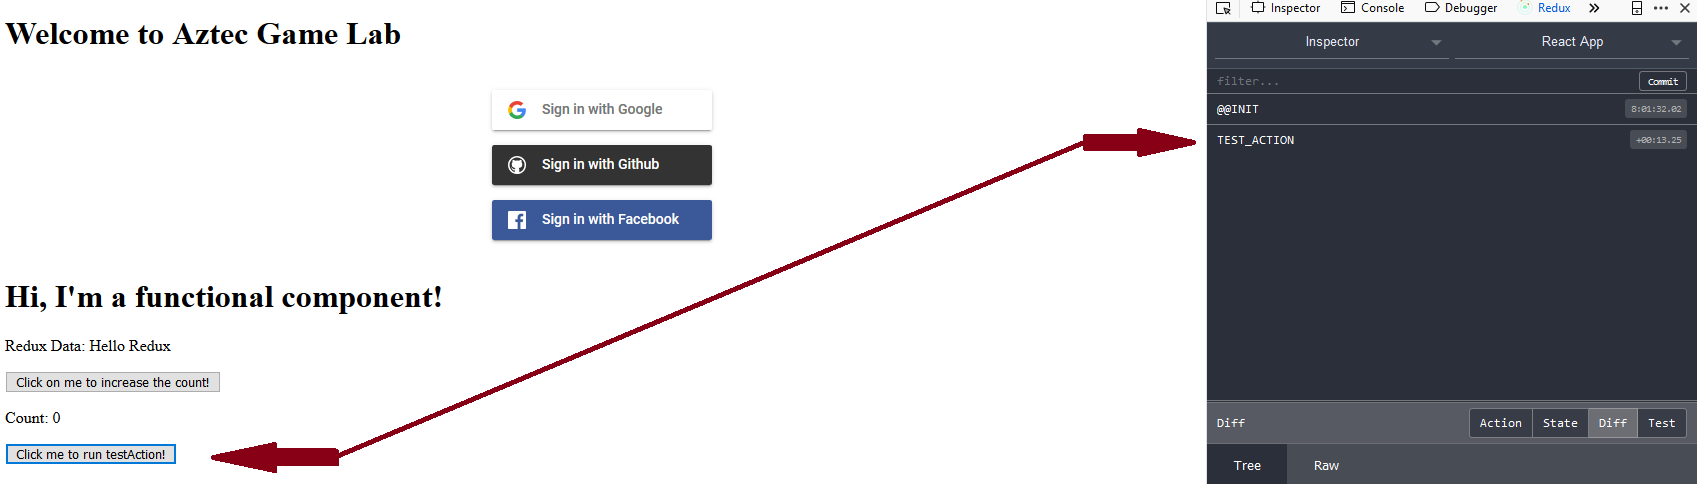
<button onClick={this.props.testAction}>Click me to run testAction!</button>
</React.Fragment>
);
}
...
- Observe that in Redux Dev Tools that the state changed!
- Make your own action in
testActions.jsin the folderredux
...

export const kevinAction = () => {
  return {
    type: "KEVIN",
    payload: "hehe xd"
  };
};
- Edit the
testReducer.jsin the folderreduxto receive and change it's state based on that action!
export default (state = initialState, action) => {
    switch (action.type) {
        case "TEST_ACTION":
            return { test: "Hello Redux" };
        case "KEVIN":
            return { test: "KEVIN WAS HERE" };
        default:
            return state;
    }
};
- Update the
Tutorial.js!
import { testAction, kevinAction } from "../../redux/testActions";

...

<button onClick={this.props.kevinAction}>Click me to run kevinAction!</button>

...

const mapDispatchToProps = dispatch =>
  bindActionCreators(
    {
      testAction,
      kevinAction
    },
    dispatch
  );
Jest Documentation
Install the prerequisites for using jest with React:
- Enzyme Adapter for React v16:
- yarn --save-dev enzyme enzyme-adapter-react-16
- Alternatively: npm i --save-dev enzyme enzyme-adapter-react-16
- yarn --save-dev enzyme enzyme-adapter-react-16
- Refactor counter in tutorial to its own Component
- Create a unit test for your component
- yarn test and make sure all tests pass
- Submit a PR to merge your tut-<First Name + Last Name> into tutorial
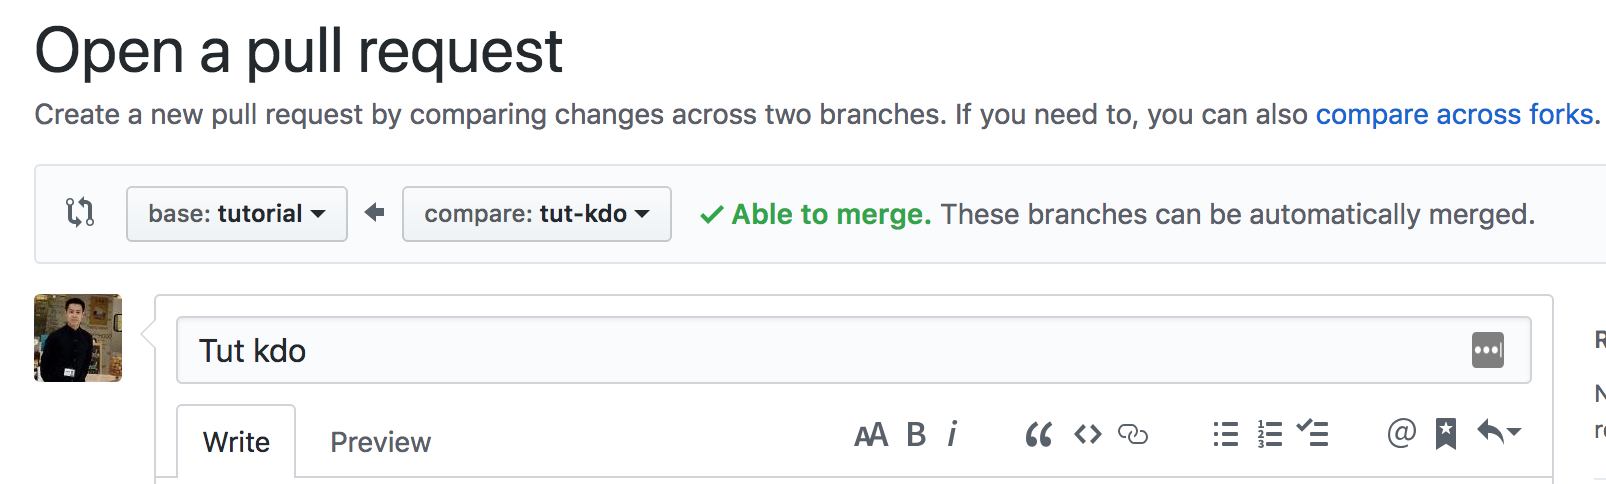
- Use the PR template under .github folder or in the wiki
- Assign reviewers and yourself as assignee on the right sidebar
Finally, the checks will run, someone will approve and you're officially a AGL Developer! Please ping me if you have any questions and check out my tutorial branch tut-kdo if you get stuck!