Home
There are two ways you can use this software in.
Java Requirements: Java 8 or higher
After you download the software, put it in a separate folder and create two directories:
Output and Resources.
Your folder should look like shown below:
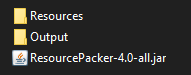
Make sure you set it up correctly because the program will not work properly without them. When you're done setting up everything, run the program to build your resource pack.
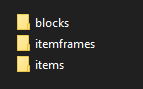
It's the place where your resource pack will be available after the building process.
This directory feeds the program with all needed images for the generation of your resource pack. It splits into three specific groups of textures.
- blocks - textures for custom blocks
- itemframes - textures for items that are meant to be displayed in an item frame
- items - textures for custom items
When you execute the software for the first time, these directories should be generated for you automatically.
After that, you may insert your textures there and run the program to your resource pack.
Source Code uses Java 16 Compiles in a way to be compatible with Java 8 or higher
You may also clone the repository and manualy build your resource pack by executing the program in your IDE.
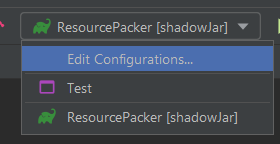
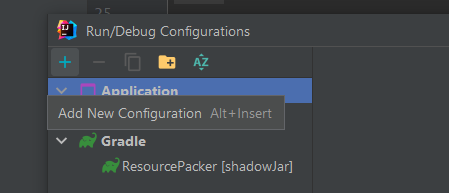
Just remember to prepare a valid setting to run the application without errors. We need them because we have to specify the path to Output and Resources directories. Here's a quick tutorial on how to set it up in IntelliJ IDEA:
- Edit the configurations
- Create new application
- Set up Build and run
The main class stays as
me.marcusslover.resourcepacker.core.internal.Core, however, your CLI arguments must meet your exact expectations. Use-rargument to specify path to the Resources directory and use the-oargument to specify path to the Output directory. The paths must be valid otherwise the program won't be working properly. Example:-r C:\Users\Mark\Desktop\CoolResourcePack\Resources -o C:\Users\Mark\Desktop\CoolResourcePack\Output
When you're done setting it up, you can go ahead and do some configuration to your resource pack.
Choosing to run the code yourself allows you to customize more things. Example of features you may modify:
- Name of your resource pack
- Description of your resource pack
- Usage of textures (custom registration)
That can be done in the ResourcePacker.class
public class ResourcePacker implements IResourcePacker {

    @Override
    public void pack(RPPacker RPPacker) {
        /*Information for the build*/
        RPPacker.setPrefix("marcusslover");
        RPPacker.setName("Packer");
        RPPacker.setDescription(List.of("Generated by ResourcePacker"));
        RPPacker.setMode(RPMode.MANUAL_REGISTRATION); // Manual registration of files.

        /*Resources*/
        ResourceHelper r = RPPacker.resources();

        /*Blocks*/
        RPBlockRegistry b = RPPacker.blocks();
        b.register(RPBlock.of("Dark Tile", r.get("dark_tile.png")));
    }
}
Then just run your custom run configuration and enjoy your resource pack. Your final built should be in the Output directory that you specified the path to.