The Expressed Exome Capture Sequencing protocol is designed to create exome capture probes directly from RNA. The probes are then used from hybrid capture of exome DNA sequences, allowing for genotyping of alleles at expressed genes.
This protocol is still in the process of being optimized. Please contact Jon Puritz (jpuritz@uri.edu) for more information before starting!
- RNA Extraction
- Quantify
- Visualize
- mRNA Library Prep
- Quant
- DSN Normalization
- Quant Libraries
- Split libraries
Before you begin this protocol, you should order the custom oligos required for mRNA library prep and genomic DNA library prep and anneal them. See Anneal RNA adapters and Anneal DNA Adapters
Refer to manual during procedure (steps below are for notes and comments)
Using unmodified TRI Reagent Protocol LINK (Below are summary steps)
- Nuclease-free Water
- 1-bromo-3-chloropropane (BCP; recommended, e.g., MRC, Cat #BP 151), or chloroform without added isoamyl alcohol 100%
- isopropanol, ACS grade or better
- 100% ethanol, ACS grade or better
- Tissue homogenizer with replacable probes (such as Qiagen TissueRuptor®)
- Appropriately sized RNase-free centrifuge tubes with secure closures, compatible with phenol/chloroform (polypropyl- ene, or polyallomer), and capable of withstanding centrifugal forces of 12,000G
- Centrifuge capable of 12,000 x g
Notes before starting
- Place all pipettes, tips, and supplies inside the hood and expose to UV for 30 minutes. (Do not put your samples in the UV hood!)
- Prepare 75% ethanol by mixing 250 μL nuclease-free water with 750 μL 100% ethanol per mL of TRI Reagent solution to be used. Include 10% overage to ensure a sufficient volume.
- Homogenize tissue samples in 10–20 volumes TRI Reagent solution. Homogenize cultured cells in 1 mL TRI Reagent solution per 5–10 x 10^6 cells, or per 10 cm^2 culture dish area.
- Incubate the homogenate for 5 min at room temp.
- (Optional) Centrifuge at 12,000 xg for 10 min at 4°C and transfer the supernatant to a fresh tube.
- Add 100 μL BCP per 1 mL of TRI Reagent solution, mix well, and incubate at room temp for 5–15 min.
- Add 100 μL BCP per 1 mL of TRI Reagent solution used for homogenization. Alternatively, 200 μL of chloroform (without isoamyl alcohol) can be used in place of BCP.
- Cap the tubes tightly and shake vigorously for 15 sec.
- Incubate the mixture at room temperature for 5–15 min.
- Centrifuge at 12,000 x g for 10–15 min at 4°C, then transfer the aqueous phase to a fresh tube.
- Centrifuge at 12,000 x g for 10–15 min at 4°C. Centrifugation at temperatures > 8°C may cause some DNA to partition in the aqueous phase, which is undesireable.
- Transfer the aqueous phase (colorless top layer) to a fresh tube.
- Add 500 μL of isopropanol per 1 mL of TRI Reagent solution, vortex for 5–10 sec, and incubate at room temp for 5–10 min.
- Add 500 μL of isopropanol per 1 mL of TRI Reagent solution used for sample homogenization.
- Vortex at moderate speed for 5–10 sec.
- Incubate the samples at room temp for 5–10 min.
- Centrifuge at 12,000 x g for 8 min at 4–25°C, and discard the supernatant.
- Centrifuge at 12,000 x g for 8 min at 4–25°C.
- Carefully remove the supernatant without disturbing the pellet.
- Precipitated RNA forms a gel-like or white pellet on the side and bottom of the tube.
- Add 1 mL of 75% ethanol per 1 mL of TRI Reagent solution
- Centrifuge at 7,500 x g for 5 min, remove the ethanol, and briefly air dry the RNA pellet.
- Centrifuge at 7,500 x g for 5 min at 4–25°C.
- If the precipitated RNA floats or does not form a compact pellet, repeat the centrifugation at 12,000 x g for 5 min to consolidate the pellet at the bottom of the tube.
- Remove the ethanol wash without disturbing the pellet.
- Remove all residual ethanol by centrifuging again briefly and removing the ethanol that collects with a fine tip pipette. Complete removal of ethanol is necessary for the RNA to perform well in downstream applications.
- Air dry the RNA pellet for 3–5 min.
- Do not completely dry the RNA pellet as this will greatly decrease its solubility.
- Centrifuge at 7,500 x g for 5 min at 4–25°C.
- Dissolve RNA in the buffer of your choice.
- Dissolve RNA in THE RNA Storage Solution (P/N AM7000, AM7001), Nuclease-free Water, or your choice of buffer‡ by passing the solution a few times through a pipette tip or by vigorous vortexing
- The resuspension volume is determined by the size of the RNA pellet. 3–5 mm pellets typically require 300–500 μL. If necessary, increase the resuspension volume or incubate at 55–60°C to completely dissolve the pellet.
- Store at 4°C for immediate analysis. For long-term storage, store at –70°C or colder.
- Dissolve RNA in THE RNA Storage Solution (P/N AM7000, AM7001), Nuclease-free Water, or your choice of buffer‡ by passing the solution a few times through a pipette tip or by vigorous vortexing
Results will be used for calibration points during library generation Refer to manual during procedure (steps below are for notes and comments)
- Qubit® RNA HS Assay Kit (ThermoFisher Q32852)
- Microcentrifuge tubes for florescence (Fisher Catalog # 07-200-183)
- Qubit® 3.0 Flourometer
- Set up the required number of 0.5-mL tubes for standards and samples. The Qubit® RNA HS Assay requires 2 standards.
- Label the tube lids.
- Prepare the Qubit® working solution by diluting the Qubit® RNA HS Reagent 1:200 in Qubit® RNA HS Buffer. Use a clean plastic tube each time you prepare Qubit® working solution. Do not mix the working solution in a glass container.
- Add 190 μL of Qubit® working solution to each of the tubes used for standards.
- Add 10 μL of each Qubit® standard to the appropriate tube, then mix by vortexing 2–3 seconds. Be careful not to create bubbles.
- Add Qubit® working solution to individual assay tubes so that the final volume in each tube after adding sample is 200 μL.
- Add each sample to the assay tubes containing the correct volume of Qubit® working solution, then mix by vortexing 2–3 seconds. The final volume in each tube should be 200 μL.
- Allow all tubes to incubate at room temperature for 2 minutes.
- On the Home screen of the Qubit® 3.0 Fluorometer, press RNA, then select RNA: High Sensitivity as the assay type. The “Read standards” screen is displayed. Press Read Standards to proceed.
- Insert the tube containing Standard #1 into the sample chamber, close the lid, then press Read standard. When the reading is complete (~3 seconds), remove Standard #1.
- Insert the tube containing Standard #2 into the sample chamber, close the lid, then press Read standard. When the reading is complete, remove Standard #2.
- Press Run samples.
- On the assay screen, select the sample volume and units
- Insert a sample tube into the sample chamber, close the lid, then press Read tube. When the reading is complete (~3 seconds), remove the sample tube.
- Repeat step last step until all samples have been read
Note that a Tapestation could also be used at this step.
- Pipette 550uL gel matrix (red) into a spin filter
- Centrifuge at 1500g for 10 mins at room temp
- Aliquot 65uL filtered gel into 0.5mL RNase-free tubes
- Allow RNA dye (blue) to equilibrate to room temp for 30 mins (in the dark)
- Vortex RNA dye (blue) for 10 secs and spin down
- Add 1 uL RNA dye into a 65uL aliquot of filtered gel
- Vortex solution
- Spin gel-dye mix at 13,000g for 10 mins at room temp
- Select correct icon
- Select correct program (RNA, DNA, protein)
- Slowly fill one of the wells of the electrode cleaner with 350uL RNase-free water
- Place the electrode cleaner in the bioanalyzer
- Close the lid and let sit for 5 mins
- Upon removing the electrode cleaner, keep lid open for at least 30 secs (to allow for evaporation)
- Put a new chip on the chip priming station
- Pipette 9uL of gel-dye mix in the well marked G (white G on black background)
- Position the plunger at 1mL
- Close the chip priming station (MAKE SURE IT CLICKS)
- Press plunger down until it’s held by the clip
- Wait exactly 30 secs and release clip
- Wait exactly 5 secs and slowly pull plunger back to 1mL
- Open chip priming station and pipette 9uL gel-dye mix into wells marked G (black G on grey background)
- Discard remaining gel-dye mix
- Pipette 9uL of RNA conditioning solution (white) into well marked CS
- Pipette 5uL of RNA marker (green) in all 11 sample wells and the ladder well
- Pipette 1uL ladder into the well marked ladder
- Pipette 1uL of sample into each of the 11 sample wells (pipette 1uL RNA marker (green) into each unused sample well)
- Vortex chip for 1 min at 2400 rpm
- Run the chip in the bioanalyzer within 5 mins (RNA assay)
CLEAN THE ELECTRODES AGAIN AFTER EVERY RUN
Annealing buffer stock (10X):
| Component | Concentration |
|---|---|
| Tris HCl, pH 8 | 100 mM |
| NaCl | 500 mM |
| EDTA | 10 mM |
For a 50mL conical of 10X annealing buffer:
- 5mL of 5M NaCl
- 500μl of 1M EDTA
- 5mL of 1M Tris HCl, pH. 8
- Fill rest of volume with nuclease free water

| Oligo Name | Sequence | Inline Barcode |
|---|---|---|
| Y-inline-SaIIa | CACTCTTTCCCTACACGACGCTCTTCCGATCTNNNNNNGTCGAC*T | NNNNNNGTCGACT |
| Y-inline-SaIIb | /5Phos/A*GTCGACNNNNNNAGATCGGAAGAGCACACGTCTGAACTCCAGTC | NNNNNNGTCGACT |
| Y-inline-SaIIa_NO_N | CACTCTTTCCCTACACGACGCTCTTCCGATCTGTCGAC*T | GTCGACT |
| Y-inline-SaIIb_NO_N | /5Phos/G*TCGACAGATCGGAAGAGCACACGTCTGAACTCCAGTC | GTCGACT |
Single-stranded oligos need to be annealed with their appropriate partner before ligation. Then the annealed adapters have to be diluted to a working strength concentration.
- To create Adapter SaIIa, combine Y-inline-SaIIa withY-inline-SaIIb in a 1:1 ratio in working strength annealing buffer (final buffer concentration 1x) for a total annealed adapter concentration of 40uM (for example, if purchased oligos are resuspended to an initial concentration of 100uM, use 40uL Y-inline-SaIIb, 40ul Y-inline-SaIIa, 10ul 10x annealing buffer and 10ul nuclease-free water). Pair Y-inline-SaIIa_NO_N with Y-inline-SaIIb_NO_N in the same fashion.
- In a thermocyler, incubate at 97.5°C for 2.5 minutes, and then cool at a rate of not greater than 3°C per minute until the solution reaches a temperature of 21°C. Hold at 4°C.
- Prepare final working strength concentrations of annealed adapters from this annealed stock (the appropriate working stock dilution for your experiment can be determined from the chart below). For convenience, it is possible to store the adapters at 4°C while in active use.
| Quantity of starting RNA | Adapter stock concentration (what you make for step 3 above) | Adapter concentration in ligation reaction |
|---|---|---|
| 100 – 250 ng | 140 nM | 10 nM |
| 251 – 500 ng | 350 nM | 25 nM |
| 501 – 2000 ng | 700 nM | 50 nM |
| 2001 – 4000 ng | 1400 nM | 100 nM |
For Puritz and Lotterhos 2017, we used 4000 ng starting RNA, but because of difficulties assessing and quantifying molluscan RNA, we chose to use a 700 nM working stock with a final reaction concentration of 50 nM.
This should take 8-10 hours and can be done over 2 days safely. Refer to manual during procedure (steps below are for notes and comments)
Note: the input amount of RNA for this is a lot of RNA. Our lab has had success in making libraries with 4ug, 2ug, and 1ug as the input for each sample. That is 4000ng, 2000ng, or 1000ng. The starting volume is 25ul, sometimes RNA needs to be concentrated before use (such as with a vacuum centrifuge).
KAPA Stranded mRNA-Seq Kit (KAPA #KK8420). This kit includes all the enzymes and buffers required for cDNA library preparation from isolation of poly(A)-tailed RNA. Kits include reagents for RNA fragmentation, 1st strand cDNA synthesis and 2nd strand synthesis/marking, and cDNA library preparation, including A-tailing, ligation and library amplification.
10 mM Tris-HCL (pH 8.0 - 8.5)
- Magnetic stand and compatible tubes or striptubes
- Thermocycler
- SPRI purification beads (KAPA Pure Beads or AmpureXP)
Steps in Library construction:
- mRNA capture using magnetic oligo-dT beads
- Fragmentation using heat and magnesium
- 1st Strand cDNA Synthesis using random priming
- 2nd Strand cDNA Synthesis and marking, which converts the cDNA:RNA hybrid to double-stranded cDNA (dscDNA) and incorporates dUTP in the second cDNA strand
- A-tailing to add dAMP to the 3′-ends of the dscDNA library fragments
- Adapter ligation, where dsDNA adapters with 3′-dTMP overhangs are ligated to A-tailed library insert fragments
- NOTE Here, we use the custom adapters
- Library amplification to amplify library fragments carrying appropriate adapter sequences at both ends using high-fidelity, low-bias PCR; the strand marked with dUTP is not amplified.
- NOTE Here you can either multiplex your RNA libraries (if you are going to sequence them) using the PCR primers outlined in the Genomic Library Prep section. Or you can use the universal primer mix if you are not going to sequence them
Before mRNA capture beads can be used they must be washed with mRNA Bead Binding Buffer
- Resuspend beads thoroughly by gentle pipetting
- For each library to be prepared, transfer 26.25 uL of the resuspended mRNA Capture beads into a 1.5mL tube
- Up to 48 libraries (1,260 uL) can be washed in a single tube
- Place the tube on a magnet holder and incubate at room temperature until solution is clear
- Discard supernatant and replace with an equal volume of mRNA Bead Binding Buffer
- Remove tube from magnet and again resuspend the beads by pipetting
- Place the tube on a magnet holder and incubate at room temperature until solution is clear
- Discard supernatant and replace with an equal volume of mRNA Bead Binding Buffer
- Remove tube from magnet and again resuspend the beads by pipetting
mRNA Capture
- Combine the following for each RNA sample to be captured:
| Component | Volume |
|---|---|
| RNA sample (in RNase-free water) | 25 μl |
| KAPA mRNA Capture Beads | 25 μl |
| Total Volume per sample | 50 μl |
- Mix thoroughly by gently pipetting up and down several times
- Place the plate/tube in a thermal cycler and carry out the 1st mRNA capture program as follows:
| Step | Temp. | Duration |
|---|---|---|
| 1st mRNA capture | 65 °C | 2 min |
| Cool | 20 °C | 5 min |
- Place the plate/tube containing the mixture of KAPA mRNA Capture Beads and RNA on a magnet and incubate at room temperature until the solution is clear. Remove and discard the supernatant
- Remove the plate/tube from the magnet and resuspend the beads thoroughly in 100 μl of KAPA mRNA Bead Wash Buffer by pipetting up and down several times
- Place the plate/tube on the magnet and incubate at room temperature until the solution is clear. Remove and discard the supernatant
- Remove the plate/tubes from the magnet and resuspend the beads in 25 μl of RNase-free water and pipette to mix
- Place the plate/tubes in a thermal cycler and carry out the 2nd mRNA capture program as follows:
| Step | Temp. | Duration |
|---|---|---|
| 2nd mRNA capture | 70 °C | 2 min |
| Cool | 20 °C | 5 min |
- Add 25 μl of KAPA Bead Binding Buffer to the mixture of KAPA mRNA Capture Beads and RNA and mix thoroughly by gently pipetting up and down several times
- Incubate the plate/tubes at 20 °C for 5 min (room temperature)
- Place the plate/tubes on the magnet and incubate at room temperature until the solution is clear. Remove and discard the supernatants
- Remove the tubes from the magnet and resuspend the beads in 100 μl of KAPA mRNA Bead Wash Buffer by pipetting up and down several times
- Place the plate/tube on the magnet and incubate at room temperature until the solution is clear. Remove and discard the entire volume of supernatant
- Prepare the required volume of 1X Fragment, Prime and Elute Buffer as a master mix to be used for each sample as follows (multiply volume by number of samples):
| Component | Volume per sample |
|---|---|
| Water | 5.5 μl |
| Fragment, Prime and Elute Buffer (2X) | 5.5 μl |
| Total Volume per sample | 11 μl |
- Thoroughly resuspend the KAPA mRNA Capture Beads with captured mRNA in 11 μl of 1X Fragment, Prime and Elute Buffer.
Resuspended beads with captured mRNA may be stored at 4 oC for up to 24 hours. Do not freeze the samples as this will damage the beads. When ready, proceed to step below.
- Place the plate/tubes in a thermal cycler and carry out the fragmentation and priming program as follows:
| Desired Fragment Size | Temp. | Duration |
|---|---|---|
| 100 – 200 bp | 94 °C | 8 min |
| 200 – 300 bp | 94 °C | 6 min |
| 300 – 400 bp | 85 °C | 6 min |
For Puritz and Lotterhos (2017), we chose 94 °C for 7 mins to have fragments between 150-250 bp, approximately the same size distribution as planned for our DNA libraries.
- Immediately place the plate/tube on a magnet to capture the beads, and incubate until the liquid is clear. Caution: To prevent hybridization of poly(A)- rich RNA to the capture beads, do not allow the sample to cool before placing on the magnet.
- Carefully remove 10 μl of the supernatant containing the eluted, fragmented, and primed RNA into a separate plate or tube.
- Proceed immediately to 1st Strand Synthesis.
- Make the 1st Strand Synthesis master mix on ice (multiply volumes by number of samples):
| Component | Volume needed for 1 reaction (1/2 reactions from kit protocol) with 20% |
|---|---|
| 1st Strand Synthesis Buffer | 5.5 μl |
| KAPA Script | 0.5 μl |
- On ice, assemble each 1st Strand Synthesis reaction as follows:
| Component | Volume per sample |
|---|---|
| Fragmented, primed RNA eluted from beads | 10 μl |
| 1st Strand Synthesis Master Mix | 5 μl |
| Total volume per reaction | 15 μl |
- Keeping the plate/tubes on ice, mix thoroughly by gently pipetting the reaction up and down several times.
- Incubate the plate/tube in a thermocyler using the following protocol:
| Step | Temp. | Duration |
|---|---|---|
| Primer extension | 25 °C | 10 min |
| 1st Strand synthesis | 42 °C | 15 min |
| Enzyme inactivation | 70 °C | 15 min |
| HOLD | 4 °C | ∞ |
- Place the plate/tube on ice and proceed immediately to 2nd Strand Synthesis and Marking.
- Make the 2nd Strand Synthesis and Marking master mix on ice (multiple volumes by number of samples):
| Component | Volume needed for 1 reaction (1/2 reactions from kit protocol) with 10% excess |
|---|---|
| 2nd Strand Marking Buffer | 15.5 μl |
| 2nd Strand Synthesis Enzyme Mix | 1 μl |
- On ice, assemble each 2nd Strand Synthesis and Marking reaction as follows:
| Component | Volume |
|---|---|
| 1st Strand cDNA | 15 μl |
| 2nd Strand Synthesis and Marking Master Mix | 15 μl |
| Total volume per reaction | 30 μl |
- Mix thoroughly by gently pipetting each reaction up and down several times.
- Incubate the plate/tubes in the thermocyler using the following protocol:
| Step | Temp. | Duration |
|---|---|---|
| 2nd Strand synthesis and marking | 16 °C | 60 min |
| HOLD | 4 °C | ∞ |
- Place the plate/tube on ice and proceed immediately to 2nd Strand Synthesis and Marking Cleanup.
-
Bring KAPA Pure Beads to room temperature by taking them out of the fridge ~30 minutes before you need them, and swirl the bottle to resuspend the beads completely
-
Perform a 1.8X Bead cleanup by combining the following for each reaction:
| Component | Volume |
|---|---|
| 2nd Strand Synthesis reaction product (total volume) | 30 μl |
| KAPA Pure beads | 54 μl |
| Total Volume | 84 μl |
- Thoroughly resuspend the beads in each sample by pipetting up and down multiple times
- Incubate the plate/tubes at room temperature for 15 min to allow the DNA to bind to the beads, having the tubes on an orbital shaker at ~200rpm is preferred
- Place the plate/tubes on a magnet to capture the beads. Incubate until the liquid is clear
- Carefully remove and discard 74 μl of supernatant in each tube
- Keeping the plate/tubes on the magnet, add 200 μl of 80% ethanol
- Incubate the plate/tube at room temperature for ≥30 sec
- Carefully remove and discard the ethanol in each tube
- Keeping the plate/tubes on the magnet, add 200 μl of 80% ethanol
- Incubate the plate/tubes at room temperature for ≥30 sec
- Carefully remove and discard the ethanol in each tube. Try to remove all residual ethanol without disturbing the beads
- Dry the beads at room temperature, until all of the ethanol has evaporated.
- Caution: over-drying the beads may result in dramatic yield loss.
- Proceed immediately to A-Tailing immediately, or follow the Safe Stopping Point instructions below
- Resuspend the beads in 7.5 μl 1X A-Tailing Buffer (multiple volumes by number of samples):
| Component | Volume needed for 1 reaction (1/2 reactions from kit protocol) |
|---|---|
| Nuclease-free water | 6.75 μl |
| A-tailing buffer (10X) | 0.75 μl |
- Cover the reaction and store at 4 degrees C for up to 24 hours. Do not freeze the samples as this will damage the beads. When ready, proceed to A-Tailing after Safe Stopping Point.
- A-Tailing is performed either directly after the 2nd Strand Synthesis and Marking Cleanup, or after the Safe Stopping Point, where beads were resuspended in 1X A-Tailing Buffer and stored at 4 °C for up to 24 hours.
- On ice, make the A-Tailing Immediately master mix (multiple volumes by number of samples):
| Component | Volume needed for 1 reaction (1/2 reactions from kit protocol), including 10% excess |
|---|---|
| Water | 13.2 μl |
| 10X KAPA A-Tailing Buffer | 1.65 μl |
| KAPA A-Tailing Enzyme | 1.65 μl |
- Resuspend the beads with cDNA with 15μl of the A-Tailing immediately master mix
- Mix thoroughly by pipetting up and down several times.
- Incubate the plate/tubes in the thermocyler using the following protocol:
| Step | Temp. | Duration |
|---|---|---|
| A-Tailing | 30 °C | 30 min |
| Enzyme inactivation | 60 °C | 30 min |
| HOLD | 4 °C | ∞ |
- Proceed immediately to Adapter Ligation.
- To resume library preparation after storing the samples overnight, make the A-Tailing after safe stopping point master mix on ice (multiple volumes by number of samples):
| Component | Volume needed for 1 reaction (1/2 reactions from kit protocol), including 10% excess |
|---|---|
| Water | 5.775 μl |
| 10X KAPA A-Tailing Buffer | 0.825 μl |
| KAPA A-Tailing Enzyme | 1.65 μl |
- Combine the A-Tailing after safe stopping point master mix with the stored samples:
| Component | Volume |
|---|---|
| Beads with dscDNA (in 1X A-Tailing Buffer) | 7.5 μl |
| A-Tailing Master Mix after Safe Stopping Point | 7.5 μl |
| Total Volume | 15 μl |
- Mix thoroughly by pipetting up and down several times. 4/ Incubate the plate/tubes in the thermocycler using the following protocol:
| Step | Temp. | Duration |
|---|---|---|
| A-Tailing | 30 °C | 30 min |
| Enzyme inactivation | 60 °C | 30 min |
| HOLD | 4 °C | ∞ |
- Proceed immediately to Adapter Ligation.
Adapter concentration will vary depending on overall RNA yield, see table below (also in the adapter annealing section):
| Quantity of starting material | Adapter stock concentration | Adapter concentration in ligation reaction |
|---|---|---|
| 100 – 250 ng | 140 nM | 10 nM |
| 251 – 500 ng | 350 nM | 25 nM |
| 501 – 2000 ng | 700 nM | 50 nM |
| 2001 – 4000 ng | 1400 nM | 100 nM |
For Puritz and Lotterhos 2017, we used 4000 ng starting RNA, but because of difficulties assessing and quantifying molluscan RNA, we chose to use a 700 nM working stock with a final reaction concentration of 50 nM.
- Make the adapter ligation master mix on ice (multiple volumes by number of samples):
| Component | Volume needed for 1 reaction (1/2 reactions from kit protocol), including 10% excess |
|---|---|
| Water | 8.8 μl |
| 5X KAPA Ligation Buffer | 7.7 μl |
| KAPA T4 DNA Ligase | 2.75 μl |
- On ice, set up the adapter ligation reactions as follows, note, if you are using more than one adapter, make sure to add the correct one to each sample:
| Component | Volume |
|---|---|
| Beads with A-tailed DNA | 15 μl |
| Adapter Ligation Master Mix | 17.5 μl |
| Adapters* | 2.5 μl |
| Total Volume | 35 μl |
- Mix thoroughly by pipetting up and down several times to resuspend the beads
- Incubate the plate/tube at 20 °C for 30 min (room temperature), if the samples can be placed on an orbital shaker at 200rpm this is ideal
- Proceed immediately to 1st Post-Ligation Cleanup
- Bring PEG/NaCl to room temperature by taking out of the 4 degree ~30 minutes before use
- Perform a 1X bead cleanup by adding 35 μl of PEG/NaCl to each ligated sample (that already contain beads)
- Thoroughly resuspend the beads by pipetting up and down multiple times
- Incubate the plate/tubes at room temperature for 15 min to allow the DNA to bind to the beads, if the samples can be placed on an orbital shaker at 200rpm this is ideal
- Place the plate/tubes on a magnet to capture the beads. Incubate until the liquid is clear
- Carefully remove and discard 65 μl of supernatant
- Keeping the plate/tubes on the magnet, add 200 μl of freshly made 80% ethanol
- Incubate the plate/tube at room temperature for ≥30 sec
- Carefully remove and discard the ethanol
- Keeping the plate/tube on the magnet, add 200 μl of 80% ethanol
- Incubate the plate/tube at room temperature for ≥30 sec
- Carefully remove and discard the ethanol. Try to remove all residual ethanol without disturbing the beads
- Dry the beads at room temperature, until all of the ethanol has evaporated. Caution: over-drying the beads may result in dramatic yield loss
- Remove the plate/tubes from the magnet
- Thoroughly resuspend the beads in 25 μl of 10 mM Tris-HCl (pH 8.0)
- Incubate the plate/tubes at room temperature for 5 min to allow the DNA to elute off the beads, if the samples can be placed on an orbital shaker at 200rpm this is ideal
The solution with resuspended beads can be stored at 4 °C for up to 24 hours. Do not freeze the beads, as this can result in dramatic loss of DNA. When ready, proceed to 2nd Post-Ligation Cleanup.
- Bring PEG/NaCl to room temperature by taking out of the 4 degree ~30 minutes before use
- Perform a 1X bead cleanup by adding 25 μl of PEG/NaCl to each ligated sample (that already contain beads)
- Thoroughly resuspend the beads by pipetting up and down multiple times
- Incubate the plate/tube at room temperature for 15 min to allow the DNA to bind to the beads, if the samples can be placed on an orbital shaker at 200rpm this is ideal
- Place the plate/tube on a magnet to capture the beads. Incubate until the liquid is clear
- Carefully remove and discard 45 μl of supernatant
- Keeping the plate/tube on the magnet, add 200 μl of 80% ethanol
- Incubate the plate/tube at room temperature for ≥30 sec
- Carefully remove and discard the ethanol
- Keeping the plate/tube on the magnet, add 200 μl of 80% ethanol
- Incubate the plate/tube at room temperature for ≥30 sec
- Carefully remove and discard the ethanol. Try to remove all residual ethanol without disturbing the beads
- Dry the beads at room temperature, until all of the ethanol has evaporated. Caution: over-drying the beads may result in dramatic yield loss
- Remove the plate/tube from the magnet
- Thoroughly resuspend the beads in 11.25 μl of 10 mM Tris-HCl (pH 8.0)
- Incubate the plate/tube at room temperature for 5 min to allow the DNA to elute off the beads, if the samples can be placed on an orbital shaker at 200rpm this is ideal
- Place the plate/tube on a magnet to capture the beads. Incubate until the liquid is clear.
- Transfer 10 μl of the clear supernatant to a new plate/tube and proceed to Library Amplication
The purified, adapter-ligated library DNA may be stored at 4 °C for up to 1 week, or frozen at -20 °C for up to 1 month. When ready, proceed to Library Amplification.
- Make the library amplification master mix on ice, note, if samples are being multiplexed and have different primers, do not make a master mix. If you are multiplexing, you can use the PCR primers outlined in the Genomic Library Prep section:
| Component | Volume needed for 1 reaction (1/2 reactions from kit protocol), including 10% excess |
|---|---|
| 2X KAPA HiFi HotStart ReadyMix | 13.75 μl |
| 10X KAPA Library Amplication Primer Mix | 2.75 μl |
- If multiplexing samples, add 2X KAPA HiFi HotStart ReadyMix and 10uM primers individually in volumes as stated in above table into new PCR tubes for each sample, and add 10μl of the cleaned ligated cDNA samples
- If using a master mix, combine 15μl of the library amplification master mix and 10μl of the cleaned ligated cDNA samples
- Mix well by pipetting up and down several times
- Amplify the library using the following thermal cycling protocol:
| Step | Temp | Duration | Cycles |
|---|---|---|---|
| Initial denaturation | 98 °C | 45 sec | 1 |
| Denaturation | 98 °C | 15 sec | 12 |
| Annealing* | 60 °C | 30 sec | 12 |
| Extension | 72 °C | 30 sec | 12 |
| Final Extension | 72 °C | 5 min | 1 |
| Hold | 10 °C | ∞ | 1 |
- Place the plate/tube on ice and proceed to Library Amplification Cleanup
- Bring KAPA Pure Beads to room temperature by taking out of the 4 degree ~30 minutes before use and swirl to mix
- Perform a 1X bead cleanup by adding 25 μl of KAPA Pure Beads to each sample after amplification
- Thoroughly resuspend the beads by pipetting up and down multiple times
- Incubate the plate/tube at room temperature for 15 min to allow the DNA to bind to the beads, if the samples can be placed on an orbital shaker at 200rpm this is ideal
- Place the plate/tube on a magnet to capture the beads. Incubate until the liquid is clear
- Carefully remove and discard 45 μl of supernatant
- Keeping the plate/tube on the magnet, add 200 μl of 80% ethanol
- Incubate the plate/tube at room temperature for ≥30 sec
- Carefully remove and discard the ethanol
- Keeping the plate/tube on the magnet, add 200 μl of 80% ethanol
- Incubate the plate/tube at room temperature for ≥30 sec
- Carefully remove and discard the ethanol. Try to remove all residual ethanol without disturbing the beads
- Dry the beads at room temperature, until all of the ethanol has evaporated. Caution: over-drying the beads may result in dramatic yield loss
- Remove the plate/tube from the magnet
- Thoroughly resuspend the dried beads in 22 μl of 10 mM Tris-HCl (pH 8.0)
- Incubate the plate/tube at room temperature for 5 min to allow the DNA to elute off the beads, if the samples can be placed on an orbital shaker at 200rpm this is ideal
- Place the plate/tube on a magnet to capture the beads. Incubate until the liquid is clear
- Transfer 20 μl of the clear supernatant to a new plate/tubes.
Procedure (Standard HS DNA protocol)
- Set up the required number of 0.5-mL tubes for standards and samples. The Qubit® DNA HS Assay requires 2 standards
- Label the tube lids
- Prepare the Qubit® working solution by diluting the Qubit® DNA HS Reagent 1:200 in Qubit® DNA HS Buffer. Use a clean plastic tube each time you prepare Qubit® working solution Do not mix the working solution in a glass container.
- Add 190 μL of Qubit® working solution to each of the tubes used for standards
- Add 10 μL of each Qubit® standard to the appropriate tube, then mix by vortexing 2–3 seconds. Be careful not to create bubbles
- Add Qubit® working solution to individual assay tubes so that the final volume in each tube after adding sample is 200 μL, (we use 199μL solution to 1 μL sample)
- Add each sample to the assay tubes containing the correct volume of Qubit® working solution, then mix by vortexing 2–3 seconds. The final volume in each tube should be 200 μL
- Allow all tubes to incubate at room temperature for 2 minutes
- On the Home screen of the Qubit® 3.0 Fluorometer, press DNA, then select DNA: High Sensitivity as the assay type. The “Read standards” screen is displayed. Press Read Standards to proceed
- Insert the tube containing Standard #1 into the sample chamber, close the lid, then press Read standard. When the reading is complete (~3 seconds), remove Standard #1
- Insert the tube containing Standard #2 into the sample chamber, close the lid, then press Read standard. When the reading is complete, remove Standard #2
- Press Run samples
- On the assay screen, select the sample volume and units
- Insert a sample tube into the sample chamber, close the lid, then press Read tube. When the reading is complete (~3 seconds), remove the sample tube
- Repeat step last step until all samples have been read
This is a safe stopping point. If you are stopping, store your sample at ‐15° to ‐25°C.
DSN normalization is critical ensuring an even distribution of coverage across probes. There are a genes that are highly expressed in all cells and DSN normalization helps to remove these high abundance probes and transcripts.
The protocol below was taken from Illumina's recommendations LINK
| Reagent | Supplier |
|---|---|
| 1 M HEPES buffer solution | Invitrogen, part # 15630‐080 |
| 5 M NaCl solution | Ambion, part # AM9760G |
| KAPA HiFi HotStart PCR kit with dNTPs | Kapa, part #KK2502 |
| Strip tubes | General lab supplier |
| DSN Kit | Evrogen, part # EA001 Sigma Aldrich, part # E7023 |
| Ethanol 200 proof (absolute) for molecular biology (500 ml) | AB, part # 4333764F |
| 10X KAPA Library Amplification Primer Mix (Universal primer mix) | Included in KAPA stranded mRNA kit |
| SPRI beads | KAPA Pure Beads, part #KK8000 |
| Nuclease-free water | General lab supplier |
- Thermocycler (2!)
- Magentic stand compatible with strip tubes
-
First pool individual RNA libraries in equal quantities to create a single pool, we have experimented with 500 ng total or 200ng of each library, the final volume of this should not exceed 13.5 μl. If many probes are desired, multiple probe synthesis reactions can be done, and pooled at the end before hybridization
-
Create a 4X hybridization solution (this amount is excess of what is needed):
| Component | Volume |
|---|---|
| 1 M HEPES buffer solution | 200 𝜇l |
| 5 M NaCl solution | 400 𝜇l |
| Nuclease‐free water | 400 𝜇L |
| Total Volume | 1000 𝜇L |
- Use two thermocyclers and set one to hold at 68°C
- Prepare the following reaction mix in a separate, sterile, nuclease‐free 200 μl PCR tube on ice for each pool of cDNA to be normalized. If the pooled cDNA is less than 13.5 μl, increase the volume to 13.5 μl with nuclease free water:
| Component | Volume |
|---|---|
| Sample library | 13.5 𝜇l |
| 4X Hybridization buffer | 4.5 𝜇l |
| Total Volume Per Sample | 18 𝜇L |
- Gently pipette the entire volume up and down 10 times, then centrifuge briefly to mix
- Transfer the entire volume of reaction mix directly to the bottom of a new, sterile, nuclease‐free 200 μl PCR tube, using a pipette. Do not let the sample contact the side of the tube during the process
- Incubate the reaction mix tube on the thermal cycler using the following PCR cycling conditions:
| Step | Temp | Duration |
|---|---|---|
| Initial denaturation | 98 °C | 2 min |
| Treatment | 68 °C | 5 hours |
- Caution- Following incubation, keep the thermal cycler lid closed and the temperature held at 68°C. Do not remove the reaction mix tube from thermal cycler prior to and during DSN treatment.
- Dilute the 10X DSN Master buffer supplied in the DSN kit to 2X with nuclease‐ free water by combining 16 μl nuclease free water and 4 μl 10X DSN master buffer for a total volume of 20 μl
- Pre‐heat the 2X DSN buffer on the pre‐heated heat block (or another thermocycler) at 68°C
- Note: Do not remove the 2X DSN buffer from the heat block during DSN treatment, pipette from the block or thermocycler
- Quickly add 20 μl of pre‐heated 2X DSN buffer to the first reaction mix tube
- With the reaction mix tube remaining within the thermal cycler, gently pipette the entire volume up and down 10 times to mix thoroughly using a pipette set to 40 μl.
- Note:Pipette the solution directly to the bottom of the PCR tube and do not let the sample contact the side of the tube during the process.
- Note: It is important to keep the thermal cycler closed, except for the time necessary to add the 2X DSN buffer and mix. When preparing more than one reaction mix tube, keep the thermal cycler lid closed when extracting the 2X DSN buffer from its tube, then open the thermal cycler lid only for the time necessary to add and mix the 2X DSN buffer.
- Repeat steps 2 and 3 for each reaction mix tube
- Incubate the reaction mix tubes on the thermal cycler at 68°C for 10 minutes.
- Quickly add 2 μl of DSN enzyme to the first reaction mix tube using a 2 μl pipette
- With the reaction mix tube remaining within the thermal cycler, gently pipette the entire volume up and down 10 times to mix thoroughly using a pipette set to 40 μl
- Note:Pipette the solution directly to the bottom of the PCR tube and do not let the sample get stuck on the side of the tube during the process
- Repeat steps 6 and 7 for each reaction mix tube
- Incubate the reaction mix tubes on the thermal cycler at 68°C for 25 minutes
- Add 40 μl of 2X DSN stop solution (should be thawed but on ice) to each reaction mix tube. Gently pipette the entire volume up and down to mix thoroughly, then place the tubes on ice
This is a safe stopping point. If you are stopping, store your sample at ‐15° to ‐25°C.
- Bring KAPA Pure Beads to room temperature by taking out of the 4 degree ~30 minutes before use and swirl to mix
- Perform a 1.6X bead cleanup by adding 128 μl of KAPA Pure Beads to each DSN treated pool
- Thoroughly resuspend the beads by pipetting up and down multiple times
- Incubate the plate/tube at room temperature for 15 min to allow the DNA to bind to the beads, if the samples can be placed on an orbital shaker at 200rpm this is ideal
- Place the plate/tube on a magnet to capture the beads. Incubate until the liquid is clear
- Carefully remove and discard ~200 μl of supernatant
- Keeping the plate/tube on the magnet, add 200 μl of 80% ethanol
- Incubate the plate/tube at room temperature for ≥30 sec.
- Carefully remove and discard the ethanol
- Keeping the plate/tube on the magnet, add 200 μl of 80% ethanol
- Incubate the plate/tube at room temperature for ≥30 sec
- Carefully remove and discard the ethanol. Try to remove all residual ethanol without disturbing the beads
- Dry the beads at room temperature, until all of the ethanol has evaporated. Caution: over-drying the beads may result in dramatic yield loss
- Remove the plate/tube from the magnet
- Thoroughly resuspend the beads in 25 μl of 10 mM Tris-HCl (pH 8.0)
- Incubate the plate/tube at room temperature for 5 min to allow the DNA to elute off the beads, if the samples can be placed on an orbital shaker at 200rpm this is ideal
- Place the plate/tube on a magnet to capture the beads. Incubate until the liquid is clear
- Transfer 24 μl of the clear supernatant to a new plate/tube and proceed to next step
- Create the reaction mix by combining these components on ice note, if more than 1 DSN normalization took place, you can do multiple enrichments, or you could have combined them before in the cleanup step above and adjusted the cleanup volume:
| Component | Volume |
|---|---|
| DSN Treated Library | 30 μl |
| 2X KAPA HiFi HotStart ReadyMix | 25 μl |
| 10X KAPA Library Amplification Primer Mix | 5 μl |
| Total Volume per sample | 50 μl |
- Mix well by pipetting up and down several times
- Amplify the library using the following thermal cycling protocol:
| Step | Temp | Duration | Cycles |
|---|---|---|---|
| Initial denaturation | 98 °C | 45 sec | 1 |
| Denaturation | 98 °C | 15 sec | 12 |
| Annealing* | 60 °C | 30 sec | 12 |
| Extension | 72 °C | 30 sec | 12 |
| Final Extension | 72 °C | 5 min | 1 |
| Hold | 10 °C | ∞ | 1 |
- Bring KAPA Pure Beads to room temperature by taking out of the 4 degree ~30 minutes before use and swirl to mix
- Perform a 1.6X bead cleanup by adding 80 μl of KAPA Pure Beads to each DSN treated pool
- Thoroughly resuspend the beads by pipetting up and down multiple times
- Incubate the plate/tube at room temperature for 15 min to allow the DNA to bind to the beads, if the samples can be placed on an orbital shaker at 200rpm this is ideal
- Place the plate/tube on a magnet to capture the beads Incubate until the liquid is clear
- Carefully remove and discard 115 μl of supernatant
- Keeping the plate/tube on the magnet, add 200 μl of 80% ethanol
- Incubate the plate/tube at room temperature for ≥30 sec
- Carefully remove and discard the ethanol
- Keeping the plate/tube on the magnet, add 200 μl of 80% ethanol
- Incubate the plate/tube at room temperature for ≥30 sec
- Carefully remove and discard the ethanol. Try to remove all residual ethanol without disturbing the beads
- Dry the beads at room temperature, until all of the ethanol has evaporated. Caution: over-drying the beads may result in dramatic yield loss
- Remove the plate/tube from the magnet
- Thoroughly resuspend the beads in 22 μl of 10 mM Tris-HCl (pH 8.0)
- Incubate the plate/tube at room temperature for 5 min to allow the DNA to elute off the beads, if the samples can be placed on an orbital shaker at 200rpm this is ideal
- Place the plate/tube on a magnet to capture the beads. Incubate until the liquid is clear
- Transfer 22 μl of the clear supernatant to a new plate/tube and proceed to next step
Procedure (Standard HS DNA protocol)
- Set up the required number of 0.5-mL tubes for standards and samples. The Qubit® RNA HS Assay requires 2 standards
- Label the tube lids
- Prepare the Qubit® working solution by diluting the Qubit® DNA HS Reagent 1:200 in Qubit® DNA HS Buffer. Use a clean plastic tube each time you prepare Qubit® working solution. Do not mix the working solution in a glass container
- Add 190 μL of Qubit® working solution to each of the tubes used for standards
- Add 10 μL of each Qubit® standard to the appropriate tube, then mix by vortexing 2–3 seconds. Be careful not to create bubbles
- Add Qubit® working solution to individual assay tubes so that the final volume in each tube after adding sample is 200 μL (we use 199μL solution to 1 μL sample)
- Add each sample to the assay tubes containing the correct volume of Qubit® working solution, then mix by vortexing 2–3 seconds. The final volume in each tube should be 200 μL
- Allow all tubes to incubate at room temperature for 2 minutes
- On the Home screen of the Qubit® 3.0 Fluorometer, press DNA, then select DNA: High Sensitivity as the assay type. The “Read standards” screen is displayed. Press Read Standards to proceed
- Insert the tube containing Standard #1 into the sample chamber, close the lid, then press Read standard. When the reading is complete (~3 seconds), remove Standard #1
- Insert the tube containing Standard #2 into the sample chamber, close the lid, then press Read standard. When the reading is complete, remove Standard #2
- Press Run samples
- On the assay screen, select the sample volume and units
- Insert a sample tube into the sample chamber, close the lid, then press Read tube. When the reading is complete (~3 seconds), remove the sample tube
- Repeat step last step until all samples have been read
- One tube for sequencing
- One tube for probe synthesis
Note that this step is optional as sequening the probes directly is not necessary for exome capture analysis. Alternatively, a portion of the mRNA library can be saved before DSN normalization for sequencing. After this step the adapters are taken off the libraries, so they cannot be read on a sequencer anymore.
This is a safe stopping point. If you are stopping, store your sample at ‐15° to ‐25°C.
Review the planning for how much probes you will need. Ideally, there should be about 500 ng of probes per capture, so try to plan ahead to do multiple probe sysntheses if needed. If not enough of probes is obtained, the PCR product can be re-amplified.
| Reagent | Producer | Catalog # |
|---|---|---|
| Mung Bean Nuclease | NEB | M0250S |
| SalI-HF | NEB | R3138T |
| Agencourt AMPure XP | Beckman Coulter | A63881 |
-
Calculate volume of DSN normalized library from above steps for 1μg, this should be less than 12.25μl. Increase the volume of liquid to 12.25μl with nuclease free water
-
Setup a restriction digest using 1 μg of DSN library on ice, note: if you are doing more than one reaction, make a master mix of buffer, enzyme, and water and aliqout 27.75μl of it into each tube:
| Component | Volume |
|---|---|
| 10X Cutsmart Buffer | 4 μl |
| SalI-HF Enzyme (100 units) | 1 μl |
| Molecular Grade H20 | 22.75 μl |
| DSN Enriched Library | 12.25 μl |
| Total Volume | 40 μl |
-
Incubate reactions in thermocycler at 37°C for between 4 and 16 hours (we have had similar success with 4, 8, and 12 hours).
-
Using the same tubes from the previous step combine the following:
| Component | Volume |
|---|---|
| Digested Library | 40 μl |
| 10X Mung Bean Nuclease buffer | 4.5 μl |
| Mung Bean Nuclease (10 units per μl) | 0.5 μl |
| Total Volume | 45 μl |
-
Incubate at 30°C for 30 minutes
-
Do 2 consecutive 1.5X KAPA Pure Bead cleanups to remove the enzymes and all digested adapters. Note, there is a chance you can get away with 1 clean up, but we almost always have to do a second cleanup. You can check for any residual adapters between cleanups with a D5000 TapeStation run
- Bring KAPA Pure Beads to room temperature by taking out of the 4 degree ~30 minutes before use and swirl to mix
- Perform a 1.5X bead cleanup by adding 67.5 μl of KAPA Pure Beads to each 45 μl of the MBN treated reaction
- Thoroughly resuspend the beads by pipetting up and down multiple times
- Incubate the plate/tube at room temperature for 15 min to allow the DNA to bind to the beads, if the samples can be placed on an orbital shaker at 200rpm this is ideal
- Place the plate/tube on a magnet to capture the beads. Incubate until the liquid is clear
- Carefully remove and discard 105 μl of supernatant
- Keeping the plate/tube on the magnet, add 200 μl of 80% ethanol
- Incubate the plate/tube at room temperature for ≥30 sec.
- Carefully remove and discard the ethanol
- Keeping the plate/tube on the magnet, add 200 μl of 80% ethanol
- Incubate the plate/tube at room temperature for ≥30 sec
- Carefully remove and discard the ethanol. Try to remove all residual ethanol without disturbing the beads
- Dry the beads at room temperature, until all of the ethanol has evaporated. Caution: over-drying the beads may result in dramatic yield loss
- Remove the plate/tube from the magnet
- Thoroughly resuspend the beads in 22 μl of 10 mM Tris-HCl
- Incubate the plate/tube at room temperature for 2 min to allow the DNA to elute off the beads, if the samples can be placed on an orbital shaker at 200rpm this is ideal
- Place the plate/tube on a magnet to capture the beads. Incubate until the liquid is clear
- Transfer 21 μl of the clear supernatant to a new plate/tube and proceed to next step
This is a safe stopping point. If you are stopping, store your sample at ‐15° to ‐25°C.
- Bring KAPA Pure Beads to room temperature by taking out of the 4 degree ~30 minutes before use and swirl to mix
- Perform a 1.5X bead cleanup by adding 31.5 μl of KAPA Pure Beads to each 21 μl of the 1st cleaned up MBN treated reaction the beads by pipetting up and down multiple times
- Incubate the plate/tube at room temperature for 15 min to allow the DNA to bind to the beads, if the samples can be placed on an orbital shaker at 200rpm this is ideal
- Place the plate/tube on a magnet to capture the beads. Incubate until the liquid is clear
- Carefully remove and discard ~50ul μl of supernatant
- Keeping the plate/tube on the magnet, add 200 μl of 80% ethanol
- Incubate the plate/tube at room temperature for ≥30 sec
- Carefully remove and discard the ethanol
- Keeping the plate/tube on the magnet, add 200 μl of 80% ethanol
- Incubate the plate/tube at room temperature for ≥30 sec
- Carefully remove and discard the ethanol. Try to remove all residual ethanol without disturbing the beads
- Dry the beads at room temperature, until all of the ethanol has evaporated. Caution: over-drying the beads may result in dramatic yield loss
- Remove the plate/tube from the magnet
- Thoroughly resuspend the beads in 22 μl of 10 mM Tris-HCl (pH 8.0), note: this volume can change depending on the number of captures, the quantity of probes will increase a lot during biotin labeling, but if you know you need a lot of probes, a larger volume can be used here for multiple biotin labelings
- Incubate the plate/tube at room temperature for 5 min to allow the DNA to elute off the beads, if the samples can be placed on an orbital shaker at 200rpm this is ideal
- Place the plate/tube on a magnet to capture the beads. Incubate until the liquid is clear
- Transfer 21 μl of the clear supernatant to a new plate/tube and proceed to next step
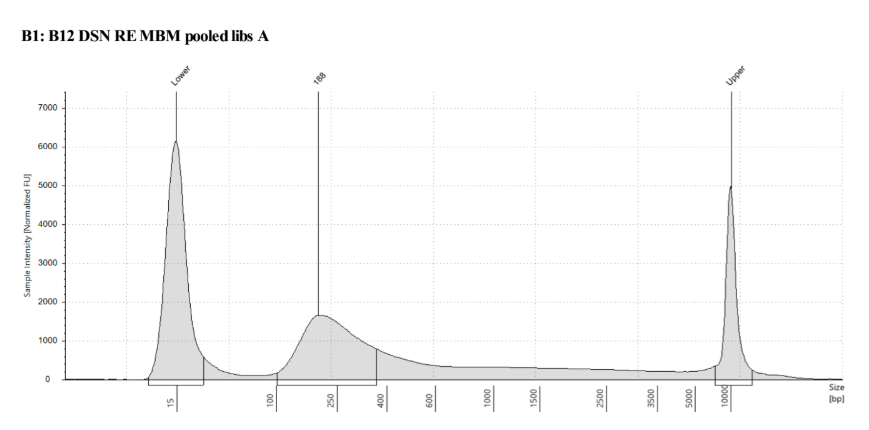
Here, 1μl of cleaned MBN reaction should be run on a fragment analyzer such as a TapeStation. You should check for a loss in size compared to the final cDNA libraries (loss of adapters), and for no small peaks that are left-over adapters. See example:
This is a safe stopping point. If you are stopping, store your sample at ‐15° to ‐25°C.
| Reagent | Producer | Catalog # |
|---|---|---|
| DecaLabel™ Biotin DNA Labeling Kit | Thermo Scientific | FERK0651 |
- Make a master mix for the decanucleotide reaction pertaining to how many reactions, if you are just doing 1 use 10 μl of Decanucleotide in 5X Reaction Buffer and 14 μl of nuclease-free water
| Component | Volume for 1 reaction (includes 10% excess) |
|---|---|
| Decanucleotide in 5X Reaction Buffer | 11 μl |
| Water, nuclease-free | 15.4 μl |
- Aliquot 24 μl of master mix into new .2mL tubes
- Add 20 μl of the RE and MBN treated DSN Library to each reaction tube
- Vortex the tubes and spin down in a microcentrifuge for 3-5 s
- Incubate the tube in the theremocycler at 98°C for 10 minutes, bring down to a 4°C hold and once finished put it on ice. Spin down quickly and keep on ice
- Make a master mix on ice for biotin labeling, if doing only 1 reaction use 5 μl Biotin Labeling Mix and 1 μl Klenow fragment, exo– (5 ul)
| Component | Volume for 1 reaction (with 10% excess) |
|---|---|
| Biotin Labeling Mix | 5.5 μl |
| Klenow fragment, exo– (5 u) | 1.1 μl |
- Add 6 μl of the biotin labeling master mix to each reaction tube on ice
- Shake the tube and spin down in a microcentrifuge for 3-5 s
- Incubate for 12-20 hours at 37°C (this can be a thermocycler program)
- Add the following components into 0.2ml microcentrifuge tube:
| Component | Volume |
|---|---|
| Control Template, 10 ng/μl | 25 μl |
| Decanucleotide in 5X Reaction Buffer | 10 μl |
| Water, nuclease-free | 9 μl |
| Total Volume | 44 μl |
- Vortex the tube and spin down in a microcentrifuge for 3-5 s
- Incubate the tube in the theremocycler at 98°C for 10 minutes, bring down to a 4°C hold and once finished put it on ice. Spin down quickly and keep on ice
- Add the following components in the same tube:
| Component | Volume |
|---|---|
| Biotin Labeling Mix | 5 μl |
| Klenow fragment, exo– (5 u) | 1 μl |
| Total Volume | 50 μl |
- Perform following cleanup and QC on this tube as well
- Bring KAPA Pure Beads to room temperature by taking out of the 4 degree ~30 minutes before use and swirl to mix
- Perform a 1.5X bead cleanup by adding 75 μl of KAPA Pure Beads to each 50 μl of the biotin reactions
- Thoroughly resuspend the beads by pipetting up and down multiple times.
- Incubate the plate/tube at room temperature for 15 min to allow the DNA to bind to the beads, if the samples can be placed on an orbital shaker at 200rpm this is ideal
- Place the plate/tube on a magnet to capture the beads. Incubate until the liquid is clear
- Carefully remove and discard 115 μl of supernatant
- Keeping the plate/tube on the magnet, add 200 μl of 80% ethanol
- Incubate the plate/tube at room temperature for ≥30 sec
- Carefully remove and discard the ethanol
- Keeping the plate/tube on the magnet, add 200 μl of 80% ethanol
- Incubate the plate/tube at room temperature for ≥30 sec
- Carefully remove and discard the ethanol. Try to remove all residual ethanol without disturbing the beads
- Dry the beads at room temperature, until all of the ethanol has evaporated. Caution: over-drying the beads may result in dramatic yield loss
- Remove the plate/tube from the magnet
- Thoroughly resuspend the beads in 20-50 μl of 10 mM Tris-HCl (pH 8.0). Volume needed depends on the number of captures. Calculate 10 μl per capture plus an aliquot for checking the probes concentration using Qubit, although the concentration of the probes will determine how much is needed for each capture reaction
- Incubate the plate/tube at room temperature for 5 min to allow the DNA to elute off the beads, if the samples can be placed on an orbital shaker at 200rpm this is ideal
- Place the plate/tube on a magnet to capture the beads. Incubate until the liquid is clear
- Transfer 19-49 μl of the clear supernatant to a new plate/tube and proceed to next step
Procedure (Standard HS DNA protocol)
- Set up the required number of 0.5-mL tubes for standards and samples. The Qubit® RNA HS Assay requires 2 standards
- Label the tube lids
- Prepare the Qubit® working solution by diluting the Qubit® DNA HS Reagent 1:200 in Qubit® DNA HS Buffer. Use a clean plastic tube each time you prepare Qubit® working solution. Do not mix the working solution in a glass container
- Add 190 μL of Qubit® working solution to each of the tubes used for standards
- Add 10 μL of each Qubit® standard to the appropriate tube, then mix by vortexing 2–3 seconds. Be careful not to create bubbles
- Add Qubit® working solution to individual assay tubes so that the final volume in each tube after adding sample is 200 μL (we use 199μL solution to 1 μL sample)
- Add each sample to the assay tubes containing the correct volume of Qubit® working solution, then mix by vortexing 2–3 seconds. The final volume in each tube should be 200 μL
- Allow all tubes to incubate at room temperature for 2 minutes
- On the Home screen of the Qubit® 3.0 Fluorometer, press DNA, then select DNA: High Sensitivity as the assay type. The “Read standards” screen is displayed. Press Read Standards to proceed
- Insert the tube containing Standard #1 into the sample chamber, close the lid, then press Read standard. When the reading is complete (~3 seconds), remove Standard #1
- Insert the tube containing Standard #2 into the sample chamber, close the lid, then press Read standard. When the reading is complete, remove Standard #2
- Press Run samples
- On the assay screen, select the sample volume and units
- Insert a sample tube into the sample chamber, close the lid, then press Read tube. When the reading is complete (~3 seconds), remove the sample tube
- Repeat step last step until all samples have been read
- Run probes on BioAnalyzer/Tape Station/Fragment analyzer
They should look like this:
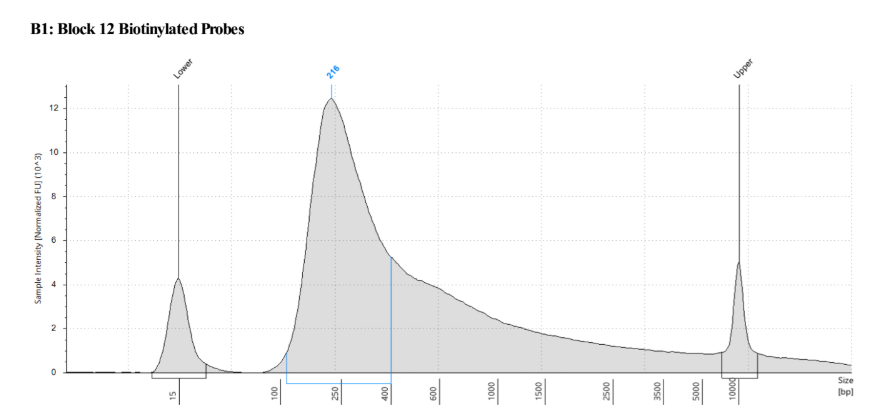
Note how there is a tail on the distribution, this often shows up after biotin labeling, but it has never interfered with hybridization as far as we can tell.
This is a safe stopping point. If you are stopping, store your sample at ‐15° to ‐25°C.
Adapter Oligos:
| Name | 5' to 3' Sequence |
|---|---|
| Y-inline-1a | CACTCTTTCCCTACACGACGCTCTTCCGATCTATCACG*T |
| Y-inline-2a | CACTCTTTCCCTACACGACGCTCTTCCGATCTCGATGT*T |
| Y-inline-3a | CACTCTTTCCCTACACGACGCTCTTCCGATCTTTAGGC*T |
| Y-inline-4a | CACTCTTTCCCTACACGACGCTCTTCCGATCTTGGCCA*T |
| Y-inline-5a | CACTCTTTCCCTACACGACGCTCTTCCGATCTACAGTG*T |
| Y-inline-6a | CACTCTTTCCCTACACGACGCTCTTCCGATCTGCCAAT*T |
| Y-inline-7a | CACTCTTTCCCTACACGACGCTCTTCCGATCTCAGATC*T |
| Y-inline-8a | CACTCTTTCCCTACACGACGCTCTTCCGATCTACTTGA*T |
| Y-inline-9a | CACTCTTTCCCTACACGACGCTCTTCCGATCTGATCAG*T |
| Y-inline-10a | CACTCTTTCCCTACACGACGCTCTTCCGATCTTAGCTT*T |
| Y-inline-11a | CACTCTTTCCCTACACGACGCTCTTCCGATCTGGCTAC*T |
| Y-inline-12a | CACTCTTTCCCTACACGACGCTCTTCCGATCTCTTGCA*T |
| Y-inline-1b | PC*GTGATAGATCGGAAGAGCACACGTCTGAACTCCAGTC |
| Y-inline-2b | PA*CATCGAGATCGGAAGAGCACACGTCTGAACTCCAGTC |
| Y-inline-3b | PG*CCTAAAGATCGGAAGAGCACACGTCTGAACTCCAGTC |
| Y-inline-4b | PT*GGCCAAGATCGGAAGAGCACACGTCTGAACTCCAGTC |
| Y-inline-5b | PC*ACTGTAGATCGGAAGAGCACACGTCTGAACTCCAGTC |
| Y-inline-6b | PA*TTGGCAGATCGGAAGAGCACACGTCTGAACTCCAGTC |
| Y-inline-7b | PG*ATCTGAGATCGGAAGAGCACACGTCTGAACTCCAGTC |
| Y-inline-8b | PT*CAAGTAGATCGGAAGAGCACACGTCTGAACTCCAGTC |
| Y-inline-9b | PC*TGATCAGATCGGAAGAGCACACGTCTGAACTCCAGTC |
| Y-inline-10b | PA*AGCTAAGATCGGAAGAGCACACGTCTGAACTCCAGTC |
| Y-inline-11b | PG*TAGCCAGATCGGAAGAGCACACGTCTGAACTCCAGTC |
| Y-inline-12b | PT*GCAAGAGATCGGAAGAGCACACGTCTGAACTCCAGTC |
PCR Primers:
| Name | 5' to 3' Sequence |
|---|---|
| i5_PCRprimer_L1_D501_AGGCTATA | AATGATACGGCGACCACCGAGATCTACACTATAGCCTACACTCTTTCCCTACACGACGCTCTTCCGATC*T |
| i5_PCRprimer_L2_D502_GCCTCTAT | AATGATACGGCGACCACCGAGATCTACACATAGAGGCACACTCTTTCCCTACACGACGCTCTTCCGATC*T |
| i5_PCRprimer_L3_D503_AGGATAGG | AATGATACGGCGACCACCGAGATCTACACCCTATCCTACACTCTTTCCCTACACGACGCTCTTCCGATC*T |
| i5_PCRprimer_L4_D504_TCAGAGCC | AATGATACGGCGACCACCGAGATCTACACGGCTCTGAACACTCTTTCCCTACACGACGCTCTTCCGATC*T |
| i5_PCRprimer_L5_D505_CTTCGCCT | AATGATACGGCGACCACCGAGATCTACACAGGCGAAGACACTCTTTCCCTACACGACGCTCTTCCGATC*T |
| i5_PCRprimer_L6_D506_TAAGATTA | AATGATACGGCGACCACCGAGATCTACACTAATCTTAACACTCTTTCCCTACACGACGCTCTTCCGATC*T |
| i5_PCRprimer_L7_D507_ACGTCCTG | AATGATACGGCGACCACCGAGATCTACACCAGGACGTACACTCTTTCCCTACACGACGCTCTTCCGATC*T |
| i5_PCRprimer_L8_D508_GTCAGTAC | AATGATACGGCGACCACCGAGATCTACACGTACTGACACACTCTTTCCCTACACGACGCTCTTCCGATC*T |
| i5_PCRprimer_L9_TTGTCGGT | AATGATACGGCGACCACCGAGATCTACACACCGACAAACACTCTTTCCCTACACGACGCTCTTCCGATC*T |
| i5_PCRprimer_L10_TTGCCACT | AATGATACGGCGACCACCGAGATCTACACAGTGGCAAACACTCTTTCCCTACACGACGCTCTTCCGATC*T |
| i5_PCRprimer_L11_AGTCTGTG | AATGATACGGCGACCACCGAGATCTACACCACAGACTACACTCTTTCCCTACACGACGCTCTTCCGATC*T |
| i5_PCRprimer_L12_AAGTGTCG | AATGATACGGCGACCACCGAGATCTACACCGACACTTACACTCTTTCCCTACACGACGCTCTTCCGATC*T |
| i7_PCRprimer_701 | CAAGCAGAAGACGGCATACGAGATCGAGTAATGTGACTGGAGTTCAGACGTGTGC*T |
| i7_PCRprimer_702 | CAAGCAGAAGACGGCATACGAGATTCTCCGGAGTGACTGGAGTTCAGACGTGTGC*T |
| i7_PCRprimer_703 | CAAGCAGAAGACGGCATACGAGATAATGAGCGGTGACTGGAGTTCAGACGTGTGC*T |
| i7_PCRprimer_704 | CAAGCAGAAGACGGCATACGAGATGGAATCTCGTGACTGGAGTTCAGACGTGTGC*T |
| i7_PCRprimer_705 | CAAGCAGAAGACGGCATACGAGATTTCTGAATGTGACTGGAGTTCAGACGTGTGC*T |
| i7_PCRprimer_706 | CAAGCAGAAGACGGCATACGAGATACGAATTCGTGACTGGAGTTCAGACGTGTGC*T |
| i7_PCRprimer_707 | CAAGCAGAAGACGGCATACGAGATAGCTTCAGGTGACTGGAGTTCAGACGTGTGC*T |
| i7_PCRprimer_708 | CAAGCAGAAGACGGCATACGAGATGCGCATTAGTGACTGGAGTTCAGACGTGTGC*T |
| i7_PCRprimer_709 | CAAGCAGAAGACGGCATACGAGATCATAGCCGGTGACTGGAGTTCAGACGTGTGC*T |
| i7_PCRprimer_710 | CAAGCAGAAGACGGCATACGAGATTTCGCGGAGTGACTGGAGTTCAGACGTGTGC*T |
| i7_PCRprimer_711 | CAAGCAGAAGACGGCATACGAGATGCGCGAGAGTGACTGGAGTTCAGACGTGTGC*T |
| i7_PCRprimer_712 | CAAGCAGAAGACGGCATACGAGATCTATCGCTGTGACTGGAGTTCAGACGTGTGC*T |
Note about PCR Primers In recent EecSeq preps, the Puritz lab has been pairing PCR primers to avoid index hopping on Illumina patterned flow cells (HiSeq X Ten, HiSeq3000, HiSeq4000, NovaSeq6000). For example, libraries with the i5 501 index will always have a i7 701 index. If in your sequencing reads you get a sequence with i5 501 and i7 703 indexes, you can discard those reads as index hopping (instead of missassinging reads if you had a library with that index combination). This does limit multiplexing, however with 12 adapter inline barcodes and 12 pairs of PCR indexes, this is 144 unique combinations.
Please make sure you have planned your multiplexing before starting library prep. It is best practice to randomly and evenly allocate samples by attributes (location, species, population, treatment, etc.) to index/barcode combinations if possible to avoid any sequencing batch effects. For example, do not give all of the samples in population A the same index pair.
Single-stranded oligos need to be annealed with their appropriate partner before ligation.
- To create Adapter Y-inline 1, combine each oligo 1a with its complementary oligo 1b in a 1:1 ratio in working strength annealing buffer (final buffer concentration 1x) for a total annealed adapter concentration of 40uM (for example, if purchased oligos are resuspended to an initial concentration of 100uM, use 40ul oligo 1a, 40ul oligo 1b, 10ul 10x annealing buffer and 10ul nuclease-free water). Do the same for oligos 2a and 2b to create the adapter Y-inline 2.
- In a thermocyler, incubate at 97.5°C for 2.5 minutes, and then cool at a rate of not greater than 3°C per minute until the solution reaches a temperature of 21°C. Hold at 4°C.
- Prepare final working strength concentrations of annealed adapters from this annealed stock. For convenience, it is possible to store the adapters at 4°C while in active use. For Puritz and Lotterhos 2017, a working stock of 40 μM was used, leading to a final adapter:DNA molar ratio of ~ 50:1.
The above adapters have inline barcodes which will appear in the sequences and need to be demultiplexed bioinformatically.
| Adapter | Inline Barcode |
|---|---|
| 1 | ATCACG |
| 2 | CGATGT |
| 3 | TTAGGC |
| 4 | TGGCCA |
| 5 | ACAGTG |
| 6 | GCCAAT |
| 7 | CAGATC |
| 8 | ACTTGA |
| 9 | GATCAG |
| 10 | TAGCTT |
| 11 | GGCTAC |
| 12 | CTTGCA |
These inline barcodes can be combined with the 12 PCR primers that add a P7 Illumina index which is read directly in a sepeartate sequencing run and is returned to the user in index-labeled files. With the above design 144 different individuals or pools could be multiplexed on a single lane.
Alternatively, any TruSeq style DNA adapters could be used with this protocol as long as they match with the Blockling Oligos used during Probe Hybridization
Refer to manual during procedure (steps below are for notes and comments).
For Puritz and Lotterhos 2017, genomic DNA was sheared to a modal peak of 150 bp using a Covaris sonicator. For other preps in the Puritz Lab, we have used a QSonica sonicator for a modal peak at 150bp. The protocol below assumes you are starting with sheared DNA. We have had success with 500ng of DNA as a starting amount, however the kit reports effective library prep with 1ng-1ug.
- Adjust sample volume of 500 ng fragmented DNA to 25 μl with 10mM Tris HCl in PCR strip tubes or a plate
- Create the End Repair and A-Tailing master mix on ice (multiple volumes by number of samples):
| Component | Volume for 1 reaction (includes 10% excess) |
|---|---|
| End Repair & A-Tailing Buffer | 3.85 μl |
| End Repair & A-Tailing Enzyme Mix | 1.65 μl |
- Add 5 μl of the master mix to each of the tubes with your DNA
- Vortex gently and spin down briefly. Return the reaction plate/tube(s) to ice
- Incubate in a thermocycler programmed as outlined below. A heated lid is required for this step. If possible, set the temperature of the heated lid to ~85°C (instead of the usual 105°C)
| Step | Temp | Time |
|---|---|---|
| End repair and A-tailing 1 | 20 °C | 30 min |
| End repair and A-tailing 2 | 65 °C | 30 min |
| Hold | 10 °C | ∞ |
Note: If proceeding to the adapter ligation reaction setup without any delay, the reaction may be cooled to 20°C instead of 10°C
- Dilute adapter stocks to the appropriate concentration, as outlined below:
| Fragmented DNA | Adapter stock concentration | Adapter:insert molar ratio |
|---|---|---|
| 1 μg | 15 μM | 10:1 |
| 500 ng | 15 μM | 20:1 |
| 250 ng | 15 μM | 40:1 |
| 100 ng | 15 μM | 100:1 |
| 50 ng | 15 μM | 200:1 |
| 25 ng | 15 μM | 200:1 |
| 10 ng | 15 μM | 200:1 |
| 5 ng | 15 μM | 200:1 |
| 2.5 ng | 15 μM | 200:1 |
| 1 ng | 15 μM | 200:1 |
For Puritz and Lotterhos (2017), a working stock of 40 μM was used, leading to a final adapter:insert molar ratio of ~ 50:1.
- Make the Adapter Ligation master mix on ice (multiple volumes by number of samples):
| Component | Volume for 1 reaction (includes 10% excess) |
|---|---|
| PCR-grade water | 2.75 μl |
| Ligation Buffer | 16.5 μl |
| DNA ligase | 5.5 μl |
- Add 22.5 μl of the master mix to each tube with the A-tailed reaction on ice
- Add 2.5 μl of specific adapters to each sample. You will likely be adding a different adapter to each/most sample(s). Make sure this is planned ahead of time to multiplex with the PCR primers. Having a list of which adapters to add to which sample and checking them off after each time you pipette minimizes error/allows you to recognize error
- Vortex and centrifuge briefly
- Incubate at 20°C (room temp) for 60 min, preferrably on an orbital shaker at 200 rpm
- Note: to achieve higher conversion rates and library yields, particularly for low-input samples, consider increasing the ligation time—to a maximum of 4 hrs at 20°C, or overnight at 4°C. Please note that longer ligation times may lead to increased levels of adapter-dimer. Adapter concentrations may have to be optimized if ligation times are extended significantly
- Proceed immediately to the next step
- Bring KAPA Pure Beads to room temperature by taking out of the 4 degree ~30 minutes before use and swirl to mix
- Perform a 0.8X cleanup by adding 44 μl of KAPA Pure beads to each sample tube after the ligation step and pipetting ~10 times until homogenous
- Incubate the plate/tube(s) at room temperature for 15 min to bind DNA to the beads, if the samples can be placed on an orbital shaker at 200rpm this is ideal
- Place the plate/tube(s) on a magnet to capture the beads. Incubate until the liquid is clear
- Carefully remove and discard the supernatant
- Keeping the plate/tube(s) on the magnet, add 200 μL of 80% ethanol
- Incubate the plate/tube(s) on the magnet at room temperature for ≥30 sec
- Carefully remove and discard the ethanol
- Keeping the plate/tube(s) on the magnet, add 200 μL of 80% ethanol
- Incubate the plate/tube(s) on the magnet at room temperature for ≥30 sec
- Carefully remove and discard the ethanol. Try to remove all residual ethanol without disturbing the beads
- Dry the beads at room temperature for 3 – 5 min, or until all of the ethanol has evaporated. Caution: over-drying the beads may result in reduced yield.
- Remove the plate/tube(s) from the magnet
- Thoroughly resuspend the beads in in 12.5 μL of 10 mM Tris-HCl, pH 8.0
- Incubate the plate/tube(s) at room temperature for 5 min to elute DNA off the beads, if the samples can be placed on an orbital shaker at 200rpm this is ideal
- Place the plate/tube(s) on a magnet to capture the beads. Incubate until the liquid is clear
- Transfer 11 μL of supernatant to a new plate/tube(s)
Procedure (Standard HS DNA protocol)
- Set up the required number of 0.5-mL tubes for standards and samples. The Qubit® RNA HS Assay requires 2 standards
- Label the tube lids
- Prepare the Qubit® working solution by diluting the Qubit® DNA HS Reagent 1:200 in Qubit® DNA HS Buffer. Use a clean plastic tube each time you prepare Qubit® working solution. Do not mix the working solution in a glass container
- Add 190 μL of Qubit® working solution to each of the tubes used for standards
- Add 10 μL of each Qubit® standard to the appropriate tube, then mix by vortexing 2–3 seconds. Be careful not to create bubbles
- Add Qubit® working solution to individual assay tubes so that the final volume in each tube after adding sample is 200 μL (we use 199μL solution to 1 μL sample)
- Add each sample to the assay tubes containing the correct volume of Qubit® working solution, then mix by vortexing 2–3 seconds. The final volume in each tube should be 200 μL
- Allow all tubes to incubate at room temperature for 2 minutes
- On the Home screen of the Qubit® 3.0 Fluorometer, press DNA, then select DNA: High Sensitivity as the assay type. The “Read standards” screen is displayed. Press Read Standards to proceed
- Insert the tube containing Standard #1 into the sample chamber, close the lid, then press Read standard. When the reading is complete (~3 seconds), remove Standard #1
- Insert the tube containing Standard #2 into the sample chamber, close the lid, then press Read standard. When the reading is complete, remove Standard #2
- Press Run samples
- On the assay screen, select the sample volume and units
- Insert a sample tube into the sample chamber, close the lid, then press Read tube. When the reading is complete (~3 seconds), remove the sample tube
- Repeat step last step until all samples have been read
- If sets samples are receiving the same index primers a master mix can be created for each set of index primers to be used. For example, the lab has make 6 sets of master mixes, each with a unique primer pair, that was used for 3 samples each (18 total samples were amplified). The Puritz Lab often pairs the indexes to avoid index hopping on patterned flow cells, for example the 701 i7 index primer is always paired with the 501 i5 index primer. If each sample is getting a unique pair of index primers, amplification mix and primers should be aliquoted individually
- Example master mixes, multiply volumes by the number of samples in each index pair set. Create master mixes on ice:
| Component | Volume for 1 sample (including 10% excess) |
|---|---|
| KAPA HiFi HotStart Ready Mix | 13.75 μl |
| i5 index primer X | 1.375 μl |
| i7 index primer X | 1.375 μl |
- Create new strip tubes/plates with 10 μl of cleaned, adapter ligated samples in each tube
- If using master mixes, add 15μl of the appropriate mix to each tube
- If adding unique primer pairs to each sample, add 12.5 μl of KAPA HiFi HotStart Ready Mix to each tube, then add 1.25 μl of each index primer. Having a list of which sample gets which primers that can be checked off after each addition is helpful for minimizing errors/recognizing errors
- Calculate number of cycles needed based on previous quants
| Amount of adapter-ligated DNA in amplification reaction | Number of cycles required to generate 1 μg of library DNA |
|---|---|
| 500 ng | 1-2 |
| 100 ng | 3-4 |
| 50 ng | 5-6 |
| 25 ng | 7-8 |
| 10 ng | 8-9 |
| 5 ng | 11-12 |
| 1 ng | 12-13 |
For Puritz and Lotterhos (2017), 6 PCR cycles were used
- Vortex and centrifuge briefly
- Amplify using the following cycling protocol (X is chosen number of cycles):
| Step | Temp | Duration | Cycles |
|---|---|---|---|
| Initial denaturation | 98 °C | 45 sec | 1 |
| Denaturation | 98 °C | 15 sec | X |
| Annealing | 60 °C | 30 sec | X |
| Extension | 72 °C | 30 sec | X |
| Final Extension | 72 °C | 1 min | 1 |
| Hold | 4 °C | ∞ | 1 |
- Proceed immediately to the next step
- Bring KAPA Pure Beads to room temperature by taking out of the 4 degree ~30 minutes before use and swirl to mix
- Perform a 1X cleanup by adding 25 μl of KAPA Pure beads to each sample tube after the amplification step and pipetting ~10 times until homogenous
- Incubate the plate/tube(s) at room temperature for 15 min to bind DNA to the beads, if the samples can be placed on an orbital shaker at 200rpm this is ideal
- Place the plate/tube(s) on a magnet to capture the beads. Incubate until the liquid is clear
- Carefully remove and discard the supernatant
- Keeping the plate/tube(s) on the magnet, add 200 μL of 80% ethanol
- Incubate the plate/tube(s) on the magnet at room temperature for ≥30 sec
- Carefully remove and discard the ethanol
- Keeping the plate/tube(s) on the magnet, add 200 μL of 80% ethanol
- Incubate the plate/tube(s) on the magnet at room temperature for ≥30 sec
- Carefully remove and discard the ethanol. Try to remove all residual ethanol without disturbing the beads
- Dry the beads at room temperature for 5 min, or until all of the ethanol has evaporated. Caution: over-drying the beads may result in reduced yield.
- Remove the plate/tube(s) from the magnet
- Thoroughly resuspend the beads in in 15 μL of 10 mM Tris-HCl, pH 8.0
- Incubate the plate/tube(s) at room temperature for 5 min to elute DNA off the beads, if the samples can be placed on an orbital shaker at 200rpm this is ideal
- Place the plate/tube(s) on a magnet to capture the beads. Incubate until the liquid is clear
- Transfer 11 μL of supernatant to a new plate/tube(s)
This is a safe stopping point. If you are stopping, store your sample at ‐15° to ‐25°C.
- Plan your capture pools before starting hybridization. In fact, planning capture pools should be done when planning multiplexing. The main thing to do when planning how many captures to do is to evenly spread sample "attributes" between captures, ie if you have samples from 4 populations, each capture should have roughly the same number of samples from each population. This minimizes any batch effect based on capture efficiency.
- There is also the question of how much gDNA library per sample to use, and how many gDNA libraries to have in each capture reaction. The Puritz Lab has had successes with capture pools that included: 5, 6, and 10 samples in each. The lab has also had success with 500ng as the total amount for the capture pooled gDNA, and with 200ng of each gDNA library.
- How many gDNA libraries you have will be the largest factor in determining this. The washes after hybridization are intensive, so decreasing the number of tubes to handle is something to consider. For example, for a project with 50 samples, 5 capture pools that had 10 samples each were used. For a project with 18 samples, 3 capture pools that had 6 samples each were used.
- Probes are used in excess. We recommend using 500 ng of probes, but have also successfully captured with as little as 100 ng of probes and 100 ng of library. We have also had success with 500ng of probes with 600ng of pooled gDNA libraries, and 500ng of probes with 1ug of pooled gDNA libraries. Yield will scale directly with input
- It is important to note that the total volume of all the gDNA libraries for 1 capture plus the volume of probes needs to be less than or equal to 23.5ul.
| Reagent | Supplier | Catalog # |
|---|---|---|
| Denhardt’s solution (50x) | Life Technologies | 750018 |
| Dynabeads® M-280 Streptavidin | Life Technologies | 11205D, M-270 |
| SSC Buffer Concentrate (20x) | Fisher Scientific | 5075059 |
| SDS Micropellets | Fisher Scientific | BP8200100 |
| Cot-1 DNA (1 mg/ml) | ThermoFischer | 15279011 |
| KAPA Pure Beads | Roche Sequencing | KK8001 |
Note that if using custom DNA adapters, it is critical to ensure that the blocking oligos match the adapter sequences.
| Name | 5' to 3' Sequence |
|---|---|
| BO1.i5.F | AGATCGGAAGAGCGTCGTGTAGGGAAAGAGTGTIIIIIIIIGTGTAGATCTCGGTGGTCGCCGTATCATT |
| BO2.i5.R | AATGATACGGCGACCACCGAGATCTACACIIIIIIIIACACTCTTTCCCTACACGACGCTCTTCCGATCT |
| BO3.i7.F | CAAGCAGAAGACGGCATACGAGATIIIIIIGTGACTGGAGTTCAGACGTGTGCTCTTCCGATCT |
| BO4.i7.R | AGATCGGAAGAGCACACGTCTGAACTCCAGTCACIIIIIIATCTCGTATGCCGTCTTCTGCTTG |
- 10 mM Tris-HCl pH 8.5 or PCR-grade water
- EDTA 500 mM
- SDS 10%
- TEN (10 mM Tris-HCl pH 7.5, 1 mM EDTA, 1M NaCl)
- 1x SSC / 0.1% SDS
- 0.5x SSC / 0.1% SDS
- 0.1x SSC / 0.1% SDS
NOTE: calculate the volume you need for each of these solutions based on the number of captures you have. How to calculate:
- TEN : 200 μl for each of 4 washes (800 μl), plus 200 μl for each capture reaction
- 1x SSC / 0.1% SDS : 200 μl for each of 2 washes per capture (400 μl * number of captures)
- 0.5x SSC / 0.1% SDS : 200 μl per capture (200 μl * number of captures)
- 0.1x SSC / 0.1% SDS : 200 μl per capture (200 μl * number of captures)
Examples on how to make solutions, the Solution Dilution Calculator is very helpful. These are example volumes, please calculate what you will need:
- TEN solution (3mL):
- 6 μl 500mM EDTA
- 600 μl 5M NaCl
- 2340 μl 10mM Tris HCl pH. 7.5
- 1x SSC / 0.1% SDS (2mL)
- 100 μl 20X SSC
- 20 μl 10% SDS
- 1880 μl nuclease-free water
- 0.5x SSC / 0.1% SDS (2mL)
- 50 μl 20X SSC
- 20 μl 10% SDS
- 1930 μl nuclease-free water
- 0.1x SSC / 0.1% SDS (2mL)
- 10 μl 20X SSC
- 20 μl 10% SDS
- 1970 μl nuclease-free water
Protocol based on previously described methods hyRAD and general capture
It takes some planning to time this nicely. Immediately after the 48 hour incubation you have to do the capture, 4 washes, and elution. This will probably take 2 hours, and you will likely want to do the amplification and QC the same day. Try to plan to have the hybridization finished at noon, leaving you the afternoon to do the rest of the steps.
- Make the Hybridization master mix on ice, multiply volumes by number of captures:
| Component | Volume for 1 capture (inculdes 10% excess) |
|---|---|
| SSC (20x) | 13.2 μl |
| EDTA (500 mM) | 0.44 μl |
| SDS (10%) | 0.44 μl |
| Denhardt’s solution (50x) | 1.76 μl |
| Cot-1 DNA (1 mg/ml) | 0.65 μl |
| BO.1 blocking oligo (200 μM) | 0.44 μl |
| BO.2 blocking oligo (200 μM) | 0.44 μl |
| BO.3 blocking oligo (200 μM) | 0.44 μl |
| BO.4 blocking oligo (200 μM) | 0.44 μl |
Be careful and make sure to add each component in these steps!
- Pool gDNA libraries as planned into capture pools in 0.2mL PCR strip tubes
- Add 500ng (or other amount as planned) of probes to each capture pool
- If the volume of pooled gDNA libraries and probes in each tube is less than 23.5 μl, increase the volume to 23.5 μl with nuclease-free water
- Add 16.5 μl of the hybridization master mix to each capture pool
- Pipette to mix, the total volume should be 40 μl
- Incubate at 95°C for 10 minutes, then at 65°C for 48 hours. Mix from time to time, about every 12 hours is ok. This can be done in a standard thermocycler, but is probably best performed in an hybridization oven with a rocking rotor for the 48 hours incubation. Because it's such a long incubation there may be evaporation, especially if you use a rocking oven. This has never effected yield (to our knowledge), but you can try parafilming the tubes and keeping them in a plastic bag to minimize evaporation).
- Do this the day the incubation ends, about an hour before it's ready
- Resuspend Dynabeads M-280 (10 mg/ml) by pipetting. The volume is small, so try to store the tube upright
- For each capture reaction: dispense 10 μl of beads in a PCR tube
- Place tubes on a magnet stand and wait for the solution to go clear
- Remove and discard the supernatant
- Take tubes off the magnet and resuspend the beads in 200μl TEN
- Repeat: Place tubes on a magnet stand and wait for the solution to go clear
- Remove and discard the supernatant
- Take tubes off the magnet and resuspend the beads in 200μl TEN
- Repeat again: Place tubes on a magnet stand and wait for the solution to go clear
- Remove and discard the supernatant
- Take tubes off the magnet and resuspend the beads in 200μl TEN
- Repeat wash a 3rd time: Place tubes on a magnet stand and wait for the solution to go clear
- Remove and discard the supernatant
- Take tubes off the magnet and resuspend the beads in 200μl TEN and store at room temp until use
- Add each 40 μl of the hybridization mixture to their respective tube with 200ul of Dynabeads (could be less than 40 μl if some evaporated)
- Gently mix by pipetting
- Incubate 30 min at room temperature on an orbital shaker at 200 rpm
- Warm 1x SSC / 0.1% SDS to 65°C (ex. in a thermomixer)
- Place tubes on a magnet plate
- Remove supernatant and retain in case of DNA loss
- Take tubes off the magnet, and resuspend the beads in each tube with 200 μl of 65°C 1x SSC / 0.1% SDS
- Pipette well and incubate for 15 min at 65°C (we recommend using a thermocycler with a 65°C hold program)
- Place tubes on a magnet plate
- Remove supernatant and retain in case of DNA loss
- Take tubes off the magnet, and resuspend the beads in each tube with 200 μl of 65°C 1x SSC / 0.1% SDS
- Pipette well and incubate for 10 min, 65°C (ex. in the thermocycler)
- Place tubes on a magnet plate
- Remove supernatant and retain in case of DNA loss
- Take tubes off the magnet, and resuspend the beads in each tube with 200 μl of room temp 0.5x SSC / 0.1% SDS
- Pipette well and incubate for 10 min, 65°C (ex. in the thermocycler)
- Place tubes on a magnet plate
- Remove supernatant and retain in case of DNA loss
- Take tubes off the magnet, and resuspend the beads in each tube with 200 μl of room temp 0.1x SSC / 0.1% SDS.
- Pipette well, incubate for 10 min, 65°C (ex. in the thermocycler)
- Use another thermocyler or a thermomixer to warm nuclease-free water to 80°C (22 μl per tube)
- Place tubes with beads on a magnet plate
- Remove supernatant and retain in case of DNA loss
- Take tubes off the magnet, and resuspend the beads in each tube with 22 μl of 80°C H20
- Pipette well, incubate for for 10 min, 80°C (we recommend using a thermocycler with a 80°C hold)
- Place tubes on a magnet plate
- Remove and SAVE THE SUPERNATANT (this contains the hybridization-enriched fragments)
- Discard the tubes with the beads
The amount of capture DNA will be really small, and needs to be amplified before QC.
- On ice, create the amplification master mix, multiply volumes by number of amplification reactions (same as number of captures):
| Component | Volume for 1 reaction (including 10% excess) |
|---|---|
| KAPA HiFi HotStart ReadyMix (2X) | 13.75 μl |
| Universal Primers (10uM) | 2.65 μl |
- Aliquot 15 μl of master mix into a PCR tube for each amplification reaction (on ice)
- Add 10 μl of the captured DNA to each respective tube (this is the supernatant from the final step)
- Vortex and centrifuge briefly
- Amplify using the following cycling protocol:
| Step | Temp | Duration | Cycles |
|---|---|---|---|
| Initial denaturation | 98 °C | 45 sec | 1 |
| Denaturation | 98 °C | 15 sec | 12 |
| Annealing* | 60 °C | 30 sec | 12 |
| Extension | 72 °C | 30 sec | 12 |
| Final Extension | 72 °C | 1 min | 1 |
| Hold | 4 °C | ∞ | 1 |
- Bring KAPA Pure Beads to room temperature by taking out of the 4 degree ~30 minutes before use and swirl to mix
- Perform a 1X cleanup by adding 25 μl of KAPA Pure beads to each tube after the amplification step and pipetting ~10 times until homogenous
- Incubate the plate/tube(s) at room temperature for 15 min to bind DNA to the beads, if the samples can be placed on an orbital shaker at 200rpm this is ideal
- Place the plate/tube(s) on a magnet to capture the beads. Incubate until the liquid is clear
- Carefully remove and discard the supernatant
- Keeping the plate/tube(s) on the magnet, add 200 μL of 80% ethanol
- Incubate the plate/tube(s) on the magnet at room temperature for ≥30 sec
- Carefully remove and discard the ethanol
- Keeping the plate/tube(s) on the magnet, add 200 μL of 80% ethanol
- Incubate the plate/tube(s) on the magnet at room temperature for ≥30 sec
- Carefully remove and discard the ethanol. Try to remove all residual ethanol without disturbing the beads
- Dry the beads at room temperature for 5 min, or until all of the ethanol has evaporated. Caution: over-drying the beads may result in reduced yield.
- Remove the plate/tube(s) from the magnet
- Thoroughly resuspend the beads in in 25 μL of 10 mM Tris-HCl, pH 8.0
- Incubate the plate/tube(s) at room temperature for 5 min to elute DNA off the beads, if the samples can be placed on an orbital shaker at 200rpm this is ideal
- Place the plate/tube(s) on a magnet to capture the beads. Incubate until the liquid is clear
- Transfer 25 μL of supernatant to a new plate/tube(s) on ice
Procedure (Standard HS DNA protocol)
- Set up the required number of 0.5-mL tubes for standards and samples. The Qubit® RNA HS Assay requires 2 standards
- Label the tube lids
- Prepare the Qubit® working solution by diluting the Qubit® DNA HS Reagent 1:200 in Qubit® DNA HS Buffer. Use a clean plastic tube each time you prepare Qubit® working solution. Do not mix the working solution in a glass container
- Add 190 μL of Qubit® working solution to each of the tubes used for standards
- Add 10 μL of each Qubit® standard to the appropriate tube, then mix by vortexing 2–3 seconds. Be careful not to create bubbles
- Add Qubit® working solution to individual assay tubes so that the final volume in each tube after adding sample is 200 μL (we use 199μL solution to 1 μL sample)
- Add each sample to the assay tubes containing the correct volume of Qubit® working solution, then mix by vortexing 2–3 seconds. The final volume in each tube should be 200 μL
- Allow all tubes to incubate at room temperature for 2 minutes
- On the Home screen of the Qubit® 3.0 Fluorometer, press DNA, then select DNA: High Sensitivity as the assay type. The “Read standards” screen is displayed. Press Read Standards to proceed
- Insert the tube containing Standard #1 into the sample chamber, close the lid, then press Read standard. When the reading is complete (~3 seconds), remove Standard #1
- Insert the tube containing Standard #2 into the sample chamber, close the lid, then press Read standard. When the reading is complete, remove Standard #2
- Press Run samples
- On the assay screen, select the sample volume and units
- Insert a sample tube into the sample chamber, close the lid, then press Read tube. When the reading is complete (~3 seconds), remove the sample tube
- Repeat step last step until all samples have been read
- Run cleaned captures on BioAnalyzer/Tape Station/Fragment analyzer
- These should be the same size as your gDNA libraries
- Example capture pool
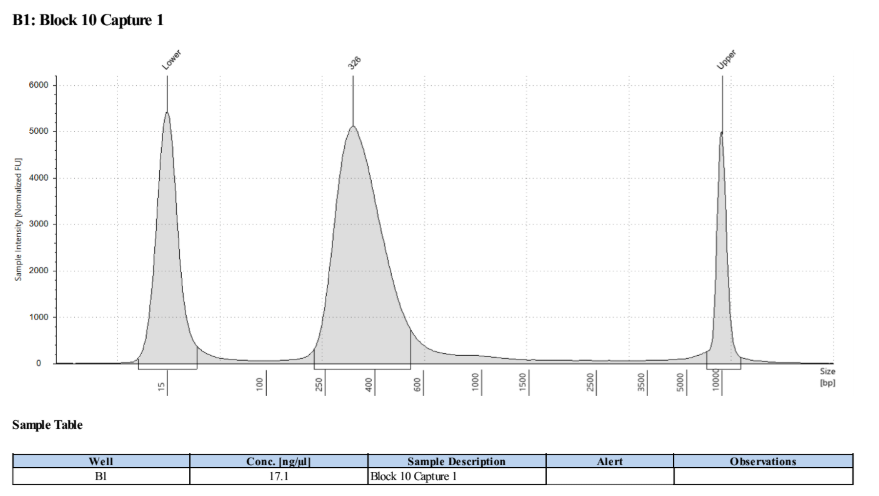
Lab notebook posts from Puritz lab manager doing EecSeq: