Azure API Management, is a service that provides a Gateway on top of your API Endpoints. How it works is that Azure API Management acts like a proxy in front of your APIs and can decide what to do with incoming requests.
By using it, you add a whole host of features like:
- Security, you can use everything from API keys, JWT to managed identity.
- Rate limiting, a great feature is being able to decide how many calls get through per a certain time unit. This helps ensure all users have a great experience and also that your service isn't overwhelmed with requests.
- Scaling & Load balancing. You can set up a number of endpoints to balance out the load and you can also decide how to "load balance".
- AI features like semantic caching, token limit and token monitoring and more. These are great features that improves responsiveness as well as helps you be on top of your token spending. Read more here.
Model Context Protocol is quickly becoming a standard for agentic AI apps and how to expose tools and data in a consistent way. Azure API Management is a natural choice when you need to "manage" APIs. MCP Servers often integrate with other APIs to resolve requests to a tool for example. Therefore combining Azure API Management and MCP makes a lot of sense.
In this specific use case we'll learn to expose API endpoints as an MCP Server. By doing this, we can easily make this endpoints part of an agentic app while also leveraging the features from Azure API Management.
- You select the endpoint methods you want exposed as tools.
- The additional features you get is dependent on what you configure in the policy section for your API. But here we will show you how you can add rate limiting.
If you have an API in Azure API Management already great, then you can skip this step. If not, check out this link, importing an API to Azure API Management.
To expose the API endpoints, let's follow these steps:
-
Navigate to Azure Portal and the following address https://portal.azure.com/?Microsoft_Azure_ApiManagement=mcp Navigate to your API Management instance.
-
In the left menu, select APIs > MCP Servers > + Create new MCP Server.
-
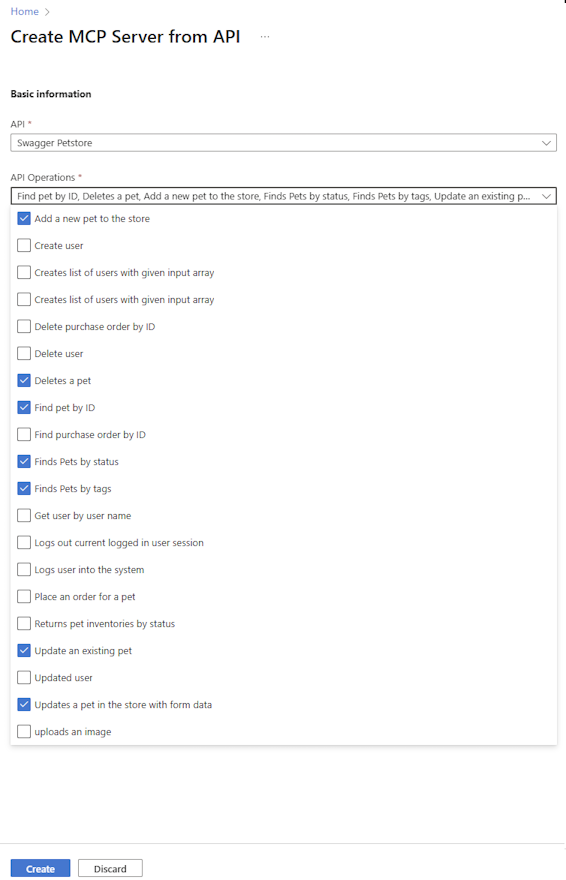
In API, select a REST API to expose as an MCP server.
-
Select one or more API Operations to expose as tools. You can select all operations or only specific operations.
-
Select Create.
-
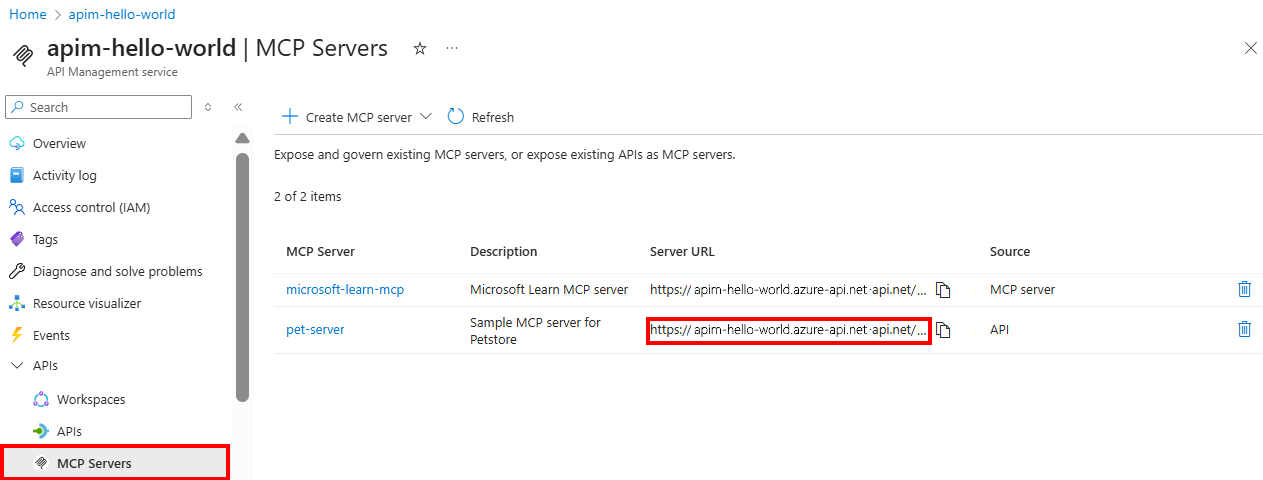
Navigate to the menu option APIs and MCP Servers, you should see the following:
The MCP server is created and the API operations are exposed as tools. The MCP server is listed in the MCP Servers pane. The URL column shows the endpoint of the MCP server that you can call for testing or within a client application.
Azure API Management has the core concept of policies where you set up different rules for your endpoints like for example rate limiting or semantic caching. These policies are authored in XML.
Here's how you can set up a policy to rate limit your MCP Server:
-
In the portal, under APIs, select MCP Servers.
-
Select the MCP server you created.
-
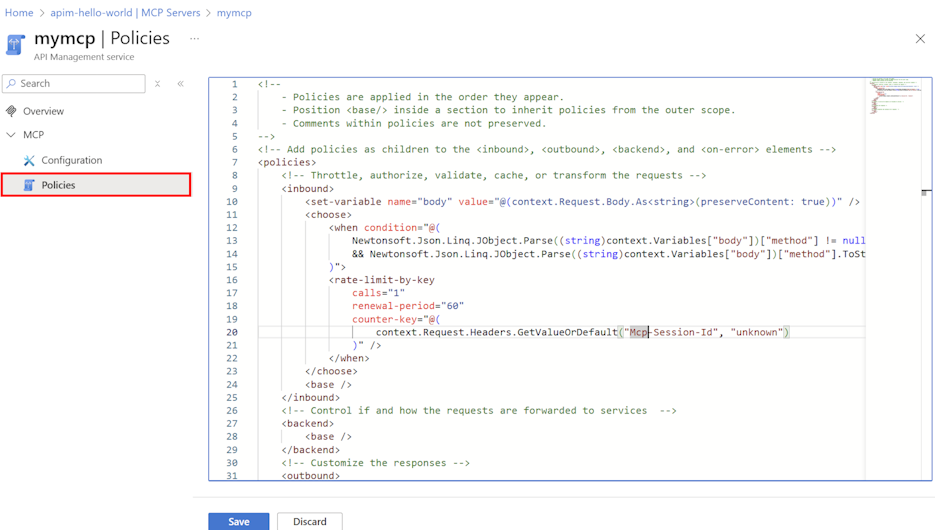
In the left menu, under MCP, select Policies.
-
In the policy editor, add or edit the policies you want to apply to the MCP server's tools. The policies are defined in XML format. For example, you can add a policy to limit calls to the MCP server's tools (in this example, 5 calls per 30 second per client IP address). Here's XML that will cause it to rate limit:
 <rate-limit-by-key calls="5"
   renewal-period="30"
   counter-key="@(context.Request.IpAddress)"
   remaining-calls-variable-name="remainingCallsPerIP"
/>
Here's an image of the policy editor:
Let's ensure our MCP Server is working as intended.
For this, we will use Visual Studio Code and GitHub Copilot and its Agent mode. We will add the MCP server to a mcp.json while. By doing so, Visual Studio Code will act as a client with agentic capabilities and end users will be able to type a prompt and interact with said server.
Let's see how, to add the MCP server in Visual Studio Code:
-
Use the MCP: Add Server command from the Command Palette.
-
When prompted, select the server type: HTTP (HTTP or Server Sent Events).
-
Enter the URL of the MCP server in API Management. Example: https://.azure-api.net/-mcp/sse (for SSE endpoint) or https://.azure-api.net/-mcp/mcp (for MCP endpoint), note how the difference between the transports is
/sseor/mcp. -
Enter a server ID of your choice. This is not an important value but it will help you remember what this server instance is.
-
Select whether to save the configuration to your workspace settings or user settings.
-
Workspace settings - The server configuration is saved to a .vscode/mcp.json file only available in the current workspace.
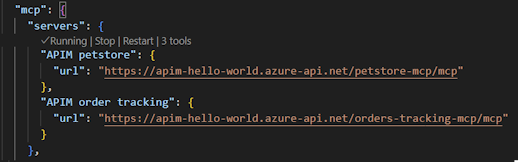
mcp.json
"servers": {
    "APIM petstore" : {
        "type": "sse",
        "url": "url-to-mcp-server/sse"
    }
}
or if you choose streaming HTTP as transport it would be slightly different:
"servers": {
    "APIM petstore" : {
        "type": "http",
        "url": "url-to-mcp-server/mcp"
    }
}
-
User settings - The server configuration is added to your global settings.json file and is available in all workspaces. The configuration looks similar to the following:
-
You also need to add configuration, a header to make sure it authenticates properly towards Azure API Management. It uses a header called *Ocp-Apim-Subscription-Key.
- Here's how you can add it to settings:
, this will cause the a prompt to be displayed to ask your for the API key value which you can find in Azure Portal for your Azure API Management instance.
- To add it to mcp.json instead, you can add it like so:
"inputs": [
  {
    "type": "promptString",
    "id": "apim_key",
    "description": "API Key for Azure API Management",
    "password": true
  }
]
"servers": {
    "APIM petstore" : {
        "type": "http",
        "url": "url-to-mcp-server/mcp",
        "headers": {
            "Ocp-Apim-Subscription-Key": "Bearer ${input:apim_key}"
        }
    }
}

Now we're all set up in either settings or in .vscode/mcp.json. Let's try it out.
There should be a Tools icon like so, where the exposed tools from your server are listed:
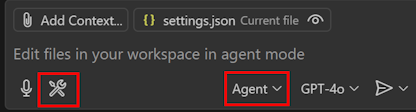
-
Click the tools icon and you should see a list of tools like so:
-
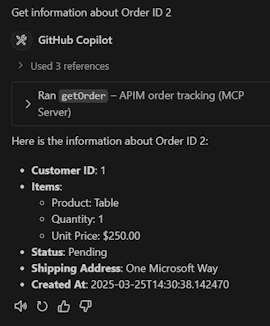
Enter a prompt in the chat to invoke the tool. For example, if you selected a tool to get information about an order, you can ask the agent about an order. Here's an example prompt:
get information from order 2You will now be presented with a tools icon asking you to proceed calling a tool. Select to continue running the tool, you should now see an output like so:
what you see above depends what tools you've setup, but the ideas is that you get a textual response like above

Here's how you can learn more:
-
Python sample: Secure remote MCP servers using Azure API Management (experimental)
-
Use the Azure API Management extension for VS Code to import and manage APIs
-
Register and discover remote MCP servers in Azure API Center
-
AI Gateway Great repo that shows many AI capabilities with Azure API Management
-
AI Gateway workshops Contains workshops using Azure Portal, which is a great way to start evaluating AI capabilities.