My Network TAP Will Not Work with SecurityOnion #9340
Replies: 4 comments 6 replies
-
|
When you configure the VM sniffing NIC in the VMware settings, are you explicitly telling VMware to use the NIC connected to the tap? Have you tried configuring VMware to pass the sniffing NIC through to the VM directly? Your Windows |
Beta Was this translation helpful? Give feedback.
-
|
Fantastic notes! Though I did have trouble getting beyond line 14 about the touchscreen without throwing things. :) I didn't see any lovenote about promiscuous mode. I have no idea how to do that on vmware workstation, but I guarantee you will see nothing forever without promiscuous mode on the NIC(s) |
Beta Was this translation helpful? Give feedback.
-
|
Thanks for the help! Promiscuous mode on the NIC made the Security Onion VM work to actually ingest the TAP data. |
Beta Was this translation helpful? Give feedback.
-
|
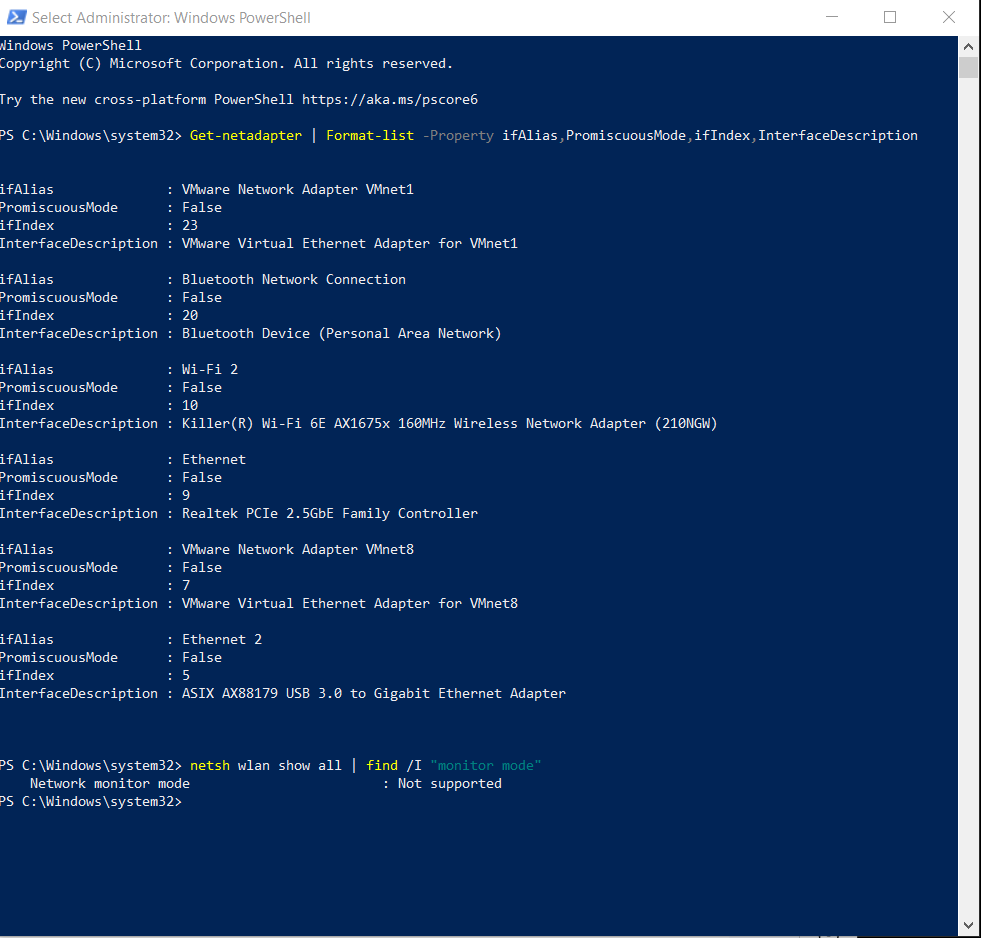
Suddenly, I cannot change the NIC to promiscuous mode using PowerShell. How do I change the NIC to promiscuous mode? |
Beta Was this translation helpful? Give feedback.
-
|
|
Beta Was this translation helpful? Give feedback.
-
|
The computer was repaired, and since the repair promiscuous mode has not worked. |
Beta Was this translation helpful? Give feedback.
-
|
The promiscuous mode suddenly worked. I do not know how it suddenly worked again. |
Beta Was this translation helpful? Give feedback.
-
|
I can only get promiscuous mode to be on when Wireshark or when SecurityOnion is running. Promiscuous mode seems to turned on but only when it is being used. |
Beta Was this translation helpful? Give feedback.
-
|
The TAP does not work with SecurityOnion. I cannot connect the TAP to the Virtual Machine (VMWare) to ingest data into SecurityOnion. |
Beta Was this translation helpful? Give feedback.
-
|
I do not know why the TAP will not connect to the SecurityOnion Virtual Machine in VMWare. Help! |
Beta Was this translation helpful? Give feedback.
Uh oh!
There was an error while loading. Please reload this page.
-
I need to know how to connect a Dualcomm ETAP-2003 10/100/1000Base-T Network TAP
to a SecurityOnion standalone VM in VMWare Workstation Pro.
In SecurityOnion I'm not seeing any traffic from outside the standalone VM.
I want the SecurityOnion iso to process traffic from the TAP the way Wireshark will.
Host Computer Information:
The host computer is a Windows 10 Pro.
Free space: 724 GB free (with the standalone SecurityOnion ISO installed)
Device name MSI
Processor 11th Gen Intel(R) Core(TM) i7-11800H @ 2.30GHz 2.30 GHz
Installed RAM 32.0 GB (31.7 GB usable)
Device ID [redacted]
Product ID [redacted]
System type 64-bit operating system, x64-based processor
Pen and touch Touch support with 10 touch points
The ipconfig for the host computer:
ipconfig
Windows IP Configuration
Ethernet adapter Ethernet:

Media State . . . . . . . . . . . : Media disconnected
Connection-specific DNS Suffix . :
Ethernet adapter Ethernet 2:
Connection-specific DNS Suffix . :
IPv6 Address. . . . . . . . . . . : 2600:4040:b1a6:4200:f3c4:9322:1672:d3d5
Temporary IPv6 Address. . . . . . : 2600:4040:b1a6:4200:857e:91fa:4bf6:1446
Link-local IPv6 Address . . . . . : fe80::6031:ca84:4923:1697%21
IPv4 Address. . . . . . . . . . . : 192.168.135.101
Subnet Mask . . . . . . . . . . . : 255.255.255.0
Default Gateway . . . . . . . . . : fe80::3ebd:c5ff:fe0f:1359%21
192.168.135.100
Wireless LAN adapter Local Area Connection* 3:
Media State . . . . . . . . . . . : Media disconnected
Connection-specific DNS Suffix . :
Wireless LAN adapter Local Area Connection* 4:
Media State . . . . . . . . . . . : Media disconnected
Connection-specific DNS Suffix . :
Ethernet adapter VMware Network Adapter VMnet1:
Connection-specific DNS Suffix . :
Link-local IPv6 Address . . . . . : fe80::1a60:a400:d86f:e4d4%9
IPv4 Address. . . . . . . . . . . : 192.168.233.1
Subnet Mask . . . . . . . . . . . : 255.255.255.0
Default Gateway . . . . . . . . . :
Ethernet adapter VMware Network Adapter VMnet8:
Connection-specific DNS Suffix . :
Link-local IPv6 Address . . . . . : fe80::32db:fb4d:a664:5f38%14
IPv4 Address. . . . . . . . . . . : 192.168.135.1
Subnet Mask . . . . . . . . . . . : 255.255.255.0
Default Gateway . . . . . . . . . :
Wireless LAN adapter Wi-Fi 2:
Connection-specific DNS Suffix . : Belkin
Link-local IPv6 Address . . . . . : fe80::1d4f:5539:6b07:557%12
IPv4 Address. . . . . . . . . . . : 192.168.2.26
Subnet Mask . . . . . . . . . . . : 255.255.255.0
Default Gateway . . . . . . . . . : 192.168.2.1
Ethernet adapter Bluetooth Network Connection 2:
Media State . . . . . . . . . . . : Media disconnected
Connection-specific DNS Suffix . :
The Ethernet adapter Ethernet 2 has a
USB 3.0 to 10/100/1000 Gigabit Ethernet Internet Adapter
connected to the computer by USB and connected to the
Dualcomm ETAP-2003 10/100/1000Base-T Network TAP's monitor port by ethernet.
One of the TAP's inline ports is connected to the router. The other is empty.
The network TAP must be working, because Wireshark on the host computer can pick up
packets from the TAP.
VMWare Information:
Under C:\Program Files (x86)\VMware\VMware Workstation\vmnetcfg.exe:
Run as administrator.
Virtual Network Editor:
VMnet0 is bridged type. Has external connection auto-bridging. No host connection marked. No DHCP marked. No subnet address marked.
VMnet1 is host-only type. Host connected. DHCP enabled. Subnet address: 192.168.233.0 Subnet mask: 255.255.255.0
VMnet8 is NAT type. Has external connection NAT. Host connected. DHCP enabled. Subnet address: 192.168.135.0 Subnet mask: 255.255.255.0
Virtual Machine Information:
CentOSSeventeenth
Hardware:
Memory: 21.1 GB
Processors: 4
Hard disk (SCSI): 200 GB
CD/DVD (IDE): Use ISO image file: C:\Users[redacted]\Downloads\securityonion-2.3.140-20220719.iso
Network Adapter: NAT
Network Adapter 2: Bridged (Automatic). Replicate physical network connection state.
USB Controller: Present. USB compatibility: USB 2.0. Share Bluetooth devices with the virtual machine.
Sound Card: Auto detect. Use default host sound card.
Printer: Present. Not enabled.
Display: Auto detect. Use host setting for monitors.
Options:
General:
Virtual machine name: CentOSSeventeenth.
Guest operating system: Linux. Version: CentOS 7 64-bit.
Working directory: C:\Users[redacted]\Documents\Virtual Machines\CentOSSeventeenth
Enhanced keyboard: Off
Power: blank
Shared Folders: Disabled
Snapshots: When powering off: Just power off.
AutoProtect: Disabled.
Guest Isolation: Enable drag and drop. Enable copy and paste.
Access Control: Not encrypted.
VMWare Tools: Time sync off. VMWare Tools updates: Use application default (currently update manually)
VNC Connections: Disabled
Unity: Unity window decorations: Show borders. Show badges. Apllications: Enable applications menu.
Appliance View: blank
Autologin: Not supported.
Advanced:
Process priorities: Input grabbed: Default. Input ungrabbed: Default.
Settings: Gather debugging information: Default
Firmware type: BIOS
File locations: Configuration: C:\Users[redacted]\Documents\Virtual Machines\CentOSSeventeenth\CentOSSeventeenth.vmx Log: (Not powered on)
Setup Summary:
Start on a Windows computer.
Mostly based on the SecurityOnion Essentials playlist on YouTube.
Download SecurityOnion ISO image (Version: 2.3.140).
Open VMWare Workstation Pro.
Make and use an Ubuntu VMware machine for the sole purpose of confirming the
signature key.
Actually confirm the signature key.
Output should show good signature.
Primary key fingerprint: C804 A93D 36BE 0C73 3EA1 9644 7C10 60B7 FE50 7013.
Proceed only if these conditions are met.
Install SecurityOnion (standalone mode):
Go to the Home Tab. Create new virtual machine.
Typical. Next.
Installer disc image file (iso): securityonion-2.3.140-20220719.iso
Linux. CentOS 7. Next.
Virtual machine name: CentOSSeventeenth
200.0 GB. Max disk storage. Split virtual disk. Next.
Customize hardware. 21620 MB memory. Number of processers:
4. Add 2nd Network Adapter. Click on Network Adapter 2. Click Bridged. Close.
Finish. Setup Security Onion:
Start the virtual machine (CentOSFirst, etc.).
Install Security Onion 2.3.140 (first option). Press Enter to begin installation.
Continue (yes).
Enter administrative username (analyst) and password.
Wait for the install to complete. Press Enter to reboot.
Select top option.
Log in to SecurityOnion.
Yes.
Install.
Standalone (Use spacebar). Ok.
Type AGREE. Ok.
Enter hostname: sostand
Description: [choose description if you want]
Management NIC: ens33 Ok. Note: spacebar used to select management NIC.
Static Ok.
On your host computer (Windows), go to Command Prompt. Type in ipconfig.
Look under VMWare VMnet8.
Look at the IPv4 address (a.b.c.d), the subnet mask (e.f.g.h).
Assuming the subnet mask is 255.255.255.0, choose the IP address a.b.c.[not d]/24
Ok.
Note: Probably choose the fourth octet to be bigger than d.
Note: 24 is based on the subnet mask; the appropriate IP address will differ
by subnet mask.
Note: Record the IP address you choose along with your passwords and usernames.
a.b.c.d Ok. (Fill in variables with appropriate numbers)
Leave default (8.8.8.8,8.8.4.4). Ok.
Leave default DNS search domain (searchdomain.local). Ok.
Ok.
Airgap.
ens34. Ok. Note: Use spacebar.
Leave default home network(s). Ok.
Basic. Ok.
Zeek for metadata.
Use ETOPEN. Ok.
Install all 4 services (osquery, wazuh, playbook, strelka). Ok.
Keep default docker IP. Ok.
Enter an email address (only as username) yourchoice@[redacted]. Ok.
Enter a password.
IP (Leave default) Ok.
Set a password for the soremote.
Basic. Ok.
1 Zeek process.
1 Suricata process.
Whether to configure ntp servers. No.
Nodebasic. Ok.
so-allow. Yes.
192.168.0.0/16 Ok. (Based on computer; assumes a = 192 and b = 168)
Yes. (Shows the options that are set. Asks to proceed.)
Setup will probably take a while.
Ok. (Press enter to reboot.)
Note: If error in setup, do not restart & use machine.
Log into SecurityOnion the first time:
Login to soeval (first password).
sudo so-status | less -R (run so-status over and over; type q to quit)
Wait around 10 minutes and verify the correct services
are running using sudo so-status. Every service should be green with ok.
ifconfig | less -R (show ip address information;
check for the ipv4 address under ens33: p.q.r.s)
Figure out ip address web portal is using.
Use ipconfig on Windows. VMnet8 range should be recorded. m.n.o.0/24
sudo so-allow selection: a. IP range: m.n.o.0/24
Login to the SecurityOnion Web Console:
Open Google Chrome.
Go to the ipv4 address under ens33. https://p.q.r.s
Click proceed to bypass the warning message.
Log into security onion. Type in the second account you made.
You are logged into the local SecurityOnion web console
if you see a menu on the left, the SecurityOnion logo on the top row,
and a screen with the title "Overview".
Some of the actions that were tried:
Try: Make Network Adapter 2 Bridged. Replicate physical network connection state
Try: Make Network Adapter (1) Custom with VMnet0. (this change made things worse by ruining SecurityOnion Console)
Try: Reboot VMware Bridge Control via CMD.
Sources: https://www.youtube.com/watch?v=TG-pPm7KVro&t=84s
https://www.minitool.com/backup-tips/vmware-bridged-network-not-working.html
Try: sudo so-allow
b Logstash Beat
192.168.0.0/23
Try: airmon-ng start bond0
Source: Linux Hackers book (specify source in detail)
Try:
Go to C:\Program Files (x86)\VMware\VMware Workstation\vmnetcfg.exe
Run as administrator
Restore defaults.
OK.
(this change stopped the securityonion console from working. bond0 disappeared.)
(Fixed the change by resetting subnet addresses of VMNet1 and VMnet8 to previous ones.)
Source: https://www.minitool.com/backup-tips/vmware-bridged-network-not-working.html
Try:
Go to C:\Program Files (x86)\VMware\VMware Workstation\vmnetcfg.exe
Run as administrator
Go to VMnet8. Set subnet mask from 255.255.255.0 to 255.255.0.0.
Source: https://www.minitool.com/backup-tips/vmware-bridged-network-not-working.html
Try:
Control Panel. Network and Internet. Network and Sharing Center.
Change adapter settings.
Right-click on the ethernet port (the one plugged into the TAP).
Click Properties.
Double click Internet Protocol Version 4 (TCP/IPv4).
Under Use the following IP address, change the IP address and default gateway
to fit under the VMnet8 subnet.
OK.
Note: Use the following DNs server addresses is for a static DNS server.
sudo so-allow
b (Logstash Beat)
192.168.135.101
sudo so-allow
s (Syslog device)
192.168.135.101
sudo so-allow
Try everything but a (Analyst).
e (Elasticsearch REST API)
f (Strelka frontend)
o (Osquery endpoint)
w (Wazuh agent)
p (Wazuh API)
r (Wazuh registration service)
192.168.135.101
Source: https://www.tp-link.com/us/support/faq/919/#:~:text=How%20to%20find%20and%20manually%20assign%20an%20IP,4%20Step%204%3A%20Set%20the%20IP%20address%20
Try:
Plug the "ASIX AX88179 USB 3.0 to Gigabit Ethernet Adapter" into the USB port
of the PC.
Start.
Settings.
Device Manager (search for this in the search bar).
Network Adapters. Click on > to the left.
Right-click on ASIX AX88179.
Install driver from Internet.
Source: https://www.amazon.com/AmazonBasics-1000-Gigabit-Ethernet-Adapter/dp/B00M77HMU0/ref=asc_df_B00M77HMU0?tag=bingshoppinga-20&linkCode=df0&hvadid=80882875798354&hvnetw=o&hvqmt=e&hvbmt=be&hvdev=c&hvlocint=&hvlocphy=&hvtargid=pla-4584482455193510&th=1
Try:
sudo so-monitor-add eth2
Try:
arp -a
Try:
sudo so-allow
b (Logstash Beat)
IP address on the Windows server (winlogbeat to collect Windows events)
Check downloads folder in SecurityOnion Console.
Source: https://www.youtube.com/watch?v=Xz-7oDrZdQY
Try: ifconfig | less -R
sudo so-monitor-add ens33
(This crashed the Security Onion Console)
sudo so-monitor-add bond0
Source: securityonion documentation release 2.3
bond0 = 00:0c:29:33:cb:ea
Source: #3527
sudo nmcli con sho
sudo so-monitor-add ens34
sudo so-monitor-add bond0 ens34
Source: #5592
To sniff network traffic from a tap/span port,
you need an interface deidcated to sniffing (no IP address).
Source: #9143
Suricata and Zeek for TAP/SPAN port traffic.
Beta Was this translation helpful? Give feedback.
All reactions