Home
.
This tutorial shows how FTC Blocks can play speaking audio on the DS phone or the REV Driver Station. ¡En Español también! Aussi en Français! ...and many other languages.
Spoken audio can provide helpful feedback to the programmers and robot operators, while the Op Mode is running. This can be more useful than audio on the Robot Controller, which may be hard to hear in competition. In any case, the REV Control Hub has no speakers.
A different tutorial shows how FTC Blocks can play short sounds (recorded audio clips) on the Robot Controller (RC) phone and Driver Station (DS phone or REV Driver Station).
Open any existing or new FTC Blocks OpMode that will use this feature. Blocks doesn't offer a Sample OpMode for this DS speaking feature; the "ConceptTextToSpeech" Sample sends spoken text only to the Robot Controller (RC phone).
In the left side menu, open Utilities, then Telemetry.

Click and drag out the purple Block "call Telemetry.speak". For now, don't use the larger Block with languageCode and countryCode.

Place that basic Block in your OpMode, where you want the speaking to happen.
Change the default "text" to the actual message that you want. The OpMode will use Android's Text-To-Speech (TTS) feature to convert your typed words into spoken audio.

Unlike the regular typed Telemetry that appears on the DS screen, spoken audio Telemetry does not require a "Telemetry.update" command.
The command Telemetry.speak begins playing the spoken message. The OpMode will immediately move to the next command. If the program ends soon, your message might not finished playing. Or, you might want the robot's next action to begin only when the audio speech has finished.
So, you can manually allow time for your audio to play. Unlike the Blocks TTS feature for RC phone, there is no Boolean variable "isSpeaking" that becomes FALSE when the audio has finished playing.
You can estimate or measure the duration of the audio. This works fairly well, assuming the audio begins playing immediately.
The sleep() method is simple and will work, but no other new commands can begin during that time.

Using a Timer is often a better way to wait. Create a new Timer object, then loop based on the elapsed time.

In general, it's helpful for a Timer loop to include a printed message with robot status.

The loop can also include Blocks for checking sensors, starting or ending other robot actions, etc. These would not be possible during a long Sleep command.
This waiting technique is most useful for Autonomous OpModes, where programmed events happen in sequence (linear OpMode). For using timers in a TeleOp program (iterative OpMode), see the Advanced section below.
Timers in FTC Blocks are described in more detail at this tutorial.
If the audio playback is not starting immediately or after a consistent delay, see below for a possible workaround.
Save and run your OpMode. Make sure you've turned up the Driver Station's audio volume (not the ringtone volume).
If the words don't sound the way you want, adjust the text. Clearly understood audio is probably more important than the exact spelling or punctuation of the typed text.

That's it! Enjoy this fun and useful feature of FTC Blocks.
- Use in Development
- Numeric and Boolean values
- Languages
- Boolean for playback time
- Toggle all debug audio
- fast replays and audio triggers -- gamepad and sensor
Sounds can be a very useful tool for programming and debugging. They can mark the transition from one Autonomous action to another, often very hard to see. Audio provides fast convenient feedback, directly from your running code. For example:
Speak "Drive forward 10 inches and stop." - did that happen? Speak "Step 1", "Step 2", "Step 3", etc. - did any steps get skipped? Speak "Color sensor sees Red." (or Blue) - was the sensor correct?
If your OpMode is not behaving as expected, audio feedback can help you find the problem in your code.
Spoken text can be generated from other sources besides typing, using the "create text" Block. Here are two examples that say (in words) numeric and Boolean values.

Even better, this feature can say (in words) a value coming directly from an encoder, sensor or gamepad. Some values have a large number of digits -- you don't need to hear all of them.
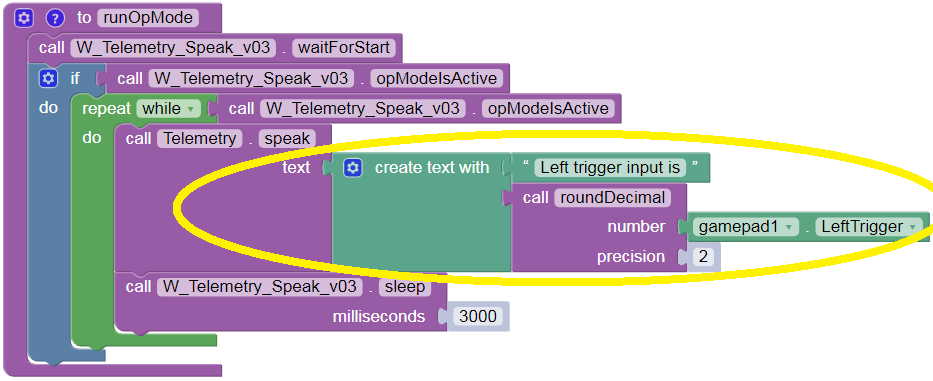
The "create text" Block expands the ways that DS Speech can help with development and debugging. In competition, this can reduce the need for a Coach/Driver to constantly monitor robot data on the DS screen.
In Android, you can change the default language for TTS playback. This is not the same as the overall default language of the phone.
Language set-up requires an internet download to the DS phone, so close the FTC app and open a regular Wi-Fi internet connection.
In the DS phone's Settings menu, open "Languages & input". Then choose "Text-to-speech output", not "Languages".
Next to "Google TTS Engine", touch the Settings icon (small image of a gear).
Select "Install voice data", and choose the preferred language (and country/region dialect). You may also choose a preferred voice; touch each one to hear a sample.
After this download, navigate back and select the preferred TTS language (that you downloaded).
That's it! That language will now be the default for TTS playback on the DS phone. (The RC phone's TTS setting is independent.)
With the TTS language reset, you may continue to use the basic purple "Telemetry.speak" Block in the instructions above. Your text can now be typed in that language, including special/native text characters -- copy them from other documents or, for example, from Microsoft Word's Insert Symbol. Numbers and Boolean values will be spoken in that language too!
You may have noticed a larger purple Block with languageCode and countryCode. This allows choosing from multiple TTS languages downloaded to the phone. Its use may be limited by memory allocation and other system-level factors.

To refresh that large Block's drop-down menu after installing a new Android TTS language, pull that Block again from the menu. A previously placed Block will not update itself with added language codes.
If that Block's drop-down menu still does not offer the code you need, pull the green label away. In the remaining bare grey field, type the country or region code needed. These codes follow the standard Android convention which can be found online.

In some cases, a language code alone will work, with no country code needed. ¡Buena suerte! Bonne chance!
As noted above, Blocks has no Boolean variable "isSpeaking" for Text-To-Speech on the Driver Station. But that Boolean does exist for Robot Controller playback. So, you could play the same message on both devices, and use the RC Boolean to know when the messages have stopped playing.
image
In this example, each Repeat While loop adds a secondary condition for safety and convenience. Note the OpMode's INIT section cannot use 'AND opModeIsActive', since the START button has not yet been pressed (to make the OpMode active).
This parallel/Boolean technique assumes that (a) both messages start at the same time, and (b) you have not adjusted the playback speed of the RC text. You might find the RC audio starts slightly later than the DS audio. If you find the "echo" annoying, try a short (e.g. 50 millisecond) sleep between the two commands. If you turn down the audio on the RC phone, you'll miss other RC audio signals and warnings. If using a REV Control Hub... there's no speaker -- perfect!
Audio cues for key Autonomous OpMode actions are useful for debugging, but can slow down the overall action sequence. Manually adding, removing and re-adding these TTS messages takes a lot of work. Consider using a single Boolean variable (e.g. "useAudio") to turn on and off all such TTS messages. When the OpMode is ready for smooth/continuous runs, simply change "useAudio" from TRUE to FALSE at the top of the program. Now there's no need to manually add/delete all the message code from your OpMode.
image
A more advanced solution is for the Driver/Coach to set this Boolean during INIT, using the gamepad. A fun programming exercise!
This is a special warning about playing sounds and speech during TeleOp OpModes. TeleOp programs are iterative OpModes, meaning the code runs in a single overall loop. This loop cycles or repeats very fast, often every 5-10 milliseconds. faster than...
If the audio is triggered by a gamepad button, for example, the sound will ghbe s
If a gamepad button triggers audio playback, a programmed pause is needed. The overall OpMode loop cycles faster than a human can release the button, causing a staccato of repeated starts. A "backlog" of waiting playbacks can build up; the sounds may continue spilling out long after the button has been released. Eventually the queued files will all play, and the sounds will stop.
But a programmed As described above in Step 2, a timed pause can be done with sleep() or a custom timer. A tutorial on Blocks timers is here. Also mentioned above is
A timed pause is essential if a sound plays in a tight loop. The audio file will start repeatedly, often so fast that it sounds like static noise or an irritating staccato of continuous starts.
Even if a gamepad button triggers playback in a repeat loop, a pause is still needed. The loop cycles faster than a human can release the button, causing a staccato of repeated starts. A "backlog" of waiting playbacks can build up; the sounds may continue spilling out long after the button has been released. Eventually the queued files will all play, and the sounds will stop.
Also mention a Boolean flag to indicate a timer has finished? This can be cleaner than a local loop as shown above for Autonomous.
The timed pause can be done with sleep() as shown above, or with a custom timer. A tutorial on Blocks timers is here.
.
Questions, comments and corrections to: westsiderobotics@verizon.net