An image display for AllSky cameras using ESP32-P4 with multi-image cycling, hardware acceleration, web configuration, and Home Assistant integration.

Check out the video below to see the display in action:
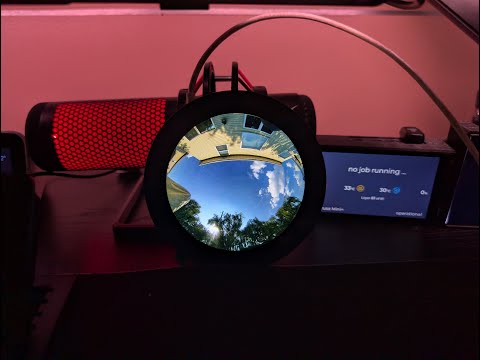
- Demo
- Build Status
- Overview
- Features
- Hardware Requirements
- Installation
- Configuration
- Image Optimization for AllSky
- Web Configuration Interface
- Troubleshooting
- Contributing
- License
- Support


This project makes your ESP32-P4 touch display into an all-sky camera viewer with features like image cycling, per-image transformations, MQTT control, and seamless Home Assistant integration.
Key Highlights:
- Display images from multiple sources with automatic cycling
- Real-time image transformations (scale, offset, rotation)
- Complete web-based configuration interface
- Native Home Assistant integration via MQTT discovery
- Touch controls for quick navigation
- Hardware-accelerated image processing using ESP32-P4 PPA
- Multi-source image cycling: Display images from up to 10 different URLs with automatic cycling
- Hardware-accelerated processing: Fast image scaling and rotation using ESP32-P4 PPA
- Per-image transformations: Individual scale, offset, and rotation settings for each image
- Web-based configuration: Complete setup interface accessible via browser
- Home Assistant integration: Native MQTT discovery with full control and monitoring
- Touch controls: Single tap for next image, double tap to toggle modes
- Touch interface:
- Single tap: Next image
- Double tap: Toggle cycling/refresh modes
- Serial commands: Real-time manipulation via USB
- Transform controls: Scale (+/-), Move (WASD), Rotate (QE)
Supported Displays:
- Waveshare ESP32-P4-WIFI6-Touch-LCD-3.4C (800x800)
- Waveshare ESP32-P4-WIFI6-Touch-LCD-4C (720x720)
Specifications:
- ESP32-P4 MCU with WiFi 6
- DSI touch display
- GT911 capacitive touch controller
- 16MB flash, PSRAM support required
Optional 3D Printed Case:

- Arduino IDE (1.8.19 or later) or PlatformIO
- ESP32 Arduino Core (3.3.4+)
- Required Libraries:
- GFX Library for Arduino (1.6.3+)
- JPEGDEC (1.8.4+)
- PubSubClient (2.8.0+)

- Click the Upload button in Arduino IDE
- Monitor serial output for status messages
On first boot, the device automatically creates a WiFi access point for easy configuration:
Connection Steps:
-
Find the WiFi Network
- Network Name:
AllSky-Display-Setup - No password required
- Network Name:
-
Connect to the Network
- Use your phone, tablet, or computer
- Connect to
AllSky-Display-SetupWiFi - The display shows a QR code and connection instructions:

-
Configure WiFi
- Scan the QR code on the display with your phone, or
- A configuration page should open automatically (captive portal)
- If not, manually open a browser and go to:
http://192.168.4.1
- Click "Scan for Networks" to see available WiFi networks
- Select your WiFi network from the list
- Enter the WiFi password
- Click "Connect"
-
Device Connects and Restarts
- The device will connect to your WiFi network
- After successful connection, it will restart
- The display will show the assigned IP address
-
Access Web Interface
- Note the IP address shown on the display
- Open a browser and go to
http://[device-ip]:8080/ - Configure additional settings like MQTT, image sources, and display preferences

Alternative Setup:
- If you prefer to manually configure WiFi by editing source code, see MANUAL_SETUP.md
After connecting to WiFi, use the web interface to add image sources, or pre-configure them in config.cpp:
const char* DEFAULT_IMAGE_SOURCES[] = {
    "http://your-server.com/image1.jpg",
    "http://your-server.com/image2.jpg",
    // Add more as needed
};- Access:
http://[device-ip]:8080/ - Configure image sources, display settings, network, and MQTT
The device automatically integrates with Home Assistant when MQTT discovery is enabled:
Entities Created:
- Light: Brightness control (0-100%)
- Switches: Cycling enabled, Random order, Auto brightness
- Numbers: Cycle interval, Update interval, Per-image transforms (scale, offset, rotation)
- Select: Current image source selector
- Buttons: Reboot device, Next image, Reset transforms
- Sensors: Current image URL, Free heap, Free PSRAM, WiFi signal, Uptime, Image count
Setup:
- Configure MQTT broker settings in web interface
- Enable "Home Assistant Discovery" in MQTT settings
- Set device name and topic preferences (optional)
- Save and reconnect MQTT
- Device appears automatically in Home Assistant
All device controls and sensors will be available in Home Assistant for dashboards, automations, and scripts.
Use this script to automatically resize AllSky images to an optimal size for the display:
#!/bin/bash

# Configuration variables
INPUT_DIR="/home/pi/allsky/tmp"
OUTPUT_DIR="/home/pi/allsky/resized"
IMAGE_NAME="image.jpg"
RESIZE_DIMENSIONS="720x720"

# Create output directory if it doesn't exist
mkdir -p "${OUTPUT_DIR}"

# Resize allsky image on demand
/usr/bin/mogrify -path "${OUTPUT_DIR}" -resize "${RESIZE_DIMENSIONS}" "${INPUT_DIR}/${IMAGE_NAME}" >/dev/null 2>&1- Save the script as
/home/pi/allsky/scripts/resize_for_display.sh - Make it executable:
chmod +x /home/pi/allsky/scripts/resize_for_display.sh - In AllSky Web UI, go to Module Manager → Daytime or Night time capture → Add the 'Allsky script' module to the selected modules → add script path to the module config
- Point your display to
http://your-allsky-server/resized/image.jpg
- Save the script to
/home/pi/resize_allsky.sh - Make it executable:
chmod +x /home/pi/resize_allsky.sh - Edit crontab:
crontab -e - Add one of these lines based on your preference:
# Run every minute
* * * * * /home/pi/resize_allsky.sh

# Run every 5 minutes
*/5 * * * * /home/pi/resize_allsky.sh

# Run every 10 minutes
*/10 * * * * /home/pi/resize_allsky.sh- Save and exit
- Point your display to
http://your-allsky-server/current/resized/image.jpg
Note: Adjust RESIZE_DIMENSIONS based on your display model (720x720 for 4C, 800x800 for 3.4C).
The device provides a comprehensive web-based configuration interface accessible at http://[device-ip]:8080/. All settings can be configured through an intuitive UI without needing to recompile the firmware.


Single Tap  : Next image (cycling mode)
Double Tap  : Toggle cycling/refresh modes
+/-   : Scale image        R     : Reset transforms
W/S   : Move up/down       L/K   : Brightness
A/D   : Move left/right    B     : Reboot
Q/E   : Rotate CCW/CW      M/I/P : System info
- Compilation: Enable PSRAM, check ESP32 core version
- Memory: Monitor PSRAM usage in serial output
- Network: Verify WiFi credentials and image URL access
- Touch: Check GT911 I2C connections and debug output
- Serial output for comprehensive debugging
- Web interface for real-time system status
- Memory and network monitoring
- Fork the repository
- Create a feature branch
- Test thoroughly
- Submit a pull request
Open source project. Check license file for details.
- Create GitHub issues for bugs/features
- Check troubleshooting section
- Monitor serial output for debugging