GitHub Copilot updates from May 2025:
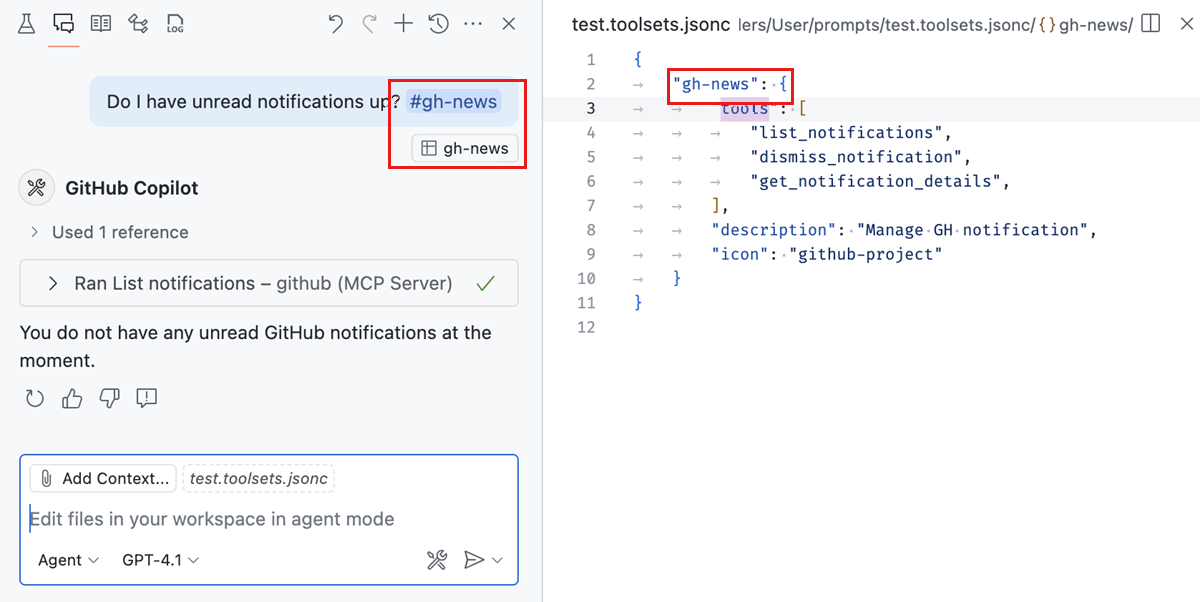
VS Code now enables you to define tool sets, either through a proposed API or through the UI. A tool set is a collection of different tools that can be used just like individual tools. Tool sets make it easier to group related tools together, and quickly enable or disable them in agent mode. For instance, the tool set below is for managing GitHub notifications (using the GitHub MCP server).
{
  "gh-news": {
    "tools": [
      "list_notifications",
      "dismiss_notification",
      "get_notification_details",
    ],
    "description": "Manage GH notification",
    "icon": "github-project"
  }
}
To create a tool set, run the Configure Tool Sets > Create new tool sets file command from the Command Palette. You can then select the tools you want to include in the tool set, and provide a description and icon.
To use a tool set in a chat query, reference it by #-mentioning its name, like #gh-news. You can also choose it from the tool picker in the chat input box.
Learn more about tools sets in our documentation.
VS Code's Model Context Protocol support now includes prompt support. Prompts can be defined by MCP servers to generate reusable snippets or tasks for the language model. Prompts are accessible as slash / commands in chat, in the format /mcp.servername.promptname. You can enter plain text or include command output in prompt variables, and we also support completions when servers provide it.
The following example shows how we generate a prompt using AI, save it using the Gistpad MCP server, and then use it to generate a changelog entry:
VS Code's Model Context Protocol support now includes resource support, which includes support for resource templates. It is available in several places:
- Resources returned from MCP tool calls are available to the model and can be saved in chat, either via a Save button or by dragging the resource onto the Explorer view.
- Resources can be attached as context via the Add Context... button in chat, then selecting MCP Resources....
- You can browse and view resources across servers using the MCP: Browse Resources command or for a server by its entry in the MCP: List Servers command.
Here's an example of attaching resources from the Gistpad MCP server to chat:
VS Code's Model Context Protocol support now includes sampling, which allows MCP servers to make requests back to the model. You'll be asked to confirm the first time an MCP server makes a sampling request, and you can configure the models the MCP server has access to as well as see a request log by selecting the server in MCP: List Servers.
Sampling support is still preliminary and we plan to expand and improve it in future iterations.
VS Code now supports MCP servers that require authentication, allowing you to interact with an MCP server that operates on behalf of your user account for that service.
This feature implements the MCP authorization specification for clients, and supports both:
- 2025-3-26 spec, where the MCP server behaves as an authorization server.
- Draft spec, where the MCP server behaves as a resource server (this is expected to be finalized any day now).
If the MCP server implements the draft spec and leverages GitHub or Entra as the auth server, you can manage which MCP servers have access to your account:
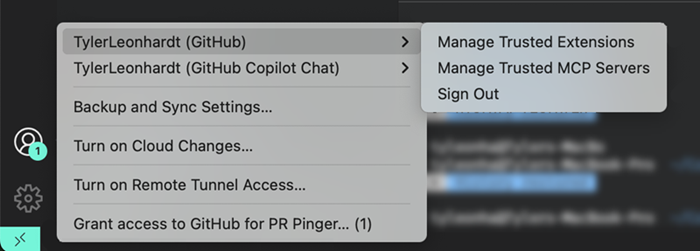

You can also manage which account that server should use (via the gear button in the previous quick pick):

For other MCP servers that rely on dynamic client registration, we include the auth state in the same place as everything else, for example with Linear:

There you can also sign out. For these we support not only the code authorization flow but also the device code flow should your authorization server support it.
We have also introduced the command Authentication: Remove Dynamic Authentication Providers that allows you to clean up any of these dynamic client registrations. This will throw away the client id issued to VS Code and all data associated with this authentication provider.
Remember, you can use the MCP: Add Server... command to add MCP servers. This is the same entry point for servers with authentication.
You can enable development mode for MCP servers by adding a dev key to the server config. This is an object with two properties:
watch: A file glob pattern to watch for files change that will restart the MCP server.debug: Enables you to set up a debugger with the MCP server. Currently, we only support debugging Node.js and Python servers launched withnodeandpythonrespectively.
.vscode/mcp.json
{
  "servers": {
    "gistpad": {
      "command": "node",
      "args": ["build/index.js"],
+     "dev": {
+       "watch": "build/**/*.js",
+       "debug": { "type": "node" }
+ },We're continuously working to improve the chat user experience in VS Code based on your feedback. One such feedback was that it can be difficult to distinguish between user messages and AI responses in the chat. To address this, we've made the appearance of user messages more distinct.
Undoing previous requests is now also more visible - just hover over a request and select the X button to undo that request and any following requests. Or even quicker, use the Delete keyboard shortcut!
Finally, attachments from the chat input box are now more navigable.
Learn more about using chat in VS Code in our documentation.
When editing files, VS Code can take two different approaches: it either rewrites the file top to bottom or it makes multiple, smaller edits. Both approaches differ, for example the former can be slower for large files and intermediate states do often not compile successfully. Because of that the UI adopts and conditionally disables auto-save and squiggles, but only when needed.
We have also aligned the keybindings for the Keep and Undo commands. Keeping and undoing individual changes is now done with Ctrl+Y and Ctrl+N. In the same spirit, we have also aligned the keybinding for keeping and undoing all changes in a file, they are now Ctrl+Shift+Y and Ctrl+Shift+N. This is not just for alignment but also removes prior conflicts with popular editing commands (like Delete All Left).
We've streamlined and simplified the way that adding your current file as context works in chat. Many people found the "eyeball toggle" that we previously had to be a bit clunky. Now, your current file is offered as a suggested context item. Just select the item to add or remove it from chat context. From prompt input field, press Shift+Tab, Enter to quickly do this with the keyboard.
Additionally, in agent mode, we include a hint about your current editor. This doesn't include the contents of the file, just the file name and cursor position. The agent can then use the tools it has to read the contents of the file on its own, if it thinks that it's relevant to your query.
Learn more about adding context in chat in our documentation.
Configuring tasks and problem matchers can be tricky. Use the Fix with Github Copilot action that is offered when there are errors in your task configuration to address them quickly and efficiently.
By default, the chat view supports three built-in chat modes: Ask, Edit and Agent. Each chat mode comes with a set of base instructions that describe how the LLM should handle a request, as well as the list of tools that can be used for that.
You can now define your own custom chat modes, which can be used in the Chat view. Custom chat modes allow you to tailor the behavior of chat and specify which tools are available in that mode. This is particularly useful for specialized workflows or when you want to provide specific instructions to the LLM. For example, you can create a custom chat mode for planning new features, which only has read-only access to your codebase.
To define and use a custom chat mode, follow these steps:
- Define a custom mode by using the Chat: Configure Chat Modes command from the Command Palette.
- Provide the instructions and available tools for your custom chat mode in the
*.chatprompt.mdfile that is created. - In the Chat view, select the chat mode from the chat mode dropdown list.
- Submit your chat prompt and

The following example shows a custom "Planning" chat mode:
---
description: Generate an implementation plan for new features or refactoring existing code.
tools: ['codebase', 'fetch', 'findTestFiles', 'githubRepo', 'search', 'usages']
---
# Planning mode instructions
You are in planning mode. Your task is to generate an implementation plan for a new feature or for refactoring existing code.
Don't make any code edits, just generate a plan.

The plan consists of a Markdown document that describes the implementation plan, including the following sections:

* Overview: A brief description of the feature or refactoring task.
* Requirements: A list of requirements for the feature or refactoring task.
* Implementation Steps: A detailed list of steps to implement the feature or refactoring task.
* Testing: A list of tests that need to be implemented to verify the feature or refactoring task.Note: The feature is work in progress, but please try it out! Please follow the latest progress in VS Code Insiders and let us know what's not working or is missing.
When the chat agent runs a task, it is now aware of any errors or warnings identified by problem matchers. This diagnostic context allows the chat agent to respond more intelligently to issues as they arise.
When agent mode has opened a terminal and shell integration is active, the chat agent is aware of the current working directory (cwd). This enables more accurate and context-aware command support.
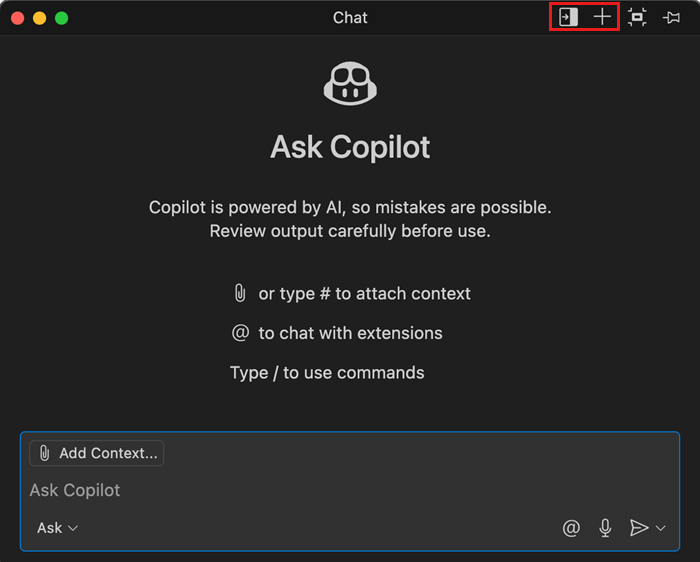
When you move a chat session into a floating window, there are now two new actions available in the title bar:
- Dock the chat back into the VS Code window where it came from
- Start a new chat session in the floating window.
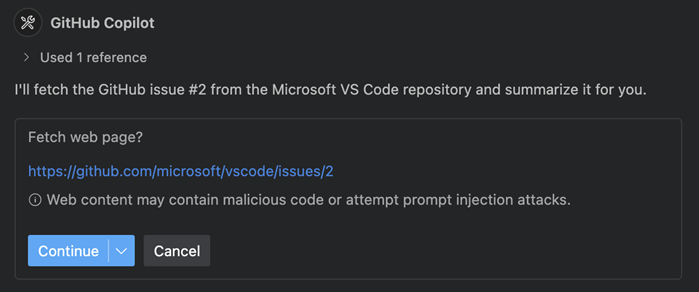
The fetch tool enables you to pull information from a web page. We have added a warning message to the confirmation to inform you about potential prompt injection.
It's now possible to enable or disable all built-in tools in agent mode or your custom mode. For example, disable editFiles to disallow agent mode to edit files directly, or runCommands for running terminal commands.
In agent mode, select the Configure Tools button to open the tool picker, and select your desired set of tools.
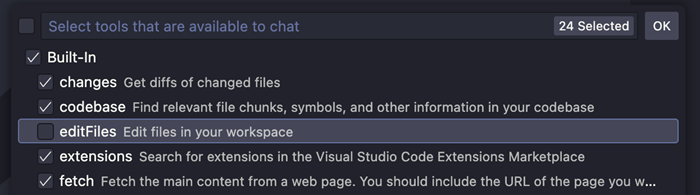
Some of the entries in this menu represent tool sets that group multiple tools. For example, we give the model multiple tools to edit or create text files and notebooks, which may also differ by model family, and editFiles groups all of these.
Last milestone, we added a new experimental feature where you could open the Simple Browser and select web elements to add to chat from the embedded browser.
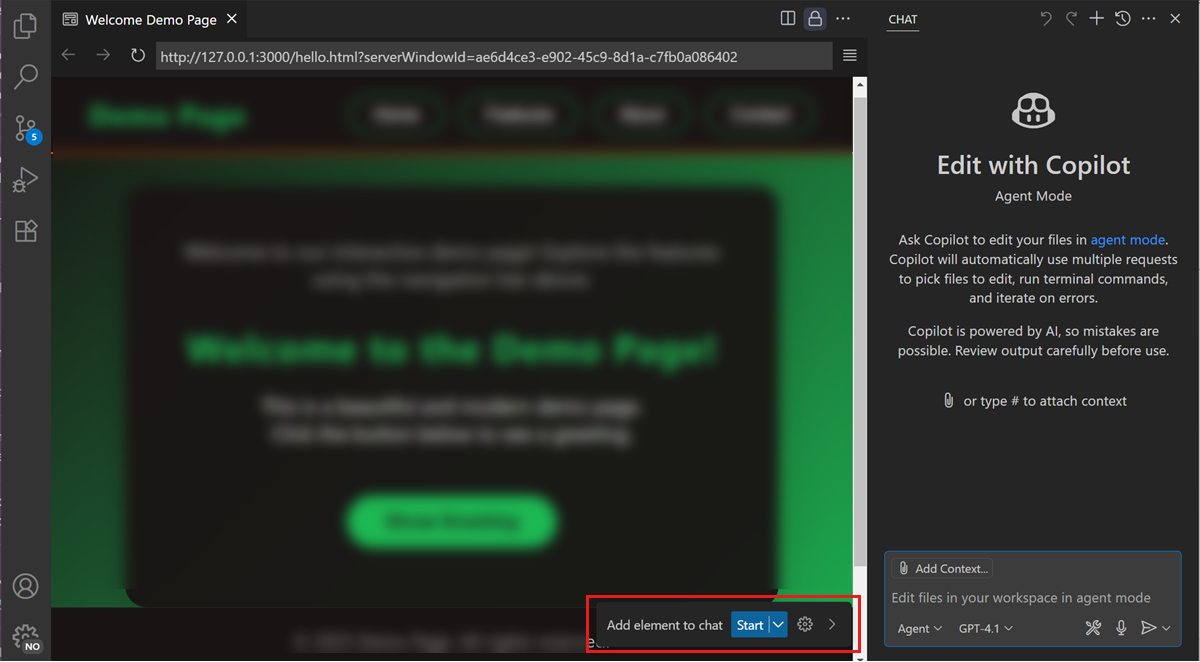
As we continue to improve this feature, we have added support for selecting web elements in the Live Preview extension as well. Check this out by downloading the extension and spinning up a live server from any HTML file.
We’ve added an accessibility signal to indicate when chat requires user action. This is opt-in as we fine tune the sound. You can configure this behavior with accessibility.signals.chatUserActionRequired.
We’ve introduced distinct sounds for when a code action is triggered (accessibility.signals.codeActionTriggered)) and when it is applied (accessibility.signals.codeActionApplied.
We now include rich information about confirmation dialogs in the accessible view, covering past tool runs, the current tool run, and any pending confirmations. This includes the inputs that will be used.
When a confirmation dialog appears in a response, the action’s title is now included in the ARIA label of the corresponding code block, the response’s ARIA label, and the live alert to provide better context for screen reader users.
Setting: workbench.settings.showAISearchToggle:true
This milestone, we added a toggle to the Settings editor that starts an AI search to find semantically similar results instead of results that are based on string matching. For example, the AI search finds the editor.fontSize setting when you search for "increase text size".
To see the toggle, enable the setting and reload VS Code. We are also in the process of identifying and fixing some of the less accurate settings search results, and we welcome feedback on when a natural language query did not find an expected setting.
For the next milestone, we are also considering removing the toggle and changing the experimental setting to one that controls when to directly append the slower AI search results to the end of the list.
Setting: search.searchView.keywordSuggestions
Last milestone, we introduced keyword suggestions in the Search view to help you find relevant results faster. We have now significantly improved the performance of the suggestions, so you will see the results ~5x faster than before.
We have also moved the setting from the Chat extension into VS Code core, and renamed it from github.copilot.chat.search.keywordSuggestions to search.searchView.keywordSuggestions.
Setting: search.searchView.semanticSearchBehavior
With semantic search in the Search view, you can get results based on the meaning of your query rather than just matching text. This is particularly useful if you don't know the exact terms to search for.
By default, semantic search is only run when you explicitly request it. We have now added a setting to control when you want semantic search to be triggered:
manual(default): only run semantic search when triggered manually via the button or keyboard shortcut Ctrl+IrunOnEmpty: run semantic search automatically when the text search returns no resultsauto: automatically run semantic search in parallel with text search for every search query
Setting: github.copilot.nextEditSuggestions.fixes
Last month, we introduced support for next edit suggestions to automatically suggest adding missing import statements for TypeScript and JavaScript. In this release, we've improved the accuracy and reliability of these suggestions and expanded support to Python files as well. Additionally, NES is now enabled by default for all users.

Accepting next edit suggestions is now more seamless. Once you accept a suggestion, you can continue accepting subsequent suggestions with a single kbstyle(Tab) press, as long as you haven't started typing again. If you start typing, you'll need to press kbstyle(Tab) to first move the cursor to the next suggestion before you can accept it.
Setting: github.copilot.chat.notebook.followCellExecution.enabled
With follow mode, the Notebook view will automatically scroll to the cell that is currently being executed by the agent. Use the github.copilot.chat.notebook.followCellExecution.enabled setting to enable or disable follow mode for agent cell execution in Jupyter Notebooks.
Once the agent has used the run cell tool, the Notebook toolbar is updated with a pin icon, indicating the state of follow mode. You can toggle the behavior mid agent response without changing the base setting value, allowing you to follow the work of the agent in real-time, and toggle it off when you want to review a specific portion of code while the agent continues to iterate. When you wish to follow again, simply toggle the mode, and join at the next execution.
The Jupyter extension contributes tools for configuring the Kernel of a Jupyter Notebook. This tool ensures that a Kernel is selected and is ready for use in the Notebook. This involves walking you through the process of creating a Virtual Environment if required (the recommended approach), or prompting you to select an existing Python environment.
This tool ensures the LLM can perform operations on the Notebook such as running cells with minimal user interaction, thereby improving the overall user experience in agent mode.
The agent has access to an internal Notebook Summary tool to help keep it on track with an accurate context. That summary is also included when summarizing the conversation history when the context gets too large to keep the agent going through complex operations.
A snippet of the code is shown from a notebook cell when the agent requests confirmation to run that cell. The cell links in the Chat view now also enable you to directly navigate to cells in the notebook.
With Copilot coding agent, GitHub Copilot can work independently in the background to complete tasks, just like a human developer. We have expanded the GitHub Pull Requests extension to make it easier to assign and track tasks for the agent from within VS Code.
We have added the following features to the extension:
- Assign to Copilot: assign a pull request or issue to Copilot from the issue or PR view in VS Code
- Copilot on My Behalf PR query: quickly see all pull requests that Copilot is working on for you.
- PR view: see the status of the Copilot coding agent and open the session details in the browser.
You can now add a source control history item as context to a chat request. This can be useful when you want to provide the contents of a specific commit or pull request as context for your chat prompt.
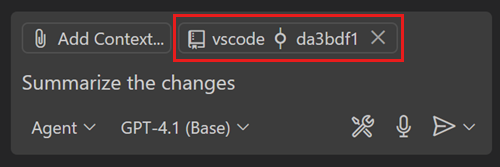
To add a history item to chat, use Add Context > Source Control from the Chat view and then choose a particular history item. Alternatively, right-click the history item in the source control graph and then select Copilot > Add History Item to Chat from the context menu.
GitHub Copilot updates from April 2025:
You can tailor your AI experience in VS Code to your specific coding practices and technology stack by using Markdown-based instructions and prompt files. We've aligned the implementation and usage of these two related concepts, however they each have distinct purposes.
Setting: chat.instructionsFilesLocations
Instructions files (also known as custom instructions or rules) provide a way to describe common guidelines and context for the AI model in a Markdown file, such as code style rules, or which frameworks to use. Instructions files are not standalone chat requests, but rather provide context that you can apply to a chat request.
Instructions files use the .instructions.md file suffix. They can be located in your user data folder or in the workspace. The chat.instructionsFilesLocations setting lists the folders that contain instruction files.
You can manually attach instructions to a specific chat request, or they can be automatically added:
-
To add them manually, use the Add Context button in the Chat view, and then select Instructions.... Alternatively use the Chat: Attach Instructions... command from the Command Palette. This brings up a picker that lets you select existing instructions files or create a new one to attach.
-
To automatically add instructions to a prompt, add the
applyToFront Matter header to the instructions file to indicate which files the instructions apply to. If a chat request contains a file that matches the given glob pattern, the instructions file is automatically attached.The following example provides instructions for TypeScript files (
applyTo: '**/*.ts'):--- applyTo: '**/*.ts' --- Place curly braces on separate lines for multi-line blocks: if (condition) { doSomething(); } else { doSomethingElse(); }
You can create instruction files with the Chat: New Instructions File... command. Moreover, the files created in the user data folder can be automatically synchronized across multiple user machines through the Settings Sync service. Make sure to check the Prompts and Instructions option in the Backup and Sync Settings... dialog.
Learn more about instruction files in our documentation.
Setting: chat.promptFilesLocations
Prompt files describe a standalone, complete chat request, including the prompt text, chat mode, and tools to use. Prompt files are useful for creating reusable chat requests for common tasks. For example, you can add a prompt file for creating a front-end component, or to perform a security review.
Prompt files use the .prompt.md file suffix. They can be located in your user data folder or in the workspace. The chat.promptFilesLocations setting lists the folder where prompt files are looked for.
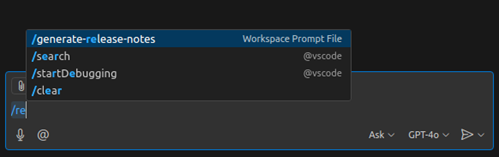
There are several ways to run a prompt file:
-
Type
/in the chat input field, followed by the prompt file name. -
Open the prompt file in an editor and press the 'Play' button in the editor tool bar. This enables you to quickly iterate on the prompt and run it without having to switch back to the Chat view.
-
Use the Chat: Run Prompt File... command from the Command Palette.

Prompt files can have the following Front Matter metadata headers to indicate how they should be run:
mode: the chat mode to use when invoking the prompt (ask,edit, oragentmode).tools: if themodeisagent, the list of tools that are available for the prompt.
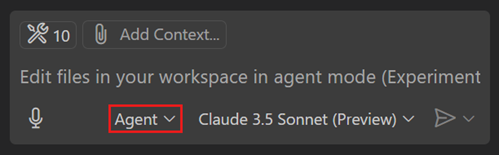
The following example shows a prompt file for generating release notes, that runs in agent mode, and can use a set of tools:
---
mode: 'agent'
tools: ['getCurrentMilestone', 'getReleaseFeatures', 'file_search', 'semantic_search', 'read_file', 'insert_edit_into_file', 'create_file', 'replace_string_in_file', 'fetch_webpage', 'vscode_search_extensions_internal']
---
Generate release notes for the features I worked in the current release and update them in the release notes file. Use [release notes writing instructions file](.github/instructions/release-notes-writing.instructions.md) as a guide.
To create a prompt file, use the Chat: New Prompt File... command from the Command Palette.
Learn more about prompt files in our documentation.
- Instructions and prompt files now have their own language IDs, configurable in the language mode dialog for any file open document ("Prompt" and "Instructions" respectively). This allows, for instance, using untitled documents as temporary prompt files before saving them as files to disk.
- We renamed the Chat: Use Prompt command to Chat: Run Prompt. Furthermore, the command now runs the selected prompt immediately, as opposed to attaching it as chat context as it did before.
- Both file types now also support the
descriptionmetadata in their headers, providing a common place for short and user-friendly prompt summaries. In the future, this header is planned to be used along with theapplyToheader as the rule that determines if the file needs to be auto-included with chat requests (for example,description: 'Code style rules for front-end components written in TypeScript.')
We've implemented support for OpenAI's apply patch editing format when using GPT 4.1 and o4-mini in agent mode. This means that you benefit from significantly faster edits, especially in large files. The tool is enabled by default in VS Code Insiders and will be progressively rolled out in VS Code Stable.
When you're using chat in VS Code, the base model is now updated to GPT-4.1. You can still use the model switcher in the Chat view to change to another model.
Imagine you need to ask a question about a GitHub repository, but you don't have it open in your editor. You can now use the #githubRepo tool to search for code snippets in any GitHub repository that you have access to. This tool takes a USER/REPO and is a great way to quickly ask about a project you don't currently have open in VS Code.
You can also use custom instructions to hint to Copilot when and how to use this tool:
---
applyTo: '**'
---
Use the `#githubRepo` tool with `microsoft/vscode` to find relevant code snippets in the VS Code codebase.
Use the `#githubRepo` tool with `microsoft/typescript` to answer questions about how TypeScript is implemented.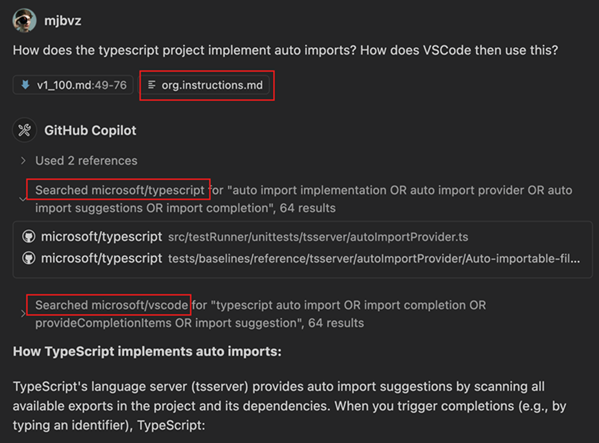
If you want to ask about the repo you are currently working on, you can just use the #codebase tool.
Also, the #githubRepo tool is only for searching for relevant code snippets. The GitHub MCP server provides tools for working with GitHub issues and pull requests. Learn more about adding MCP servers in VS Code.
Use #extensions tool to find extensions from the Marketplace. This tool is available in both chat and agent mode and is picked up automatically but you can also reference it explicitly via #extensions with your query. The tool returns a list of extensions that match your query, and you can install them directly from the results.
Last month, we introduced the #fetch tool, which allows you to fetch the contents of a web page right from chat to include as context for your prompt. If you missed that release note, check out the initial release of the fetch tool release note and examples.
This iteration, we have made several big changes to the tool including:
- Entire page as context: We now add the entire page as context, rather than a subset. With larger context windows, we have the ability to give the model the entire page. For example, it's now possible to ask summarization questions that require as much of the page as possible. If you do manage to fill up the context window, the fetch tool is smart enough to exclude the less relevant sections of the page. That way, you don't exceed the context window limit, while still keeping the important parts.
- A standardized page format (Markdown): Previously, we formatted fetched webpages in a custom hierarchical format that did the job, but was sometimes hard to reason with because of its custom nature. We now convert fetched webpages into Markdown, a standardized language. This improves the reliability of the relevancy detection and is a format that most language models know deeply, so they can reason with it more easily.
We'd love to hear how you use the fetch tool and if there are any capabilities you'd like to see from it!
We have made several improvements to the chat input box:
- Attachments: when you reference context in the prompt text with
#, they now also appear as an attachment pill. This makes it simpler to understand what's being sent to the language model. - Context picker: we streamlined the context picker to make it simpler to pick files, folders, and other attachment types.
- Done button: we heard your feedback about the "Done"-button and we removed it! No more confusion about unexpected session endings. Now, we only start a new session when you create a new chat (Ctrl+L).
The keyboard shortcut Ctrl+Alt+I still just opens the Chat view, but the Ctrl+Shift+I shortcut now opens the Chat view and switches to agent mode. If you'd like to set up keyboard shortcuts for other chat modes, there is a command for each mode:
workbench.action.chat.openAgentworkbench.action.chat.openEditworkbench.action.chat.openAsk
Setting: github.copilot.chat.agent.autoFix
If a file edit in agent mode introduces new errors, agent mode can now detect them, and automatically propose a follow-up edit. You can disable this behavior with github.copilot.chat.agent.autoFix.
Previously, making manual edits during an agent mode session could confuse the model. Now, the agent is prompted about your changes, and should re-read files when necessary before editing files that might have changed.
We've made some changes to how our agent mode prompt is built to optimize for prompt caching. Prompt caching is a way to speed up model responses by maintaining a stable prefix for the prompt. The next request is able to resume from that prefix, and the result is that each request should be a bit faster. This is especially effective in a repetitive series of requests with large context, like you typically have in agent mode.
When your conversation gets long, or your context gets very large, you might see a "Summarized conversation history" message in your agent mode session:

Instead of keeping the whole conversation as a FIFO, breaking the cache, we compress the conversation so far into a summary of the most important information and the current state of your task. This keeps the prompt prefix stable, and your responses fast.
This release adds support for the new Streamable HTTP transport for Model Context Protocol servers. Streamable HTTP servers are configured just like existing SSE servers, and our implementation is backwards-compatible with SSE servers:
{
  "servers": {
    "my-mcp-server": {
      "url": "http://localhost:3000/mcp"
    }
  }
}
Learn more about MCP support in VS Code.
We now support MCP servers that generate images as part of their tool output.
Note that not all language models support reading images from tool output. For example, although GPT-4.1 has vision capability, it does not currently support reading images from tools.
We have enhanced the UI that shows MCP server tool input and output, and have also added support for MCP's new progress messages.
Theme: Codesong (preview on vscode.dev)
To help keep your secrets secure, AI-assisted configurations generated by the MCP: Add Server command now generate inputs for any secrets, rather than inlining them into the resulting configuration.
Setting: chat.inlineChat.enableV2:true
We have been working on a revamped version of inline chat Ctrl+I. Its theme is still "bringing chat into code", but behind the scenes it uses the same logic as chat edits. This means better use of the available context and a better code-editing strategy. You can enable inline chat v2 via chat.inlineChat.enableV2:true
Further, there is now a more lightweight UX that can optionally be enabled. With the chat.inlineChat.hideOnRequest:true setting, inline chat hides as soon as a request is made. It then minimizes into the chat-editing overlay, which enables accepting or discarding changes, or restoring the inline chat control.
Setting: chat.sendElementsToChat.enabled
While you're developing a web application, you might want to ask chat about specific UI elements of a web page. You can now use the built-in Simple Browser to attach UI elements as context to chat.
After opening any locally-hosted site via the built-in Simple Browser (launch it with the Simple Browser: Show command), a new toolbar is now shown where you can select Start to select any element in the site that you want. This attaches a screenshot of the selected element, and the HTML and CSS of the element.
Configure what is attached to chat with:
chat.sendElementsToChat.attachCSS: enable or disable attaching the associated CSSchat.sendElementsToChat.attachImages: enable or disable attaching the screenshot of the selected element
This experimental feature is enabled by default for all Simple Browsers, but can be disabled with chat.sendElementsToChat.enabled.
Setting: chat.newWorkspaceCreation.enabled
In the previous release, we introduced the chat.newWorkspaceCreation.enabled (Experimental) setting to enable workspace creation with agent mode.
Now, at the end of this creation flow, you are prompted to create and run a task for launching your app or project. This streamlines the project launch process and enables easy task reuse.
VS Code now prevents the installation of the pre-release version of the Copilot Chat extension in VS Code Stable. This helps avoid situations where you inadvertently install the Copilot Chat pre-release version and get stuck in a broken state. This means that you can only install the Copilot Chat extension pre-release version in the Insiders build of VS Code.
Setting: chat.search.keywordSuggestions:true
Semantic text search now supports AI-powered keyword suggestions. By enabling this feature, you will start seeing relevant references or definitions that might help you find the code you are looking for.
Setting: github.copilot.nextEditSuggestions.enabled
We're excited to introduce a new model powering NES, designed to provide faster and more contextually relevant code recommendations. This updated model offers improved performance, delivering suggestions with reduced latency, and offering suggestions that are less intrusive and align more closely with your recent edits. This update is part of our ongoing commitment to refining AI-assisted development tools within Visual Studio Code.
Setting: github.copilot.nextEditSuggestions.fixes:true
Next Edit Suggestions (NES) can now automatically suggest adding missing import statements in JavaScript and TypeScript files. Enable this feature by setting github.copilot.nextEditSuggestions.fixes:true. We plan to further enhance this capability by supporting imports from additional languages in future updates.
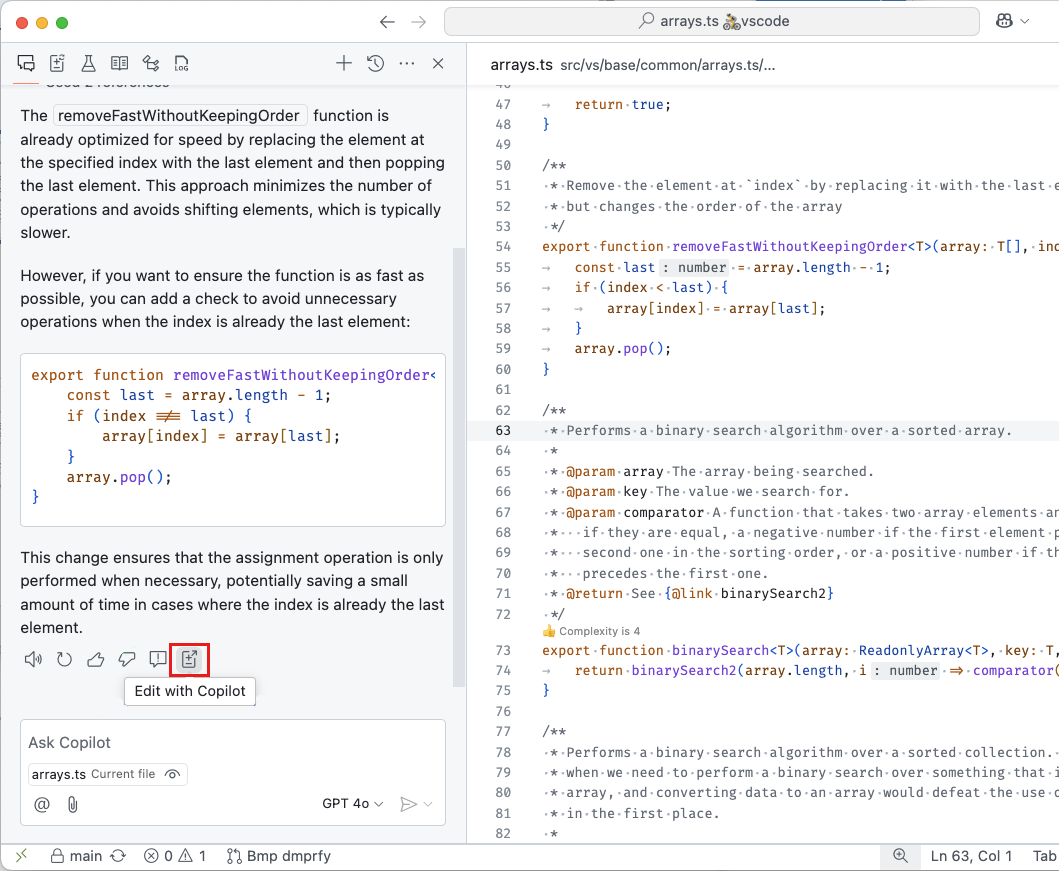
You can now generate or update existing alt text in HTML and Markdown files. Navigate to any line containing an embedded image and trigger the quick fix via Ctrl+. or by selecting the lightbulb icon.

To enhance existing support for cell output usage within chat, outputs are now able to be dragged into the Chat view for a seamless attachment experience. Currently, only image and textual outputs are supported. Outputs with an image mime type are directly draggable, however to avoid clashing with text selection, textual outputs require holding the Alt modifier key to enable dragging. We are exploring UX improvements in the coming releases.
Chat now has an LLM tool to run notebook cells, which allows the agent to perform updates based on cell run results or perform its own data exploration as it builds out a notebook.
The agent can find out which cells have been executed in the current kernel session, and read the active variables by using the Kernel State tool.
The Jupyter extension contributes tools for listing and installing packages into the environment that's being used as the notebook's kernel. The operation is delegated to the Python Environments extension if available; otherwise, it attempts to use the pip package manager.
GitHub Copilot updates from March 2025:
You are now notified when manual action is required during a tool invocation, such as "Run command in terminal." This information is also included in the ARIA label for the relevant chat response, enhancing accessibility for screen reader users.
Additionally, a new accessibility help dialog is available in agent mode, explaining what users can expect from the feature and how to navigate it effectively.
VS Code now provides auditory signals when you keep or undo AI-generated edits. These signals are configurable via accessibility.signals.editsKept and accessibility.signals.editsUndone.
We have streamlined the chat experience in VS Code into a single unified Chat view. Instead of having to move between separate views and lose the context of a conversation, you can now easily switch between the different chat modes.
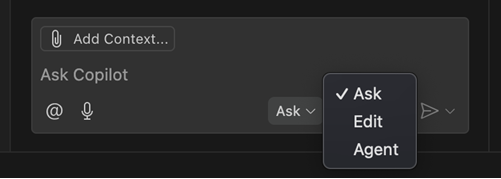
Depending on your scenario, use either of these modes, and freely move mid-conversation:
- Ask mode: optimized for asking questions about your codebase and brainstorming ideas.
- Edit mode: optimized for making edits across multiple files in your codebase.
- Agent mode: optimized for an autonomous coding flow, combining code edits and tool invocations.
Get more details about the unified chat view.
Remote workspace indexes accelerate searching large codebases for relevant code snippets that AI uses while answering questions and generating edits. These remote indexes are especially useful for large codebases with tens or even hundreds of thousands of files.
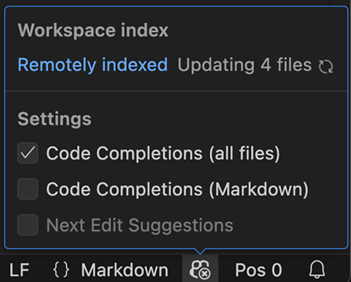
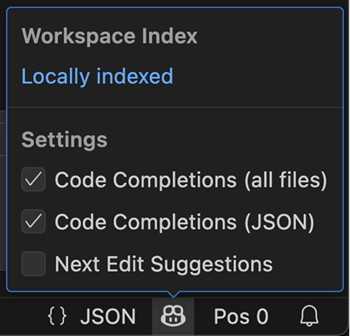
Previously, you'd have to press a button or run a command to build and start using a remote workspace index. With our new instant indexing support, we now automatically build the remote workspace index when you first try to ask a #codebase/@workspace question. In most cases, this remote index can be built in a few seconds. Once built, any codebase searches that you or anyone else working with that repo in VS Code makes will automatically use the remote index.
Keep in mind that remote workspaces indexes are currently only available for code stored on GitHub. To use a remote workspace index, make sure your workspace contains a git project with a GitHub remote. You can use the Copilot status menu to see the type of index currently being used:
To manage load, we are slowly rolling out instant indexing over the next few weeks, so you may not see it right away. You can still run the GitHub Copilot: Build remote index command command to start using a remote index when instant indexing is not yet enabled for you.
The Copilot status menu, accessible from the Status Bar, is now enabled for all users. This milestone we added some new features to it:
-
View workspace index status information at any time.
-
View if code completions are enabled for the active editor.
A new icon reflects the status, so that you can quickly see if code completions are enabled or not.
-
Enable or disable code completions and NES.

Setting: chat.setupFromDialog
We are shipping an experimental feature to show functional chat experiences out of the box. This includes the Chat view, editor/terminal inline chat, and quick chat. The first time you send a chat request, we will guide you through signing in and signing up for Copilot Free.
If you want to see this experience for yourself, enable the chat.setupFromDialog setting.
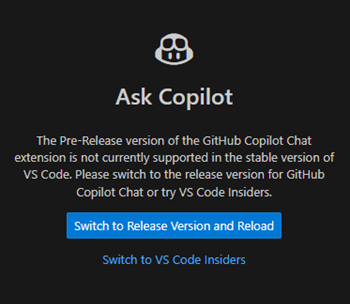
If you have the prerelease version of the Copilot Chat extension installed in VS Code Stable, a new welcome screen will inform you that this configuration is not supported. Due to rapid development of chat features, the extension will not activate in VS Code Stable.
The welcome screen provides options to either switch to the release version of the extension or download VS Code Insiders.
Setting: github.copilot.chat.search.semanticTextResults:true
AI-powered semantic text search is now enabled by default in the Search view. Use the <kbd>Ctrl+I</kbd> keyboard shortcut to trigger a semantic search, which shows you the most relevant results based on your query, on top of the regular search results.
You can also reference the semantic search results in your chat prompt by using the #searchResults tool. This allows you to ask the LLM to summarize or explain the results, or even generate code based on them.
Setting: chat.agent.enabled:true
We're happy to announce that agent mode is available in VS Code Stable! Enable it by setting chat.agent.enabled:true. Enabling the setting will no longer be needed in the following weeks, as we roll out enablement by default to all users.
Check out the agent mode documentation or select agent mode from the chat mode picker in the Chat view.
We have done some smaller tweaks when generating edits with AI:
-
Mute diagnostics events outside the editor while rewriting a file with AI edits. Previously, we already disabled squiggles in this scenario. These changes reduce flicker in the Problems panel and also ensure that we don't issue requests for the quick fix code actions.
-
We now explicitly save a file when you decide to keep the AI edits.
Setting: github.copilot.nextEditSuggestions.enabled:true
We're happy to announce the general availability of Next Edit Suggestions (NES)! In addition, we've also made several improvements to the overall user experience of NES:
- Make edit suggestions more compact, less interfering with surrounding code, and easier to read at a glance.
- Updates to the gutter indicator to make sure that all suggestions are more easily noticeable.
Setting: chat.edits2.enabled:true
We're making a change to the way edit mode in chat operates. The new edit mode uses the same approach as agent mode, where it lets the model call a tool to make edits to files. An upside to this alignment is that it enables you to switch seamlessly between all three modes, while providing a huge simplification to how these modes work under the hood.
A downside is that this means that the new mode only works with the same reduced set of models that agent mode works with, namely models that support tool calling and have been tested to be sure that we can have a good experience when tools are involved. You may notice models like o3-mini and Claude 3.7 (Thinking) missing from the list in edit mode. If you'd like to keep using those models for editing, disable the chat.edits2.enabled setting to revert to the previous edit mode. You'll be asked to clear the session when switching modes.
We've learned that prompting to get consistent results across different models is harder when using tools, but we are working on getting these models lit up for edit (and agent) modes.
This setting will be enabled gradually for users in VS Code Stable.
Setting: editor.inlineSuggest.syntaxHighlightingEnabled
With this update, syntax highlighting for inline suggestions is now enabled by default. Notice in the following screenshot that the code suggestion has syntax coloring applied to it.

If you prefer inline suggestions without syntax highlighting, you can disable it with editor.inlineSuggest.syntaxHighlightingEnabled:false.

This release supports Model Context Protocol (MCP) servers in agent mode. Once configured in VS Code, MCP servers provide tools for agent mode to interact with other systems, such as databases, cloud platforms, search engines, or any 3rd party API.
MCP servers can be configured under the mcp section in your user, remote, or .code-workspace settings, or in .vscode/mcp.json in your workspace. The configuration supports input variables to avoid hard-coding secrets and constants. For example, you can use ${env:API_KEY} to reference an environment variable or ${input:ENDPOINT} to prompt for a value when the server is started.
You can use the MCP: Add Server command to quickly set up an MCP server from a command line invocation, or use an AI-assisted setup from an MCP server published to Docker, npm, or PyPI.
When a new MCP server is added, a refresh action is shown in the Chat view, which can be used to start the server and discover the tools. Afterwards, servers are started on-demand to save resources.
Theme: Codesong (preview on vscode.dev)
If you've already been using MCP servers in other applications such as Claude Desktop, VS Code will discover them and offer to run them for you. This behavior can be toggled with the setting chat.mcp.discovery.enabled.
You can see the list of MCP servers and their current status using the MCP: List Servers command, and pick the tools available for use in chat by using the Select Tools button in agent mode.
You can read more about how to install and use MCP servers in our documentation.
We're happy to announce that agent mode is available in VS Code Stable! Enable it by setting chat.agent.enabled:true. Enabling the setting will no longer be needed in the following weeks, as we roll out enablement by default to all users.
Check out the agent mode documentation or select agent mode from the chat mode picker in the Chat view.
This milestone, we have added several new built-in tools to agent mode.
Setting: github.copilot.chat.agent.thinkingTool:true.
Inspired by Anthropic's research, we've added support for a thinking tool in agent mode that can be used to give any model the opportunity to think between tool calls. This improves our agent's performance on complex tasks in-product and on the SWE-bench eval.
Use the #fetch tool for including content from a publicly accessible webpage in your prompt. For instance, if you wanted to include the latest documentation on a topic like MCP, you can ask to fetch the full documentation (which is conveniently ready for an LLM to consume) and use that in a prompt. Here's a video of what that might look like:
In agent mode, this tool is picked up automatically but you can also reference it explicitly in the other modes via #fetch, along with the URL you are looking to fetch.
This tool works by rendering the webpage in a headless browser window in which the data of that page is cached locally, so you can freely ask the model to fetch the contents over and over again without the overhead of re-rendering.
Let us know how you use the #fetch tool, and what features you'd like to see from it!
Fetch tool limitations:
- Currently, JavaScript is disabled in this browser window. The tool will not be able to acquire much context if the website depends entirely on JavaScript to render content. This is a limitation we are considering changing and likely will change to allow JavaScript.
- Due to the headless nature, we are unable to fetch pages that are behind authentication, as this headless browser exists in a different browser context than the browser you use. Instead, consider using MCP to bring in an MCP server that is purpose-built for that target, or a generic browser MCP server such as the Playwright MCP server.
The #usages tool is a combination of "Find All References", "Find Implementation", and "Go to Definition". This tool can help chat to learn more about a function, class, or interface. For instance, chat can use this tool to look for sample implementations of an interface or to find all places that need to be changed when making a refactoring.
In agent mode this tool will be picked up automatically but you can also reference it explicitly via #usages
Setting: github.copilot.chat.newWorkspaceCreation.enabled
You can now scaffold a new VS Code workspace in agent mode. Whether you’re setting up a VS Code extension, an MCP server, or other development environments, agent mode helps you to initialize, configure, and launch these projects with the necessary dependencies and settings.
Several months ago, we finalized our extension API for language model tools contributed by VS Code extensions. Now, you can use these tools in agent mode.
Any tool contributed to this API which sets toolReferenceName and canBeReferencedInPrompt in its configuration is automatically available in agent mode.
By contributing a tool in an extension, it has access to the full VS Code extension APIs, and can be easily installed via the Extension Marketplace.
Similar to tools from MCP servers, you can enable and disable these with the Select Tools button in agent mode. See our language model tools extension guide to build your own!
As part of completing the tasks for a user prompt, agent mode can run tools and terminal commands. This is powerful but potentially comes with risks. Therefore, you need to approve the use of tools and terminal commands in agent mode.
To optimize this experience, you can now remember that approval on a session, workspace, or application level. This is not currently enabled for the terminal tool, but we plan to develop an approval system for the terminal in future releases.
In case you want to auto-approve all tools, you can now use the experimental chat.tools.autoApprove:true setting. This will auto-approve all tools, and VS Code will not ask for confirmation when a language model wishes to run tools. Bear in mind that with this setting enabled, you will not have the opportunity to cancel potentially destructive actions a model wants to take.
We plan to expand this setting with more granular capabilities in the future.
VS Code's agent achieves a pass rate of 56.0% on swebench-verified with Claude 3.7 Sonnet, following Anthropic's research on configuring agents to execute without user input in the SWE-bench environment. Our experiments have translated into shipping improved prompts, tool descriptions and tool design for agent mode, including new tools for file edits that are in-distribution for Claude 3.5 and 3.7 Sonnet models.
For the past several months, we've had a "Chat" view for asking questions to the language model, and a "Copilot Edits" view for an AI-powered code editing session. This month, we aim to streamline the chat-based experience by merging the two views into one Chat view. In the Chat view, you'll see a dropdown with three modes:
- Ask: This is the same as the previous Chat view. Ask questions about your workspace or coding in general, using any model. Use
@to invoke built-in chat participants or from installed extensions. Use#to attach any kind of context manually. - Agent: Start an agentic coding flow with a set of tools that let it autonomously collect context, run terminal commands, or take other actions to complete a task. Agent mode is enabled for all VS Code Insiders users, and we are rolling it out to more and more users in VS Code Stable.
- Edit: In Edit mode, the model can make directed edits to multiple files. Attach
#codebaseto let it find the files to edit automatically. But it won't run terminal commands or do anything else automatically.
Note: If you don't see agent mode in this list, then either it has not yet been enabled for you, or it's disabled by organization policy and needs to be enabled by the organization owner.
Besides making your chat experience simpler, this unification enables a few new features for AI-powered code editing:
- Switch modes in the middle of a conversation: For example, you might start brainstorming an app idea in ask mode, then switch to agent mode to execute the plan. Tip: press
<kbd>Ctrl+.</kbd>to change modes quickly. - Edit sessions in history: Use the Show Chats command (clock icon at the top of the Chat view) to restore past edit sessions and keep working on them.
- Move chat to editor or window: Select Open Chat in New Editor/New Window to pop out your chat conversation from the side bar into a new editor tab or separate VS Code window. Chat has supported this for a long time, but now you can run your edit/agent sessions from an editor pane or a separate window as well.
- Multiple agent sessions: Following from the above point, this means that you can even run multiple agent sessions at the same time. You might like to have one chat in agent mode working on implementing a feature, and another independent session for doing research and using other tools. Directing two agent sessions to edit files at the same time is not recommended, it can lead to confusion.
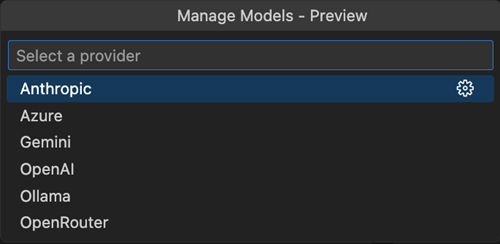
Copilot Pro and Copilot Free users can now bring their own API keys for popular providers such as Azure, Anthropic, Gemini, Open AI, Ollama, and Open Router. This allows you to use new models that are not natively supported by Copilot the very first day that they're released.
To try it, select Manage Models... from the model picker. We’re actively exploring support for Copilot Business and Enterprise customers and will share updates in future releases. To learn more about this feature, head over to our docs.
Setting: chat.promptFilesLocations
The chat.promptFilesLocations setting now supports glob patterns in file paths. For example, to include all .prompt.md files in the currently open workspace, you can set the path to { "**": true }.
Additionally, the configuration now respects case sensitivity on filesystems where it applies, aligning with the behavior of the host operating system.
- Your
.prompt.mdfiles now offer basic autocompletion for filesystem paths and highlight valid file references. Broken links on the other hand now appear as warning or error squiggles and provide detailed diagnostic information. - You can now manage prompts using edit and delete actions in the prompt file list within the Chat: Use Prompt command.
- Folder references in prompt files are no longer flagged as invalid.
- Markdown comments are now properly handled, for instance, all commented-out links are ignored when generating the final prompt sent to the LLM model.
The .github/copilot-instructions.md file now behaves like any other reusable .prompt.md file, with support for nested link resolution and enhanced language features. Furthermore, any .prompt.md file can now be referenced and is handled appropriately.
Learn more about custom instructions.
The Create User Prompt command now allows creating a new type of prompts called user prompts. These are stored in the user data folder and can be synchronized across machines, similar to code snippets or user settings. The synchronization can be configured in Sync Settings by using the Prompts item in the synchronization resources list.
Last iteration, Copilot Vision was enabled for GPT-4o. Check our release notes to learn more about how you can attach and use images in chat.
This release, you can attach images from any browser via drag and drop. Images drag and dropped from browsers must have the correct url extension, with .jpg, .png, .gif, .webp, or .bmp.
AI-powered editing support for notebooks (including agent mode) is now available in the Stable release. This was added last month as a preview feature in VS Code Insiders.
You can now use chat to edit notebook files with the same intuitive experience as editing code files: modify content across multiple cells, insert and delete cells, and change cell types. This feature provides a seamless workflow when working with data science or documentation notebooks.
VS Code now provides a dedicated tool for creating new Jupyter notebooks directly from chat. This tool plans and creates a new notebook based on your query.
Use the new notebook tool in agent mode or edit mode (make sure to enable the improved edit mode with chat.edits2.enabled:true). If you're using ask mode, type /newNotebook in the chat prompt to create a new notebook.
Use the diff toolbars to iterate through and review each AI edit across cells.
When focused on a cell container, the Undo command reverts the full set of AI changes at the notebook level.
You can now add notebook cell outputs, such as text, errors, and images, directly to chat as context. This lets you reference the output when using ask, edit, or agent mode, making it easier for the language model to understand and assist with your notebook content.
Use the Add cell output to chat action, available via the triple-dot menu or by right-clicking the output.
To attach the cell error output as chat context:
To attach the cell output image as chat context:
The tool that allows agent mode to run commands in the terminal has a number of reliability and compatibility improvements. You should expect fewer cases where the tool gets stuck or where the command finishes without the output being present.
One of the bigger changes is the introduction of the concept of "rich" quality shell integration, as opposed to "basic" and "none". The shell integration scripts shipped with VS Code should generally all enable rich shell integration which provides the best experience in the run in terminal tool (and terminal usage in general). You can view the shell integration quality by hovering over the terminal tab.
GitHub Copilot updates from February 2025:
Last month, we introduced agent mode for Copilot Edits in VS Code Insiders. In agent mode, Copilot can automatically search your workspace for relevant context, edit files, check them for errors, and run terminal commands (with your permission) to complete a task end-to-end.
Note: Agent mode is available today in VS Code Insiders, and we just started rolling it out gradually in VS Code Stable. Once agent mode is enabled for you, you will see a mode dropdown in the Copilot Edits view — simply select Agent.
We made several improvements to the UX of tool usages this month:
- Terminal commands are now shown inline, so you can keep track of which commands were run.
- You can edit the suggested terminal command in the chat response before running it.
- Confirm a terminal command with the Ctrl+Enter shortcut.
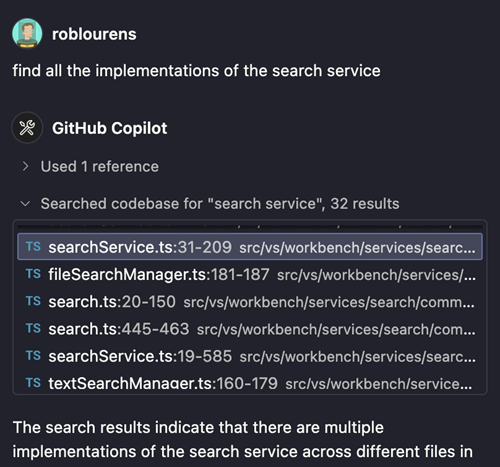
Agent mode autonomously searches your codebase for relevant context. Expand the message to see the results of which searches were done.
We've also made various improvements to the prompt and behavior of agent mode:
- The undo and redo actions in chat now undo or redo the last file edit made in a chat response. This is useful for agent mode, as you can now undo certain steps the model took without rolling back the entire chat response.
- Agent mode can now run your build tasks automatically or when instructed to do so. Disable this functionality via the
github.copilot.chat.agent.runTaskssetting, in the event that you see the model running tasks when it should not.
Learn more about Copilot Edits agent mode or read the agent mode announcement blog post.
Note: If you are a Copilot Business or Enterprise user, an administrator of your organization must opt in to the use of Copilot "Editor Preview Features" for agent mode to be available.
We are introducing notebook support in Copilot Edits. You can now use Copilot to edit notebook files with the same intuitive experience as editing code files. Create new notebooks from scratch, modify content across multiple cells, insert and delete cells, and change cell types. This preview feature provides a seamless workflow when working with data science or documentation notebooks.
For the best notebook editing experience with Copilot, we recommend using VS Code Insiders and the pre-release version of GitHub Copilot Chat, where you'll get the latest improvements to this feature as they're developed.
We have polished the integration of Copilot Edits with code and notebook editors:
- No more scrolling while changes are being applied. The viewport remains in place, making it easier to focus on what changes.
- Renamed the edit review actions from "Accept" to "Keep" and "Discard" to "Undo" to better reflect what’s happening. Changes for Copilot Edits are live, they are applied and saved as they are made and users keep or undo them.
- After keeping or undoing a file, the next file is automatically revealed.
The video demonstrates how edits are applied and saved as they occur. The live preview updates, and the user decided to "Keep" the changes. Undoing and further tweaking is also still possible.
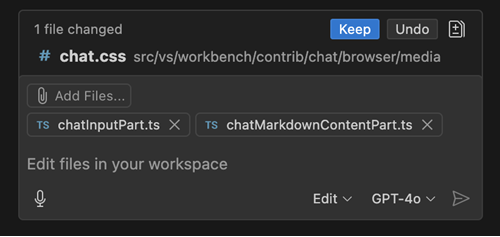
In preparation for unifying Copilot Edits with Copilot Chat, we've given Copilot Edits a facelift. Files that are attached and not yet sent, are now rendered as regular chat attachments. Only files that have been modified with AI are added to the changed files list, which is located above the chat input part.
With the chat.renderRelatedFiles setting, you can enable getting suggestions for related files. Related file suggestions are rendered below the chat attachments.
Previously, you were limited to attach 10 files to your prompt in Copilot Edits. With this release, we removed this limit. Additionally, we've removed the client-side rate limit of 14 interactions per 10 minutes.
Note that service-side usage rate limits still apply.
If you host your source code in a GitHub repository, you're able to leverage several features, including advanced code searching, the @github chat participant, and more!
However, for private GitHub repositories, VS Code needs to have permission to interact with your repositories on GitHub. For a while, this was presented with our usual VS Code authentication flow, where a modal dialog showed up when you invoked certain functionality (for example, asking @workspace or @github a question, or using the #codebase tool).
To make this experience smoother, we've introduced this confirmation in chat:
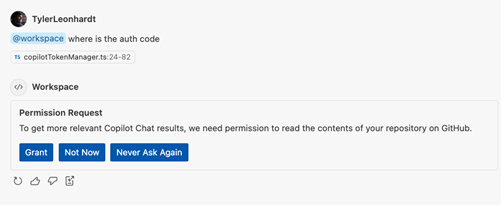
Not only is it not as jarring as a modal dialog, but it also has new functionality:
- Grant: you're taken through the regular authentication flow like before (via the modal).
- Not Now: VS Code remembers your choice and won't bother you again until your next VS Code window session. The only exception to this is if the feature needs this additional permission to function, like
@github. - Never Ask Again: VS Code remembers your choice and persists it via the
github.copilot.advanced.authPermissionssetting. Any feature that needs this additional permission will fail.
It's important to note that this confirmation does not confirm or deny Copilot (the service) access to your repositories. This is only how VS Code's Copilot experience authenticates. To configure what Copilot can access, please read the docs on content exclusion.
Setting: github.copilot.chat.codesearch.enabled
When you add #codebase to your Copilot Chat query, Copilot helps you find relevant code in your workspace for your chat prompt. #codebase can now run tools like text search and file search to pull in additional context from your workspace.
Set github.copilot.chat.codesearch.enabled to enable this behavior. The full list of tools is:
- Embeddings-based semantic search
- Text search
- File search
- Git modified files
- Project structure
- Read file
- Read directory
- Workspace symbol search
To help with fixing code or other issues in your workspace, you can now attach problems from the Problems panel to your chat as context for your prompt.
Either drag an item from the Problems panel onto the Chat view, type #problems in your prompt, or select the paperclip 📎 button. You can attach specific problems, all problems in a file, or all files in your codebase.
Previously, you could attach folders as context by using drag and drop from the Explorer view. Now, you can also attach a folder by selecting the paperclip 📎 icon or by typing #folder: followed by the folder name in your chat prompt.
Settings:
github.copilot.nextEditSuggestions.enablededitor.inlineSuggest.edits.showCollapsed:true
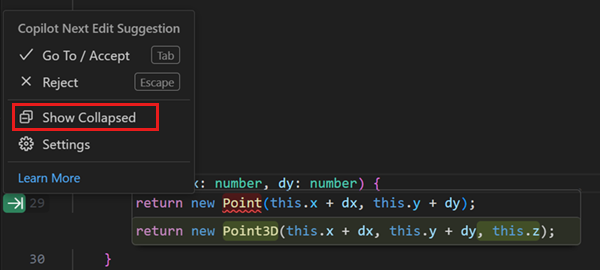
We've added a collapsed mode for NES. When you enable this mode, only the NES suggestion indicator is shown in the left editor margin. The code suggestion itself is revealed only when you navigate to it by pressing Tab. Consecutive suggestions are shown immediately until a suggestion is not accepted.
The collapsed mode is disabled by default and can be enabled by configuring editor.inlineSuggest.edits.showCollapsed:true, or you can enable or disable it in the NES gutter indicator menu.
You could already change the language model for Copilot Chat and Copilot Edits, and now you can also change the model for inline suggestions.
Alternatively, you can change the model that is used for code completions via Change Completions Model command in the Command Palette or the Configure Code Completions item in the Copilot menu in the title bar.
Note: the list of available models might vary and change over time. If you are a Copilot Business or Enterprise user, your Administrator needs to enable certain models for your organization by opting in to
Editor Preview Featuresin the Copilot policy settings on GitHub.com.
This release, we added more models to choose from when using Copilot. The following models are now available in the model picker in Visual Studio Code and github.com chat:
-
GPT 4.5 (Preview): OpenAI’s latest model, GPT-4.5, is now available in GitHub Copilot Chat to Copilot Enterprise users. GPT-4.5 is a large language model designed with advanced capabilities in intuition, writing style, and broad knowledge. Learn more about the GPT-4.5 model availability in the GitHub blog post.
-
Claude 3.7 Sonnet (Preview): Claude 3.7 Sonnet is now available to all customers on paid Copilot plans. This new Sonnet model supports both thinking and non-thinking modes in Copilot. In initial testing, we’ve seen particularly strong improvements in agentic scenarios. Learn more about the Claude 3.7 Sonnet model availability in the GitHub blog post.
We're quickly rolling out end-to-end vision support in this version of Copilot Chat. This lets you attach images and interact with images in chat prompts. For example, if you encounter an error while debugging, attach a screenshot of VS Code, and ask Copilot to help you resolve the issue. You might also use it to attach some UI mockup and let Copilot provide some HTML and CSS to implement the mockup.

You can attach images in multiple ways:
- Drag and drop images from your OS or from the Explorer view
- Paste an image from your clipboard
- Attach a screenshot of the VS Code window (select the paperclip 📎 button > Screenshot Window)
A warning is shown if the selected model currently does not have the capability to handle the file type. The only supported model at the moment will be GPT 4o, but support for image attachments with Claude 3.5 Sonnet and Gemini 2.0 Flash will be rolling out soon as well. Currently, the supported image types are JPEG/JPG, PNG, GIF, and WEBP.
Setting: chat.experimental.statusIndicator.enabled
We are experimenting with a new central Copilot status overview, accessible via the Status Bar. This view shows:
- Quota information if you are a Copilot Free user
- Editor related settings such as Code Completions
- Useful keyboard shortcuts to use other Copilot features
You can enable this new Status Bar entry by configuring the new chat.experimental.statusIndicator.enabled setting.
Setting: chat.languageContext.typescript.enabled
We are experimenting with enhanced context for inline completions and /fix commands for TypeScript files. The experiment is currently scoped to Insider releases and can be enabled with the chat.languageContext.typescript.enabled setting.
You can provide custom instructions for generating pull request title and description with the setting github.copilot.chat.pullRequestDescriptionGeneration.instructions. You can point the setting to a file in your workspace, or you can provide instructions inline in your settings:
{
  "github.copilot.chat.pullRequestDescriptionGeneration.instructions": [
    {
      "text": "Prefix every PR title with an emoji."
    }
  ]
}
Generating a title and description requires the GitHub Pull Requests extension to be installed.
GitHub Copilot updates from January 2025:
Setting: github.copilot.nextEditSuggestions.enabled
We're excited to release a new preview feature through which Copilot can help accelerate the way you write code: Copilot Next Edit Suggestions.
GitHub Copilot code completions are great at autocomplete, but since most coding activity is editing existing code, it's a natural evolution of completions to also help with edits. Copilot Next Edit Suggestions (aka "Copilot NES") is this evolution of completions.
Based on the edits you're making, Copilot NES both predicts the location of the next edit you'll want to make and what that edit should be. NES suggests future changes relevant to your current work, and you can simply Tab to quickly navigate and accept suggestions.
You can enable Copilot NES via the VS Code setting github.copilot.nextEditSuggestions.enabled.
In the following example, changing the variable name triggers an edit suggestion at another location in the file. As you use the Tab key to navigate and accept the suggestion, the arrow in the gutter indicates the relative position of the next suggestion.
Depending on the size and type of edit that Copilot suggests, the rendering of the suggestion dynamically change from side-by-side to below the current line. Configure the editor.inlineSuggest.edits.renderSideBySide:never setting to always render suggestions below the current line.
Copilot NES is rapidly evolving, and we can't wait to get your feedback via issues in our repo. You can read our full Copilot NES docs for more information and scenarios as we expand the NES experience.
Note: If you are a Copilot Business or Enterprise user, an administrator of your organization must opt in to the use of previews of Copilot features, in addition to you setting
github.copilot.nextEditSuggestions.enabledin your editor.
We've been working on a new agent mode for Copilot Edits. When in agent mode, Copilot can automatically search your workspace for relevant context, edit files, check them for errors, and run terminal commands (with your permission) to complete a task end-to-end.

You can switch between the current edit mode that we've had for a few months and agent mode with the dropdown in the Copilot Edits view. To see the dropdown, enable the chat.agent.enabled setting. You can start using agent mode in VS Code Insiders today. We will gradually be rolling it out to VS Code Stable users. If the setting doesn't show up for you in Stable, then it isn't enabled for you yet.

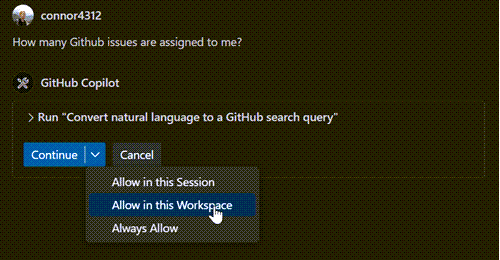
In agent mode, Copilot runs autonomously, but it can only edit files within your current workspace. When it wants to run a terminal command, it shows you the command and waits for you to review it and select Continue before proceeding.
Note: Copilot Edits may use many chat requests in agent mode, so it will periodically pause and ask you whether to continue. You can customize this with
chat.agent.maxRequests. This defaults to 15 for Copilot paid users, and 5 for Copilot Free users.
Learn more about agent mode in Copilot Edits in the VS Code documentation.
In our VS Code October release, we announced the preview of Copilot Edits. Today, we're now announcing the general availability of Copilot Edits! Copilot Edits is optimized for code editing and enables you to make code changes across multiple files in your workspace, directly from chat.
Edits can now be accepted and discarded individually, giving you more control. Also new is that the editor controls for edits remain visible when switching to the side-by-side view. This is useful for understanding larger changes.

Lastly, we have added a new setting for automatically accepting edit suggestions after a configurable timeout. The setting for that is chat.editing.autoAcceptDelay, which specifies the number of seconds after which changes are accepted. The countdown stops when you interact with the accept button or when you start to review changes. This should be familiar to anyone who binge-watches on the weekends.
Theme: GitHub Light Colorblind (Beta) (preview on vscode.dev)
In Copilot Chat, any code block can be applied to a file in the workspace by using the Apply to Editor action in the toolbar of the code block. We made several improvements to this experience:
-
The hover of the action now shows the file the code block was generated for.
-
If the code block is for a non-existent file, you are prompted where to create the file. This can be at a file path suggested by Copilot, in an untitled editor, or in the currently active editor.
-
When the changes are computed and applied, the same flow and UI as for Copilot Edits are used. You can review, improve, or discard each change individually.

Temporal context helps when editing or generating code by informing the language model about files that you have recently interacted with.
Our experimentation has shown that this yields much better Inline Chat results. Therefore, temporal context is now on by default for Inline Chat. You can configure it via github.copilot.chat.editor.temporalContext.enabled.
For Copilot Edits, we are still experimenting, and you can try it by setting github.copilot.chat.edits.temporalContext.enabled.
When you ask Copilot a question about the code in your project by using @workspace or #codebase, we use an index to quickly and accurately search your codebase for relevant code snippets to include as context. This index can either be a remote index managed by GitHub, a locally stored index, or a basic index used as a fallback for large projects that can't use a remote index.
This iteration, we've added the new workspace index to the language status indicator in the Status Bar that shows the type of index being used by Copilot and related information, such as the number of files being reindexed. To see this, just select the {} icon in the VS Code Status Bar.

Check out the Copilot workspace docs for more info about the types of workspace indexes and how you can switch between them.
Remote workspace indexes are managed by GitHub. A remote index can provide high-quality results quickly, even for large projects. They also only have to be built once per GitHub project, instead of once per user.
Given all these advantages, we have added several new ways to upgrade a project to a remote index:
-
Run the new GitHub Copilot: Build Remote Index command.
-
Select the Build Index button in the workspace index status UI. This only shows up if your project is eligible for remote indexing.
-
Select the Build Index button in the first
@workspaceresponse you see. This only shows up if your project is eligible and also only shows once per workspace.
Keep in mind that only projects with a GitHub remote can currently use a remote index. It may also take some time to build up the remote index, especially if your project is large. Check the Workspace index status UI to see if remote indexing has completed.
We've also continued optimizing code search for @workspace and #codebase. Highlights include:
-
Improved tracking and handling of locally changed files when using a remote index.
-
Added background updating of changed files in the local index, so that
@workspacequestions don't have to wait for them to be updated. -
Optimized the basic index for large projects.
When writing queries for Chat or Edits, you can now reference files that were modified in Git source control by using the #changes context variable. For example, you could prompt for summarize the #changes in my workspace.

You can add #codebase to your query and Copilot Edits will discover relevant files for your task. We've added experimental support for discovering relevant files using additional tools like file and text search, Git repository state, and directory reads. Previously, #codebase only performed semantic search.
You can enable it with github.copilot.chat.edits.codesearch.enabled, and please [share any feedback](https://github.com/microsoft/vscode-copilot-release with us.
We're introducing end-to-end vision support in the pre-release version of GitHub Copilot Chat in VS Code Insiders. This lets you attach images and interact with images in Copilot Chat prompts. For example, if you're encountering an error while debugging, quickly attach a screenshot of VS Code and ask Copilot to help you resolve the issue.
You can now attach images using several methods:
- Drag and drop images from your OS or from the Explorer view
- Paste an image from the clipboard
- Attach a screenshot of the VS Code window (select Attach > Screenshot Window)
A warning is shown if the selected model currently does not have the capability to handle images. The only supported model at the moment will be GPT 4o. Currently, the supported image types are JPEG/JPG, PNG, GIF, and WEBP.
This feature lets you build, store, and share reusable prompts. A prompt file is a .prompt.md Markdown file that follows the same format used for writing prompts in Copilot Chat, and it can link to other files or even other prompts. You can attach prompt files for task-specific guidance, aid with code generation, or keep complete prompts for later use.
To enable prompt files, set chat.promptFiles to true, or use the { "/path/to/folder": boolean } notation to specify a different path. The .github/prompts folder is used by default to locate prompt files (*.prompt.md, if no other path is specified.
Learn more about prompt files in the VS Code documentation.
GitHub Copilot updates from November 2024:
Last milestone, we introduced Copilot Edits (currently in preview), which allows you to quickly edit multiple files at once using natural language. Since then, we've continued to iterate on the experience. You can try out Copilot Edits by opening the Copilot menu in the Command Center, and then selecting Open Copilot Edits, or by triggering Ctrl+Shift+I.
Copilot Edits can make multiple changes across different files. You can now more clearly see its progress as edits stream in. And with the editor overlay controls, you can easily cycle through all changes and accept or discard them.
You might use the Chat view to explore some ideas for making changes to your code. Instead of applying individual code blocks, you can now move the chat session to Copilot Edits to apply all code suggestions from the session.
In Copilot Edits, the working set determines the files that Copilot Edits can suggest changes for. To help you add relevant files to the working set, for a Git repo, Copilot Edits can now suggest additional files based on the files you've already added. For example, Copilot Edits will suggest files that are often changed together with the files you've already added.
Copilot shows suggested files alongside the Add Files button in the working set. You can also select Add Files and then select Related Files to choose from a list of suggested files.
Edit sessions are now fully restored after restarting VS Code. This includes the working set, acceptance state, as well as the file state of all past edit steps.
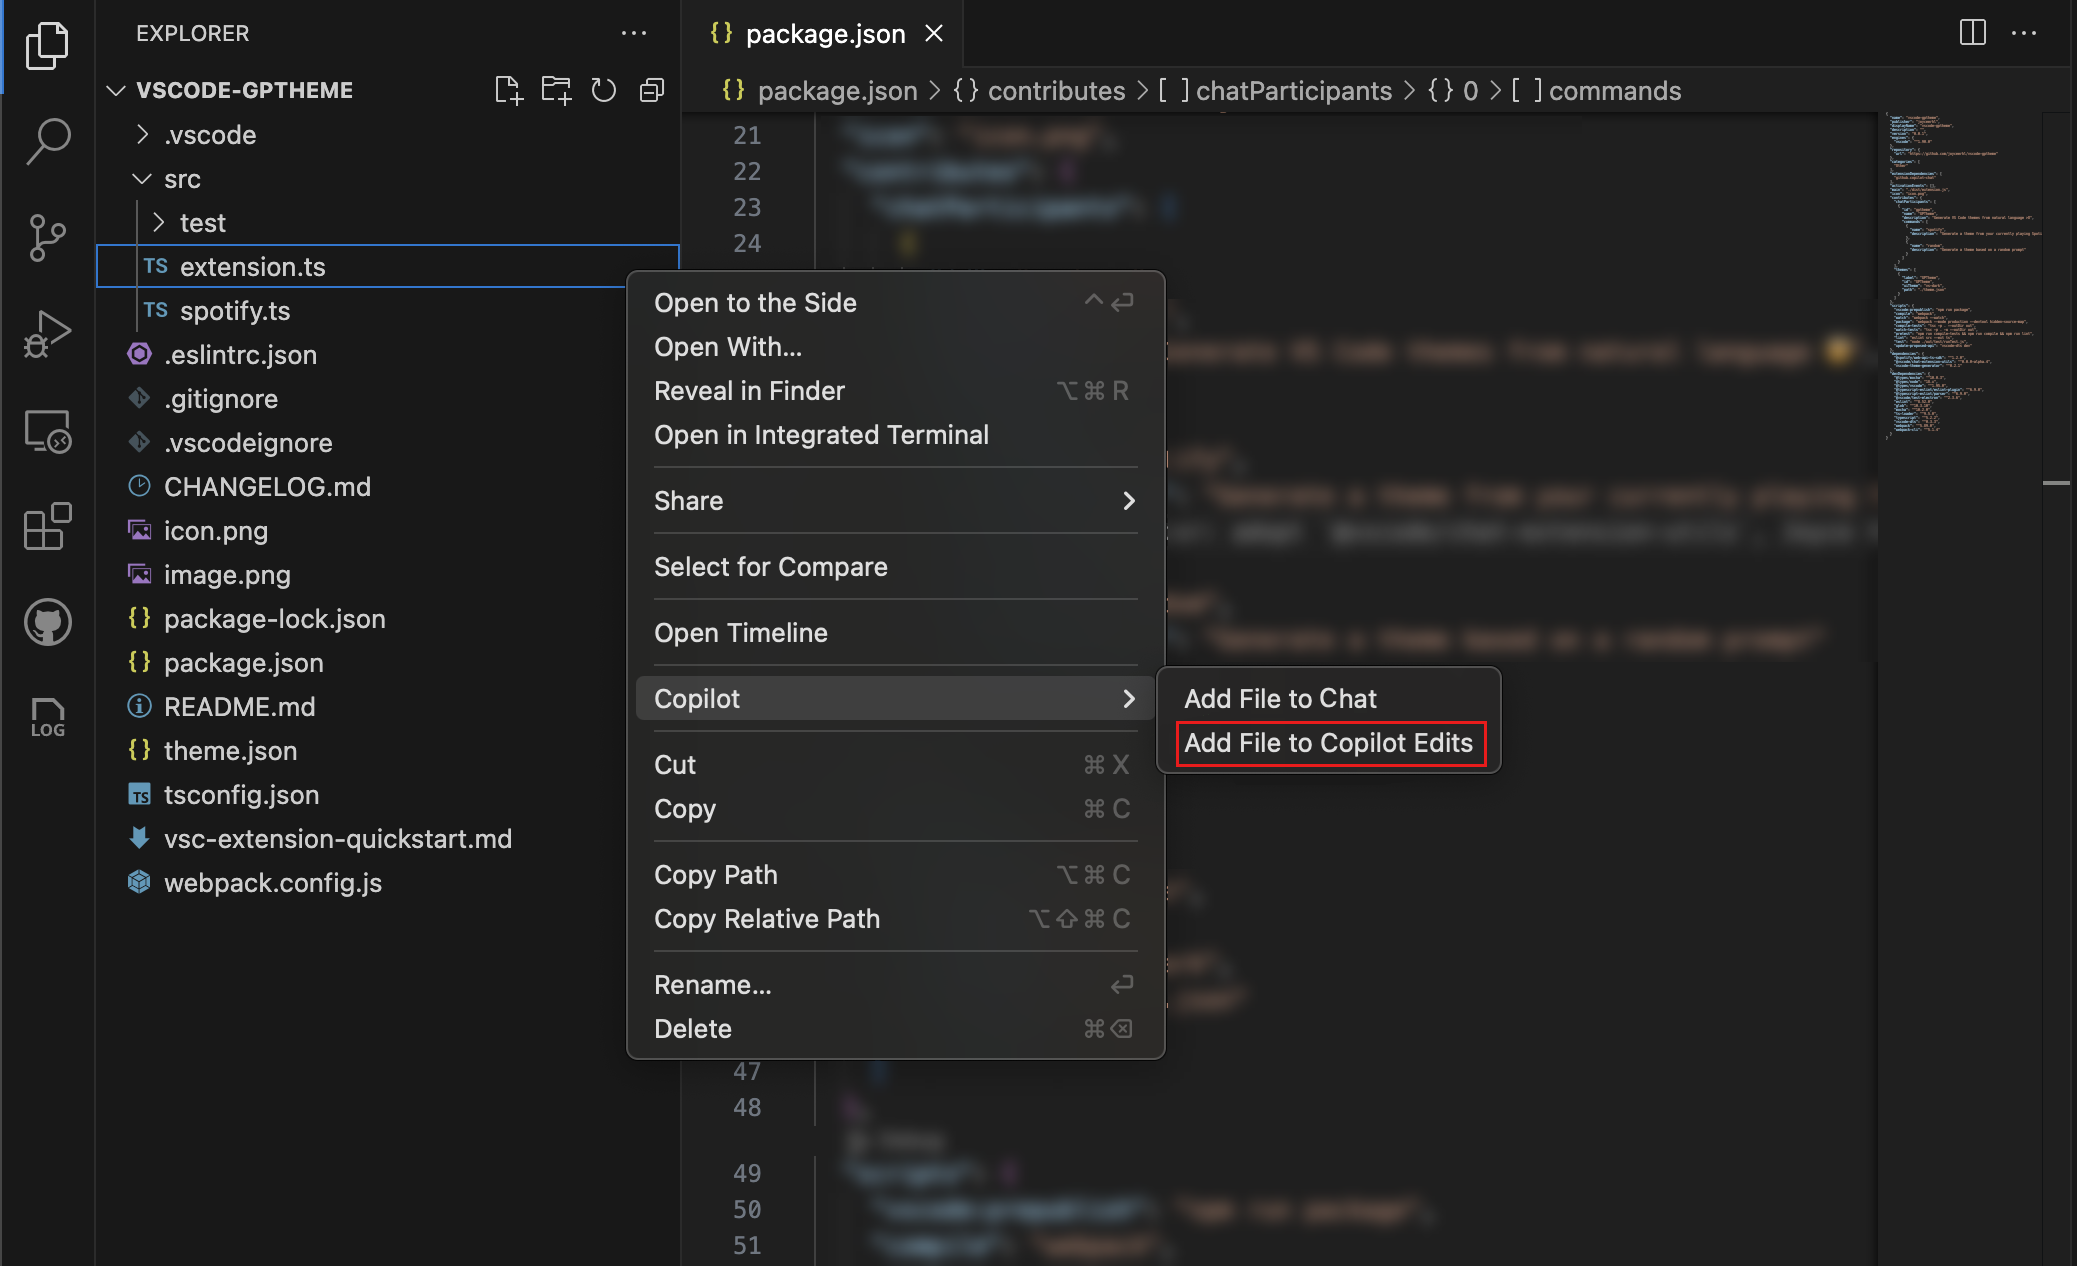
You can add files to your Copilot Edits working set with the new Add File to Copilot Edits context menu action for search results in the Search view and for files in the Explorer view. Additionally, you can also attach a text selection to Copilot Edits from the editor context menu.
Configuring debugging can be tricky, especially when you're working with a new project or language. This milestone, we're introducing a new copilot-debug terminal command to help you debug your programs using VS Code. You can use it by prefixing the command that you would normally run with copilot-debug. For example, if you normally run your program using the command python foo.py, you can now run copilot-debug python foo.py to start a debugging session.
After your program exits, you are given options to rerun your program or to view, save, or regenerate the VS Code launch configuration that was used to debug your program.

Copilot's debugging features, including copilot-debug and the /startDebugging intent, now generate preLaunchTasks as needed for code that needs a compilation step before debugging. This is often the case for compiled languages, such as Rust and C++.
We’ve added new ways to include symbols and folders as context in Copilot Chat and Copilot Edits, making it easier to reference relevant information during your workflow.
Symbols can now easily be added to Copilot Chat and Copilot Edits by dragging and dropping them from the Outline View or Breadcrumbs into the Chat view.
We’ve also introduced symbol completion in the chat input. By typing # followed by the symbol name, you’ll see suggestions for symbols from files you've recently worked on.
To reference symbols across your entire project, you can use #sym to open a global symbols picker.
Folders can now be added as context by dragging them from the Explorer, Search, or other views into Copilot Chat.
When a folder is dragged into Copilot Edits, all files within the folder are included in the working set.
VS Code extensions can use the VS Code API to build on the capabilities of Copilot. You can now see a graph of an extension's Copilot usage in the Runtime Status view. This graph shows the number of chat requests that were made by the extension over the last 30 days.

Copilot can help you generate commit messages based on the changes you've made. This milestone, we added support for custom instructions when generating a commit message. For example, if your commit messages need to follow a specific format, you can describe this in the custom instructions.
You can use the github.copilot.chat.commitMessageGeneration.instructions setting to either specify the custom instructions or specify a file from your workspace that contains the custom instructions. These instructions are appended to the prompt that is used to generate the commit message. Get more information on how to [use custom instructions](https://code.visualstudio.com/docs/copilot/copilot-customization.
This milestone, we have further improved the user experience of Inline Chat: we made the progress reporting more subtle, while streaming in changes squiggles are disabled, and detected commands are rendered more nicely.
Also, we have continued to improve our pseudo-code detection and now show a hint that you can continue with Inline Chat when a line is mostly natural language. This functionality lets you type pseudo code in the editor, which is then used as a prompt for Inline Chat. You can also trigger this flow by pressing Ctrl+I.

Additionally, there is a new, experimental, setting to make an Inline Chat hint appear on empty lines. This setting can be enabled via inlineChat.lineEmptyHint. By default, this setting is disabled.
Terminal Inline Chat has a fresh coat of paint that brings the look and feel much closer to editor Inline Chat:

Here are some other improvements of note that were made:
- The layout and positioning of the widget is improved and generally behaves better
- There's a model picker
- The buttons on the bottom are now more consistent
When you use @workspace to ask Copilot about your currently opened workspace, we first need to narrow the workspace down into a set of relevant code snippets that we can hand off to Copilot as context. If your workspaces is backed by a GitHub repo, we can find these relevant snippets quickly by using Github code search. However, as the code search index tracks the main branch of your repository, we couldn't rely on it for local changes or when on a branch.
This milestone, we've worked bring the speed benefits of Github search to branches and pull requests. This means that we now search both the remote index based on your repo's main branch, along with searching any locally changed files. We then merge these results together, giving Copilot a fast and up to date set of snippets to work with. You can read more about Github code search and how to enable it.
GitHub Copilot updates from October 2024:
Setting: github.copilot.chat.edits.enabled
With Copilot Edits, currently in preview, you can start an AI-powered code editing session where you can quickly iterate on code changes. Based on your prompts, Copilot Edits proposes code changes across multiple files in your workspace. These edits are applied directly in the editor, so you can quickly review them in-place, with the full context of the surrounding code.
Copilot Edits is great for when you are building something iteratively. It brings the best of Copilot Chat and Inline Chat together in one experience. Have an ongoing, multi-turn chat conversation on the side, while benefiting from inline code suggestions.
Get started with Copilot Edits in just three steps:
-
Start an edit session by selecting Open Copilot Edits from the Chat menu, or press Ctrl+Shift+I.
-
Add relevant files to the working set to indicate to Copilot which files you want to work on.
-
Enter a prompt to tell Copilot about the edit you want to make! For example,
Add a simple navigation bar to all pagesorUse vitest instead of jest.
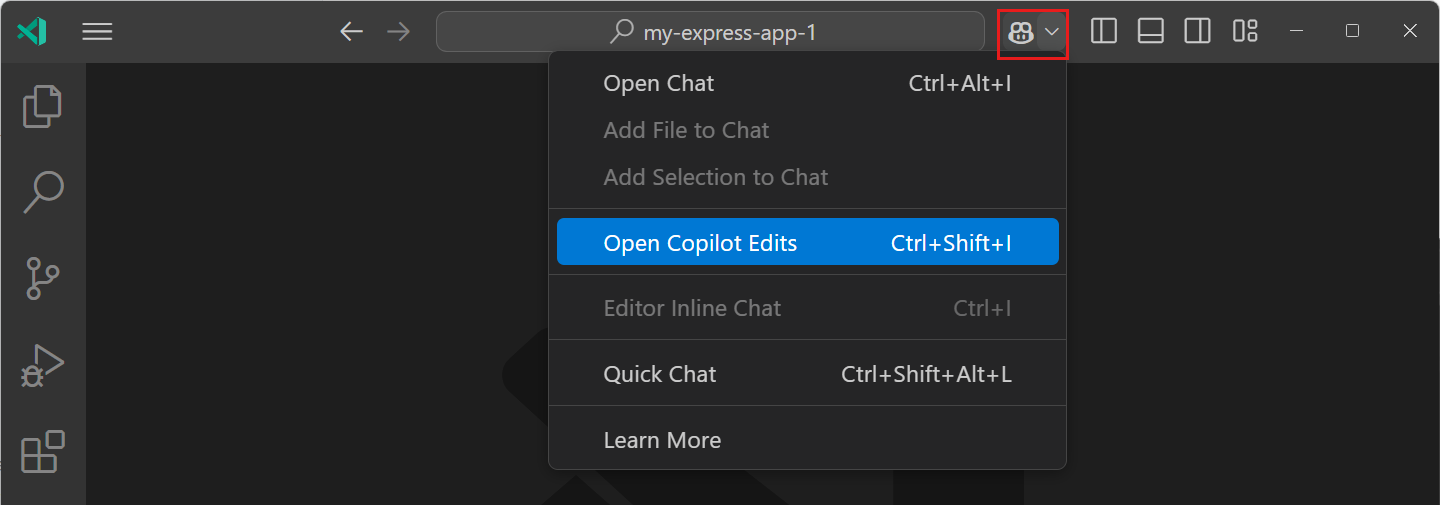
Get more details about Copilot Edits in our documentation. Try it out now and provide your feedback through our issues!
The new default location for the Chat view is the Secondary Side Bar. By using the Secondary Side Bar, you can have chat open at any time, while you still have other views available to you like the File Explorer or Source Control. This provides you with a more integrated AI experience in VS Code. You can quickly get to chat by using the Ctrl+Shift+I keyboard shortcut.
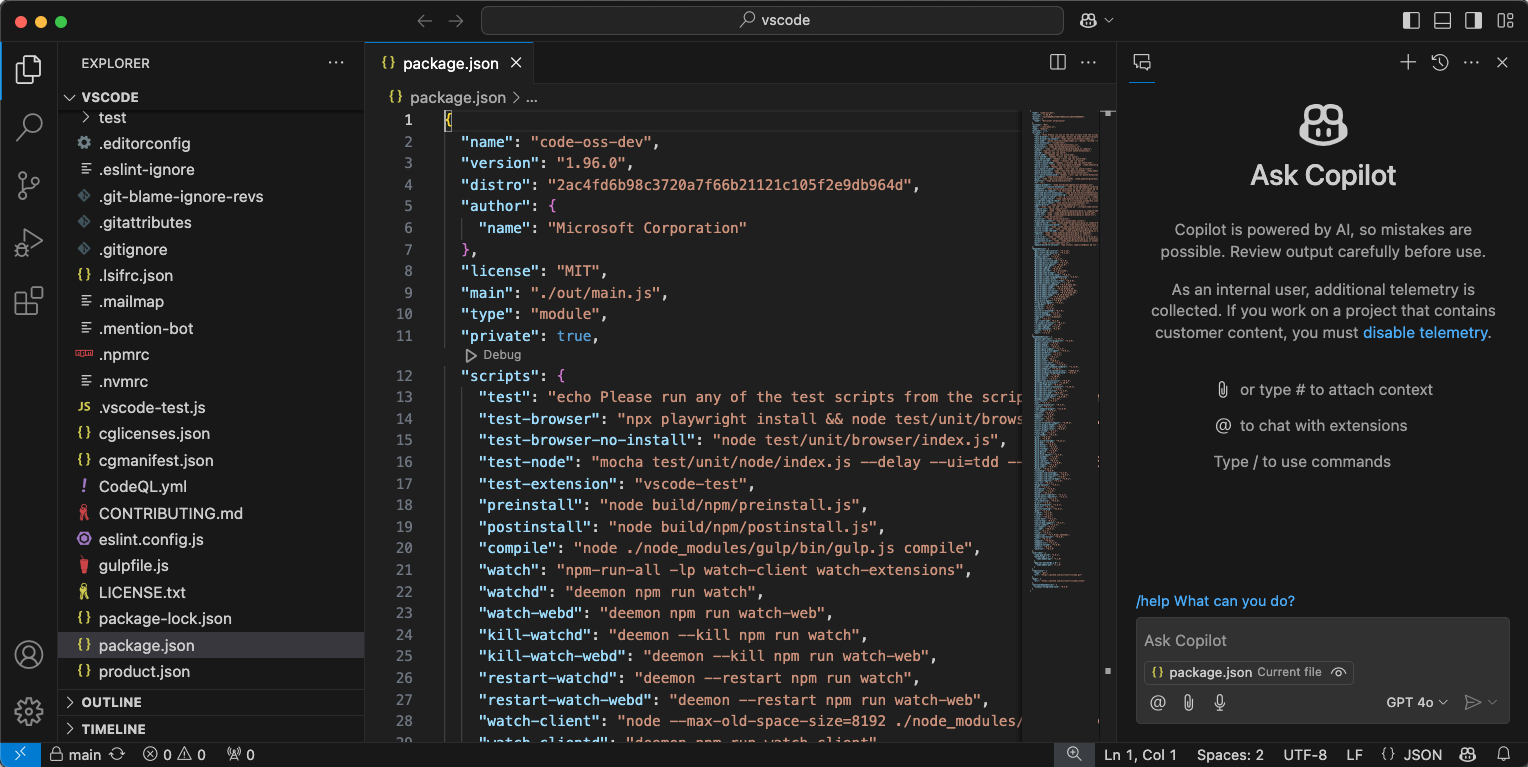
With the introduction of the new Chat menu next to the Command Center, bringing up the Secondary Side Bar with chat is just a click away:
The chat menu gives you access to the most common tasks for Copilot Chat. If you wish to hide this menu, a new setting chat.commandCenter.enabled is provided.
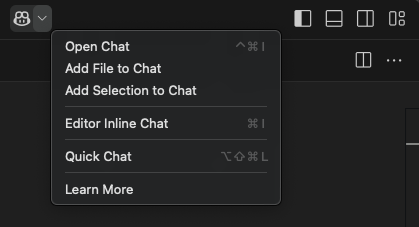
Note: If you had previously installed GitHub Copilot, a view will show up at the location you had Chat before that enables you to restore the Chat view to the old location, if that works better for you.
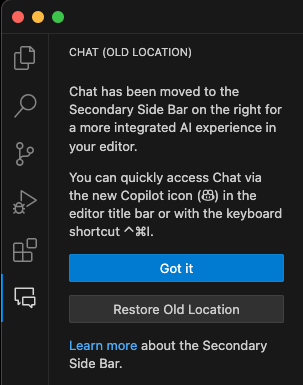
With GitHub Copilot code review in Visual Studio Code, you can now get fast, AI-powered feedback on your code as you write it, or request a review of all your changes before you push. GitHub Copilot code review in Visual Studio Code is currently in preview. Try it out and provide feedback through our issues.
There are two ways to use Copilot code review in VS Code:
-
Review selection: for an initial review, select code in the editor and either select Copilot > Review and Comment from the editor context menu, or use the GitHub Copilot: Review and Comment command from the Command Palette. (This feature is in preview.)
-
Review changes: for a deeper review of all uncommitted changes, select the Copilot Code Review button in the Source Control view, which you can also do in your pull request on GitHub.com. (Join the waitlist, open to all Copilot subscribers)
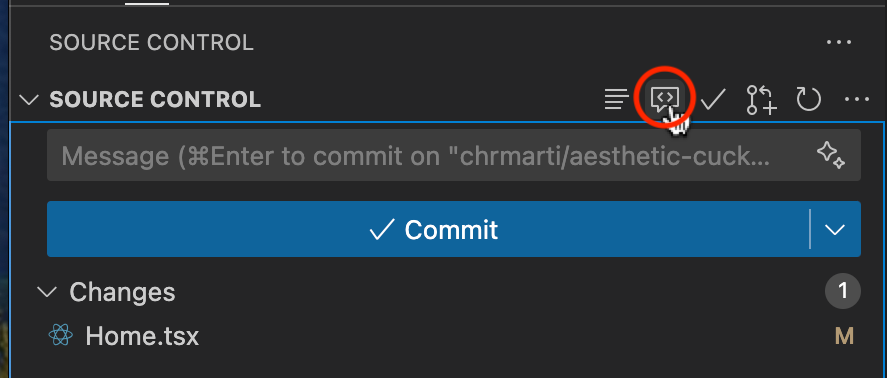
Copilot's feedback shows up as comments in the editor, attached to lines of your code. Where possible, the comments include actionable code suggestions, which you can apply in one action.
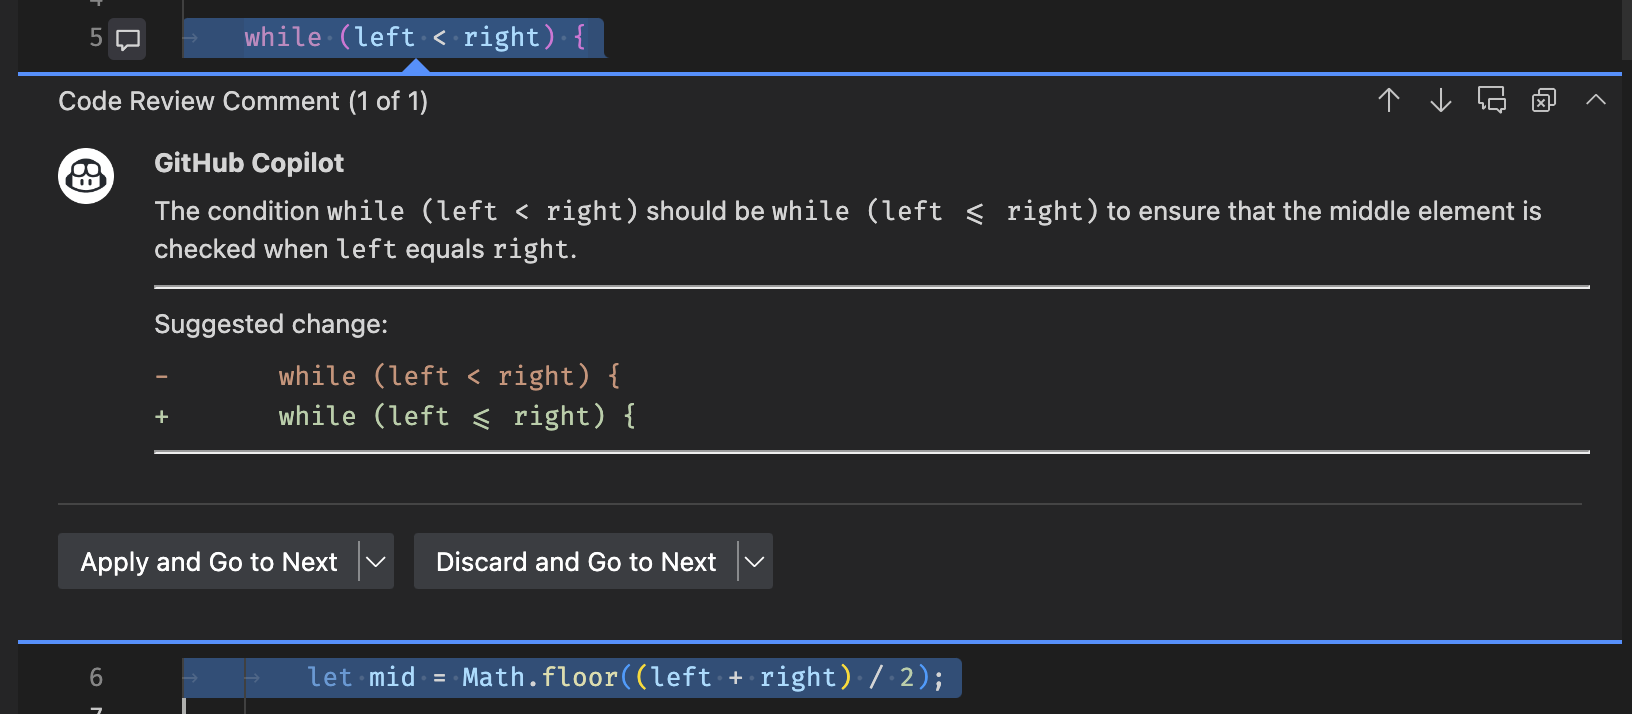
To learn more about Copilot code review, head to the GitHub code review documentation.
Copilot can provide review comments that match the specific practices of your team or project, provided you give the right context. When reviewing selections with custom review instructions, you can define those specific requirements via the github.copilot.chat.reviewSelection.instructions setting. Similar to code-generation and test-generation instructions, you can either define the instructions directly in the setting, or you can store them in a separate file and reference it in the setting.
The following code snippet shows an example of review instructions:
  "github.copilot.chat.reviewSelection.instructions": [
    {
      "text": "Logging should be done with the Log4j ."
    },
    {
      "text": "Always use the Polly library for fault-handling."
    },
    {
      "file": "code-style.md" // import instructions from file `code-style.md`
    }
  ],
An example of the contents of the code-style.md file:
Private fields should start with an underscore.

A file can only contain one class declaration.Setting: chat.experimental.detectParticipant.enabled
GitHub Copilot has several built-in chat participants, such as @workspace, which also contribute commands to the Chat view. Previously, you had to explicitly specify the chat participant and command in a chat prompt. To make it easier to use chat participants with natural language, we've enabled Copilot Chat to automatically route your question to a suitable participant or chat command.

If the automatically selected participant is not appropriate for your question, you can select the rerun without link at the top of the chat response to resend your question to Copilot.
Copilot Chat has always automatically included your current selection or the currently visible code as context with your chat request. Large Language Models (LLMs) are generally good at understanding whether a piece of context is relevant. But sometimes, when you ask a question that is not about your current editor, including this context might affect how the model interprets your question.
We now show a special attachment control in the chat input that gives a hint about the editor context and which enables you to toggle whether or not to include the editor context.
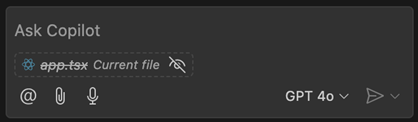
There are no changes to the behavior of the editor context. When the active editor has a selection, then just the selection is included. Otherwise, just the code that is scrolled into view is included. You can still attach other files or the full file by using the paperclip button or by typing # in the chat prompt.
A common use case of Copilot Chat is asking questions about the code in your workspace, such as using /tests to generate new unit tests for the selected code or asking @workspace to find some specific class or function in your project. This milestone, we added enhanced links for any workspace symbols that Copilot mentions in chat responses. These symbol links can help you better understand Copilot responses and learn more about the symbols used in them.
Symbol links are rendered as little pills in the response, just like the file links we added last milestone. To start learn more about a symbol, just seleect the symbol link to jump to that symbol's definition:
You can also hover over the symbol link to see which file the symbol is defined in:
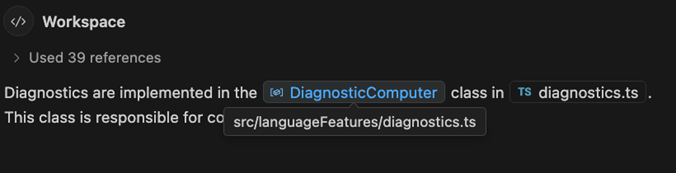
To start exploring a symbol in more detail, just right-click on the symbol link to bring up a context menu with options, such as Go to Implementations and Go to References:
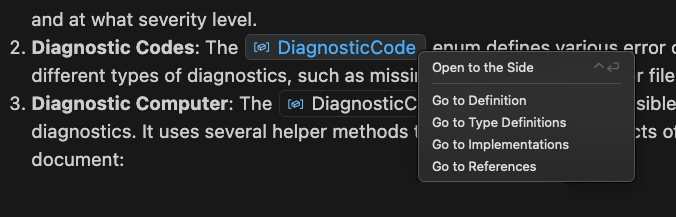
Basic symbol links should work for any language that supports Go to Definition. More advanced IntelliSense options, such Go to Implementations, also require support for that language. Make sure to install language extensions to get the best symbol support for any programming languages used in Copilot responses.
The Problem hover now includes the action to fix the problem using Copilot. This action is available for problems that have a fix available, and the fix is generated by Copilot.
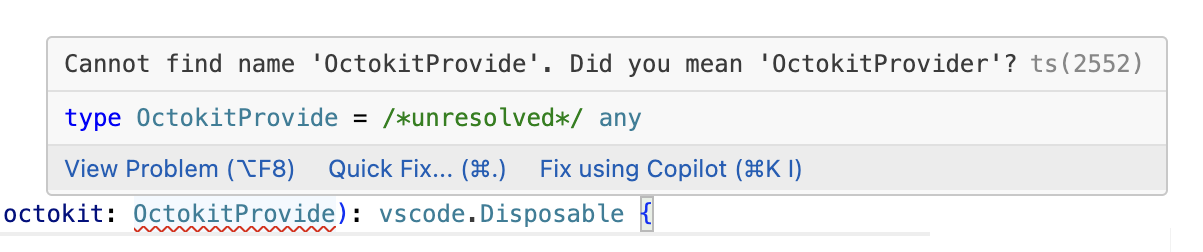
@workspace lets you ask questions about code in your current project. This is implemented using either GitHub's code search or a smart local index that VS Code constructs. This milestone, we added a few more UI elements that let you understand how this workspace index is being used.
First up, the new GitHub Copilot: Build Local Workspace index command lets you explicitly start indexing the current workspace. This indexing is normally kicked off automatically the first time you ask a @workspace question. With the new command, you can instead start indexing at any time. The command also enables indexing of larger workspaces, currently up to 2000 files (not including ignored files, such as the node_modules or out directories).
While the index is being built, we now also show a progress item in the status bar:
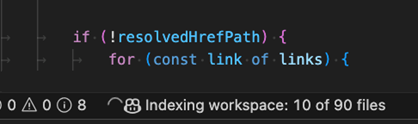
Indexing workspaces with many hundreds of files can take a little time. If you try to ask an @workspace question while indexing is being constructed, instead of waiting, Copilot will try to respond quickly by using a simpler local index that can be built up more quickly. We now show a warning in the response when this happens:

Notice that Copilot was still able to answer the question in this case, even though it used the simpler local index instead of the more advanced one. That's often the case, although more ambiguous or complex questions might only be answerable once the smarter index has been constructed. Also keep in mind that if your workspace is backed by a GitHub repository, we can instead use GitHub's code search to answer questions. That means that code search is used instead of the simpler local index.
The follow-up prompts suggested by Chat are now more concise and only appear on the first turn to make room for the conversation. The new setting Setting: github.copilot.chat.followUps allows changing this new behavior from firstOnly to always (every turn) or never (disables follow-ups.
As we continue to add new features to GitHub Copilot, we want to make it easier to check out what's new and ready to try out. We've restructured our settings and added support for tagging preview and experimental settings.
New features may go through the following early access stages, which are described in the settings editor as follows:
Experimental This setting controls a new feature that is actively being developed and may be unstable. It is subject to change or removal.
Preview This setting controls a new feature that is still under refinement yet ready to use. Feedback is welcome.
You can check out all of GitHub Copilot's preview features using @tag:preview in the Settings editor and all of the experimental features using @tag:experimental.
Setting: github.copilot.chat.codeGeneration.useInstructionFiles
The newly introduced .github/copilot-instructions.md file lets you document code-specific conventions for Copilot in your workspace or repository. With this release, the setting is enabled by default in VS Code, so chat conversations automatically include this file if it is present in the workspace. You can verify which instructions are added to a chat request in the Used references list. Learn more about customizing Copilot with instructions.
Setting: github.copilot.chat.search.semanticTextResults
Last milestone, we introduced the ability to perform a semantic search using Copilot to get search results that are semantically relevant to your query. We have now improved the search results by sorting them by their relevance. Keyword matches from more relevant snippets are deemed more relevant overall.
GitHub Copilot updates from September 2024:
Previously, we announced that you can sign up for early access to OpenAI o1 models. Once you have access, you will have a Copilot Chat model picker control in Copilot Chat in VS Code to choose which model version to use for your chat conversations.
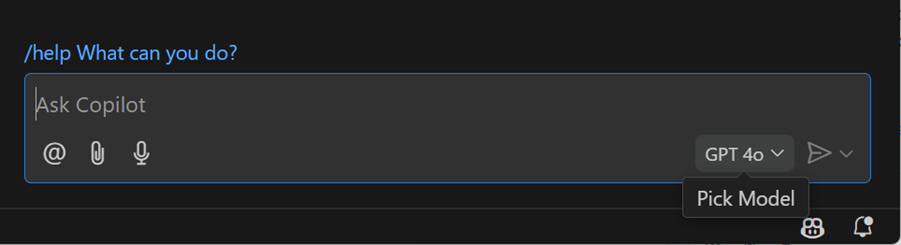
We've upgraded Copilot Inline Chat to GPT-4o, to give you faster, more accurate, and higher-quality code and explanations when you use Chat in the editor.
You can allow GitHub Copilot to return code that could match publicly available code on GitHub.com. When this functionality is enabled for your organization subscription or personal subscription, Copilot code completions already provided you with details about the matches that were detected. We now show you these matches for public code in Copilot Chat as well.
If this is enabled for your organization or subscription, you might see a message at the end of the response with a View matches link. If you select the link, an editor opens that shows you the details of the matching code references with more details.
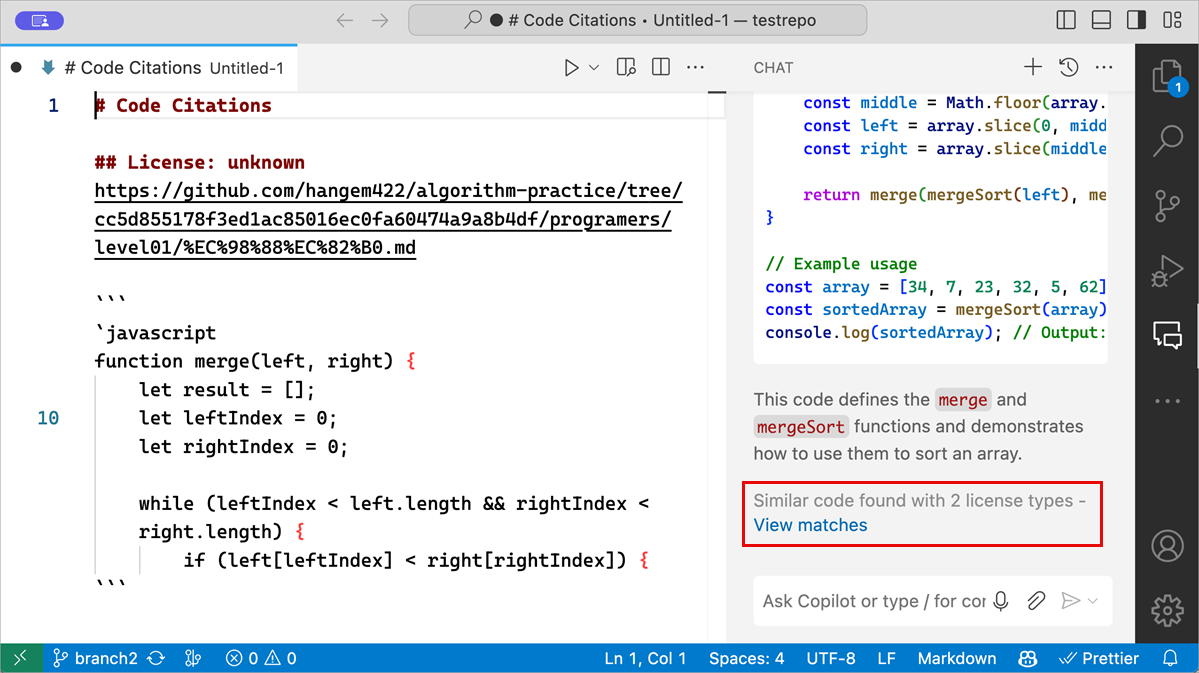
Get more information about code referencing in GitHub Copilot on the GitHub Blog.
In chat input fields you can now type #<filename> to get file names suggested and attached. This works in chat locations that support file attachments, such as panel-chat, quick-chat, inline- and notebook-chat.
We've improved rendering of any workspace file paths mentioned in Copilot responses. These paths are very common when asking @workspace questions.
The first thing you'll notice is that paths to workspace files now include a file icon so that the type of file can be easily distinguished (these file icons are based on your current file icon theme):
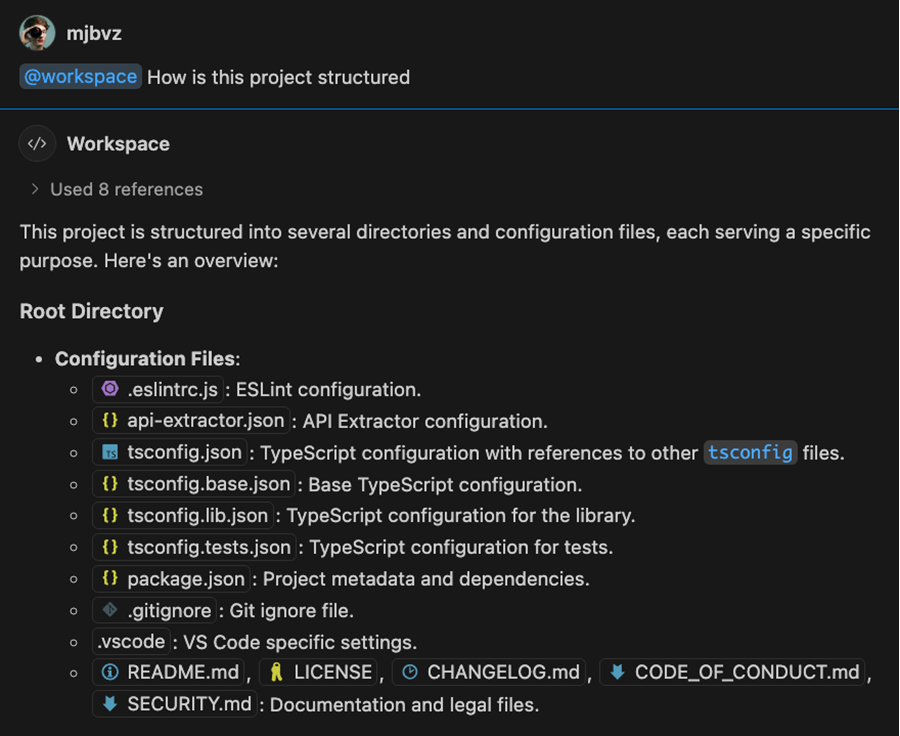
These paths are clickable links, so just click on them to open the corresponding file. You can even use drag and and drop to open the file in a new editor group or insert it into a text editor by holding shift before dropping:
By default these links only show the file name but you can hover over them to see the full file path:
You can also right click on one of these paths to open a context menu with additional commands, including copying a relative path to the resource or revealing it in your operating system's explorer:
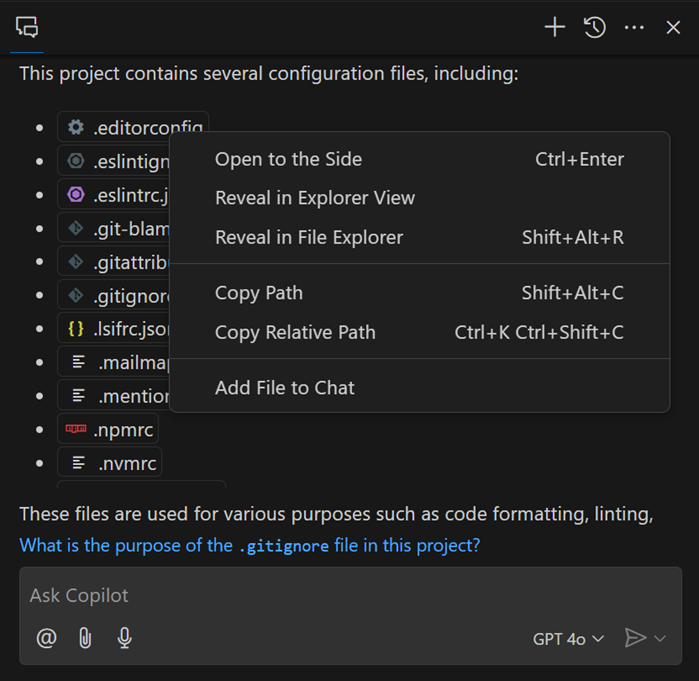
We plan to continue improving workspace path rendering in the coming iterations, as well as making similar improvements to symbol names in responses.
You can now easily attach additional files as context for a chat prompt by dragging files or editor tabs from the workbench directly into chat. By holding Shift, you can drop a file into Inline Chat instead of opening it in the editor to add it as context.
There are multiple ways to attach a file or editor selection as relevant context to your chat request, for example by using the 📎 button or typing #. Previously, this context was added only for the current request but was not included in the history of follow-on requests. Now, these attachments are kept in history, so that you can keep asking about them without having to reattach this context.
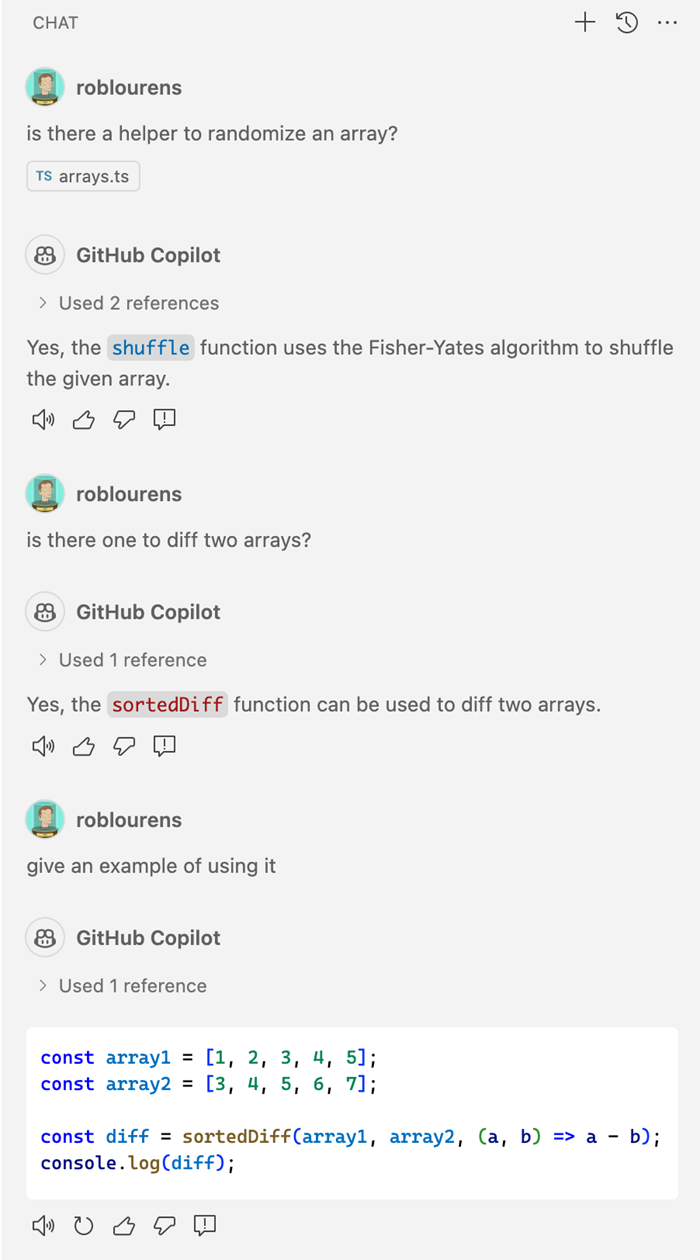
The native REPL editor used by the Python extension now supports Copilot Inline Chat and code completions directly in the input box.
When you use Copilot to generate code in a notebook, you can now accept the response and run it directly from the Inline Chat toolbar.
When using Copilot in a notebook, you can now attach variables from Jupyter kernel in your requests, via either #kernelVariable completions, or by using the Attach Context (Ctrl+/) action from the Inline Chat control. Adding variables gives you more precise control over the context of your requests in Jupyter notebooks.
We've refreshed the chat panel with a clean new welcome view, and we've updated the layout of the chat input. We've added a @ button to make it easier to find chat participants that are built-in or from chat extensions that you've installed. You can also still find these by typing / or @ as you could before.
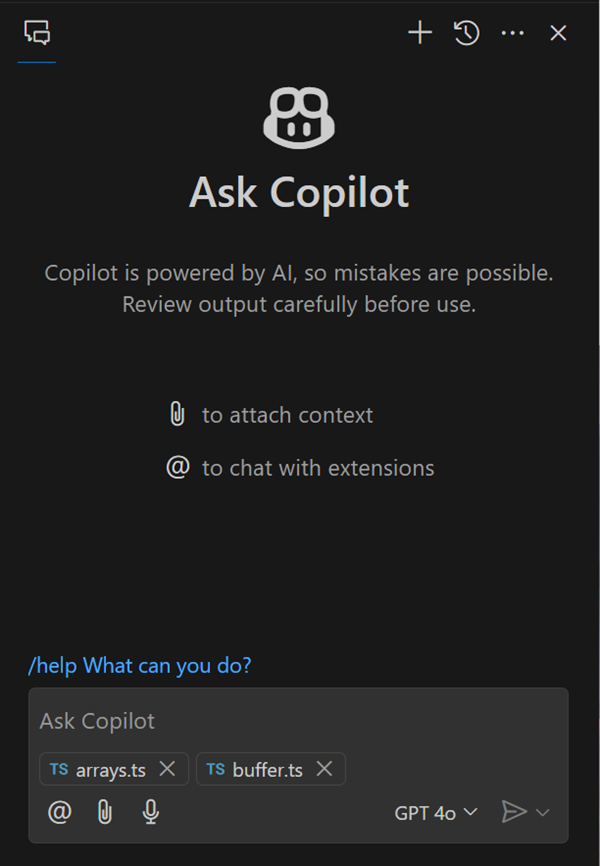
Setting: github.copilot.chat.search.semanticTextResults
The Search view enables you to perform an exact search across your files. We have now added a semantic search functionality to the Search view that uses Copilot to give search results that are semantically relevant.
Notice in the screenshot that the text results only contain exact matches for "diff view", whereas the GitHub Copilot results also have relevant matches for "merge editor".
This functionality is still in preview and by default, the setting is not enabled. Try it out and let us know what you think!
Setting: github.copilot.chat.fixTestFailure.enabled
We've added specialized logic to help you to diagnose the reasons why unit tests fail. This logic is triggered in some scenarios with /fix, and you can also invoke it through the /fixTestFailure slash command. The command is enabled in chat by default but can be disabled via the setting github.copilot.chat.fixTestFailure.enabled.
Setting: github.copilot.chat.experimental.setupTests.enabled
We added an experimental /setupTests slash command that can recommend a testing framework for your workspace, provide steps to setup and configure it, and recommend a VS Code extension to provide testing integration in VS Code. This can save you time and effort to get started with testing for your code.
When you use the /tests command to generate tests for your code, it can recommend /setupTests and testing extensions if looks like such an integration has not been set up yet in your workspace.
Setting: github.copilot.chat.experimental.startDebugging.enabled
In this milestone, we made improvements to the experimental /startDebugging slash command. This command enables you to easily find or create a launch configuration and start debugging your application seamlessly. When you use @vscode in Copilot Chat, /startDebugging is now available by default.

We are experimenting with a command center entry for chat. It provides quick access to all chat relevant commands, like starting chat or attaching context. You can enable this via chat.commandCenter.enabled but note that the command center itself needs to be enabled as well.
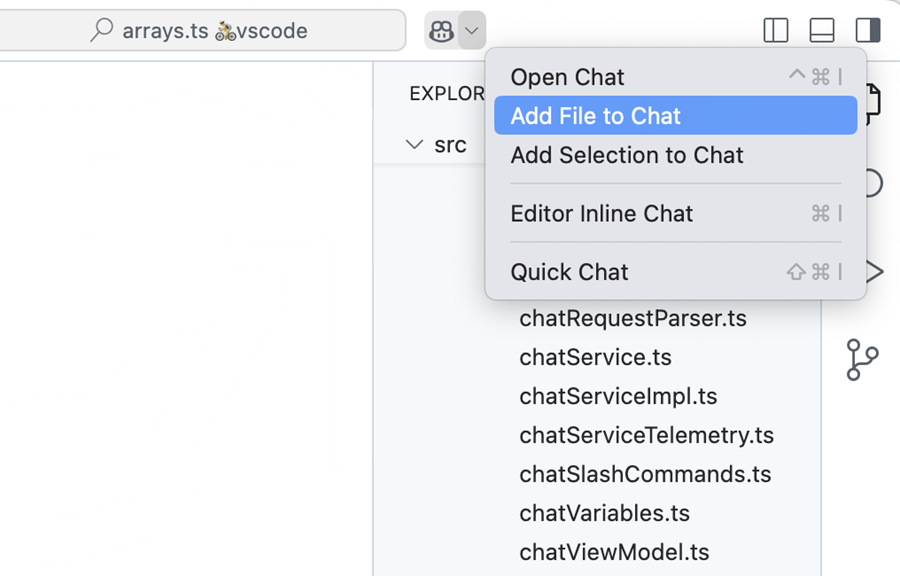
With the github.copilot.chat.experimental.temporalContext.enabled setting, you can instruct Inline Chat to consider files that you have opened or edited recently. We have improved this feature and invite everyone to give it a go.