This article is part three of my series on how to manage secrets on Kubernetes by using Pulumi. If you haven't read the previous articles, here are the links to them:
%[https://blog.ediri.io/advanced-secret-management-on-kubernetes-with-pulumi-secrets-store-csi-driver]
In this article, we will be looking at how to use Doppler to manage secrets on Kubernetes. But before we get into the details of how to set up the integration, let's take a look at what Doppler is what it can do for us.
Doppler defines itself as a "SecretOps Platform". Currently, it is a cloud-based service that allows teams to securely manage and distribute secrets across their applications and infrastructure.
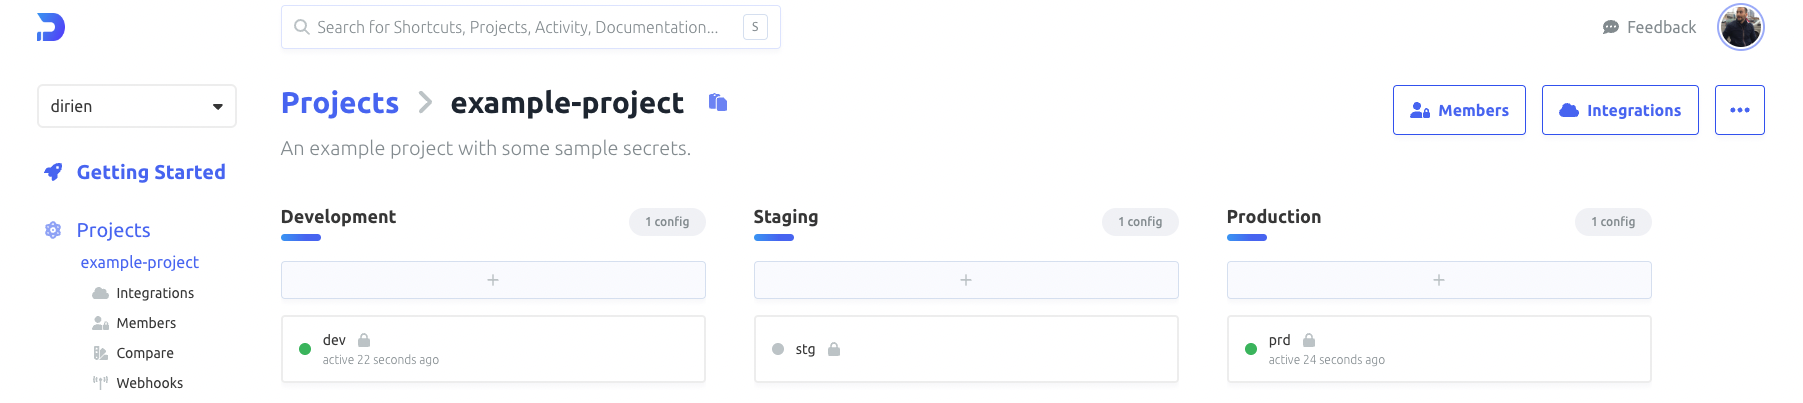
The Doppler platform is built with collaboration in mind. It supports out-of-the-box concepts like users, groups, and roles. So far it's like any other tool that supports role-based access control (RBAC). But with Doppler, there is also the concept of projects. A project is a collection of secrets that are scoped to a specific application or service. This allows you also to have project-based access control. Next to projects, Doppler also supports environments, which allows you to have different values for the same secret in different environments. For example, you can have a DB_URL secret has a different value in your dev environment than in your prod environment.
What I like the most about Doppler is a very huge list of integrations that it supports. And of all the integrations, the Kubernetes integration is the one that I like the most. And that's what we will be looking at in this article.

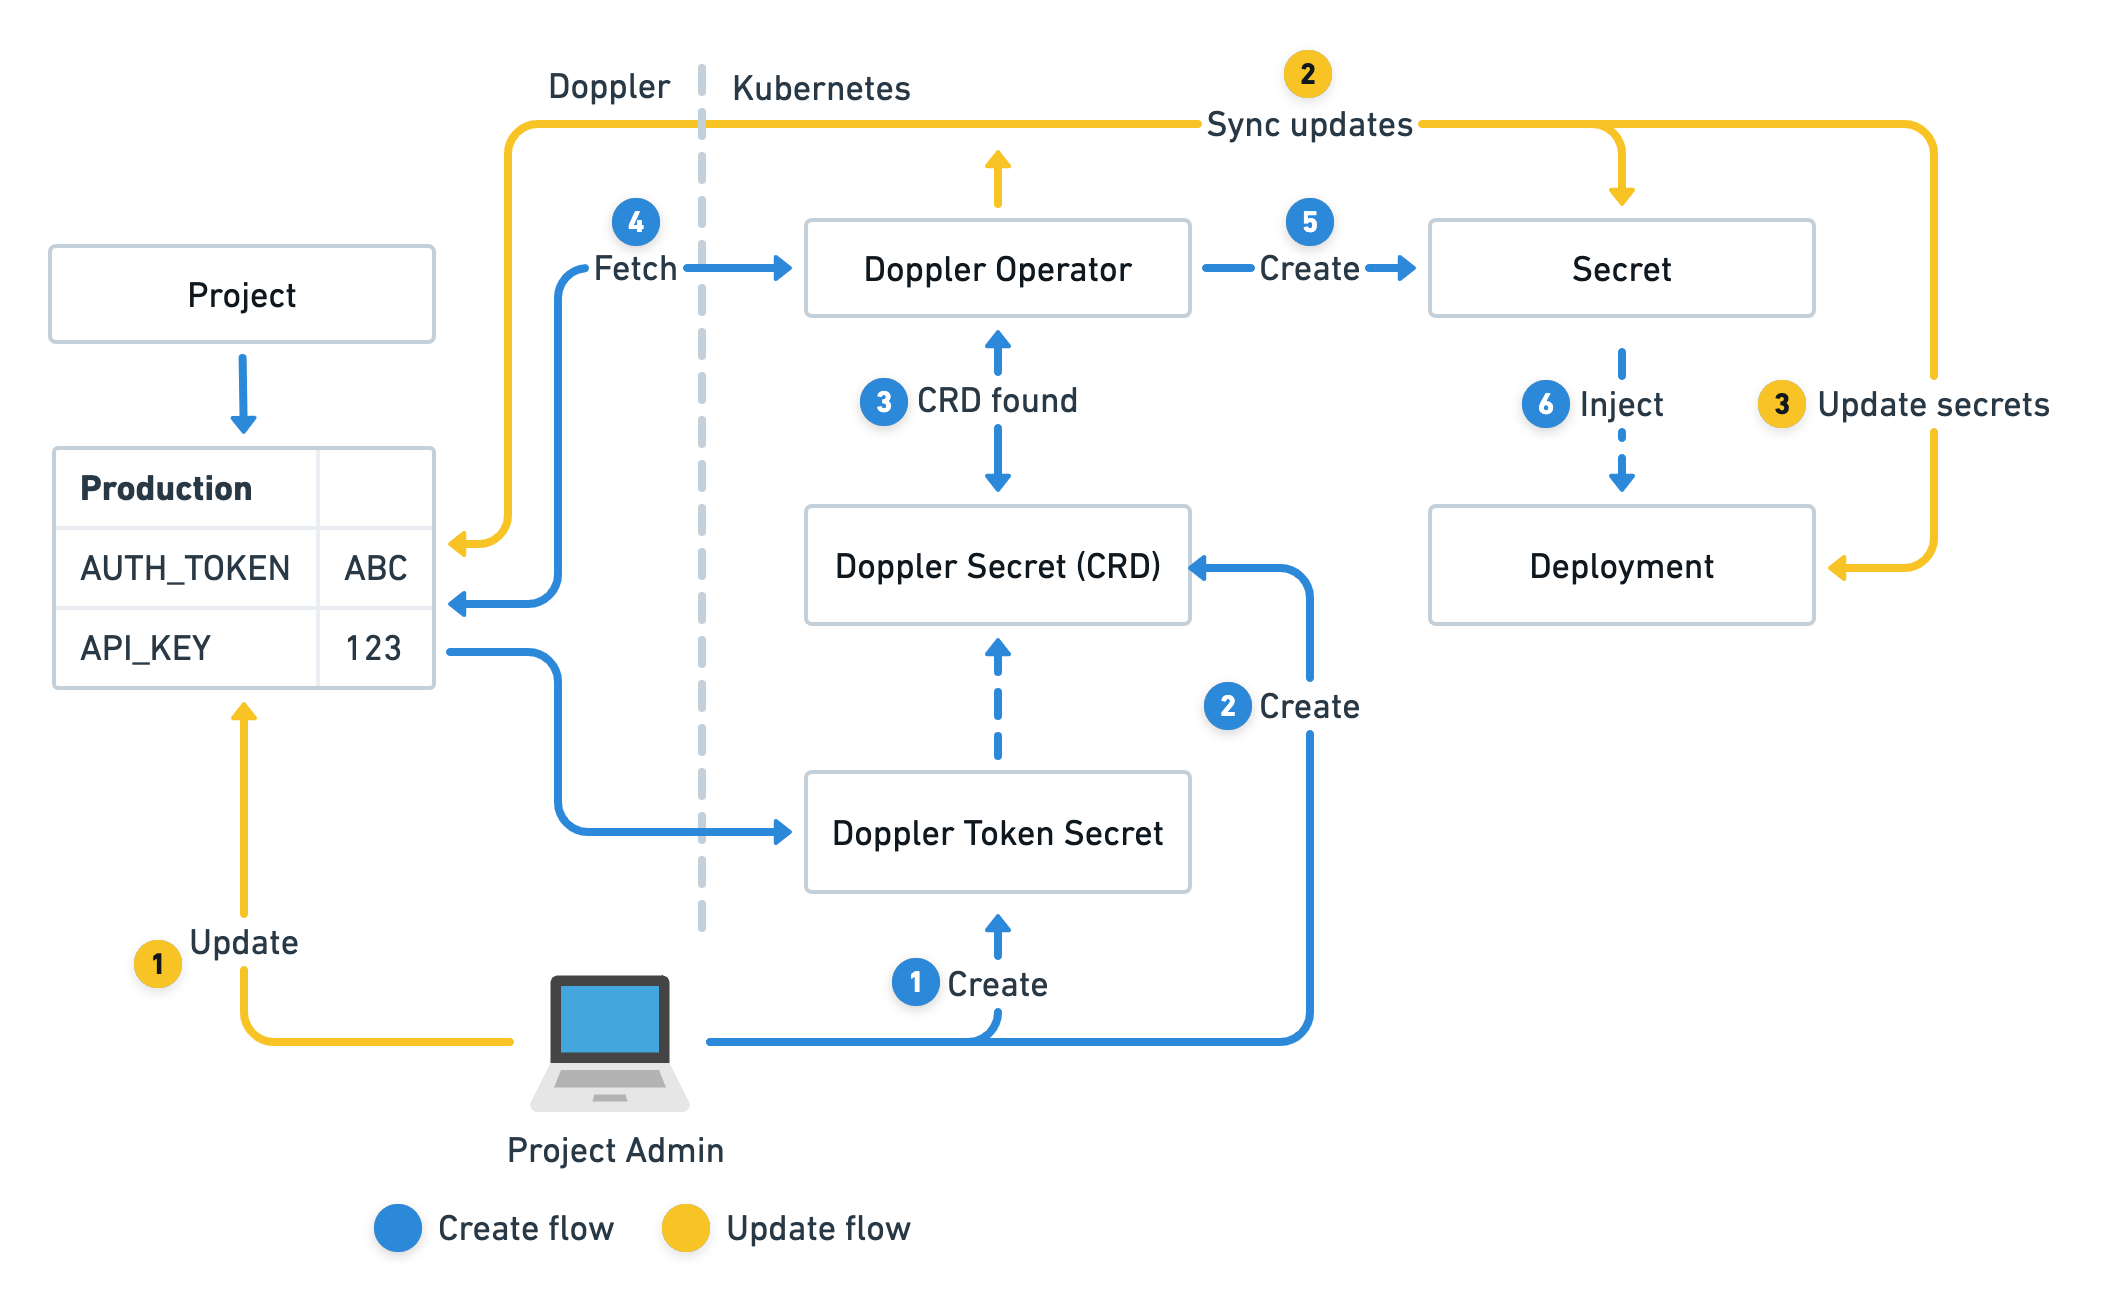
The Doppler Secrets Operator is an automated service that operates within a Kubernetes cluster, ensuring that secrets are continuously synchronized and deployments are updated accordingly.
Operating from within its unique namespace, doppler-operator-system, the Operator maintains strict access control through RBAC policies. It utilizes DopplerSecret custom resources, which specify the Doppler configuration to synchronize, the name of the Kubernetes secret under its management, and the namespace where it will be created.
The Doppler Secrets Operator is exclusively responsible for the constant synchronization of secret updates from Doppler to the Kubernetes secrets it manages. It can also optionally reload deployments that reference a managed secret, assuring your applications always have access to the most recent version of secrets.
To follow along with this article, you will need the following:
-
Pulumi CLI installed.
-
kubectl installed.
-
optional K9s, if you want to quickly interact with your cluster.
-
Doppler Account installed.
-
DigitalOcean Account installed.
-
vcluster cli installed.
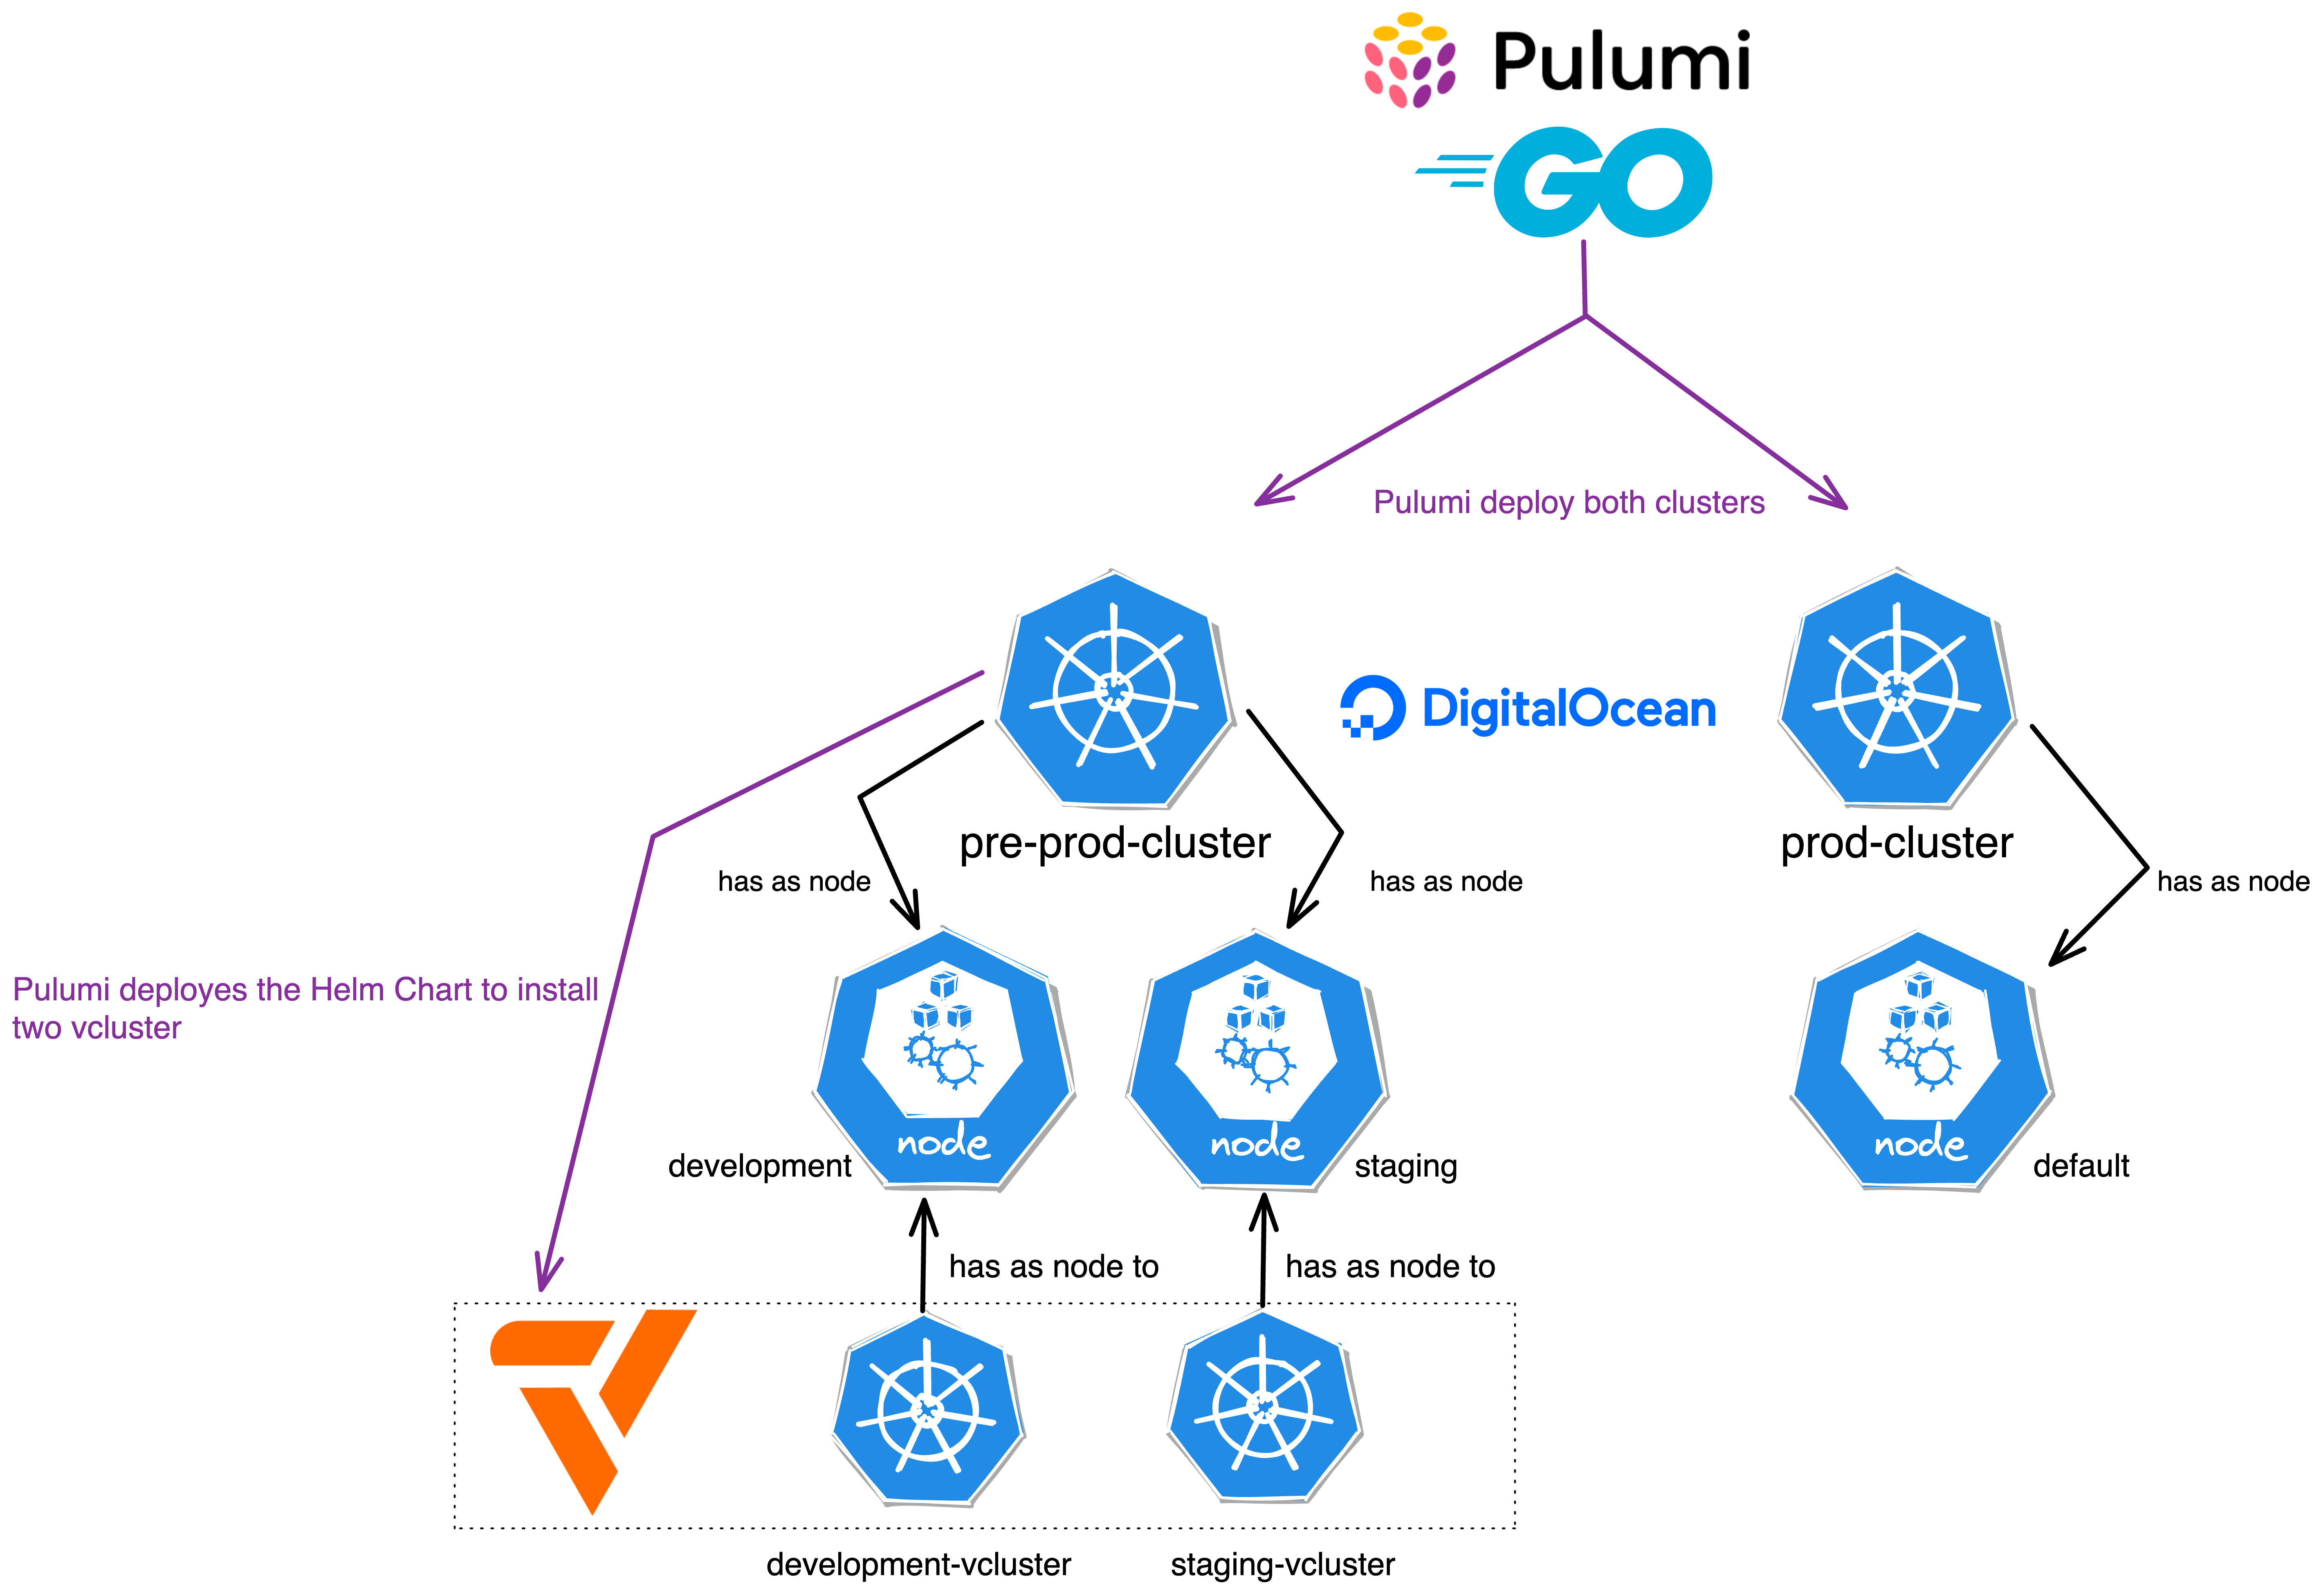
In this demo, we will add a little twist to the setup! We will deploy two DigitalOcean Kubernetes (DOKS) clusters, one for development and staging and one for production. The twist is, that the development and staging cluster will be deployed as vcluster on top of the DOKS cluster. The production cluster will be deployed as a standalone cluster.

You don't know, what vcluster is? Spend three minutes and watch this.
%[https://www.youtube.com/watch?v=gQ-KG57ruvY]
Let's start by creating a new Pulumi project. We will call it pulumi-doppler and we will use golang as the language
mkdir pulumi-doppler
cd pulumi-doppler
pulumi new digitalocean-go --force
You can leave the default values in the prompts.
This command will walk you through creating a new Pulumi project.

Enter a value or leave blank to accept the (default), and press <ENTER>.
Press ^C at any time to quit.

project name: (pulumi-doppler)
project description: (A minimal DigitalOcean Go Pulumi program)
Created project 'pulumi-doppler'

Please enter your desired stack name.
To create a stack in an organization, use the format <org-name>/<stack-name> (e.g. `acmecorp/dev`).
stack name: (dev)
Created stack 'dev'

Installing dependencies...

go: downloading github.com/pulumi/pulumi-digitalocean/sdk/v4 v4.19.1
Finished installing dependencies

Your new project is ready to go! ✨

To perform an initial deployment, run `pulumi up`
We can then delete the contents of the main.go file and replace it with the following code:
package main

import (
	"github.com/pulumi/pulumi-digitalocean/sdk/v4/go/digitalocean"
	"github.com/pulumi/pulumi/sdk/v3/go/pulumi"
)

type NodePoolArgs struct {
	Name      string
	Size      string
	NodeCount int
	Label     string
}

type ClusterArgs struct {
	Name     string
	Region   string
	Version  string
	NodePool *[]NodePoolArgs
}

const (
	DefaultNodePoolName = "default"
	DefaultNodePoolSize = "s-2vcpu-4gb"
)

func createDOKSCLuster(ctx *pulumi.Context, args *ClusterArgs) (pulumi.StringOutput, error) {
	// Create a new DOKS cluster
	cluster, err := digitalocean.NewKubernetesCluster(ctx, args.Name, &digitalocean.KubernetesClusterArgs{
		Region:  pulumi.String(args.Region),
		Version: pulumi.String(args.Version),
		NodePool: &digitalocean.KubernetesClusterNodePoolArgs{
			Name:      pulumi.String(DefaultNodePoolName),
			Size:      pulumi.String(DefaultNodePoolSize),
			NodeCount: pulumi.Int(1),
			AutoScale: pulumi.Bool(false),
		},
	})

	if err != nil {
		return pulumi.StringOutput{}, err
	}
	if args.NodePool != nil {
		for _, nodePool := range *args.NodePool {
			_, err := digitalocean.NewKubernetesNodePool(ctx, nodePool.Name, &digitalocean.KubernetesNodePoolArgs{
				ClusterId: cluster.ID(),
				Name:      pulumi.String(nodePool.Name),
				Size:      pulumi.String(nodePool.Size),
				NodeCount: pulumi.Int(nodePool.NodeCount),
				Labels:    pulumi.StringMap{"env": pulumi.String(nodePool.Label)},
			})
			if err != nil {
				return pulumi.StringOutput{}, err
			}
		}
	}

	output, _ := cluster.KubeConfigs.ApplyT(func(kcs []digitalocean.KubernetesClusterKubeConfig) (string, error) {
		if len(kcs) == 0 {
			return "", nil
		}
		return *kcs[0].RawConfig, nil
	}).(pulumi.StringOutput)

	return output, nil
}

func main() {
	pulumi.Run(func(ctx *pulumi.Context) error {
		// Create the DOKS cluster for development and staging
		preProd, err := createDOKSCLuster(ctx, &ClusterArgs{
			Name:    "pre-prod-cluster",
			Region:  "fra1",
			Version: "1.26.3-do.0",
			NodePool: &[]NodePoolArgs{
				{
					Name:      "development",
					Size:      "s-2vcpu-4gb",
					NodeCount: 1,
					Label:     "development",
				},
				{
					Name:      "staging",
					Size:      "s-2vcpu-4gb",
					NodeCount: 1,
					Label:     "staging",
				},
			},
		})
		if err != nil {
			return err
		}
		ctx.Export("preProdKubeConfig", pulumi.ToSecret(preProd))

		// Create the DOKS cluster for production
		prod, err := createDOKSCLuster(ctx, &ClusterArgs{
			Name:    "prod-cluster",
			Region:  "fra1",
			Version: "1.25.8-do.0",
		})
		if err != nil {
			return err
		}
		ctx.Export("prodKubeConfig", pulumi.ToSecret(prod))
		return nil
	})
}
Let's break down the code into smaller pieces to understand what's going on here:
-
Two structures,
NodePoolArgsandClusterArgs, are declared. These structures are used to encapsulate information necessary for the creation of aDOKScluster.-
NodePoolArgsencapsulates details about a node pool, which includes itsName,Size,NodeCount(the number of nodes in the pool), andLabel(a string to label the node pool). -
ClusterArgsencapsulates information about aDOKScluster. This includes itsName,Region,Version, andNodePoolconfiguration.
-
-
The
createDOKSCLusterfunction is declared. This function is responsible for creating a DOKS cluster using the provided arguments, which are encapsulated in theClusterArgsstructure.-
The function uses the
NewKubernetesClustermethod from the DigitalOcean Pulumi provider to create a newDOKScluster. -
If the cluster creation is successful and additional
NodePoolArgsare provided, the function iterates over the slice ofNodePoolArgsto create additional node pools using theNewKubernetesNodePoolmethod. -
If the creation of additional node pools is successful, the function retrieves the raw Kubernetes configuration of the newly created cluster. This configuration is essential for interacting with the cluster.
-
-
The
mainfunction serves as the entry point of the program and two DOKS clusters are created – one for pre-production and another for production. Each cluster has its uniqueName,Region,Version, andNodePoolconfiguration.-
The pre-production cluster has a default node pool and two additional node pools labeled "development" and " staging". Each of these additional node pools has 1 node of size "s-2vcpu-4gb".
-
The production cluster is created with a default node pool.
-
With the infrastructure code in place, we can now deploy the DOKS clusters. Don't worry, we will add the vcluster and Doppler components later.
Note: Set the
DIGITALOCEAN_TOKENenvironment variable to your DigitalOcean API token before running the Pulumi command.
export DIGITALOCEAN_TOKEN=<your-digitalocean-api-token>
pulumi up
Deploying the DOKS clusters will take a few minutes. In the process, Pulumi will ask you to confirm the deployment and give you a summary of the resources that will be created.
Note: You can use the
--yesand--skip-previewflags to skip the confirmation prompt and preview, respectively.
 pulumi up
Previewing update (dev)

View in Browser (Ctrl+O): https://app.pulumi.com/dirien/pulumi-doppler/dev/previews/758944fa-5643-410a-b11a-ee4a3a95a227

     Type                                     Name                Plan
 +   pulumi:pulumi:Stack                      pulumi-doppler-dev  create
 +   ├─ digitalocean:index:KubernetesCluster  prod-cluster        create
 +   └─ digitalocean:index:KubernetesCluster  pre-prod-cluster    create


Outputs:
    preProdKubeConfig: [secret]
    prodKubeConfig   : [secret]

Resources:
    + 3 to create

Do you want to perform this update? yes
Updating (dev)

View in Browser (Ctrl+O): https://app.pulumi.com/dirien/pulumi-doppler/dev/updates/1

     Type                                     Name                Status
 +   pulumi:pulumi:Stack                      pulumi-doppler-dev  created (415s)
 +   ├─ digitalocean:index:KubernetesCluster  prod-cluster        created (413s)
 +   └─ digitalocean:index:KubernetesCluster  pre-prod-cluster    created (302s)


Outputs:
    preProdKubeConfig: [secret]
    prodKubeConfig   : [secret]

Resources:
    + 3 created

Duration: 6m58sIf you have the kubectl CLI installed, you can use the pulumi stack output command to retrieve the raw Kubernetes configuration of the clusters.
This is helpful in case you want to debug the clusters or interact with them using the kubectl CLI.
pulumi stack output preProdKubeConfig --show-secrets > pre-prod-cluster.yaml
export KUBECONFIG=pre-prod-cluster.yaml
kubectl get nodes -o wide
You should see an output similar to the following:
pulumi stack output preProdKubeConfig --show-secrets > pre-prod-cluster.yaml
export KUBECONFIG=pre-prod-cluster.yaml
kubectl get nodes -o wide
NAME                STATUS   ROLES    AGE     VERSION   INTERNAL-IP   EXTERNAL-IP       OS-IMAGE                         KERNEL-VERSION          CONTAINER-RUNTIME
default-fx9bk       Ready    <none>   4m30s   v1.26.3   10.135.0.5    142.93.162.26     Debian GNU/Linux 11 (bullseye)   6.0.0-0.deb11.6-amd64   containerd://1.6.14
development-fx9gg   Ready    <none>   61s     v1.26.3   10.135.0.6    134.209.245.105   Debian GNU/Linux 11 (bullseye)   6.0.0-0.deb11.6-amd64   containerd://1.6.14
staging-fx9gw Ready <none> 26s v1.26.3 10.135.0.7 207.154.215.11 Debian GNU/Linux 11 (bullseye) 6.0.0-0.deb11.6-amd64 containerd://1.6.14Now that we have the DOKS clusters up and running, we can add the vcluster and Doppler components to them.
First, we need to add the pulumi-kubernetes package to our project:
go get github.com/pulumi/pulumi-kubernetes/sdk/go/kubernetesThen head over to our main.go file and add the following code:
package main

// omitted for brevity

func deployProd(ctx *pulumi.Context, cluster pulumi.StringOutput) error {
	productionKubernetesProvider, err := kubernetes.NewProvider(ctx, "production-k8s", &kubernetes.ProviderArgs{
		Kubeconfig:            cluster,
		EnableServerSideApply: pulumi.Bool(true),
	})
	if err != nil {
		return err
	}

	dopplerOperatorHelm, err := helm.NewRelease(ctx, "doppler-operator", &helm.ReleaseArgs{
		Name:            pulumi.String("doppler-operator"),
		Chart:           pulumi.String("doppler-kubernetes-operator"),
		Namespace:       pulumi.String("doppler-operator-system"),
		CreateNamespace: pulumi.Bool(false),
		RepositoryOpts: &helm.RepositoryOptsArgs{
			Repo: pulumi.String("https://helm.doppler.com"),
		},
		Version: pulumi.String("1.2.5"),
	}, pulumi.Provider(productionKubernetesProvider))
	if err != nil {
		return err
	}

	secret, err := v1.NewSecret(ctx, "doppler-token-secret", &v1.SecretArgs{
		Metadata: &metav1.ObjectMetaArgs{
			Name:      pulumi.String("doppler-token-secret"),
			Namespace: pulumi.String("doppler-operator-system"),
		},
		Type: pulumi.String("Opaque"),
		Data: pulumi.StringMap{
			"serviceToken": config.GetSecret(ctx, "doks-production").ApplyT(func(s string) (string, error) {
				return base64.StdEncoding.EncodeToString([]byte(s)), nil
			}).(pulumi.StringOutput),
		},
	}, pulumi.Provider(productionKubernetesProvider), pulumi.DependsOn([]pulumi.Resource{dopplerOperatorHelm}))
	if err != nil {
		return err
	}

	_, err = apiextensions.NewCustomResource(ctx, "dopplersecrets", &apiextensions.CustomResourceArgs{
		ApiVersion: pulumi.String("secrets.doppler.com/v1alpha1"),
		Kind:       pulumi.String("DopplerSecret"),
		Metadata: &metav1.ObjectMetaArgs{
			Name:      pulumi.String("doppler-token-secret"),
			Namespace: secret.Metadata.Namespace().Elem(),
		},
		OtherFields: kubernetes.UntypedArgs{
			"spec": pulumi.Map{
				"tokenSecret": pulumi.Map{
					"name":      secret.Metadata.Name().Elem(),
					"namespace": secret.Metadata.Namespace().Elem(),
				},
				"managedSecret": pulumi.Map{
					"name":      pulumi.String("doppler-secret"),
					"namespace": pulumi.String("default"),
				},
			},
		},
	}, pulumi.Provider(productionKubernetesProvider), pulumi.DependsOn([]pulumi.Resource{dopplerOperatorHelm}))
	if err != nil {
		return err
	}
	_, err = appsv1.NewDeployment(ctx, "hello-server", &appsv1.DeploymentArgs{
		Metadata: &metav1.ObjectMetaArgs{
			Name: pulumi.String("hello-server"),
			Annotations: pulumi.StringMap{
				"secrets.doppler.com/reload": pulumi.String("true"),
			},
		},
		Spec: &appsv1.DeploymentSpecArgs{
			Replicas: pulumi.Int(1),
			Selector: &metav1.LabelSelectorArgs{
				MatchLabels: pulumi.StringMap{
					"app": pulumi.String("hello-server"),
				},
			},
			Template: &v1.PodTemplateSpecArgs{
				Metadata: &metav1.ObjectMetaArgs{
					Labels: pulumi.StringMap{
						"app": pulumi.String("hello-server"),
					},
				},
				Spec: &v1.PodSpecArgs{
					Containers: v1.ContainerArray{
						v1.ContainerArgs{
							Name:  pulumi.String("hello-server"),
							Image: pulumi.String("ghcr.io/dirien/hello-server/hello-server:latest"),
							Ports: v1.ContainerPortArray{
								v1.ContainerPortArgs{
									ContainerPort: pulumi.Int(8080),
								},
							},
							EnvFrom: v1.EnvFromSourceArray{
								v1.EnvFromSourceArgs{
									SecretRef: &v1.SecretEnvSourceArgs{
										Name: pulumi.String("doppler-secret"),
									},
								},
							},
						},
					},
				},
			},
		},
	}, pulumi.Provider(productionKubernetesProvider))
	if err != nil {
		return err
	}
	return nil
}

func deployPreProd(ctx *pulumi.Context, cluster pulumi.StringOutput, stage string) error {
	preProdKubernetesProvider, err := kubernetes.NewProvider(ctx, fmt.Sprintf("%s-k8s", stage), &kubernetes.ProviderArgs{
		Kubeconfig:            cluster,
		EnableServerSideApply: pulumi.Bool(true),
	})
	if err != nil {
		return err
	}
	_, err = helm.NewRelease(ctx, fmt.Sprintf("%s-vcluster", stage), &helm.ReleaseArgs{
		Name:  pulumi.String(fmt.Sprintf("%s-vcluster", stage)),
		Chart: pulumi.String("vcluster"),
		RepositoryOpts: &helm.RepositoryOptsArgs{
			Repo: pulumi.String("https://charts.loft.sh"),
		},
		Values: pulumi.Map{
			"sync": pulumi.Map{
				"nodes": pulumi.Map{
					"enabled":         pulumi.Bool(true),
					"enableScheduler": pulumi.Bool(true),
					"nodeSelector":    pulumi.Sprintf("env=%s", stage),
				},
			},
			"nodeSelector": pulumi.Map{
				"env": pulumi.String(stage),
			},
			"init": pulumi.Map{
				"helm": pulumi.Array{
					pulumi.Map{
						"chart": pulumi.Map{
							"name":    pulumi.String("doppler-kubernetes-operator"),
							"repo":    pulumi.String("https://helm.doppler.com"),
							"version": pulumi.String("1.2.5"),
						},
						"release": pulumi.Map{
							"name":      pulumi.String("doppler-operator"),
							"namespace": pulumi.String("doppler-operator-system"),
						},
					},
				},
			},
		},
	}, pulumi.Provider(preProdKubernetesProvider))
	if err != nil {
		return err
	}
	return nil
}
func main() {
	pulumi.Run(func(ctx *pulumi.Context) error {
		// omitted for brevity

		// Deploy the vcluster to development and staging
		err = deployPreProd(ctx, preProd, "development")
		if err != nil {
			return err
		}
		err = deployPreProd(ctx, preProd, "staging")
		if err != nil {
			return err
		}

		// omitted for brevity
		err = deployProd(ctx, prod)
		if err != nil {
			return err
		}
		return nil
	})
}
A lot is going on here, so let's break it down again.
-
The
deployPreProdfunction is responsible for deploying avclusterto the pre-production environments, including development and staging. This function employs the Helm chart for deploying thevclusterand eachvclusteris configured to use specific node pools - namelydevelopmentandstaging.-
The
preProdKubernetesProvideris created with the given cluster configuration, which is identified by the stage parameter. This provider enables Pulumi to manage resources in a Kubernetes cluster. -
The
sync.nodes.nodeSelectorfield is used to specify the node pool for thevclustersynchronization feature, whereas thenodeSelectorfield determines the node pool for thevclusteritself. This dual configuration is implemented to ensure the correct allocation and utilization of resources within the respective environments. -
In addition to this, the
init.helmfield is leveraged to deploy the Doppler Secrets Operator within thevcluster. This is achieved by specifying the name, repository, and version of the Helm chart.
-
-
The function
deployProdis used to deploy the Doppler Secrets Operator without the usage ofvcluster. Remember this was our production cluster.-
A Kubernetes provider
productionKubernetesProvider, which is a representation of the Kubernetes cluster where the resources will be deployed. It uses the provided cluster string output (which is presumably a kubeconfig) to connect to the Kubernetes cluster. -
A Kubernetes secret, named
doppler-token-secret, is created in thedoppler-operator-systemnamespace. This secret is created with data retrieved from the Pulumi configuration usingconfig.GetSecret(ctx, " doks-production"). This data is then base64 encoded before being added to the secret.
See below for how to set the config on Pulumi! -
A custom resource, of kind
DopplerSecret, which includes references to thedoppler-token-secretand a managed secret nameddoppler-secretin thedefaultnamespace. -
A Kubernetes deployment, named
hello-server, which creates a pod running theghcr.io/dirien/hello-server/hello-server:latestDocker image and exposes port8080. This deployment includes an environment variable sourced from thedoppler-secret.
-
-
Both functions will be called in the
mainfunction, after the creation of the DOKS cluster.
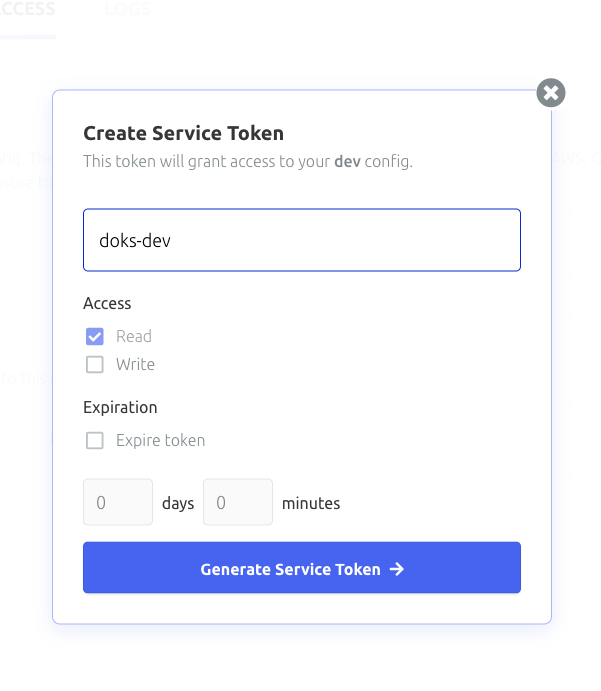
To generate a service token, head over to the Doppler dashboard, and select your project and environment. Click the Access tab and generate the token there


Now you can use the Pulumi config command to set the service token:
pulumi config set doks-production <toke> --secretNow with all set, we can call our Pulumi function to deploy the vclusters and Doppler Secrets Operator to all of our environments.
pulumi upIf you love the thrill, set
--yesto skip the confirmation prompt and--skip-previewto skip the preview step.
After a couple of minutes, everything should be deployed and ready to go. We can now try to test everything out.
I left the demo example at Doppler, as it is.

The easiest way to test the Doppler Secrets Operator is in the production environment. This is because I already have deployed a demo application that uses the secrets the Doppler Secrets Operator retrieves from Doppler and created a Kubernetes secret for it.
Again, this is a short demo. I did not create any Ingress or Service to expose the application. Instead, we will use kube port forwarding to access the application.
pulumi stack output prodKubeConfig --show-secrets > prod.yaml
export KUBECONFIG=prod.yaml
kubectl port-forward deployment/hello-server 8080:8080
And then use curl to access the application and retrieve the secret. The env endpoint will return the value of any environment variable set in the pod. In this case, the DB_URL environment variable.
curl http://localhost:8080/env/DB_URL
DB_URL=psql://autopilot@10.127.172.12/modelX%
That looks good, let's try if the pod gets restarted when we update the secret in Doppler. To achieve this, you need to add "secrets.doppler.com/reload": "true" to the annotations of the deployment.

We keep an eye on the pod using kubectl get pods -w and update the secret in Doppler. After a couple of seconds, the pod should be restarted.
k get pods -o wide -w
NAME                            READY   STATUS    RESTARTS   AGE   IP             NODE            NOMINATED NODE   READINESS GATES
hello-server-66bd4dd5f5-swktv   1/1     Running   0          19m   10.244.0.124   default-fx9cn   <none>           <none>
hello-server-55bbf4b78c-b49xq   0/1     Pending   0          0s    <none>         <none>          <none>           <none>
hello-server-55bbf4b78c-b49xq   0/1     Pending   0          0s    <none>         default-fx9cn   <none>           <none>
hello-server-55bbf4b78c-b49xq   0/1     ContainerCreating   0          0s    <none>         default-fx9cn   <none>           <none>
hello-server-55bbf4b78c-b49xq   1/1     Running             0          2s    10.244.0.73    default-fx9cn   <none>           <none>
hello-server-66bd4dd5f5-swktv   1/1     Terminating         0          20m   10.244.0.124   default-fx9cn   <none>           <none>
hello-server-66bd4dd5f5-swktv   0/1     Terminating         0          20m   10.244.0.124   default-fx9cn   <none>           <none>
hello-server-66bd4dd5f5-swktv   0/1     Terminating         0          20m   10.244.0.124   default-fx9cn   <none>           <none>
hello-server-66bd4dd5f5-swktv   0/1     Terminating         0          20m   10.244.0.124   default-fx9cn   <none>           <none>
Recreating the port-forward and calling the env endpoint again should show the updated secret.
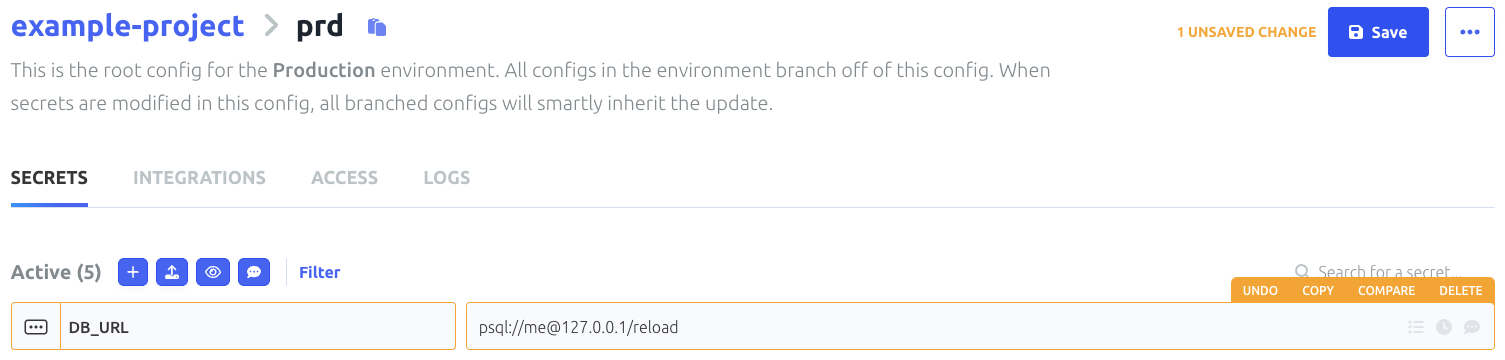
curl http://localhost:8080/env/DB_URL
DB_URL=psql://me@127.0.0.1/reload
Full success! Now we can test the same in the development and staging environments. For this, we need to use the kubeconfig of the pre-prod-cluster
pulumi stack output preProdKubeConfig --show-secrets > pre-prod.yaml
export KUBECONFIG=pre-prod.yaml
And then we use the vcluster context to access the vcluster in the development and staging environments.
vcluster connect development-vcluster -n default
done √ Switched active kube context to vcluster_development-vcluster_default_do-fra1-pre-prod-cluster-e058708
warn   Since you are using port-forwarding to connect, you will need to leave this terminal open
- Use CTRL+C to return to your previous kube context
- Use `kubectl get namespaces` in another terminal to access the vcluster
Forwarding from 127.0.0.1:10511 -> 8443
Forwarding from [::1]:10511 -> 8443
Check that the vcluster has the development node pool assigned to it!
kubectl get nodes
NAME STATUS ROLES AGE VERSION
development-fx9gg Ready    <none>   25h v1.26.3
That looks very good, last check is to see if the Doppler Secrets Operator is running in the vcluster.
kubectl get pods -n doppler-operator-system
NAME                                                   READY   STATUS    RESTARTS   AGE
doppler-operator-controller-manager-57b55f6fdf-qmh26   2/2     Running   0          24h
Everything looks good, we can now test the Doppler Secrets Operator in the development environment.
We create a service token as Kubernetes secret in the doppler-operator-system namespace.
kubectl create secret generic doppler-token-secret \
  --namespace doppler-operator-system \
  --from-literal=serviceToken=<DOPPLER_SERVICE_TOKEN_FOR_DEVELOPMENT_ENVIRONMENT>
secret/doppler-token-secret createdCreate the DopperSecret in the default namespace.
cat <<EOF > manifest.yaml
apiVersion: secrets.doppler.com/v1alpha1
kind: DopplerSecret
metadata:
  name: doppler-secret-test
  namespace: doppler-operator-system
spec:
  tokenSecret:
    name: doppler-token-secret
  managedSecret:
    name: doppler-test-secret
    namespace: default
EOF
kubectl apply -f manifest.yaml
dopplersecret.secrets.doppler.com/doppler-secret-test createdDeploy the application in the default namespace.
cat <<EOF > deployment.yaml
apiVersion: apps/v1
kind: Deployment
metadata:
  name: hello-server
  annotations:
    secrets.doppler.com/reload: "true"
spec:
  replicas: 1
  selector:
    matchLabels:
      app: hello-server
  template:
    metadata:
      labels:
        app: hello-server
    spec:
      containers:
        - name: hello-server
          image: ghcr.io/dirien/hello-server/hello-server:latest
          ports:
            - containerPort: 8080
          envFrom:
            - secretRef:
                name: doppler-test-secret
EOF
kubectl apply -f deployment.yaml
deployment.apps/hello-server createdAnd now port-forward the pod and check if the secret is available.
kubectl port-forward deployments/hello-server 8080:8080In another terminal, we can check the env endpoint like before.
curl http://localhost:8080/env/DB_URL
DB_URL=psql://elon@localhost/modelX%
Success! The same steps can be done for the staging environment. I will leave that as an exercise for you.
The cleanup is very easy, we just need to call the destroy command.
pulumi destroyIn my opinion, the Doppler SecretOps Platform is a very promising way to approach the problem of managing secrets for a nearly infinite number of integration possibilities. In this example, I showed how to use the Doppler Secrets Operator as all things Kubernetes is what I am most familiar with. But the Doppler SecretOps Platform can be used for much more!
I particularly liked the Dashboard the most! I can see all my projects and environments in one place and can easily change the secrets for each environment. I can also see the history of changes and who changed what and when and of course I can create different teams and assign them to different projects and environments.
But I have to mention that the Doppler Secrets Operator is still in beta and there are some things that I did not like much and tried to avoid in this example. For example: currently, you can not create the namespace for the operator in advance. The namespace is created by the operator itself. That broke for me the automation of the vcluster! The init values in vcluster are not allowing to run the installation of Helm charts before the manifests are.
This is an issue for me when I want to use a vanilla GitOps approach with Flux or ArgoCD. There are issues open for both, the Doppler Secrets Operator and the vcluster project. I hope that this will be fixed soon.
I have to say, that I could maybe go around this by using more glue code but this is a demo and I wanted to keep it as simple as possible.
On the other hand, the production cluster without the vcluster is working very well and everything works as expected.
I hope you enjoyed this demo and I hope that you will try out the Doppler SecretOps Platform yourself!
%[https://docs.doppler.com/docs]