11. Setting the solution up in Service Fabric
Service Fabric supports both, Linux and Windows Containers, so this guidance is split in two depending if you want to deploy eShopOnContainers as Linux or Windows Containers because the SF cluster has to be created for one environment or the other.
In order to deploy eShopOnContainers as Windows Containers an Azure SF environment must be first set. There is available an ARM template to do that job in the following link SF Win ARM deployment. Follow the steps in create SF. The ARM script will generate all the necessary Azure resources to publish eShopOnContainers as windows containers.
Once the SF resources have been successfully created, the next step is to publish the SF projects. These projects are under the directory SF Directory and contains all the xml config files needed to configure and publish eShopOnContainers. It is composed by the following SF projects:

- eShopOnServiceFabric: contains all the api services consumed by eShop.
- eShopOnServiceFabricIdSrv: contains the Identity server for authentication.
- eShopOnServiceFabricWebMVC: contains the MVC web app.
- eShopOnServiceFabricWebSPA: containes the SPA web app.
- eShopOnServiceFabricWebStatus: contains the web app for service health checking.
- eShopOnServiceFabricBus: contains a bus service (Rabbitmq).
- eShopOnServiceFabricNoSql: contains a no sql service (MongoDB).
- eShopOnServiceFabricRedis: contains a cache service (Redis).
- eShopOnServiceFabricSql: contains a sql service (Mssql).
Before deploying, replace ALL the external urls in the cloud.xml config file of each SF app which reference the SF dns name with the dns name of your SF. Therefore, replace the token #{your_sf_dns}# with your cluster DNS name. Image tags in the servicemanifest.xml files need to be changed as well by replacing the token #{tag}# with an existing tag (Ex: eshop/ordering.api:latest).
Example:


Additionally, to enable AppInsights Azure in SF, follow steps described bellow:
- Create Azure AppInsights

- Enable Multi-role application map

- Retrieve the Instrumentation Key from your AppInsights service properties and set it in the cloud.xml config file of each SF app.

To deploy the SF apps:
- Open the eShopOnContainers-ServicesAndWebApps.sln with vs2017 (Service Fabric SDK installation must be installed).
- Add the existing SF projects in the solution in order to be published.
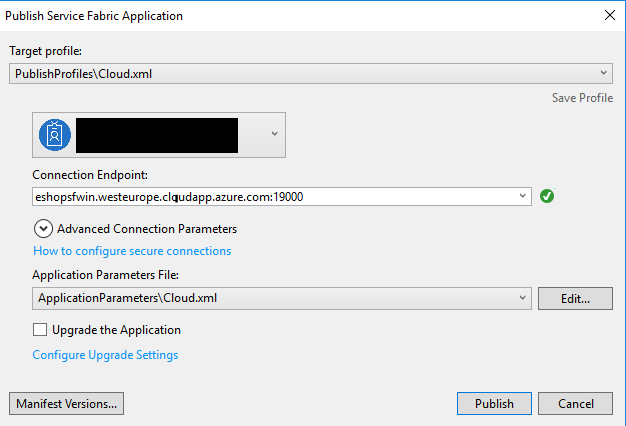
- Right-click on each SF project selecting the publish button. Firstly, publish the infrastructure services SF infrastructure services and once deployed, do the same process for the rest of apps.

A new window will be prompted allowing you to select the SF cluster you have previously created.
Open the SF explorer page to check out the deployment and healthcheck status.


... TBD ...
In order to deploy eShopOnContainers as Linux Containers an Azure SF environment must be first set. There is available an ARM template to do that job in the following link SF Linux ARM deployment. Follow the steps in create SF. The ARM script will generate all the necessary Azure resources to publish eShopOnContainers as Linux containers.
Once the SF resources have been successfully created, the next step is to publish the SF projects. These projects are under the directory SF Directory and contains all the xml config files needed to configure and publish eShopOnContainers. It is composed by the following SF projects:
- eShopOnServiceFabric: contains all the api services consumed by eShop.
- eShopOnServiceFabricIdSrv: contains the Identity server for authentication.
- eShopOnServiceFabricWebMVC: contains the MVC web app.
- eShopOnServiceFabricWebSPA: containes the SPA web app.
- eShopOnServiceFabricWebStatus: contains the web app for service health checking.
- eShopOnServiceFabricBus: contains a bus service (Rabbitmq).
- eShopOnServiceFabricNoSql: contains a no sql service (MongoDB).
- eShopOnServiceFabricRedis: contains a cache service (Redis).
- eShopOnServiceFabricSql: contains a sql service (Mssql).
Before deploying, replace ALL the external urls in the cloud.xml config file of each SF app which reference the SF dns name with the dns name of your SF. Therefore, replace the token #{your_sf_dns}# with your cluster DNS name. Image tags in the servicemanifest.xml files need to be changed as well by replacing the token #{your_sf_dns}# with an existing tag (Ex: eshop/ordering.api:latest).
Example:
Additionally, to enable AppInsights Azure in SF, follow steps described bellow:
- Create Azure AppInsights
- Enable Multi-role application map
- Retrieve the Instrumentation Key from your AppInsights service properties and set it in the cloud.xml config file of each SF app.
To deploy the SF apps:
- Open the eShopOnContainers-ServicesAndWebApps.sln with vs2017 (Service Fabric SDK installation must be installed).
- Add the existing SF projects in the solution in order to be published.
- Right-click on each SF project selecting the publish button. Firstly, publish the infrastructure services SF infrastructure services and once deployed, do the same process for the rest of apps.
A new window will be prompted allowing you to select the SF cluster you have previously created.
Open the SF explorer page to check out the deployment and healthcheck status.