<- [Part 1] Quick-Start Tutorial
We'll start with the Gardener itself.
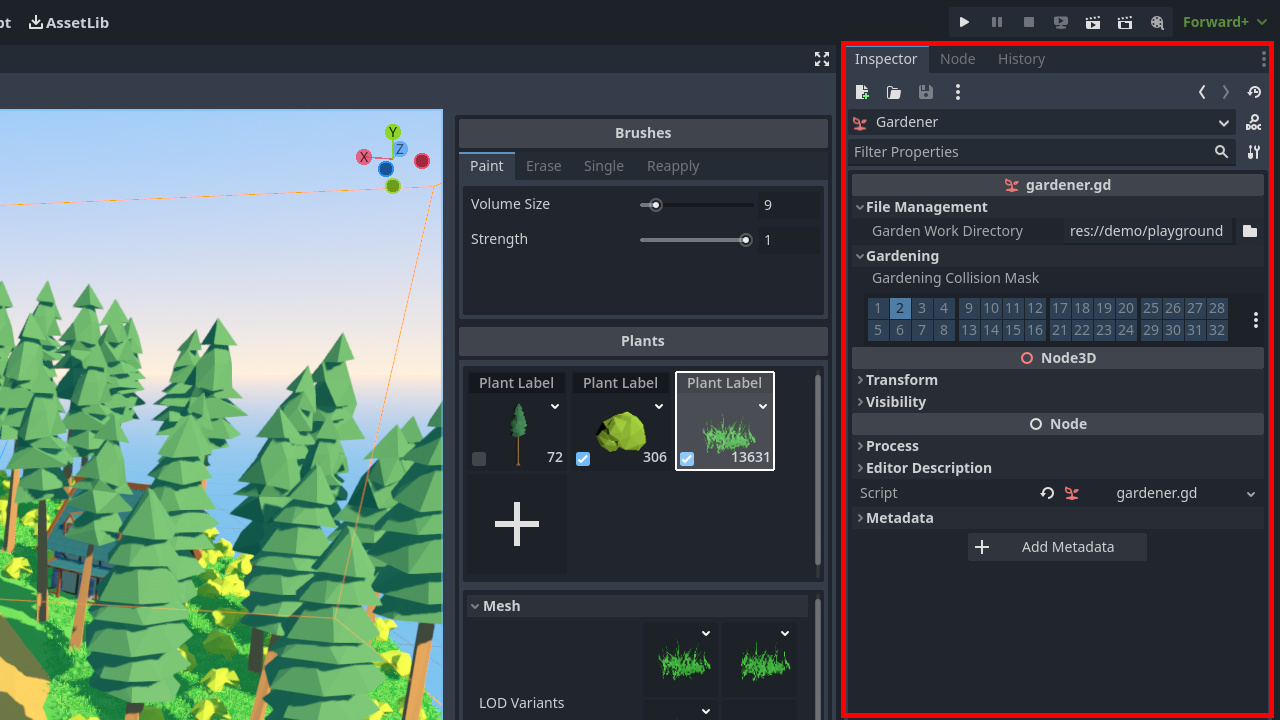
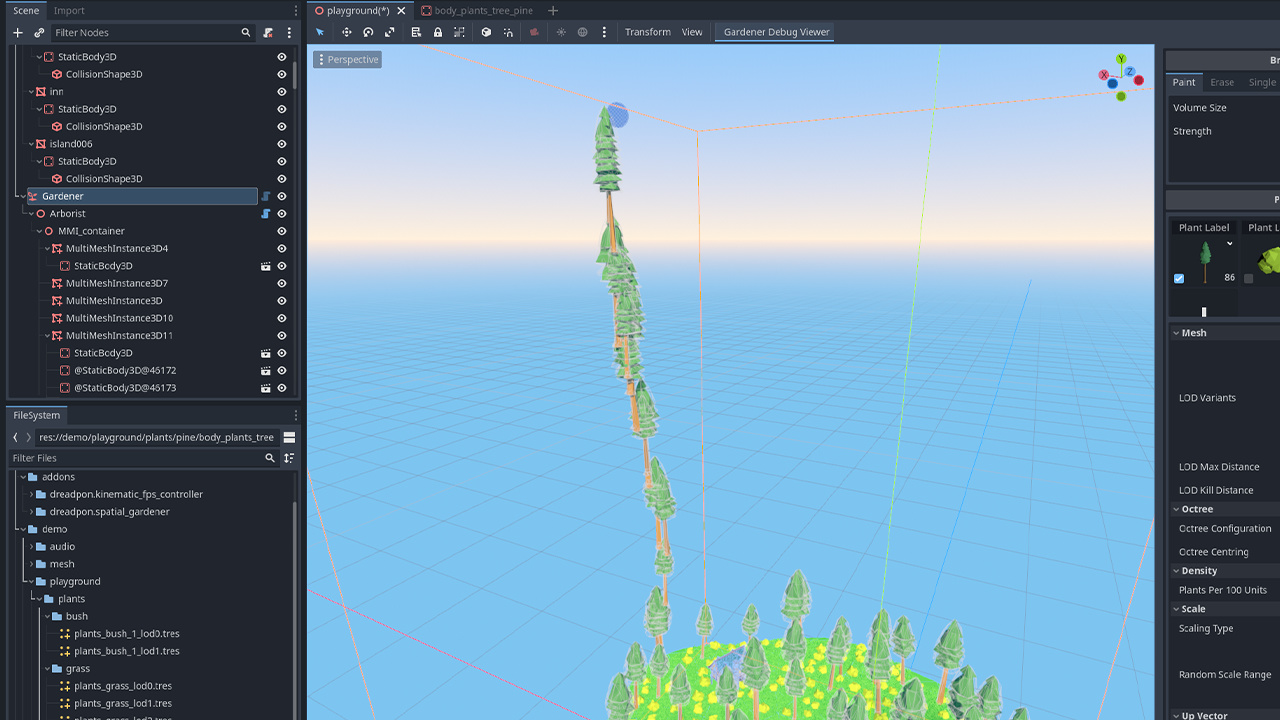
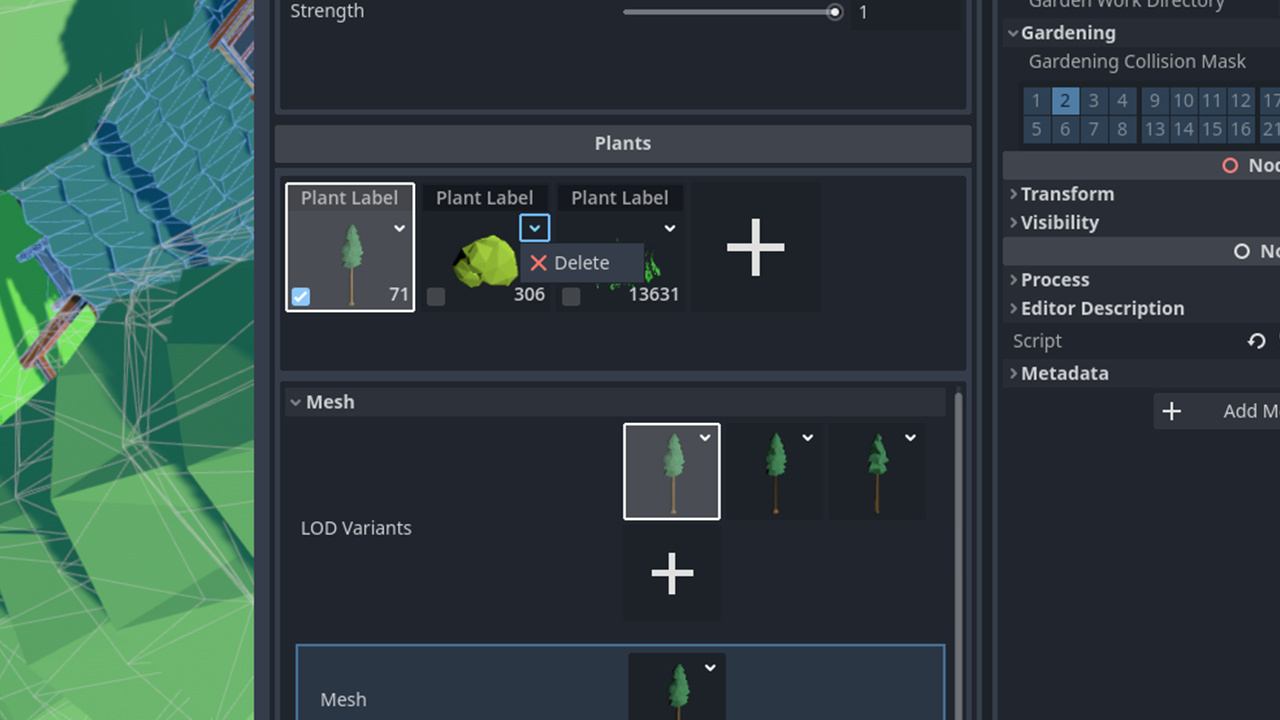
Work Directoryis the main place to save your plant and brush configurations. It's meant to ease reusing plants across different Gardeners. It's worth to mention that Godot's resource system is pretty wonky at times. I had to work around some of it's quirks when saving and loading resources. So, you shouldn't tinker with it besides the intended way covered in this tutorial.Collision Maskwas already explained. It's very important to set it up correctly, or you might end up with something like this:
- Next, the
Transforms. Gardeners should work fine with custom translations and rotations. It's not something I tested much, so it's better to leave it at world origin and instead recenter the octree.
Next up, the scene tree structure.
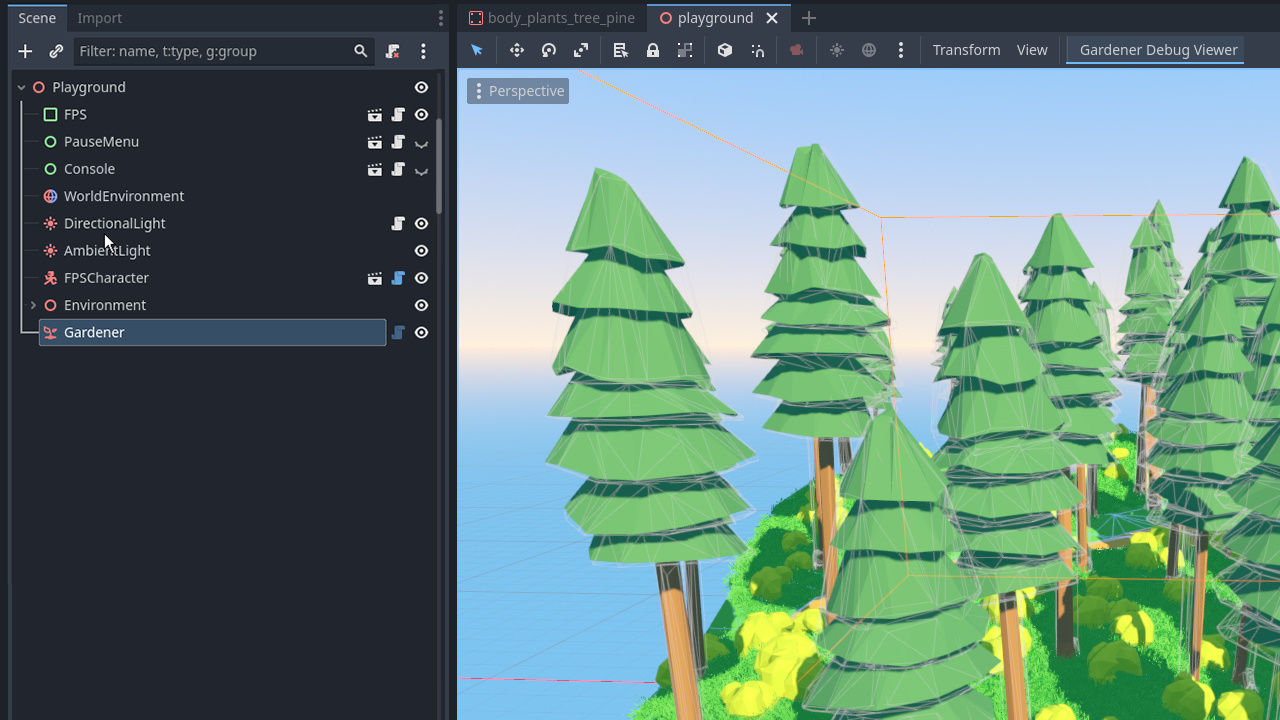
NOTE: starting from 1.4.0 Gardener is the only node visible in the hierarchy. You should not add any children to it or otherwise interfere with its descendants.
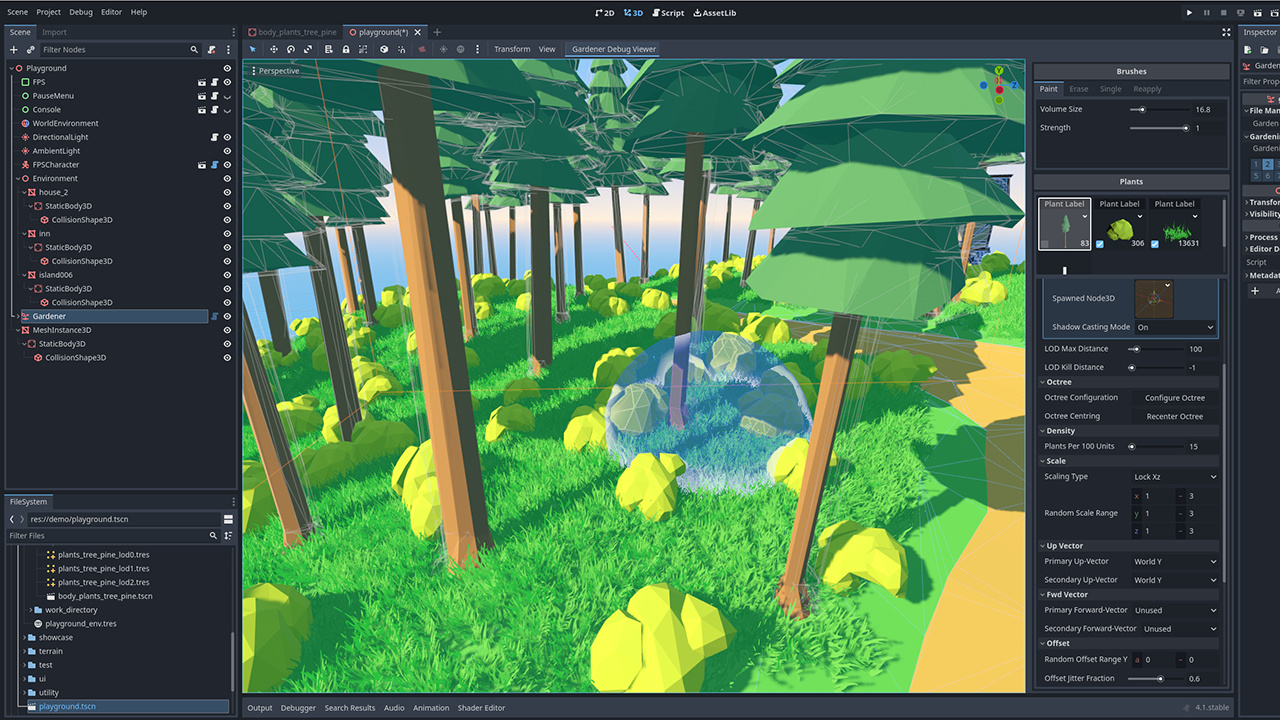
Now the brushes.
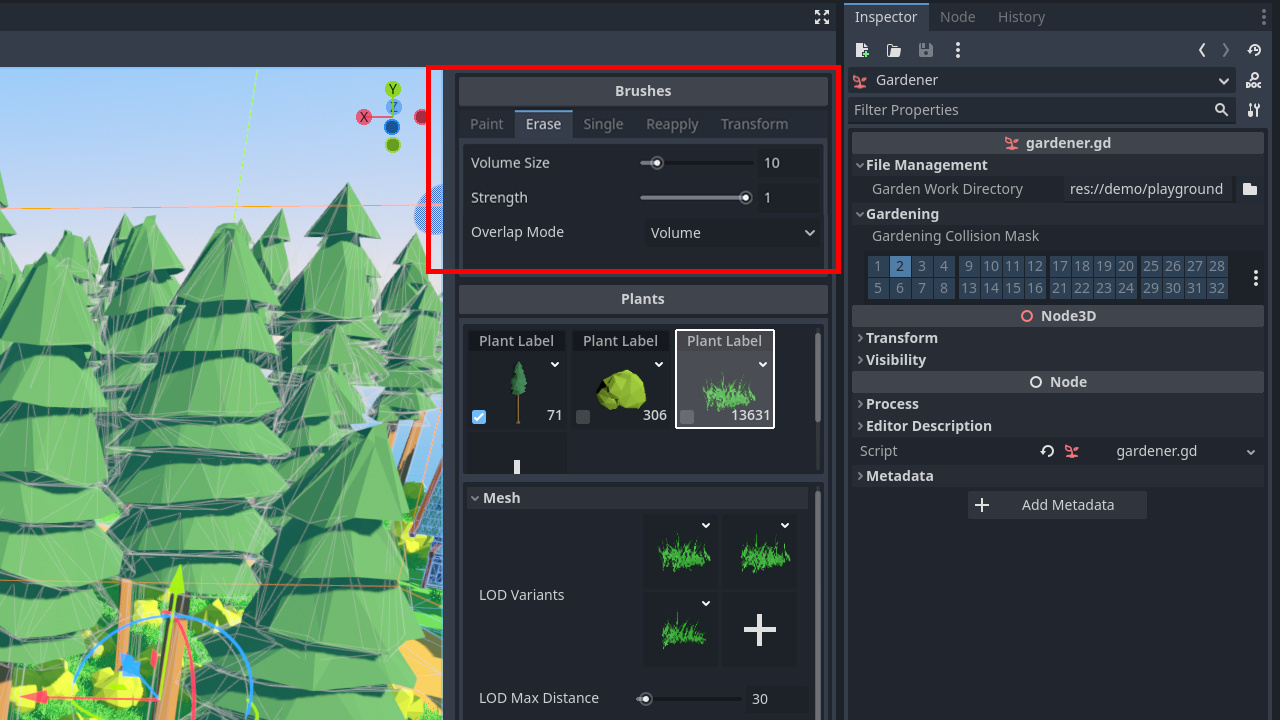
You can switch between them by clicking, or pressing buttons 1-4 on your keyboard.
Paintbrush adds foliage. It'sStrengthmultiplies plant density. At 0.5 strength you'll get half the density.Eraseremoves foliage.Strengthdefines how much foliage is removed related to current density in the settings. A value of 0.5 will make your foliage approximately half as dense. It's a bit wonky though, as density isn't 100% precise in this plugin.Singleis used to place individual objects like trees or props.Reapplyupdates individual transforms of already placed plants. It doesn't affect density, octree configuration or LOD settings.Transformis used to select painted instances one at a time and transform it using Godot's built-in gizmo
Both size and strength can be quickly edited: Size by holding Side Mouse Button 1 and dragging, and Strength by holding Shift + Side Mouse Button 1.
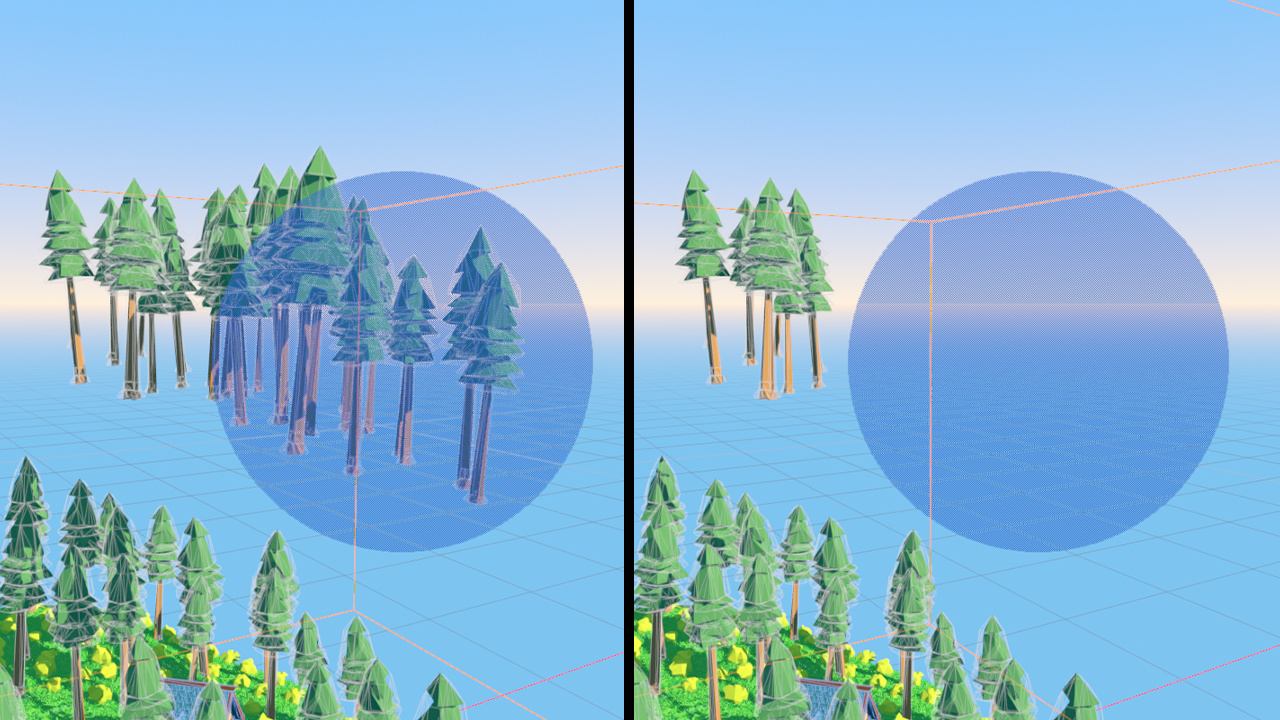
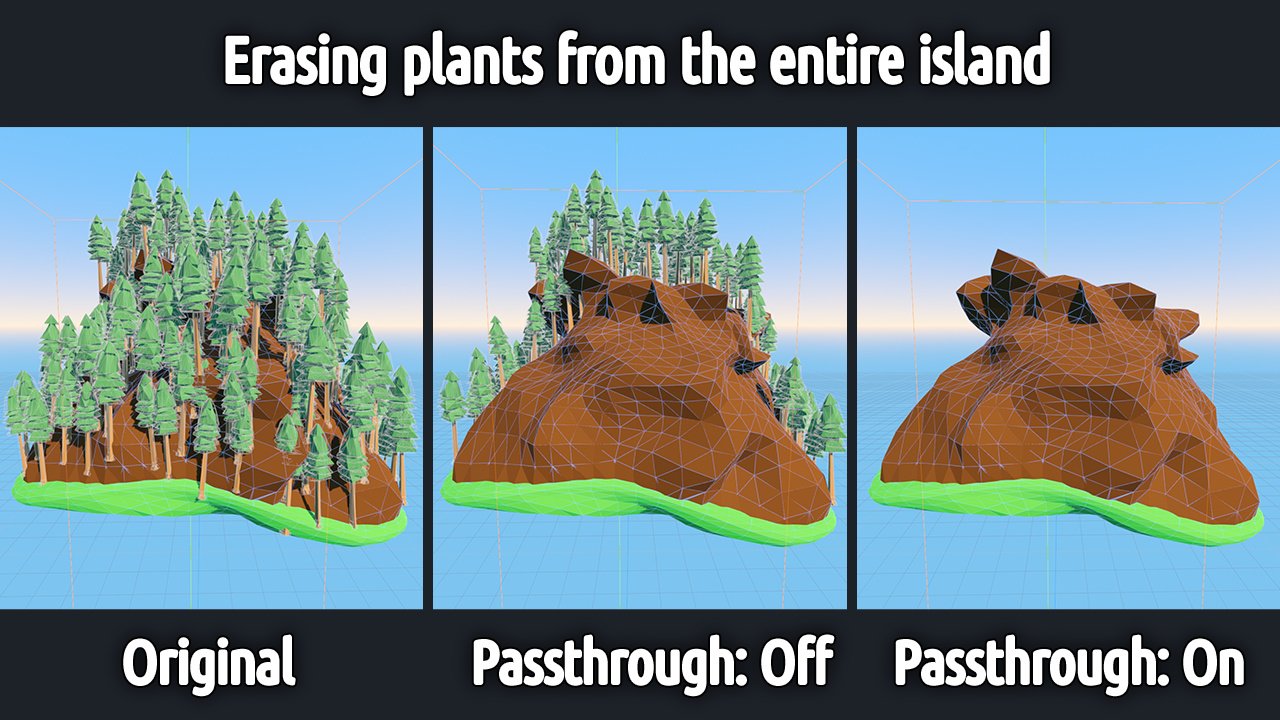
Erase and Reapply brushes can also be switched into Projection Overlap Mode. Whereas Volume brushes stick to terrain, Projection brushes live in screen_space and will affect ALL the plants inside it's radius, no matter how far from camera. This is very useful when you move a part of your terrain and need to erase any plants left hanging.
You can quickly switch between Volume and Projection brushes by pressing ` (backtick, left of number 1 on most keyboards).
Projection brushes don't have strength, because strength is relative to plant density which is closely tied to physical terrain. Since Projection brush is independent from terrain, it can't properly handle density.
By default Projection brushes don't affect plants obstructed by terrain. If you want to ignore obstruction checks, set Passthrough to On.
For Transform brush, Selection Mode defines how the instance is selected. Due to the fact that instances can be both pure Meshes or Node3Ds, you have a few options here:
Meshoption performs a geometry-based raycast (without using a physics engine). Use this when you have aMeshfield assigned for yourLOD VariantsNode3D First Meshis used with aSpawned Node3Dfield. It scans thePackedSceneyou assign and finds the firstMeshInstance3Dnode (if any). Then performs the same geometry-based scan as withMeshselection modeNode3D Bodyperforms a physics-based raycast against anyPhysicsBodies3DthatSpawned Node3Dmight have.
Selection Mask is used together with Node3D Body selection mode to define physics layers used for raycasting.
Preprocess Selection defines whether or not Mesh based geometry raycasts will be occluded by other geometry present in the level. Turn this off if you want to pick instances through any other geometry.
As for plant UI, I'm pretty sure you can't create a second inspector window in Godot. Or reuse any of the inspector UI really. So I had to rebuild the entire property management system to ensure basic editor functionality can work inside custom Control nodes. So it behaves slihtly differently from the native Inspector.
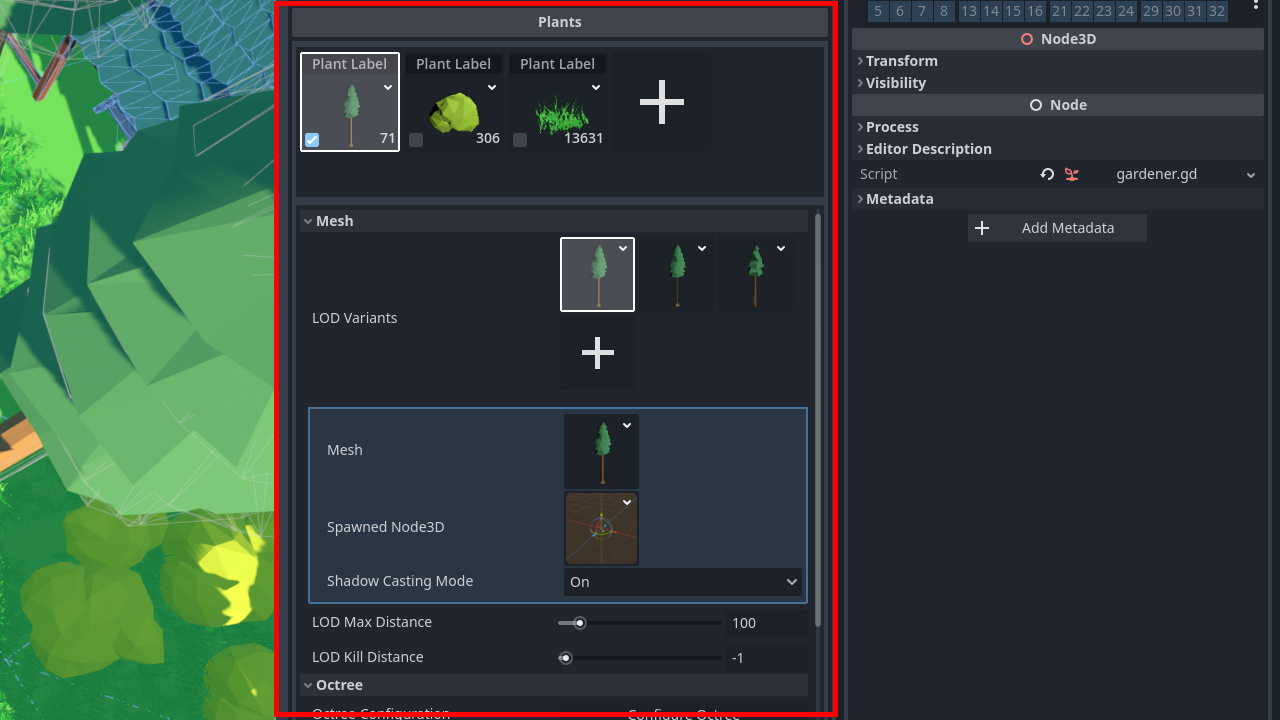
The plant list is simple. You can add, delete plants, and select them for painting with a checkbox. There's also an editable label on top - you can make it anything you like to ease navigation between plants.
Now onto individual plant properties.
-
LOD Variantsis a list of 'Level of Detail' meshes in order of their simplification. Inside, you can set theMeshandSpawned Spatial. You can add, delete or clear variant's properties. For ease of use, you can drag'n'drop both the meshes and spatials without opening the variant.You can also set how individual LOD Variants cast their shadows - lower LODs usually don't need them and disabling shadows can greatly improve performance.
-
At
LOD Max Distancethreshold, lowest LOD is shown. LODs in between are chosen at equal intervals. -
At
LOD Kill Distancethreshold, meshes and spawned spatials are removed entirely, to reduce machine load. -
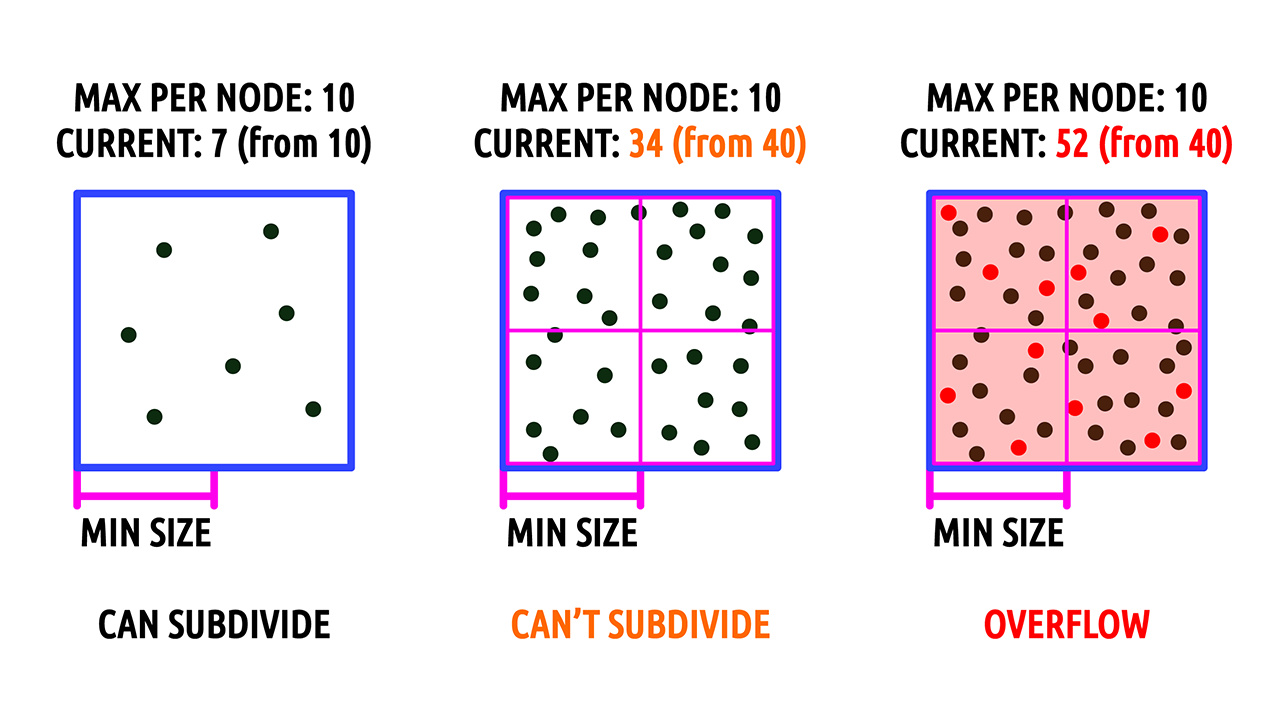
Octree configurationsets two things: a maximum number of plants in each node and a minimum size of that node. To understand what's going on here, I advise you read an article on gamedev.net.-
If a node exceeds it's capacity, it will subdivide into 8 smaller nodes. But it won't subdivide less than it's minimum size. Instead, it will keep adding objects over it's capacity limit. If your nodes seem to overflow with objects – check the scale you're working in. Perhaps you need to scale everything up or reduce the minimum node size.
-
-
Plants Per 100 Unitsrepresents how many objects you'll have in a 100x100 units square. But many things affect the final result.-
First - your brush is circular, not square. Naturally, the corners are cut off.

-
Next, when you paint, your brush creates a virtual 2D grid. It then places the objects on that grid and applies a random offset, so it looks more natural. As grid moves and rotates, grid cells tend to overlap a lot and this usually results in increased density of up to 30%. If you really need these numbers to be accurate, you can do a pass with
Erasebrush set to 0 strength. This will remove any excess objects. -
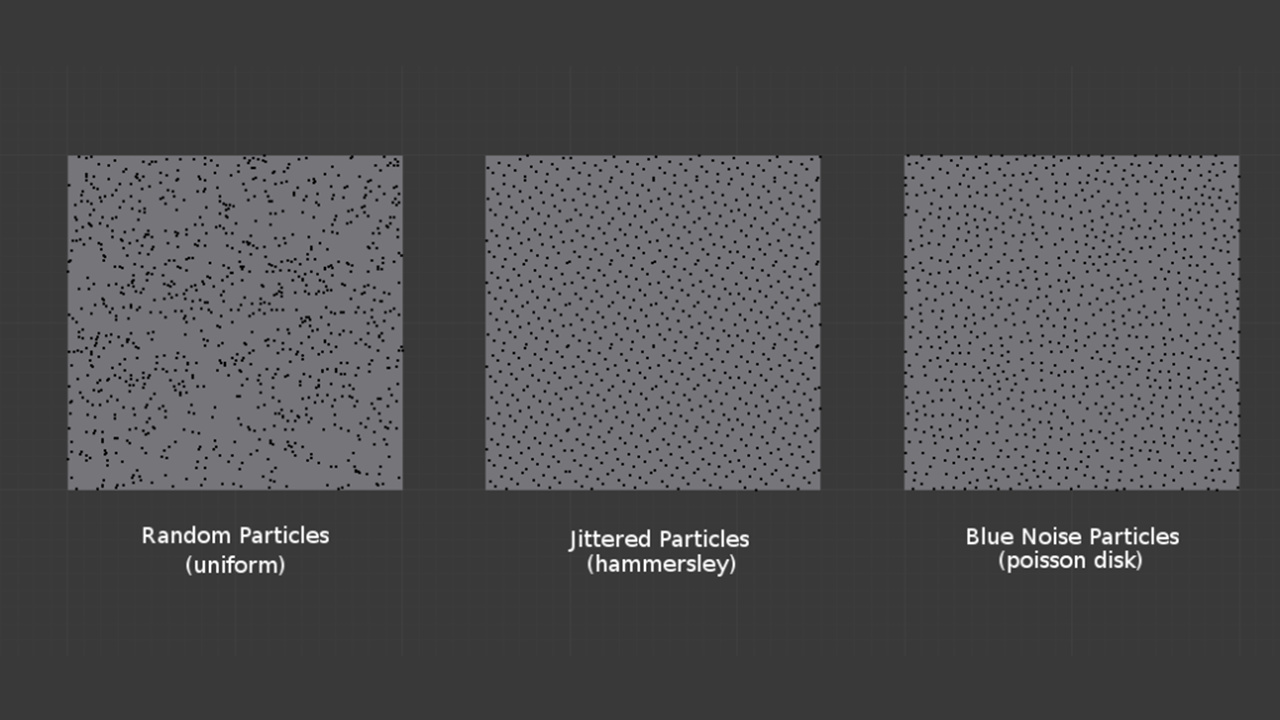
If you ever worked with foliage, you probably know that sometimes it's placed procedurally using a distribution function such as blue noise. Spatial Gardener doesn't support that and is meant for manually painting any surface, not just a heightmap terrain. So most of the 2D placement solutions don't apply here.
-
-
Scaling typedefines the scaling constraint. WithUniformit keeps the original proportions.Freeusually creates wonky objects, but allows all axes to scale independently.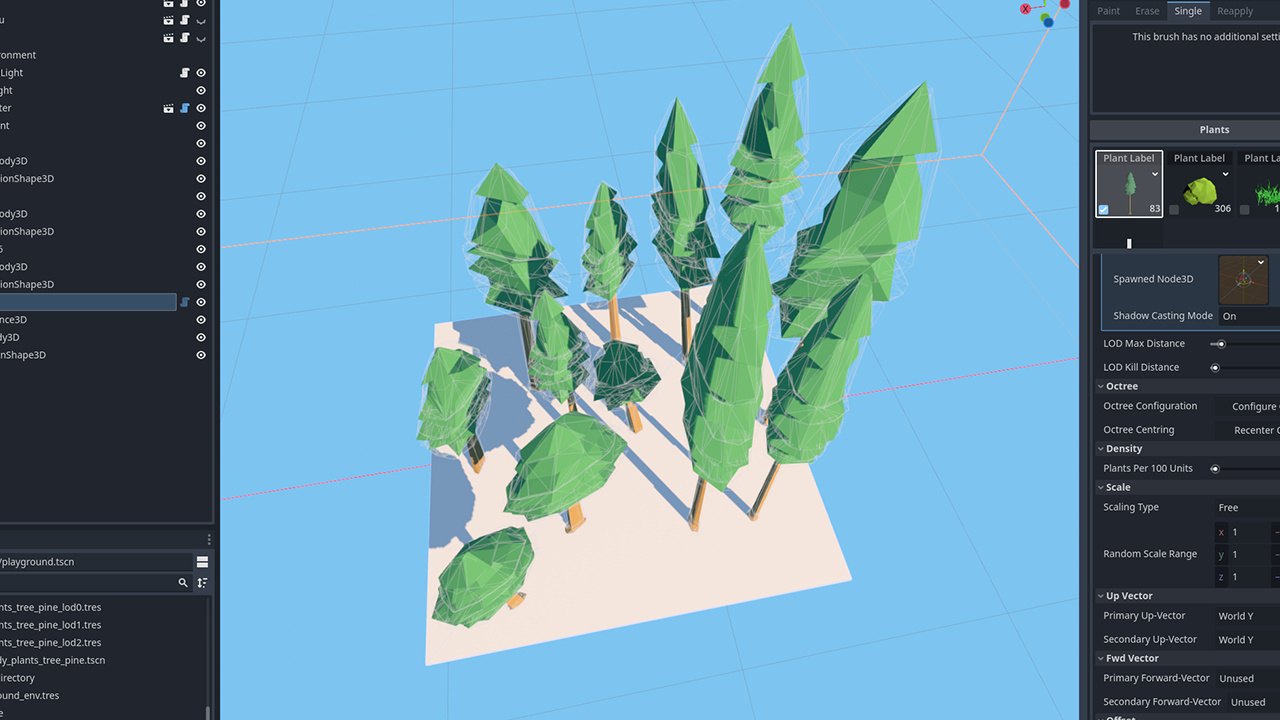
Last three options define a plane in 3D space and constraint only that plane, leaving the third axis independent. Most used one is probably
Lock XZ: it gives proportional horizontal scale, but allows varying vertical scale.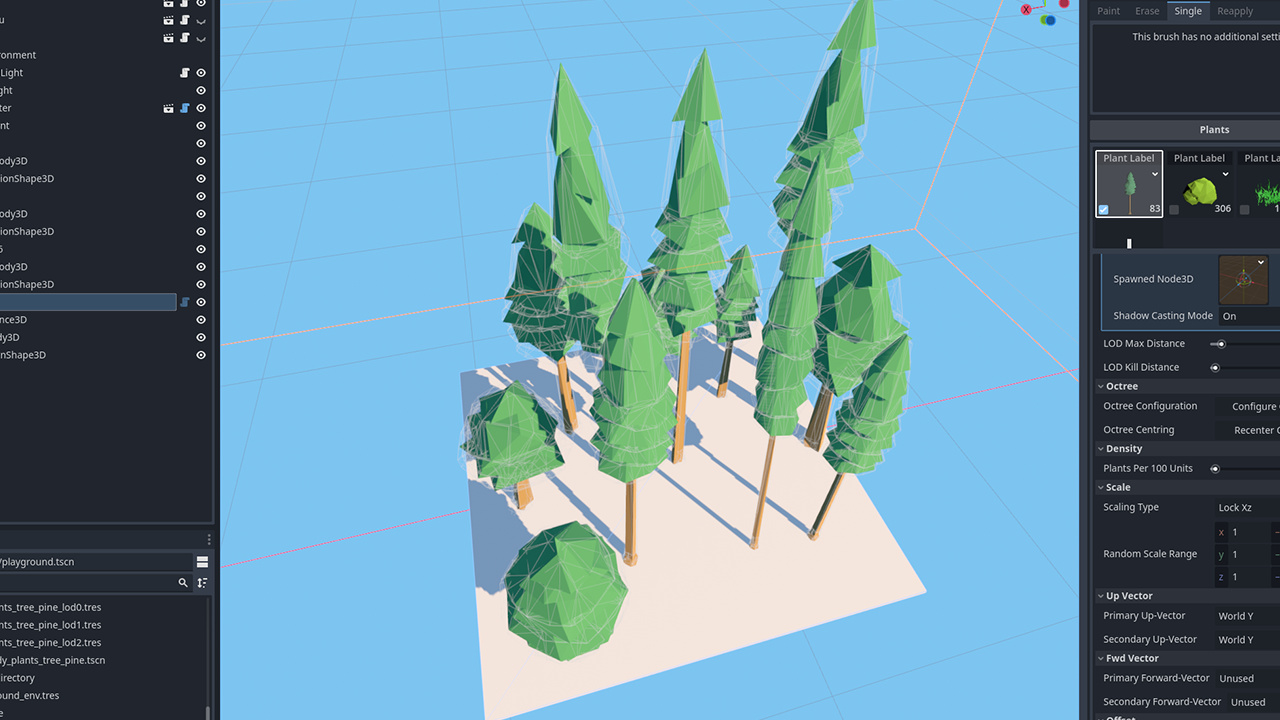
-
Random Scale Rangedefines bounds for choosing a random scale. If a scaling constraint is active, only the first property can be edited, the rest will follow automatically. -
Up-Vectors. They define which direction is the 'top side' of our object. You can choose a world-space vector, normal of the surface or define a custom vector. You can also blend between thePrimaryandSecondaryvectors by a givenBlendingfactor.
-
Same goes for
Forward-Vectors. They define which direction is 'forward' for an object. This is mainly used to make vines that point outwards from the surface. Keep in mind thatUp-Vectorstill takes precedence.
-
Random Offset Range Yoffsets the object vertically by a random value. It's used to cover the bottom side of an object, like roots of a tree. If the object is scaled, say, twice the size, this value will be doubled too.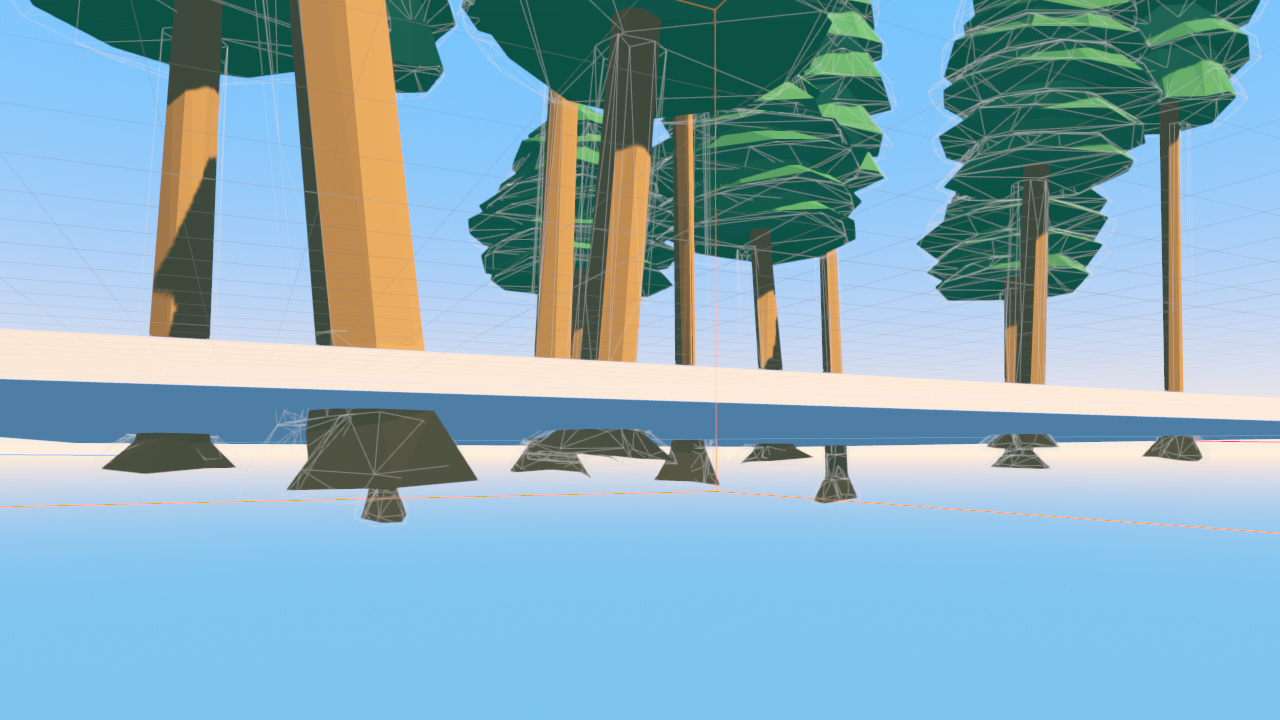
-
Random Jitter Fractionoffsets an object from the original placement grid. Default value of 0.6 keeps it natural_looking, but prevents overlaps between neighbors.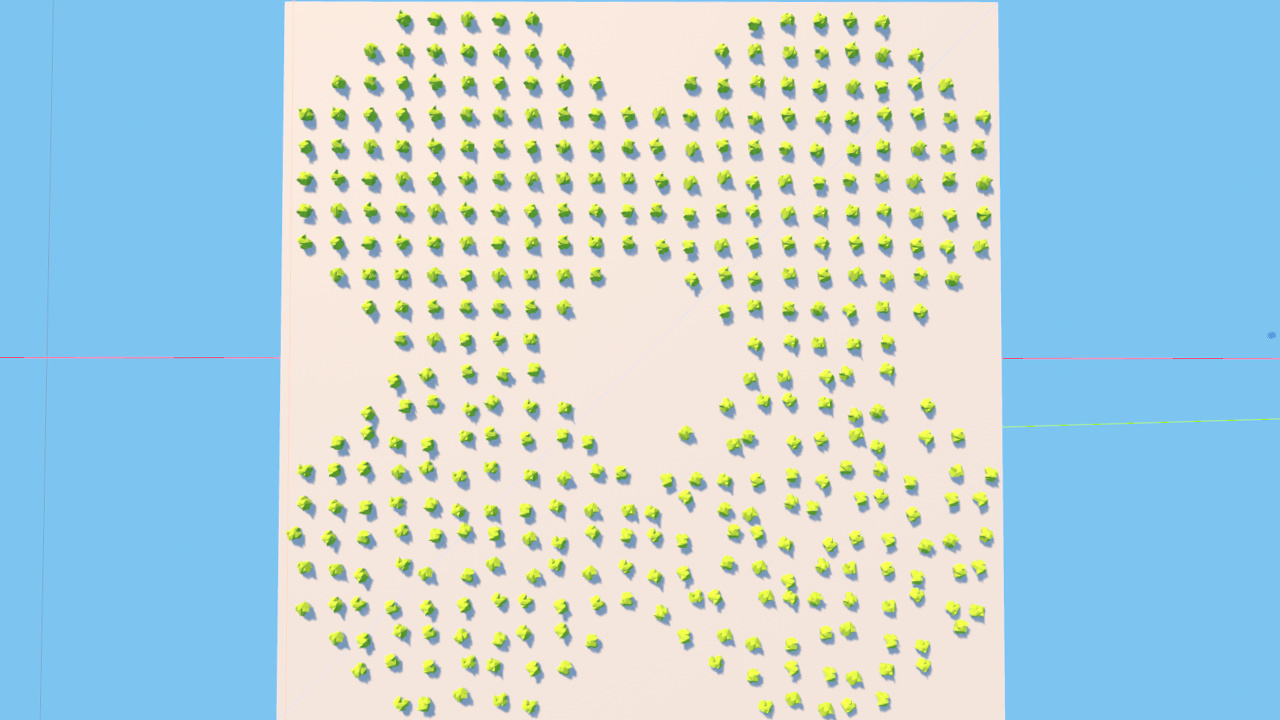
-
Random Rotationsare ranges for choosing random rotations, from 0 to 180 degrees in each direction. By default, rotation onYaxis is fully randomized. -
Allowed Slope Rangeprevents object placement on inclined or vertical surfaces. Limit this to 45 (or 90) degrees, and you'll prevent placement on a steep terrain.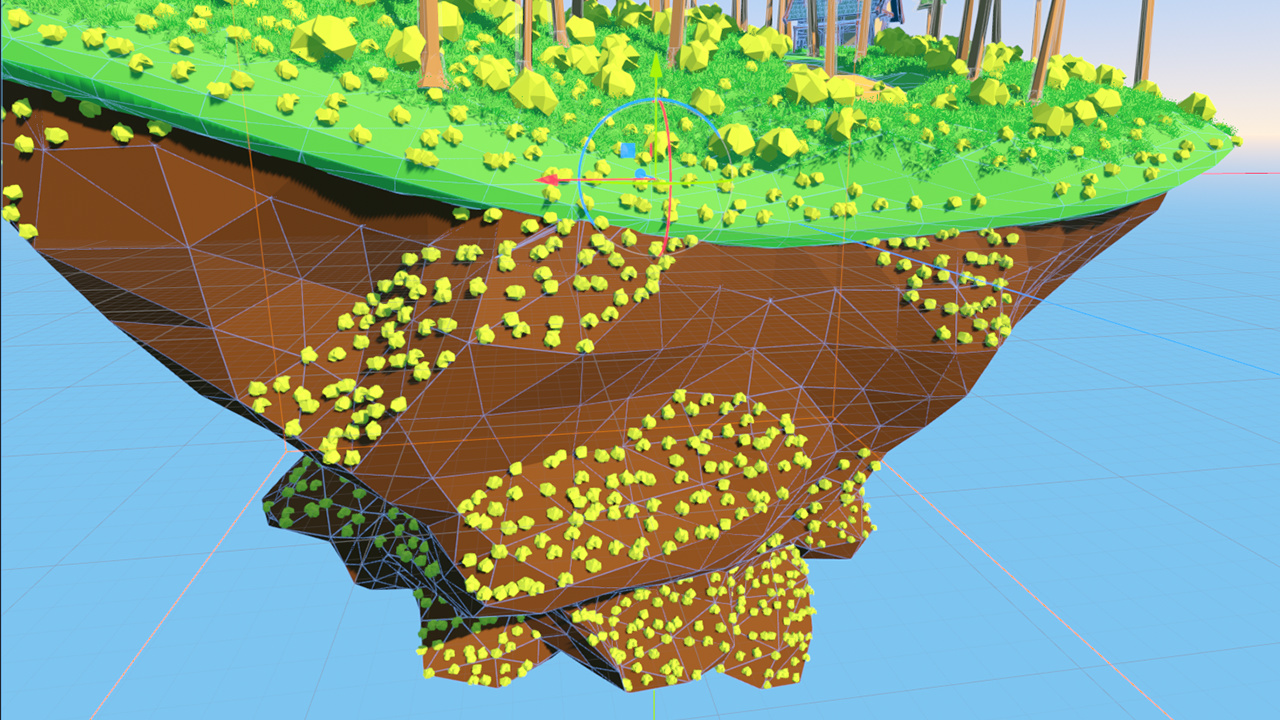
-
Import Plant DataandExport Plant Datahandle importing and exporting all variables belonging to a current plant as well as transforms of all already placed plants to JSON file. This is useful when migrating versions, as it uses a format independent from Godot itself. Godot 3.5 version of this exports only transforms (no plant data) but is still valid for importing in Godot 4.0. -
Import Greenhouse DataandExport Greenhouse Datahandle importing and exporting all variables belonging to all plants for thisGardeneras well as transforms of all already placed plants to JSON file. This is used to basically back up the entireGardener. Even though it doesn't technically relate to the currenlty selected plant, it still can be accessed only if you added at least one. This might be improved in future versions. Spatial Gardener for Godot 3.5 does not have these buttons at all.
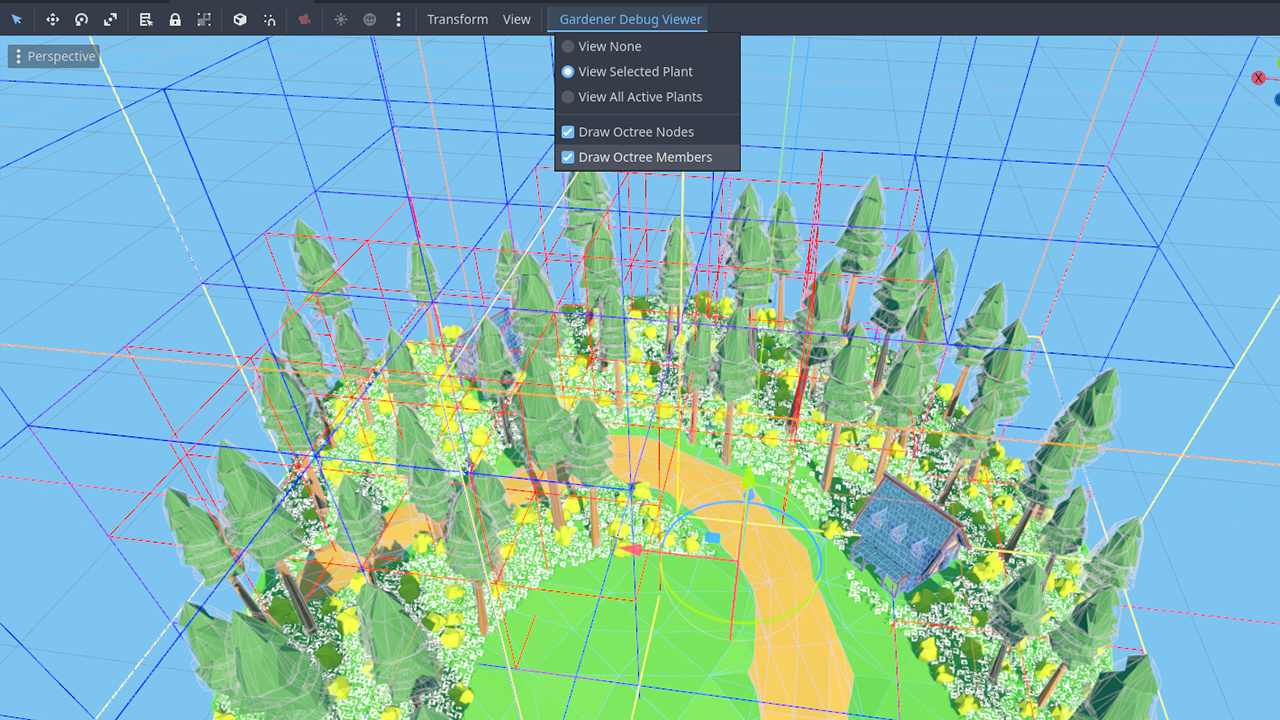
Next, a debugging tool called Gardener Debug Viewer. It visualizes the underlying octrees.
- You can choose to display the
Selected Plant(currently open in the sidepanel) orAll Active Plantsat once for the selected Gardener. - Besides showing
Octree Nodes, it can show individualNode Members, to inspect hidden objects, for example (like grass that exceedsLOD Kill Distance).
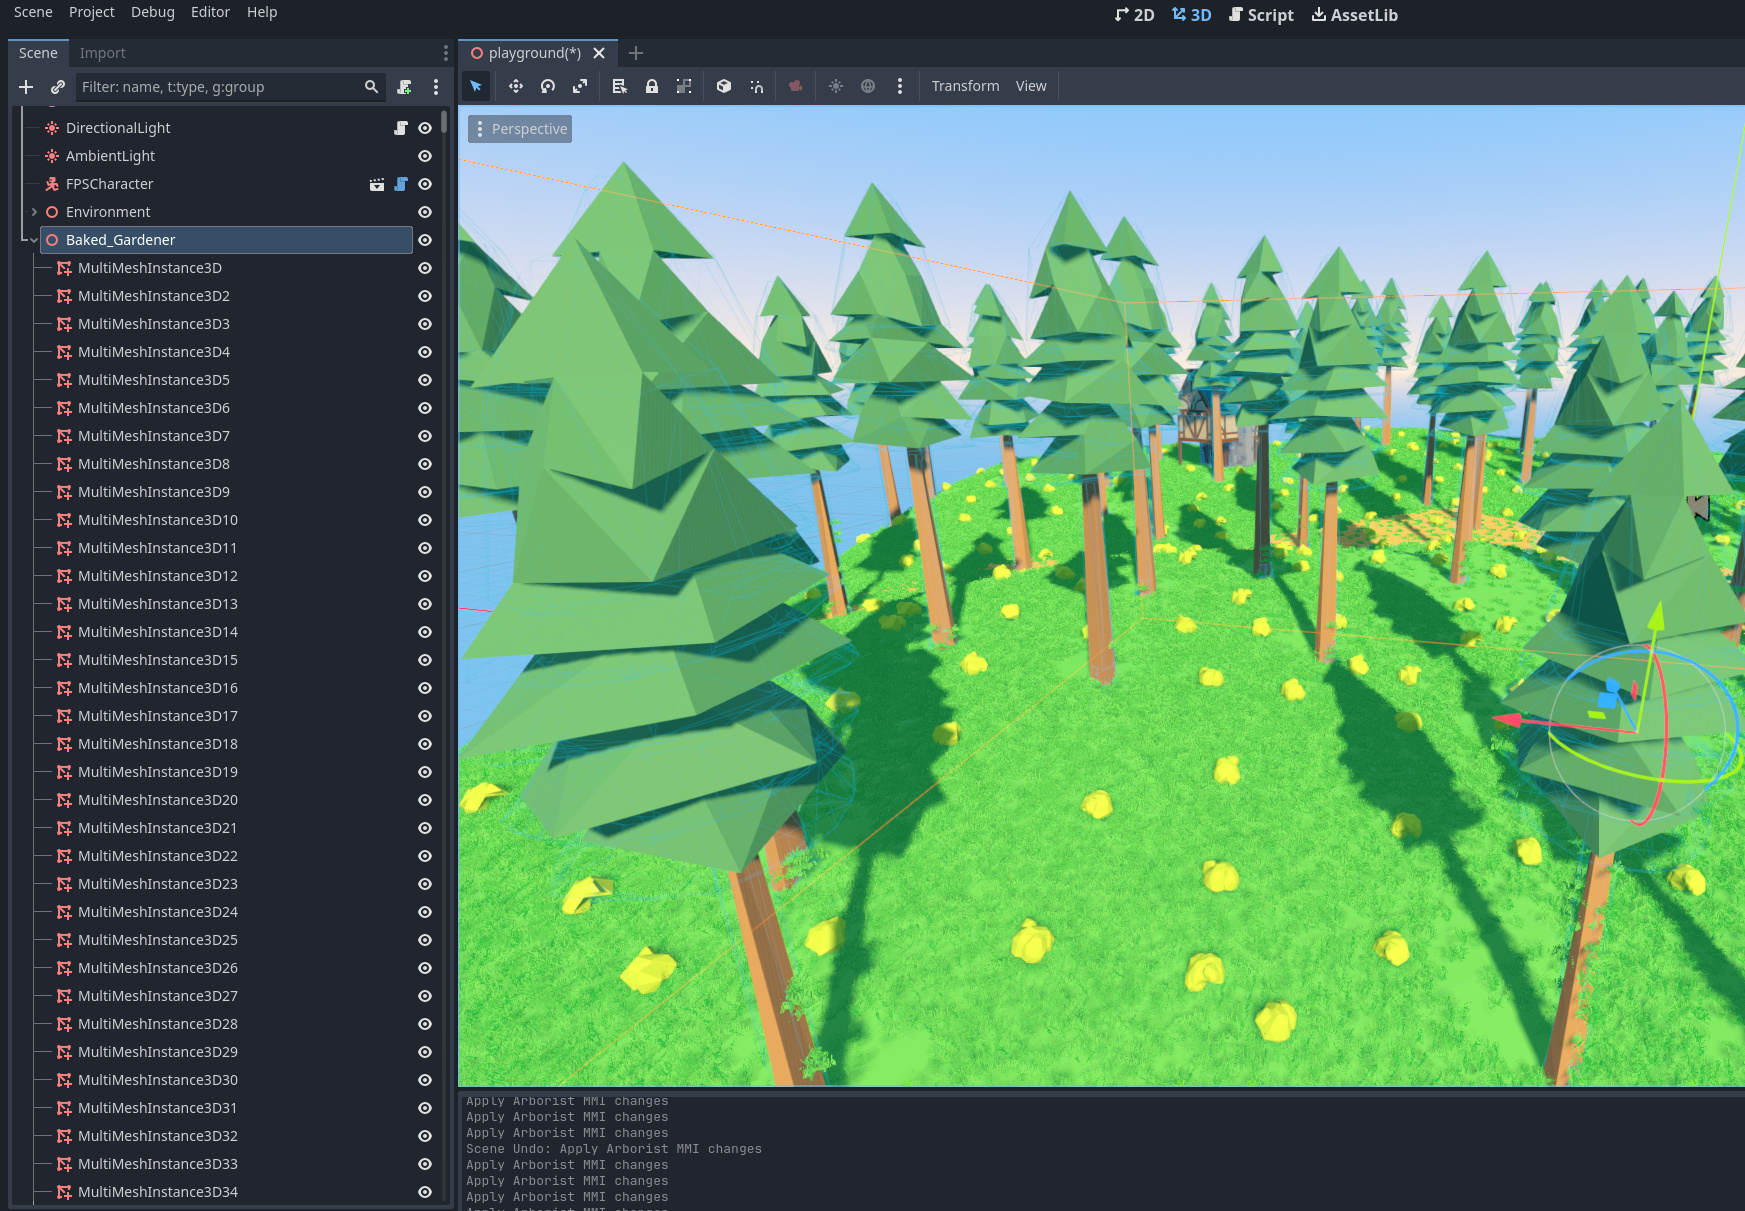
In 1.4.0 LOD management and instance spawning system was reworked, which resulted in nodes no longer being visible in the SceneTree. Sometimes though, you may want to take all instances out of the Gardener and work with them as regular Nodes. Bake Gardener functionality is supposed to help with that.
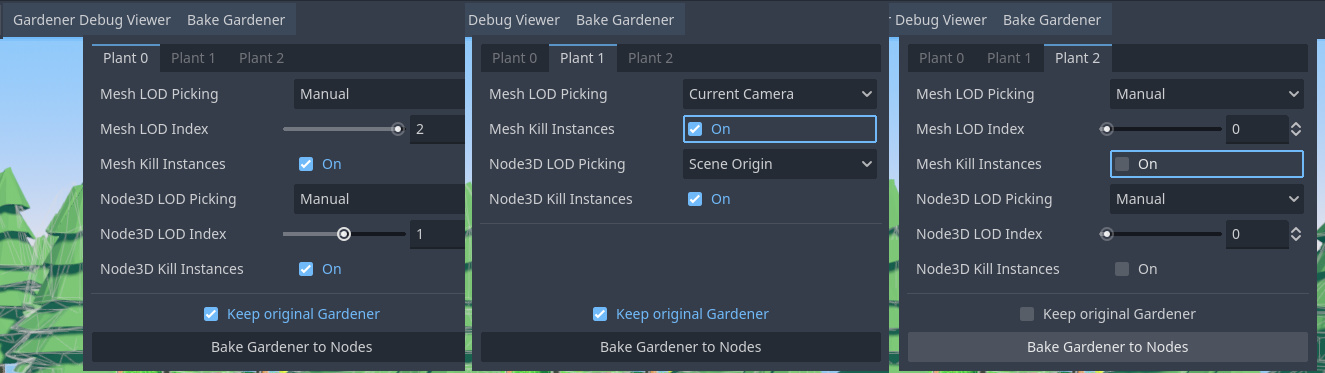
Baking menu allows you to configure the baking process separately for each plant in your Gardener.
Mesh LOD PickingandNode3D LOD Pickingdefines how baker should pick which LOD to use:Manualallows you to specify an LOD index manuallyCurrent Camerauses LODs as they are assigned around the current/editor cameraScene Originuses LODs as if the camera was at scene origin coordinates (0, 0, 0)Noneskips bakingMesh/Node3Dfor current plant
Mesh LOD IndexandNode3D LOD Indexdefines which LOD should be chosed withManualpicking modeMesh Kill InstancesandNode3D Kill Instancesdefines whetherSpawned Node3Dinstances farther thanLOD Kill Distanceshould be culled/killed on bake or kept regardless
Keep Original Gardener also allows you to keep the Gardener Node in the SceneTree or delete it after baking is done.
After pressing Bake Gardener to Nodes, depending on your chosen settings, an hierarchy of Nodes should appear in the SceenTree.
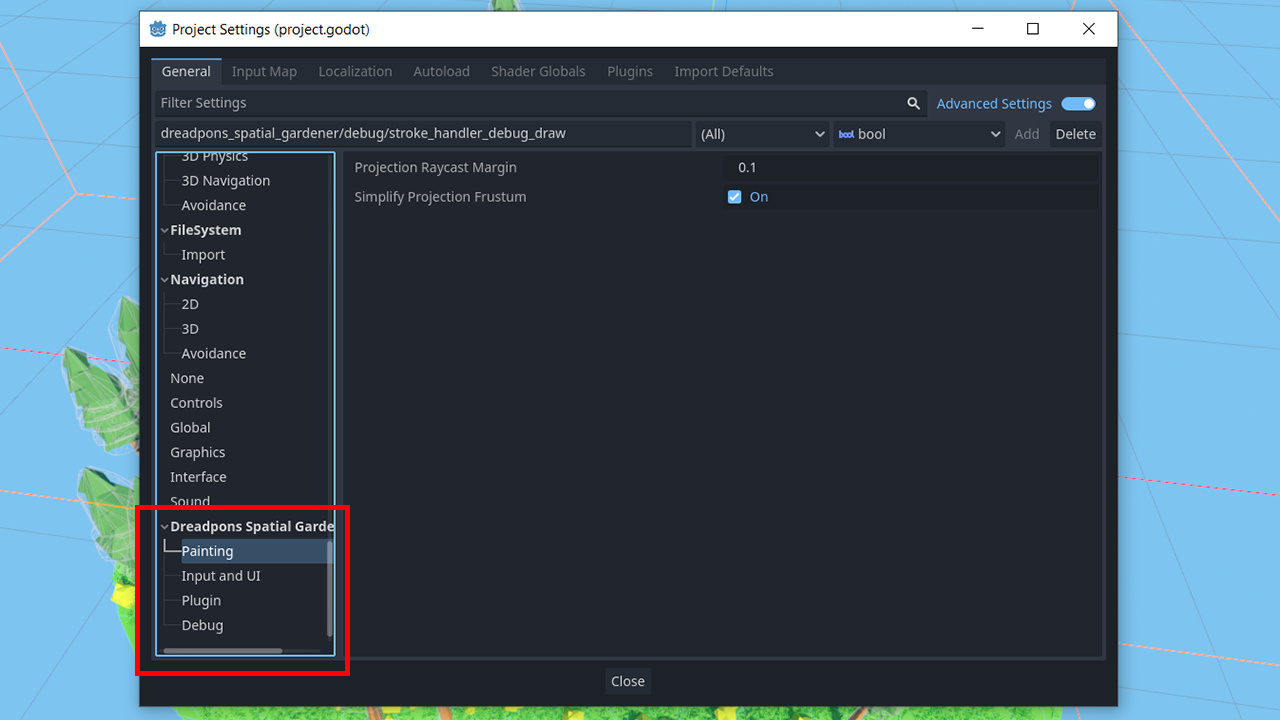
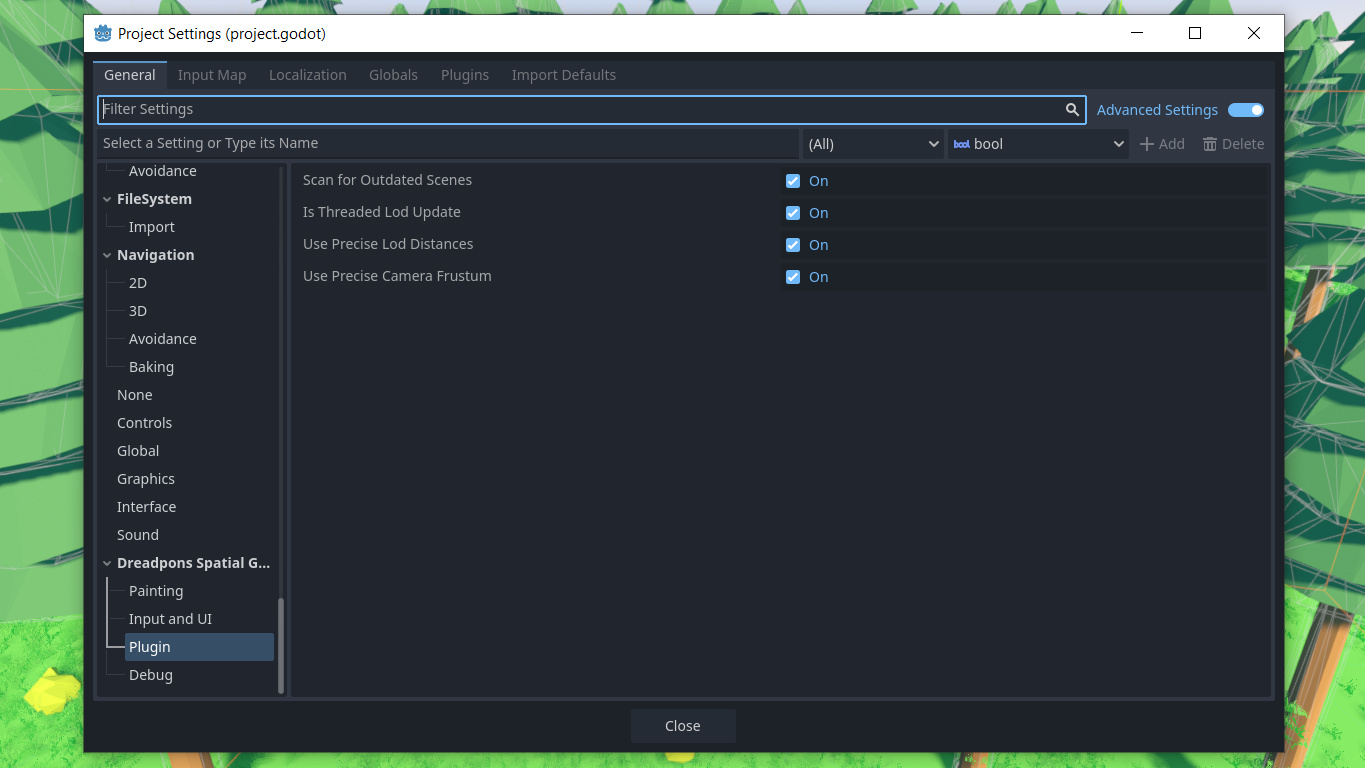
And finally, the plugin settings. Go to Project -> Project Settings and scroll until you see Dreadpon Spatial Gardener.
-
In
Paintingare all the tweakable settings related to painting a plant. Most of these are currently related toProjectedbrush, so if you have troubles with precision whenPassthroughis disabled or your camera has a highnearclipping plane - you can tweak these.
-
In
Input and UIyou can: toggle undo_redo for editing plant properties, change useful keybinds and change the range for each slider in the UI.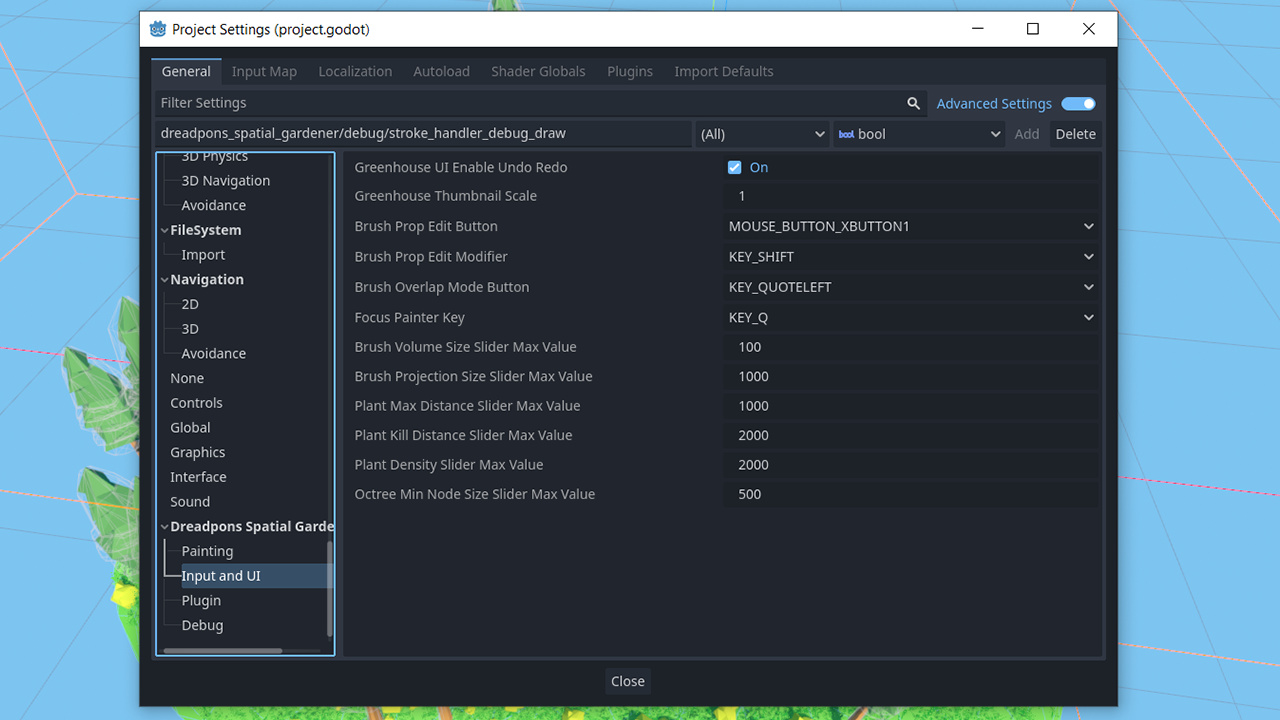
-
In
Pluginare all the tweakable settings related to plugin in general. From here you can tweak whether or not outdated scene scanning should be performed on statup, whether LOD updates should be offloaded to a separate thread, whether precise claculations should be used during this process, whether precise frustum algorithm should be used when using aTransformbrush. -
It is recommenended to leave all these on (if you experience long project statup times, you can disable scene scanning).
-
In
Debugyou can assign a key to dump information about the scene to console for inspection. This doesn't work in_game, but works in_editor. You can also activate logging of various functions, or set the member size forGardener Debug Viewer.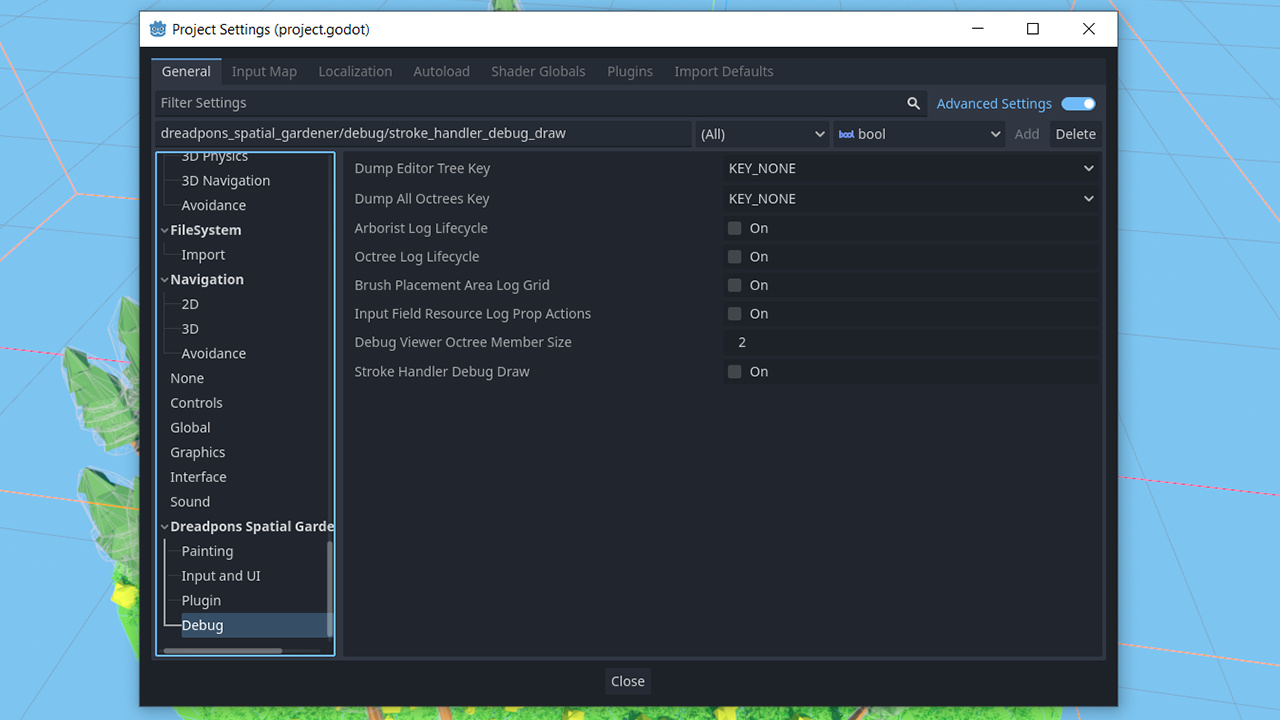
That covers most of the things you need to know about this plugin. You are welcome to get a look through the code itself, as it contains some useful insights here and there. However, you shouldn't call plugin functions from your own code. There's currently no interface to integrate Gardeners in your gameplay logic, and they're best kept separate. More so, if you have active gardeners you shouldn't edit the plugin's code. This will lead to data corruption and loss.
Thanks for following through. I hope you now understand how Spatial Gardener works.
Please share your thoughts and feel free to drop by on Discord. Since I find foliage painting quite useful for modern 3D games, I'm open to suggestions and collaboration.
Farewell and good luck!