Porting an existing Visual Pinball PinMAME game
Game logic for many Visual Pinball tables is done using VBScript. A table contains a main script that references other scripts that are included with a Visual Pinball installation. The scripts all work together and connect the playfield to a game controller such as Visual PinMAME.
Out of the box, Visual Pinball Engine can do a lot without any scripting at all!
This guide will show how to port an existing VPX Terminator 2: Judgement Day table to Visual Pinball Engine.
For most of the setup, we can refer to this page.
Make sure you are using Unity 2020.3.11f or greater.
Install the following packages:
-
VisualPinball.Engine(0.0.1-preview.46 or greater) -
VisualPinball.Engine.PinMAME(0.0.1-preview.42 or greater) -
VisualPinball.Unity.Hdrp(0.0.1-preview.58 or greater)
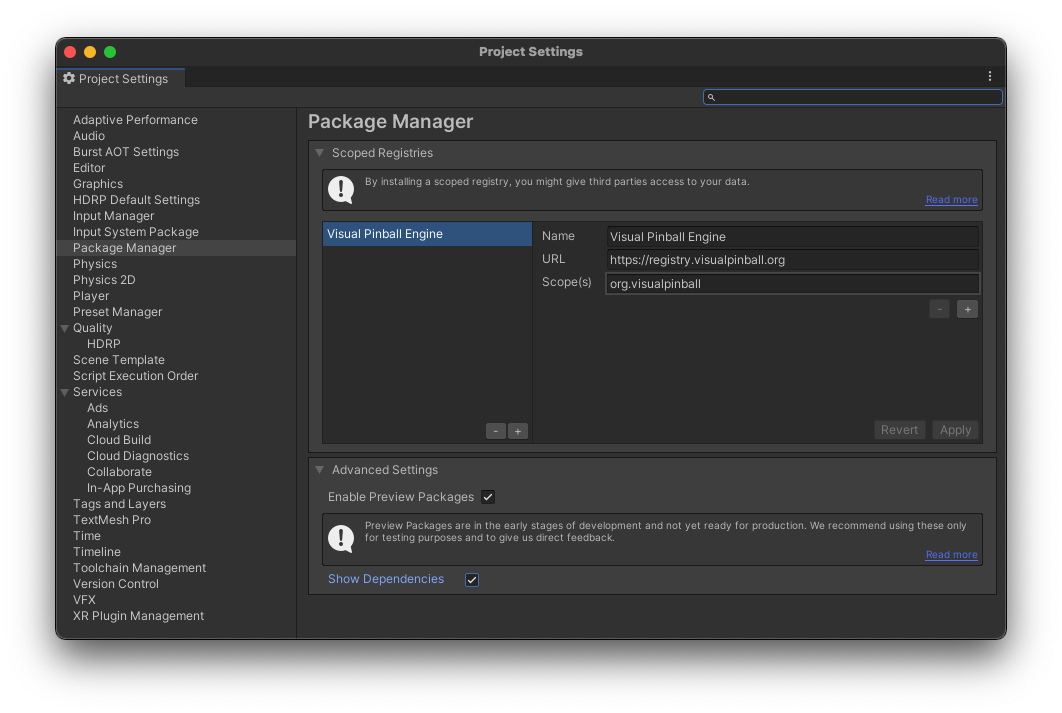
Setup the VPE scoped registry:
Clone the repositories:
git clone https://github.com/freezy/VisualPinball.Engine
git clone https://github.com/VisualPinball/VisualPinball.Unity.Hdrp
git clone https://github.com/VisualPinball/VisualPinball.Engine.PinMAME
Build the PinMAME Unity Plugins:
The PinMAME libraries are large and change often, so they are not stored in the git repo. We only need to do this once.
cd VisualPinball.Engine.PinMAME
git checkout feature/audio
cd VisualPinball.Engine.PinMAME
dotnet build -c Release
Verify the plugins have been created by looking in the Plugins/<RID> folder:

You will need to find an existing VPX Terminator 2: Judgement Day table. (Not sharing where to find one)
Create a new Basic Indoors (HDRP) Scene and save it as T2VPE

Select the Main Camera, and set Post Anti-aliasing to SMAA

Select the Plane, and change the Transform Y Position to -0.1

Import the VPX Terminator 2: Judgement Day table:

You will need to find an existing Terminator 2 L8 ROM. (Not sharing where to find one)
- If you are on Windows, make sure you have a working install of VPinMAME. Place the ROM in the VPinMAME's roms folder:

- If you are on MacOS or Linux, make a
.pinmame/romsfolder in your home directory and place the ROM here:

The service manual is vital to find the connections between the table and PinMAME. Manuals are available at IPDB

Reviewing the table script is vital to understanding how everything works.
- If you are on Windows and have Visual Pinball installed, you can view the script using the
View->Scriptmenu command.

- If you are on MacOS or Linux, you can use the
vptscriptcommand line tool to extract the script. Once extracted, you can usedos2unixto remove the carriage returns^M:
brew install node libvips dos2unix
npm install --global vpx-js
vptscript "Terminator 2: Judgment Day (Williams 1991).vpx" --save
dos2unix "Terminator 2: Judgment Day (Williams 1991).vbs"
vim "Terminator 2: Judgment Day (Williams 1991).vbs" +"%s/\r/\r/g" +wq
Terminator 2: Judgement Day uses a few other scripts that are part of a Visual Pinball installation:
- core.vbs VPinMAME driver core
- VPMKeys.vbs Visual PinMAME Key Constants
- WPC.vbs WPC Constants
Now that we have everything we need, we can finally get to work!
Whenever you import a table, it automatically adds a Default Game Logic Engine:

We need to remove this, by clicking Remove Component in the Table Inspector under Default Game Logic:

Next Select Add Component to search for PinMAME

In the PinMAME Inspector, select Terminator 2: Judgement Day for Game, and select L-8 for ROM.

The PinMAME Game Logic Engine can automatically populate the Switch, Coil, Wire, and Lamp managers per game. This feature is not complete, but it is a good start in getting a game configured.
Select Populate Hardware and then click Yes when prompted

Once the hardware is populated, confirm that the switch and coil managers are similar to below:


Next, we can add a DMD by selecting Create Displays. You will see a Dot Matrix Display game object added to the scene:

You can now save your scene.
Click the Play button to make sure the ROM and DMD are configured correctly.
If this is the first time you've ever run the ROM, the DMD will cycle between BOOKKEEPING TOTALS CLEARED and FACTORY SETTINGS RESTORED. Press 7 to restart the ROM.

Now click the Stop button.
Next we need to properly configure the Trough and the Plunger. To do this, we need to again refer to the service manual to understand how it works:

When the ball enters the outhole, it actives Switch 18 (Outhole). The CPU activates Coil 3 (Outhole) which kicks the ball in the trough. If all three balls are in the trough, then Ball 3 activates Switch 15 (Trough Left), Ball 2 activates Switch 16 (Trough Center), and Ball 1 activates Switch 17 (Trough Right).
When the player hits the Start button (Switch 13), the CPU activates Coil 4 (Trough) which moves Ball 1 into the Shooter Lane. Ball 1 then activates Switch 78 (Shooter). When the player presses the Grip Trigger (Switch 34), the CPU activates Coil 9 (Plunger) which launches the Ball 1 around the playfield.
In the Trough inspector, set the following:
Type: Two coils multiple switches
Ball Count: 3
Switch Count: 3
Has Jam Switch: [ ]
Roll Time: 300

Playfield Links
	Input Switch: Drain
	Exit Kicker: Ball Release

Next, in the Switch Manager, configure the Trough switches:
15, Trough Left, Device, Trough - Ball 3 (entry)
16, Trough Center, Device, Trough - Ball 2
17, Trough Right, Device, Trough - Ball 1 (eject)
18, Outhole, Device, Trough - Entry Switch

In the Coil Manager, configure the Trough coils:
3, Outhole, Device, Trough, Entry
4, Trough, Device, Trough, Exit

Click the Play button. Once the game starts, add coins using the 5 key. Press 1 to start the game.
You will notice the ball never made it into the shooter lane. If we turn off Primitive 68 (Apron), and Primitive 45 (Shooter Cover), you can see the ball move, but it seems like it didn't have quite enough power to make it into the shooter lane:

To understand why this is happening, we need to see how the trough is set up.
Since we know the switches related to the trough, we can search the table's script. We can see that this table uses a cpvmBallStack:

If we look at InitKick function for a cvpmBallStack in the Core.vbs script, we see it defined as:
       Public Sub InitKick(aKicker, aDir, aForce)
              Set mExitKicker = aKicker : mExitDir = aDir : mExitForce = aForce
              Set mSoundKicker = aKicker
       End Sub
The parameters aDir, and aForce provide a clue that they are related to direction and force.
So, now we know that activating the BallRelease kicker will kick the ball 90 degrees with a force of 8.
If we search the table hierarchy for BallRelease, we see that the Default Angle is already 90 degrees, however the Default Speed is 3:

Change the Default Speed value to 8, save, and click the Play button:

Now the ball, properly goes into the shooter lane!
You can now turn back on Primitive 68 (Apron), and Primitive 45 (Shooter Cover).
Let's wire up the Auto Shooter.