- Board type: TTGO LORA SX1278 ESP32 0.96 OLED Display Module 16 Mt Bytes 128 Mt bit) 433Mhz For Arduino
- manufactor: TTGO
- Banggood: Banggood Link
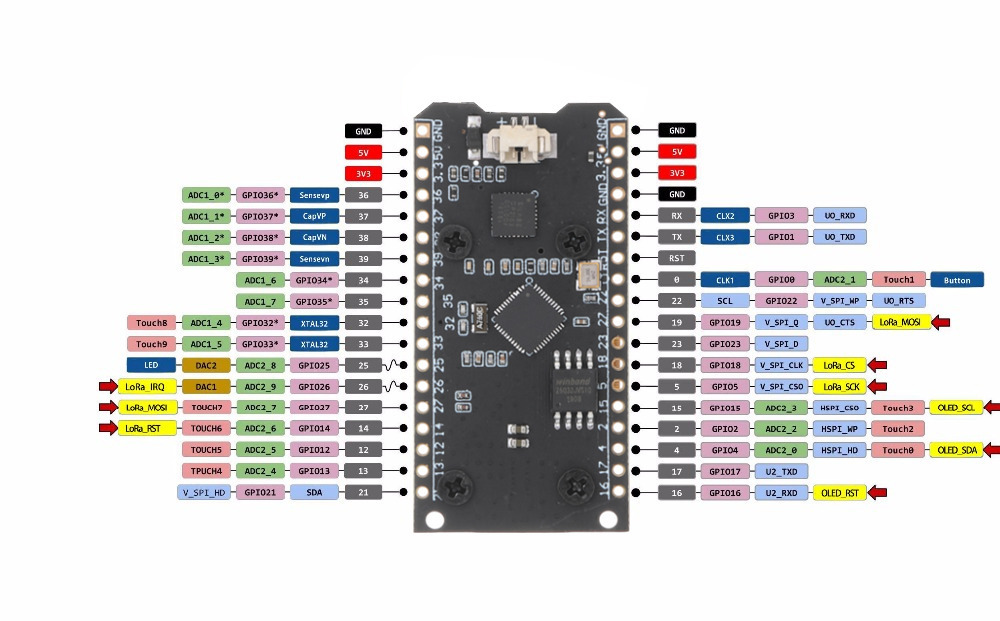
- Pinout: Pinout Image Link
src: randomnerdtutorials
add: instructions for windows
and for ubuntu
-
Download and install the arduino ide
-
For Windows: File -> Preferences -> Enter
https://dl.espressif.com/dl/package_esp32_index.jsoninto the “Additional Board Manager URLs” Tools -> Board -> Boards Manager -> Search for ESP32 and press install button for the “ESP32 by Espressif Systems“For Linux: Arduino -> Preferences -> Enter
https://dl.espressif.com/dl/package_esp32_index.json intothe “Additional Board Manager URLs” Tools -> Board -> Boards Manager -> Search for ESP32 and press install button for the “ESP32 by Espressif Systems“
src: Install ESP32 Arduino IDE
add: link ref. 1,
link ref. 2, link ref. 3
- File -> Preferences:
https://docs.heltec.cn/download/package_heltec_esp32_index.json - Board Manager: Heltec ESP32 install
- Manage Libraries: Heltec ESP32 install
- Example -> Custom Library Examples -> Heltec ESP32 Dev-Boards -> Factory_Test -> WiFi_Lora_32Factory_Test
- Tools > Board and select the WiFi LoRA 32
- Change Band to 433E6
src: randomnerdtutorials
add: WiFi LoRa ESP32
- Manage Libraries: LoRa by Sandeep Mistry, SSD1306, GFx
- Tools -> Board and select the TTGO LoRa32-OLED V1 board
- Send Code -> LoRa-TTGO-Send
- Receive Code -> LoRa-TTGO-Receive
- Change Band to 433E6