Users should be able to send messages directly to each other. The messages must be delivered instantly, in real-time. The app must support not only text messages but also images, videos, and other attachments.
After sending a message, users can see its status:
- Sent (shown with one check mark)
- Delivered (shown with two check marks)
- Read (shown with two blue check marks)
- When you open the app, it shows you as online.
- Others can see this.
- They can also see when you were last online.
The app will also support group chats.
| Requirement | Description |
|---|---|
| Availability | Our chat system must always be available. It should aim for 99.99999% uptime, which means it rarely goes down. |
| Low Latency | Messages should send quickly without delays. The system should feel instant, like real-time conversation. |
| Scalability | Our system must handle a very large number of users, potentially millions, at the same time. As more users join, the system should easily manage the increasing load. |
| Security | Messages should be end-to-end encrypted. This means that only the sender and receiver can read the messages. Nobody else can see them, not even the people who run the app. |
1 billion
2 billion
Let's calculate how many reads and writes we do to the system.
There are only a couple of possible ways to write (add or update data into the system) as per our functional requirements:
- Sending a message
- Updating the state of the message (
Sent → Delivered,Delivered → Read)
Similarly, there are only a couple of primary ways to read data from our system:
- Reading the sent message
- Each time the message's status changes (from 'Sent' to 'Delivered', and 'Delivered' to 'Read'), the system performs a read operation. This allows it to update the sender with delivery and read receipts, displaying the correct symbols on their phone:
- Double black tick for 'Delivered'
- Double blue ticks for 'Read'
-
For each message sent, there are three write operations:
- Initially saving the message
- Two updates as it changes status from 'Sent' to 'Delivered', then 'Delivered' to 'Read'
-
There are also three corresponding read operations:
- One for the recipient to read the message
- Two for updating the sender about the message's delivery and read status
Let's assume a user sends 10 messages in a day.
-
Total messages (or write requests) in a day:
DAU X 10 messages per day X 3 writes per message
= 1 Billion X 10 X 3 = 30 Billion messages/day -
Total write requests per second:
30 Billion / (24 hrs X 60 X 60)
= 0.34 million write requests per second -
Read Operations:
There are three corresponding reads for each message for three writes, resulting in no change to the throughput calculation for reads. -
Total messages (or read requests) per second:
DAU X 10 messages per day X 3 reads per message
= 1 Billion X 10 X 3 = 30 Billion messages/day
= 0.34 million read requests per second
Text messages are usually around 100 Bytes.
Image, video, or document messages are around 250 KB.
From throughput estimation, we know there are 30 Billion write requests per day.Now, assume 1 out of 100 messages are media messages.
-
Text data storage
(0.99 × 30B) × 100 bytes = 2.97 TB/day -
Media data storage
(0.01 × 30B) × 250 KB = 75 TB/day -
Total storage
~ 78 TB/day -
Total storage in 10 years
(78 TB/day × 365 × 10) = 284 PB
By memory, we mean cache memory size.
Accessing data from the database takes a long time, but if we want to access it faster, we use cache.
The amount of cache memory required every day can simply be taken as:
Network / Bandwidth estimation tells us how much data flows in and out of our system per second.
Incoming data in a day is ultimately saved in the storage.
- Given: Data stored in a day = 78 TB/day
- Therefore: Incoming data in a day = 78 TB/day
- Hence: Incoming data per second = 78 TB / (24 × 60 × 60) ≈ 950 MB/sec
We have seen in the throughput section that in our system, the number of reads and writes per day are roughly the same. This means the data going out each day matches the data coming in.
- Therefore: Outgoing data per second ≈ Incoming data per second ≈ 950 MB/sec
If Max wants to send a message to Emily using WhatsApp, Max can send the message to the WhatsApp server, and then the WhatsApp server can relay that same message to Emily.

- User1 (Max) sends a message to the WhatsApp server.
- WhatsApp server relays that message to User2 (Emily).
We can handle this with a simple HTTP request.
This is more challenging. The server needs to send the message to User2.

In HTTP, the server cannot initiate requests to the user. Requests can only be sent from the client to the server — it's a one-way street (client → server).
WebSockets are a mechanism that allows bidirectional communication. Both the server and client can send messages to each other.
At a fundamental level, a WebSocket connection is an "upgraded" version of an HTTP request.
-
The client starts by sending an HTTP GET request with the following headers:
Connection: UpgradeUpgrade: websocket
-
The endpoint the client uses, such as
ws://whatsapp.com/chat, is specifically set up by the server for handling WebSocket connection requests.
("ws" stands for WebSockets.) -
When the server receives this HTTP request, it understands that the client wants to switch from HTTP to WebSockets.
It responds with the status code 101 - Switching Protocols (HTTP → WebSocket).


Once the connection is upgraded, it remains open, allowing both the server and client to send messages directly to each other in real-time without needing the traditional HTTP request/response model.
- Max sends messages to the server through his connection.
- Emily receives messages from the server through her connection.
In a WebSocket connection:
- Messages flow back and forth quickly because there is no need for extra headers or metadata (as in HTTP).
This makes communication faster.

WebSockets maintain a continuous, open connection that allows direct data exchanges without the traditional HTTP request-response model. Therefore, there is no need for specific API design details like HTTP methods (GET, POST, PUT, DELETE), endpoints, or bodies. Both the client and server can directly send data to each other.
When a message travels from the sender to the receiver, it goes through three stages:
-
Message Sent (single black tick)
The message has left the sender and reached the WhatsApp server. -
Message Delivered (two black ticks)
The message has moved from the WhatsApp server to the receiver. -
Message Read (two blue ticks)
The receiver has actually opened and read the message.

WhatsApp Servers inform the client about the message status (Sent, Delivered, Read) using the same WebSocket connection that was established. As the status changes— Sent → Delivered → Read—the server sends the updates to the client. The app then displays the appropriate ticks.
The online status or 'last seen' feature shows when a user last used the app. If they are currently active, it should display 'online'.
Using the established WebSocket connection between the server and the client, we can also get the last seen time or online status.
As shown in the example, Emily's phone (Client) continuously updates the WhatsApp Server with her last active times on the app. This update is sent over the WebSocket connection between Emily and the WhatsApp Server. The server keeps saving these last seen times.

When Max asks - "When was Emily last active?", the server provides this information. This communication also occurs over the WebSocket connection established between Max and the WhatsApp Server.

The API design for group messaging is quite similar to that for 1:1 messaging. We use WebSocket connections to send and receive messages. The slight difference here is that there are multiple recipients.
As you can see in the image below, Max, Amanda, and Mike are in a WhatsApp group. Max posts a message in the group saying:
"Meeting at 3:00 pm today."
-
The message travels to the server through the WebSocket connection between Max and the WhatsApp Servers.
-
The WhatsApp Server then relays this message to the other group members (Amanda and Mike), again using their respective WebSocket connections.

We've already touched on this topic in the API design section. Remember from the diagram below how Max first sends an HTTP GET request to the server, asking to switch protocols to WebSockets. The server responds with HTTP 101 (Switching Protocols).

We understood the API part of this flow earlier but didn’t see what actually happens on the server side during this process. Let’s zoom into that now.
Max's initial GET request first hits the API Gateway.
The API Gateway routes the request to some specialized servers called WebSocket Handler Servers via the Load Balancer.
- Max's request is routed to WebSocket Handler 1.
- Emily's request goes to WebSocket Handler 2.
The WebSocket Handler acknowledges the request and responds back with HTTP 101 (Switching Protocols). This response reaches the client via the API Gateway.

As you can see:
- Max is connected to WebSocket Handler 1.
- Emily is connected to WebSocket Handler 2.
Other clients will also be connected to a particular WebSocket Handler.
To maintain these connections, the mapping (User → WebSocket Handler) is stored in the backend. If Max wants to send a message to Emily:
- Max sends the message to WebSocket Handler 1.
- WebSocket Handler 1 looks up in the mappings and finds that Emily is connected to WebSocket Handler 2.
- WebSocket Handler 1 relays the message to WebSocket Handler 2.
- WebSocket Handler 2 finally sends the message to Emily.

These mappings are created by the WebSocket Connections Manager Service at the same time when the client gets connected to a WebSocket Handler.
- WebSocket Handler 1 sends this mapping (Client → WebSocket Handler 1) to the WebSocket Connections Manager Service.
- The WebSocket Connections Manager Service stores this mapping in a cache for quick access.

- Multiple clients can connect to the same WebSocket Handler.
- Additionally, these WebSocket Handlers are interconnected and communicate with each other using WebSockets.
- Managing numerous open and persistent connections is a complex task, which is why WebSocket Handlers aren't assigned any other major responsibility.
Let's try designing the core feature of 1:1 messaging.
Let’s see how the flow runs step by step using the diagram below:
-
Max sends a message:
Max sends a message to Emily saying "Hi Emily" using the WebSocket connection.
(Max ↔ WebSocket Handler 1) -
WebSocket Handler 1 queries WebSocket Connections Manager:
WebSocket Handler 1 asks which WebSocket Handler Emily is connected to. -
WebSocket Connections Manager checks the cache:
The manager checks the cache to see where Emily (Client 2) is connected and finds she's linked to WebSocket Handler 2. This information is then sent back to WebSocket Handler 1. -
Message routing:
WebSocket Handler 1 sends the "Hi Emily" message to WebSocket Handler 2. -
Message delivery:
WebSocket Handler 2 sends this message to Emily.

The flow seems straightforward, right? But there's a potential problem:
Imagine just after step 4, as WebSocket Handler 2 is about to send the message to Emily, her phone turns off. This would break Emily's connection with WebSocket Handler 2, meaning the message wouldn't reach her and would be lost.

What can we do to avoid this situation?
The solution is simpler than you might think. Take a minute to think about it.
The solution is straight forward—we start storing messages. This ensures that messages are never lost due to network interruptions. If a client goes offline, their messages are stored in a database and can be retrieved as soon as they come back online.Look at the diagram below, and you’ll understand.

-
Max sends a message to Emily:
Max sends the message "Hi Emily" using the WebSocket connection (Max ↔ WebSocket Handler 1). -
WebSocket Handler 1 forwards the message:
WebSocket Handler 1 first passes the message to the Message Service. -
Message Service stores the message:
The Message Service adds the message to the Messages DB, containing the following information:- From: Who sent the message
- To: Who the message is for
- Message: The actual message content
- Time: When the message was sent
- Current State: The status of the message (Sent, Delivered, Read).
- Initially, the state remains 'Sent' as the message has just reached the server.
-
WebSocket Handler 1 queries the connection:
WebSocket Handler 1 calls the WebSocket Connections Manager to check which WebSocket Handler Emily is connected to. -
WebSocket Connections Manager checks the cache:
It finds that Emily (Client 2) is linked to WebSocket Handler 2 and returns this information to WebSocket Handler 1. -
Message routing:
WebSocket Handler 1 sends the "Hi Emily" message to WebSocket Handler 2 via an internal WebSocket connection (WebSocket Handler 1 ↔ WebSocket Handler 2). -
Emily goes offline:
At this point, Emily goes offline. No problem—the message is already stored in the Messages DB and can be retrieved whenever Emily comes back online.
Let's imagine Emily comes back online after a while. Here's what happens next.

Here's what happens next:
-
Step 1, Step 2, Step 3: Upon reconnecting, she first establishes a WebSocket connection with her handler.
-
Step 4, Step 5: The WebSocket Handler saves this mapping in the WebSocket Connections Cache, a process we already know from the WebSocket connection establishment flow.
-
Step 6, Step 7: Now here are the additional steps:
- WebSocket Handler 2 asks the Message Service if there are any messages for Emily that need to be delivered (all the messages for Emily in the 'Sent' state).
- Message Service finds one such message ("Hi Emily") and returns it to WebSocket Handler 2.
-
Step 8: WebSocket Handler 2 sends "Hi Emily" to Emily.
After adding the Message Service and Messages DB, the overall 1:1 messaging flow looks like this:
-
Max sends a message:
Max sends a message to Emily saying "Hi Emily" using the WebSocket connection (Max ↔ WebSocket Handler 1). -
Message Handling:
WebSocket Handler 1 first gives this message to the Message Service. -
Storing Message:
The Message Service adds this message to the Messages DB. The message entry contains the following information:- From: Who sent the message
- To: Who the message is for
- Message: The actual message content
- Time: When the message was sent
- State: Sent, Delivered, Read (Currently, the state remains 'Sent' because the message has just reached the server)
-
Checking Connection:
WebSocket Handler 1 calls the WebSocket Connections Manager and asks which WebSocket Handler Emily is connected to. -
Fetching Connection Info:
The WebSocket Connections Manager checks this information in the cache and finds out that Emily (Client 2) is connected to WebSocket Handler 2. This information is then returned to WebSocket Handler 1. -
Internal WebSocket Communication:
WebSocket Handler 1 sends the "Hi Emily" message to WebSocket Handler 2 through an internal WebSocket connection (WebSocket Handler 1 ↔ WebSocket Handler 2). -
Final Delivery:
Ultimately, WebSocket Handler 2 sends this message to Emily.

We've already understood 1:1 messaging for text messages. In this lesson, let's look at how 1:1 messaging for assets works. An asset can be an image, video, document, or any other attachment.
This flow is conceptually very similar to text messaging, but the difference here is that instead of a text message, an asset URL is sent. Let's understand this with an example.
Max sends an image, "sunrise.jpeg" to Emily:
- Max taps the '+' (upload attachment) button on WhatsApp, selects the "sunrise.jpeg" image from his gallery, and uploads it.
- This process takes about a second to complete.
- Have you ever wondered what happens behind the scenes in that brief moment?

- Step 0.1: As soon as Max taps the '+' button, selects the image, and clicks upload, a request is sent to the API Gateway. The API Gateway forwards this request to the Asset Service.
- Step 0.2: The Asset Service uploads the "sunrise.jpeg" image to the Object Storage.
- Step 0.3: Object Storage then uploads the image to the CDN.
- Step 0.4: Max receives the URL of the uploaded image.
- Step 1: Max sends this image URL to WebSocket Handler 1.
- ...
- Step 7: Emily receives the URL of the uploaded image.
- Step 8: At this step, she actually downloads the image from the CDN.
You've probably noticed when you send a WhatsApp message to a friend, initially a single black tick appears. Then, after some time, when the message reaches your friend's phone, a double black tick appears. Finally, when your friend reads it, it turns into a double blue tick. Basically, the 'state' of your message changes:

Let’s understand this flow and see what happens on the server side during this process and how your phone knows which tick to display.
We've previously explored how to send a 1:1 message. Now, let's add a new step between steps 3 and 4—Step 3.5.
- Step 3.5: In step 3, we stored our message on the server. This is the exact moment when we should notify Max that his message has been 'Sent'. So that's what we do. We notify him, and then his phone displays a black tick next to that message.

Naturally, the 'delivered' status of a message happens after it has been delivered to Emily. Here’s how it happens:

- Step 8: After receiving the message, Emily's phone sends a confirmation back to WebSocket Handler 2, confirming that she has received the message.
- Step 9: WebSocket Handler 2 then informs the Message Service that the message to Emily has been delivered.
- Step 10: The Message Service updates the status in Messages DB from 'Sent' to 'Delivered.' It also checks in the DB who sent the message (Client 1). This is because we want to inform the sender that their message has been successfully delivered.
- Step 11: WebSocket Handler 2 asks the WebSocket Connections Manager which WebSocket Handler is connected to Client 1.
- Step 12: The Connections Manager checks the cache and finds that it's connected to WebSocket Handler 1.
- Step 13: Therefore, WebSocket Handler 2 informs WebSocket Handler 1 that Max's "Hi Emily" message has been delivered.
- Step 14: WebSocket Handler 1 then notifies Max about this. Now, Max sees a double black tick (
 ) on that message.

The flow is very similar to the 'Delivered' status, with a small change. This time, the flow starts only after Emily reads the message.

- Step 15: Emily reads the message, and then her phone notifies WebSocket Handler 2.
- Step 16: WebSocket Handler 2 tells the Message Service that Emily has read the "Hi Emily" message.
- Step 17: The Message Service updates the status in Messages DB from 'Delivered' to 'Read.' It also checks in the DB who sent the message (Client 1).
- Step 18: WebSocket Handler 2 asks the WebSocket Connections Manager which WebSocket Handler is connected to Client 1.
- Step 19: The Connections Manager checks the cache and finds that it's connected to WebSocket Handler 1.
- Step 20: Therefore, WebSocket Handler 2 informs WebSocket Handler 1 that Max's "Hi Emily" message has been read.
- Step 21: WebSocket Handler 1 then notifies Max about this. Now, Max sees a double blue tick (
 ) on that message.

Note: The term "online" can sometimes be overloaded. In this entire section, when we use the word "online," we mean that the client has their app open and is actively using it.
Most messaging platforms, including WhatsApp, have a feature that allows you to see if your friend is online or not. You can also see when they were last active. Let's dive into how this feature is designed.

-
1:00 PM:
Max opens his app. Through a WebSocket connection, the client sends a ping to WebSocket Handler 1, indicating that Max is active on the app. -
Step 1:
WebSocket Handler 1 calls the Last Seen Service. -
Step 2:
The Last Seen Service updates the Last Seen DB with the current active time for Client 1: August 4th, 2024, at 13:00:00. -
1:01 PM:
One minute passes, and Max is still actively using the app. The app sends another ping through the WebSocket connection to WebSocket Handler 1. -
Step 3:
WebSocket Handler 1 again contacts the Last Seen Service. -
Step 4:
The Last Seen Service updates the database with the new active time for Client 1: August 4th, 2024, at 13:01:00.
This process continues every minute.
-
1:09 PM:
Max is still active, and another ping is sent. -
Step 5:
WebSocket Handler 1 contacts the Last Seen Service once more. -
Step 6:
The Last Seen Service updates the Last Seen Database with the latest active time for Client 1: 13:09:00. -
1:10 PM:
Max closes the app. The Last Seen time in the database remains at 13:09:00.
Every time the app is open or in an active state in the foreground, it sends a signal to the server every minute. This helps the server keep track of the last time the client was active.

-
Emily wants to know when Max was last active.Emily asks WebSocket Handler 2 when Max was last seen.
-
WebSocket Handler 2 contacts the Last Seen Service to inquire about this.
-
The Last Seen Service checks the Last Seen DB for the last active time of Max.
-
WebSocket Handler 2 informs Emily that Max was last online on August 4th, 2024, at 13:09:00.
In this section, let's explore how the group messaging feature is designed. Group messaging means if Max, Amanda, and Mike are in a group, and Max sends a message saying "Meeting at 3 PM today", both Amanda and Mike should receive it.
Conceptually, this flow is very similar to 1:1 messaging, but there are a few nuances to grasp.

-
Max sends a group message:
"Meeting at 3 PM today." The group includes Max, Amanda, and Mike. Through the WebSocket connection, this message goes from Max to WebSocket Handler 1. -
Saving the message:
WebSocket Handler 1 first calls the Message Service to save this message. -
Storing in Messages DB:
The Message Service saves this message in the Messages DB with the following details:- From: Who sent the message (Max)
- To: The target group
- Message: The actual message content
- Time: When it was sent
- Current State: Sent, Delivered, Read (Currently, the state is 'Sent')
- ID: A system-generated message ID
-
Event creation:
The Message Service puts an event in the Message Queue, containing all the details of the message, including the target group. -
Event processing:
The Group Service pulls this event from the Message Queue. -
Target group determination:
The Group Service determines the target group (Group 1) from the event. It checks the Groups DB to see which users are in this target group (Client 1, Client 3, Client 4). -
WebSocket handler lookup:
The Group Service asks the WebSocket Connections Manager which WebSocket Handlers the target users (excluding the sender, Client 1) are connected to. -
Handler mapping:
The WebSocket Connections Manager checks the cache and provides this information:- Client 3 ↔ WebSocket Handler 3
- Client 4 ↔ WebSocket Handler 4
-
Message delivery:
The Group Service then sends the message to all these WebSocket Handlers. -
Final delivery:
The WebSocket Handlers deliver the message to the respective users.
In order to decide the DB type, here are some general guidelines that you can follow, but do remember it’s not always black and white. A lot depends on the project needs:
- Fast Data Access: NoSQL is generally preferred over SQL.
- High Scale: NoSQL databases tend to perform better than SQL databases.
- Data Structure:
- Fixed Structure: SQL is more suited.
- Flexible Structure: NoSQL should be the choice.
- Query Complexity:
- Complex Queries: SQL should be the choice.
- Simpler Queries: NoSQL can be used.
- Frequent/Evolving Data: NoSQL supports flexible structures and handles frequent changes better.
| Database | Deciding Factors | Decision |
|---|---|---|
| MessagesDB |
|
NoSQL |
| GroupsDB |
|
NoSQL |
| Last Seen DB |
|
NoSQL |
Note: The tables shown in high-level design were simplified versions just to illustrate the overall flow. This lesson provides a more detailed schema of those, which can be used to efficiently store our data.

- Database Type: NoSQL
- Common Queries: Retrieve all messages marked as 'Sent' for a user. This ensures users can get their messages that they missed while they were disconnected.
- Indexing:
ReceiverId
Note: Because we have these common queries to grab messages by ReceiverId / SenderId, we create an index on these fields. This will set a shortcut to quickly find the data by these IDs.

- Database Type: NoSQL
- Common Queries: Reading which users are in a particular group.
- Indexing:
GroupId
Note: Because we have this common query to grab users for a GroupId, we create an index on this field. This will set a shortcut to quickly find the data by GroupId.

- Database Type: NoSQL
- Common Queries: Reading the last seen time for a particular client ID.
- Indexing:
clientId
Note: Because we have this common query to grab the last seen time for a client, we create an index on this field. This will set a shortcut to quickly find the data by clientId.
Imagine you sent a confidential message to your friend using WhatsApp, including your personal and bank details, and a hacker intercepted and read it along the way.

To avoid such risks, we use something called end-to-end encryption. But what exactly is end-to-end encryption?
Think of it like this: You and your friend have developed a secret language over the years that only the two of you understand.
- When you send a message, you convert it into this secret language and send it off.
- Your friend, who also knows this secret language, understands the message.
- If a clever hacker intercepts and tries to read the message, they won't understand a thing because the secret language is known only to you and your friend.
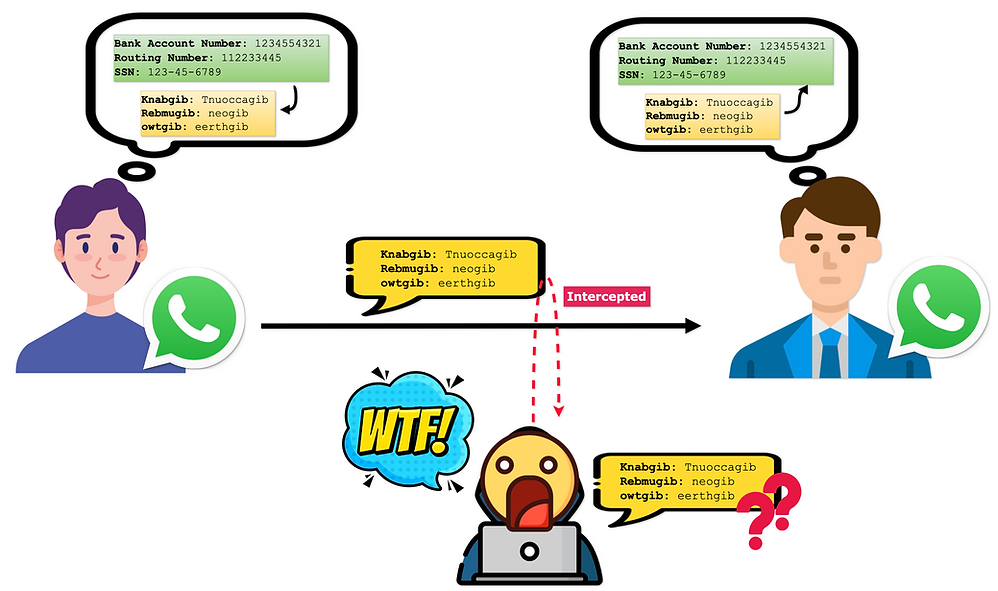
This is the gist of end-to-end encryption.
- Encryption: Turning the English message into a secret language.
- Decryption: Turning the secret language back into the English message.
When we say that WhatsApp messages are end-to-end encrypted, it means that messages travel from one end (the sender) to the other end (the recipient) in encrypted form.
- They are even stored on the server in this encrypted form.
- This prevents any hacker (who intercepts the messages) from gaining any useful information, thus improving the security of our system.
You might wonder how this secret language (i.e., encryption and decryption) works in the digital world. It's done through a lock and key mechanism.
-
Your friend has a lock and a key.
- He keeps the key to himself and gives the lock to you.
-
Before sending the message, you lock the message.
-
When the message reaches your friend, he uses his key to unlock it and read the message.
Since only your friend has the key, even if a hacker intercepts the message, they can't read it.
