This article provides a step-by-step guide to install Hadoop 3.3.0 on Windows 10 via WSL (Windows Subsystem for Linux). These instructions are also applicable for installing Hadoop on Linux systems.
Hadoop 3.3.0 (released on July 14 2020) is the most recent release in the Apache Hadoop 3.3 line as of the time of this article.
Follow the steps mentioned in the page below to first enable Windows Subsystem for Linux and then install a Linux distribution of your choice (preferably Ubuntu).
Windows Subsystem for Linux Installation Guide for Windows 10
Initial Linux Configuration (optional)
We will create a dedicated Hadoop user for executing Hadoop commands. Although not required, it is a recommended step as it separates the Hadoop installation from other software applications and user accounts running on the same machine.
-
Create a user group
hadoopsudo addgroup hadoop
-
Create a user
hdusersudo adduser hduser
It will ask for password 2 times followed by user details, just press enter for each prompt and confirm Yes in the end.
-
Add user
hduserto user grouphadoopsudo adduser hduser hadoop
-
Add
hduserto sudoers list so thathdusercan do admin taskssudo visudo
Append after the line
#Allow member of group sudo to execute any commandhduser ALL=(ALL) ALL
Then save and close the file.
-
Logout of current session
logout -
Login again as
hdusersu hduser cd
Hadoop requires SSH access to manage its nodes.
This is a critical step and please make sure you follow the steps
Make sure you can SSH to localhost in Ubuntu:
ssh localhostIf you encounter the error ssh: connect to host localhost port 22: Connection refused, run the following commands:
sudo apt remove openssh-server
sudo apt install openssh-server
sudo service ssh start
If you cannot ssh to localhost without a passphrase, run the following command to initialize your private and public keys:
ssh-keygen -t rsa -P '' -f ~/.ssh/id_rsa
cat ~/.ssh/id_rsa.pub >> ~/.ssh/authorized_keys
chmod 0600 ~/.ssh/authorized_keys
Now ssh localhost should work without any passphrase.
Update the package index:
sudo apt updateCheck whether Java is already installed:
java -versionIf Java isn't installed, install Java 8 from OpenJDK via the following command:
sudo apt-get install openjdk-8-jdkCheck the version installed:
java -version
openjdk version "1.8.0_275"
OpenJDK Runtime Environment (build 1.8.0_275-8u275-b01-0ubuntu1~20.04-b01)
OpenJDK 64-Bit Server VM (build 25.275-b01, mixed mode)Visit the Hadoop releases page to find a download URL for Hadoop 3.3.0:
Run the following command to download the latest binary for Hadoop 3.3.0:
wget https://downloads.apache.org/hadoop/common/hadoop-3.3.0/hadoop-3.3.0.tar.gzWait until the download is completed.
Create a hadoop folder under the user home folder:
mkdir ~/hadoopUnzip the downloaded binary package:
tar -xvzf hadoop-3.3.0.tar.gz -C ~/hadoopAfter the package is unzipped, change current directory to the Hadoop folder:
cd ~/hadoop/hadoop-3.3.0/nano ~/.bashrcSetup Hadoop and Java environment variables at the end of the .bashrc file as below and then save the bash file and close it.
#Set Hadoop-related environment variables
export JAVA_HOME=/usr/lib/jvm/java-8-openjdk-amd64
export HADOOP_HOME=~/hadoop/hadoop-3.3.0
export PATH=$PATH:$HADOOP_HOME/bin
export PATH=$PATH:$HADOOP_HOME/sbin
export HADOOP_CONF_DIR=$HADOOP_HOME/etc/hadoop
export HADOOP_MAPRED_HOME=$HADOOP_HOME
export HADOOP_COMMON_HOME=$HADOOP_HOME
export HADOOP_HDFS_HOME=$HADOOP_HOME
export YARN_HOME=$HADOOP_HOME
For applying all these changes to the current Terminal, execute the source command.
source ~/.bashrcMake sure that Java and Hadoop have been properly installed on your system and can be accessed through the Terminal by,
java -version
openjdk version "1.8.0_275"
OpenJDK Runtime Environment (build 1.8.0_275-8u275-b01-0ubuntu1~20.04-b01)
OpenJDK 64-Bit Server VM (build 25.275-b01, mixed mode)
hadoop version
Hadoop 3.3.0
Source code repository https://gitbox.apache.org/repos/asf/hadoop.git -r aa96f1871bfd858f9bac59cf2a81ec470da649af
Compiled by brahma on 2020-07-06T18:44Z
Compiled with protoc 3.7.1
From source with checksum 5dc29b802d6ccd77b262ef9d04d19c4
This command was run using /home/daftdey/hadoop/hadoop-3.3.0/share/hadoop/common/hadoop-common-3.3.0.jarThis page below is the official documentation to configure a single node cluster:
All the Hadoop configuration files should be located in ~/hadoop/hadoop-3.3.0/etc/hadoop directory.
cd ~/hadoop/hadoop-3.3.0/etc/hadoopThe configuration setup steps are as follows:
-
Edit file
hadoop-env.sh:nano hadoop-env.sh
Set Java environment variable as,
# Java path
export JAVA_HOME=/usr/lib/jvm/java-8-openjdk-amd64
-
Edit file
core-site.xml:core-site.xmlinforms Hadoop daemon where NameNode runs in the cluster. It contains configuration settings of Hadoop core such as I/O settings that are common to HDFS & MapReduce.nano core-site.xml
Add the following configuration:
<configuration>
    <property>
        <name>fs.defaultFS</name>
        <value>hdfs://localhost:9000</value>
    </property>
</configuration>
-
Edit file
hdfs-site.xml:hdfs-site.xmlcontains configuration settings of HDFS daemons (i.e. NameNode, DataNode, Secondary NameNode). It also includes the replication factor and block size of HDFS.nano hdfs-site.xml
Add the following configuration:
<configuration>
    <property>
        <name>dfs.replication</name>
        <value>1</value>
    </property>
</configuration>
-
Edit file
mapred-site.xml:mapred-site.xmlcontains configuration settings of MapReduce application like number of JVM that can run in parallel, the size of the mapper and the reducer process, CPU cores available for a process, etc.nano mapred-site.xml
Add the following configuration:
<configuration>
    <property>
        <name>mapreduce.framework.name</name>
        <value>yarn</value>
    </property>
    <property>
        <name>mapreduce.application.classpath</name>
        <value>$HADOOP_MAPRED_HOME/share/hadoop/mapreduce/*:$HADOOP_MAPRED_HOME/share/hadoop/mapreduce/lib/*</value>
    </property>
</configuration>
-
Edit file
yarn-site.xml:yarn-site.xmlcontains configuration settings of ResourceManager and NodeManager like application memory management size, the operation needed on program & algorithm, etc.nano yarn-site.xml
Add the following configuration:
<configuration>
    <property>
        <name>yarn.nodemanager.aux-services</name>
        <value>mapreduce_shuffle</value>
    </property>
    <property>
        <name>yarn.nodemanager.env-whitelist</name>
        <value>JAVA_HOME,HADOOP_COMMON_HOME,HADOOP_HDFS_HOME,HADOOP_CONF_DIR,CLASSPATH_PREPEND_DISTCACHE,HADOOP_YARN_HOME,HADOOP_MAPRED_HOME</value>
    </property>
</configuration>
Go to Hadoop home directory and format the Hadoop namenode:
cd ~/hadoop/hadoop-3.3.0
bin/hdfs namenode -format
This formats the HDFS via the NameNode. Formatting the file system means initializing the directory specified by the dfs.name.dir variable.
This command should be executed only for the first time, before starting to use Hadoop. Never format a up and running Hadoop filesystem. You will lose all your data stored in the HDFS.
The NameNode is the centerpiece of an HDFS file system. It keeps the directory tree of all files stored in the HDFS and tracks all the file stored across the cluster.
On startup, a DataNode connects to the Namenode and it responds to the requests from the Namenode for different operations.
sbin/start-dfs.sh
Starting namenodes on [localhost]
Starting datanodes
Starting secondary namenodes [tars]jps
8544 SecondaryNameNode
8304 DataNode
8149 NameNode
8702 JpsWhen the HDFS services are successfully initiated, you should be able to see these four processes running.
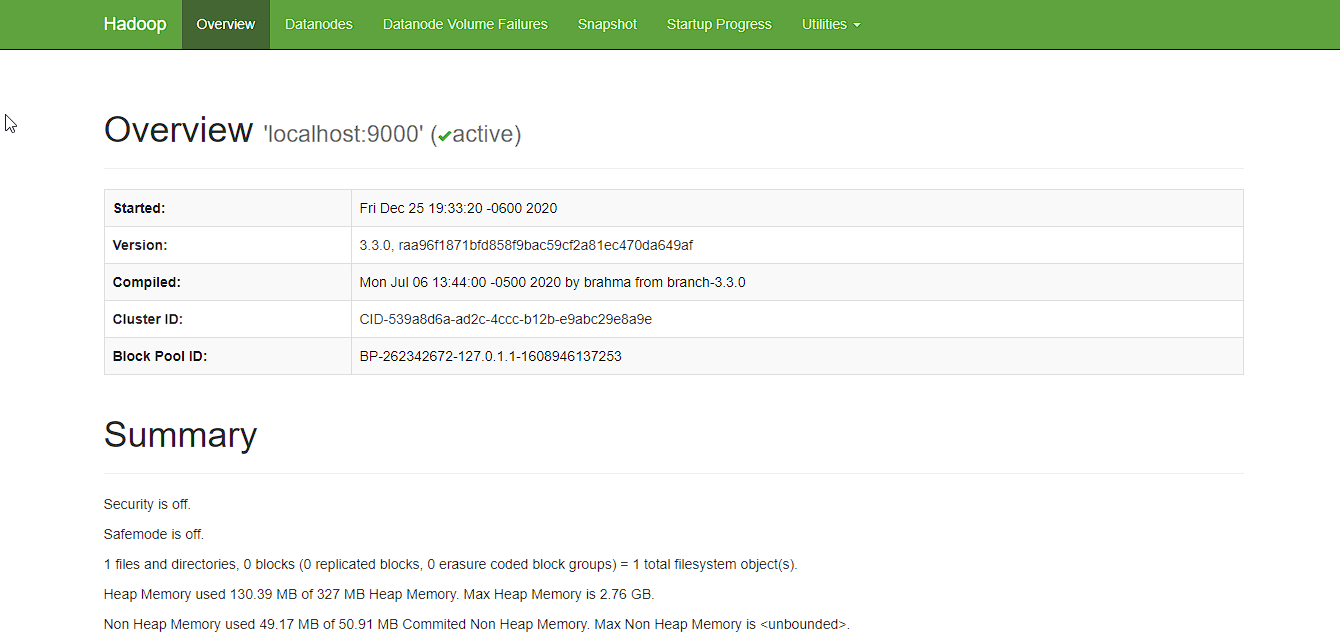
Now open the browser and go to following URL to view the NameNode interface. Scroll down and see the number of live nodes.
http://localhost:9870/dfshealth.html#tab-overview
The web UI looks like this:
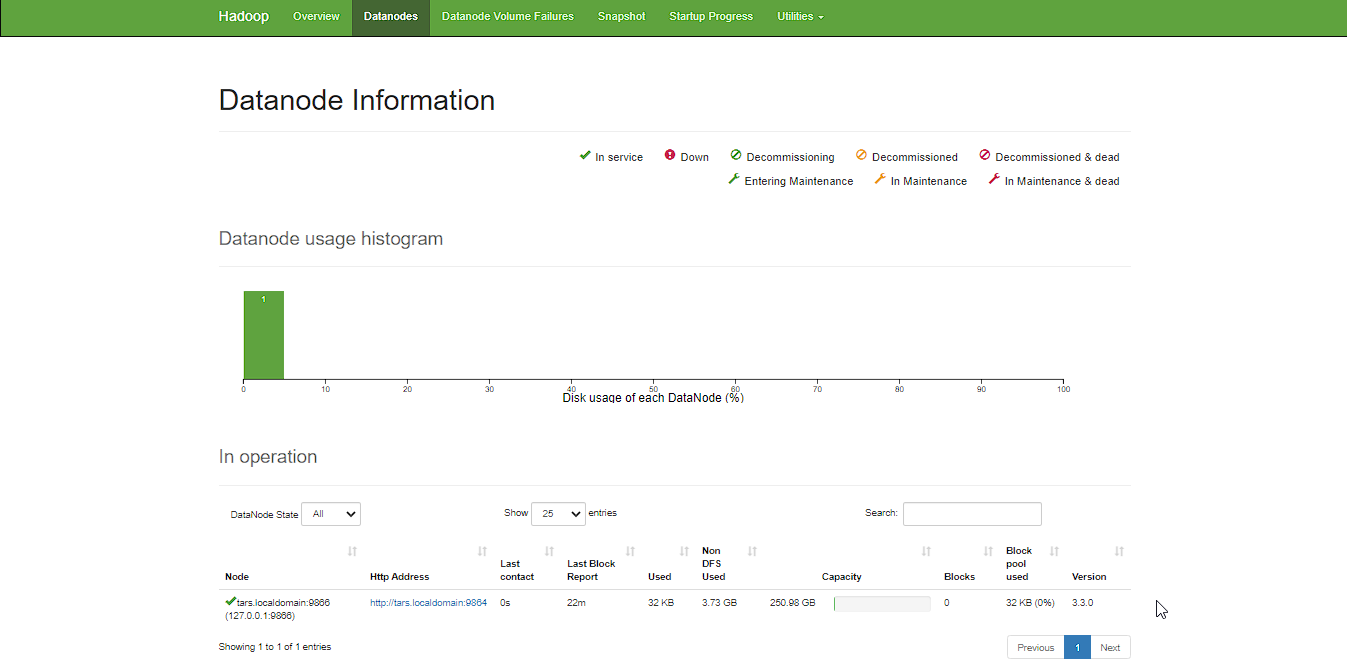
Data nodes information can be also viewd through the Datanodes menu link:
ResourceManager is the master that arbitrates all the available cluster resources and thus helps in managing the distributed applications running on the YARN system. Its work is to manage each NodeManagers and the each application’s ApplicationMaster.
The NodeManager in each machine framework is the agent which is responsible for managing containers, monitoring their resource usage and reporting the same to the ResourceManager.
sbin/start-yarn.sh
Starting resourcemanager
Starting nodemanagersjps
11831 ResourceManager
11352 DataNode
12347 Jps
11196 NameNode
11981 NodeManager
11597 SecondaryNameNodeOnce the YARN services are started, two more processes for NodeManager and ResourceManage can be seen running.
Now open the browser and go to following URL to view the YARN resource manager web UI.
The web UI looks like this:
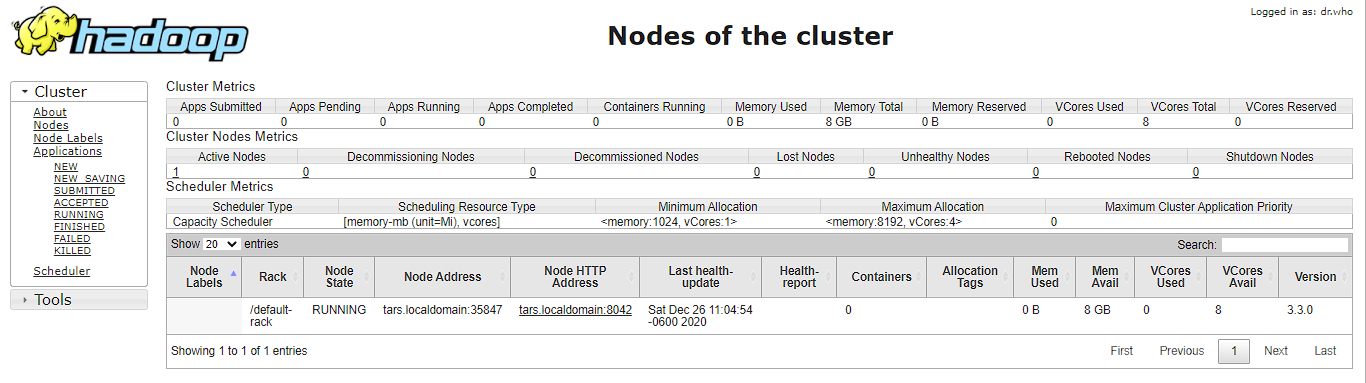
Execution of all the Hadoop applications can be monitored through this web portal.
After completion of execution of all Hadoop applications, the HDFS and YARN services can stopped as follows:
sbin/stop-yarn.sh
sbin/stop-dfs.sh
Verify status via jps command, only the jps service should be running:
jps
13257 JpsCongratulations, you have successfully installed a single node Hadoop cluster in one go on your Linux subsystem of Windows 10. It’s relatively easier compared to installing on Windows as we don’t need to download or build native Hadoop HDFS libraries.
Have fun exploring with Hadoop.
Try out an example application: Hadoop MapReduce computational model to perform analyses on DBLP publication data
If you encounter any issues while following the steps, please post a comment and I will try my best to help.
Hadoop Installation on Windows 10 using WSL