Home
This is a software ray marching rendering. It is closely related to my software raytracer. If you are looking for a software rasterizer, check the other part of the lectures.
This article shows a trivial implementation of a ray marching, the goal is to go a little bit beyond simple spheres I rendered in my raytracer project. I do not want to get photorealistic images, I want to have a simple stuff applicable to cartoons.
As always, we only have a bare compiler at our disposal, no third-party libraries are allowed. I don't want to bother with window managers, mouse/keyboard processing and so on. The result of our program will be a simple picture saved on the disk. I do not pursue speed/optimization at all, my goal is to show the basic principles.
So, how to draw such a picture in 180 lines of code under such restrictions?
Here is how an animation would look like:

Let us split the task into simple steps.
Yup, that's right. The first thing you need to do is to read the previous chapter, which describes the basics of ray tracing. It is very short, in fact, you can skip the reflections and refractions, but I recommend to read at least up to the diffuse lighting stage. The code is quite simple, people even launch it on microcontrollers: Let's draw one sphere without being obsessed with materials or lighting. For simplicity this sphere will live in the center of coordinates. I want to get such a picture:

The source code is available here, but it is short, so let's list it:
#define _USE_MATH_DEFINES
#include <cmath>
#include <algorithm>
#include <limits>
#include <iostream>
#include <fstream>
#include <vector>
#include "geometry.h"

const float sphere_radius   = 1.5;

float signed_distance(const Vec3f &p) {
    return p.norm() - sphere_radius;
}

bool sphere_trace(const Vec3f &orig, const Vec3f &dir, Vec3f &pos) {
    pos = orig;
    for (size_t i=0; i<128; i++) {
        float d = signed_distance(pos);
        if (d < 0) return true;
        pos = pos + dir*std::max(d*0.1f, .01f);
    }
    return false;
}

int main() {
    const int   width    = 640;
    const int   height   = 480;
    const float fov      = M_PI/3.;
    std::vector<Vec3f> framebuffer(width*height);

#pragma omp parallel for
    for (size_t j = 0; j<height; j++) { // actual rendering loop
        for (size_t i = 0; i<width; i++) {
            float dir_x =  (i + 0.5) -  width/2.;
            float dir_y = -(j + 0.5) + height/2.;    // this flips the image at the same time
            float dir_z = -height/(2.*tan(fov/2.));
            Vec3f hit;
            if (sphere_trace(Vec3f(0, 0, 3), Vec3f(dir_x, dir_y, dir_z).normalize(), hit)) { // the camera is placed to (0,0,3) and it looks along the -z axis
                framebuffer[i+j*width] = Vec3f(1, 1, 1);
            } else {
                framebuffer[i+j*width] = Vec3f(0.2, 0.7, 0.8); // background color
            }
        }
    }

    std::ofstream ofs("./out.ppm", std::ios::binary); // save the framebuffer to file
    ofs << "P6\n" << width << " " << height << "\n255\n";
    for (size_t i = 0; i < height*width; ++i) {
        for (size_t j = 0; j<3; j++) {
            ofs << (char)(std::max(0, std::min(255, static_cast<int>(255*framebuffer[i][j]))));
        }
    }
    ofs.close();

    return 0;
}
The class of vectors lives in the file geometry.h, I will not describe it here: it is really a trivial manipulation of two and three-dimensional vectors (addition, subtraction, assignment, multiplication by a scalar, scalar product).
So, in main() function I have two loops: the second one simply saves the picture on a disk, and the first loop iterates through all the pixels of the picture, emits a ray from the camera through this pixel, and checks whether this ray intersects with our sphere.
Attention, the main idea of the approach: If in the raytracing article we solved for the intersection of the ray and a sphere analytically, now I compute it numerically. The idea is simple: the sphere has an equation of the form x^2 + y^2 + z^2 - r^2 = 0 ; but the function f(x,y,z) = x^2 + y^2 + y^2 + z^2 - r^2 is defined anywhere in the 3D space. Inside the sphere, the function f(x,y,z) takes negative values, and outside the sphere it is positive. That is, the function f(x,y,z) computes the signed distance to our sphere for each point (x,y,z). Therefore, we will simply slide along the ray until either we get bored or the function f(x,y,z) becomes negative. This is exactly what sphere_trace() does.
Let us implement the simplest diffuse lighting, this is the image I want to get: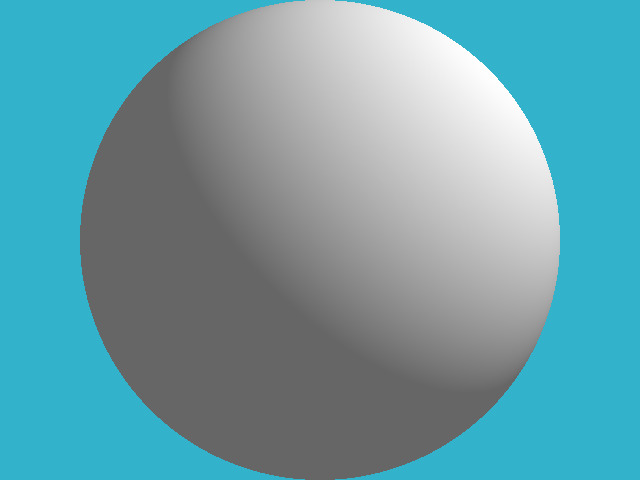
As in the raytracing article, to ease the reading flow I follow the rule 1 step = 1 commit. The changes are visible here.
For the diffuse lighting, in addition to the point of intersection, whe need to know the vector of normal to the surface at this point. I compute this normal vector by simple final differences on our signed distance function:
Of course, since we draw a simple sphere, the normal can be obtained much easier, but this approach will serve me later.
Let's draw a pattern on our sphere, for example, this one: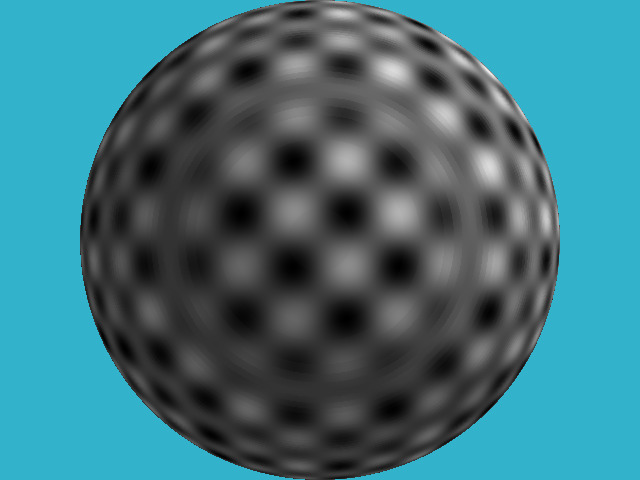
For this rendering I only modified two lines in the code!
How did I draw the image? Of course, I don't have any textures. I just took the function g(x,y,z) = sin(x) * sin(y) * sin(z); it is defined for each point of the 3D space. When my ray crosses the sphere at some point (x,y,z), the value of the function g(x,y,z) sets the pixel color of the sphere.
By the way, note the concentric circles on the sphere - these are the artifacts of my numerical calculation of the intersection.
Why would I want to draw this pattern? In fact, it will help me draw a hedgehog like this: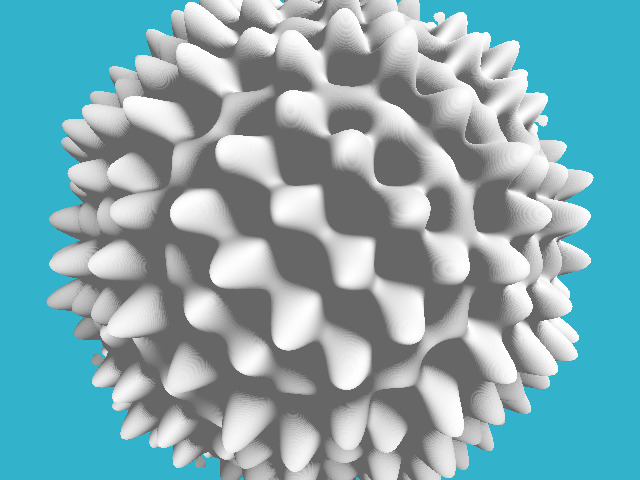
Where my pattern was black, I want to make a dent on our sphere, and where it was white, on the contrary, I'll do a hump. This trick is known under the name of the displacement mapping. To implement it, it suffices to modify three lines in the source code:
То есть, я изменил расчёт расстояния до нашей поверхности, определив его как x^2+y^2+z^2 - r^2 - sin(x)*sin(y)*sin(z). По факту, мы определили неявную функцию.
А почему это я оцениваю произведение синусов только для точек, лежащих на поверхности нашей сферы? Давайте переопределим нашу неявную функцию вот так:Разница с предыдущим кодом совсем маленькая, лучше посмотреть дифф. Вот что получится в итоге:
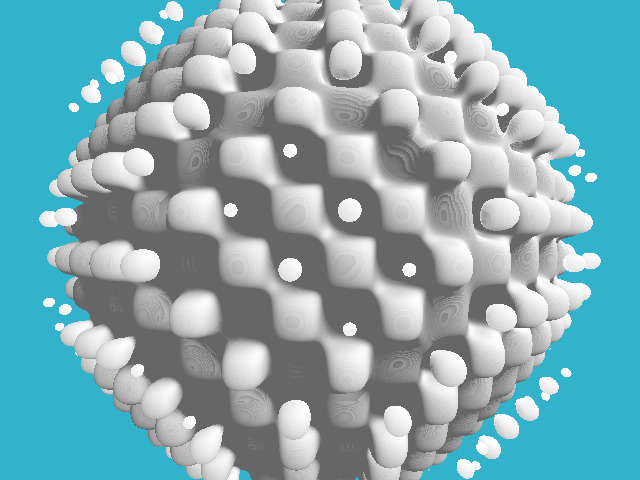
Таким образом мы можем определять несвязные компоненты в нашем объекте!
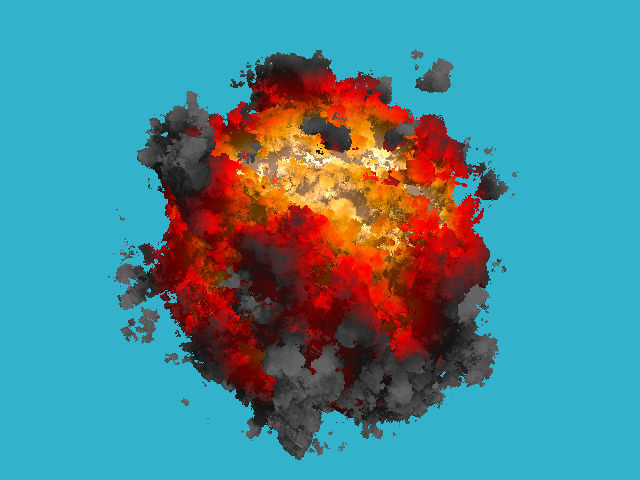
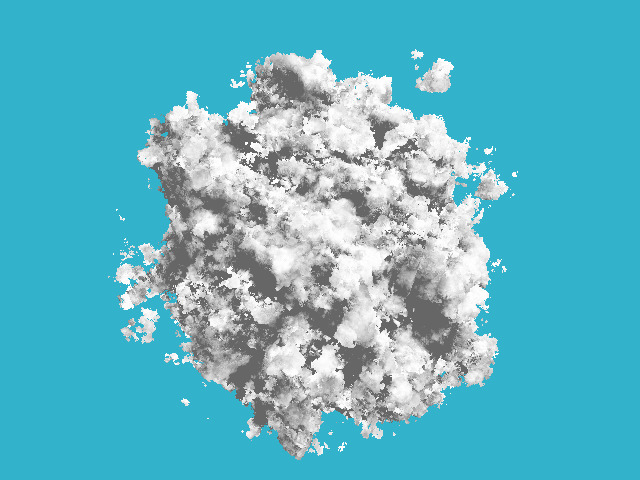
Предыдущая картинка уже начинает отдалённо напоминать взрыв, но произведение синусов имеет слишком регулярный паттерн. Нам бы какую-нибудь боолее "рваную", более "случайную" функцию... На помощь нам придёт шум Перлина. Вот что-нибудь такое нам бы подошло гораздо лучше произведения синусов:
Как генерировать подобный шум - немного оффтоп, но вот основная идея: нужно сгенерировать случайных картинок с разными разрешениями, сгладить их, чтобы получить примерно такой набор:

А потом просто их просуммировать:

Подробнее прочитать можно здесь и здесь.
Давайте добавим немного кода, генерирующего этот шум, и получим такую картинку:
Обратите внимание, что в коде рендеринга я не изменил вообще ничего, изменилась только функция, которая "мнёт" нашу сферу.
Единственное, что я изменил в этом коммите, это вместо равномерного белого цвета я наложил цвет, который линейно зависит от величины приложенного шума:float x = std::max(0.f, std::min(1.f, d));
if (x<.25f)
return lerp(gray, darkgray, x*4.f);
else if (x<.5f)
return lerp(darkgray, red, x*4.f-1.f);
else if (x<.75f)
return lerp(red, orange, x*4.f-2.f);
return lerp(orange, yellow, x*4.f-3.f);
}
Это простой линейный градиент между пятью ключевыми цветами. Ну а вот картинка!
Эта техника трассировки лучей называется ray marching. Домашнее задание простое: скрестить предыдущий рейтрейсер с блэкджеком и отражениями с нашим взрывом, да так, чтобы взрыв ещё и освещал всё вокруг!