Replies: 16 comments 25 replies
-
|
The generic solution to this is to set |
Beta Was this translation helpful? Give feedback.
-
|
I was hoping for a single setting like that, but missed it somehow. Thanks! I did a quick test with the blinky sample on both the frdm-k64f and the mimxrt1024-evk, but neither worked out of the box. I'll do some more digging and update this discussion with my findings for future reference. |
Beta Was this translation helpful? Give feedback.
-
|
Hi @aunsbjerg , Are you wanting to use the internal SRAM on the RT1024 for this, or external RAM? I've been working on this, and assuming you would want code in the internal ITCM SRAM and data in DTCM. -- Edited 5/26/2023, please note this method using The Kconfig setting CODE_LOCATION defaults to FlexSPI for this board. To change that to ITCM, I modified the line below in the board's Kconfig.defconfig, found at \zephyr\boards\arm\mimxrt1024_evk For the data, I modified the chosen location in the devicetree to DTCM. With these changes, the generated zephyr.map file confirms the change in memory map. The code in ITCM starts in the memory map at 0x0, changed from the default 0x6000_0000 for FlexSPI. And the data is moved to DTCM starting in memory map 0x2000_0000, moved from the default 0x8000_0000 in external SDRAM. But the biggest challenge I ran into was running this on the hardware. Eventually, I confirmed the Zephyr application does run when loaded properly, but I'm having issues using the debuggers to do this. You can use the serial bootloader as the client desires. But to debug it, be aware of these issues I had. We prefer using JLink probes, and I tried that first. While the JLink debugger does download the code to TCMs, a fault is triggered immediately when executing the first instruction. This seems specific to JLink, as I was able to use a CMSIS-DAP debug probe. So I will work with Segger to see if we can enable JLink to debug like this from ITCM. To prove that this Zephyr application worked with CMSIS-DAP, I ended up using NXP's MCUXpresso IDE to download and debug. And that worked. I pointed the Eclipse Debug Configuration to the generated zephyr.elf file, and then the IDE could run the application from ITCM and debug it. For the CMSIS-DAP debug probe, I used both NXP's MCU-Link and the on-board OpenSDA debug circuit on the MIMXRT1024-EVK. I don't use pyOCD much, but I tried using it with CMSIS-DAP probe and west and the --runner pyocd option. But this did not work for me. Regarding the CONFIG_XIP setting, this is used to tell the build system if you want to eXecute-In-Place (XIP) from the non-volatile location where the code is stored, or if the code will be executing from another location. With the RT MCU family, when using flash on the FlexSPI interface, you can XIP from that flash. If you build with CONFIG_XIP=n with the rest of the default settings for RT1024, the executable code is placed with the data in the SRAM memory segment. On this platform, the default SRAM segment is placed in external SDRAM. So this may not be what you were looking for. I have one last tidbit for you. The RT1024 device is an RT1020 MCU with integrated QSPI flash in the same package. If the client has no plans for using that integrated flash, the RT1020 MCU could be used instead here. Either option works, but RT1020 could save some money. Best regards |
Beta Was this translation helpful? Give feedback.
-
|
Hi @aunsbjerg , I've been able to debug with JLink now, and have reported this to Segger. When using Jlink and debugging, the very first instruction triggered an IACCVIOL fault, caused by the MPU. So it seems the Jlink scripts for this device are either not disabling the MPU, or not configuring ITCM region as executable (I’m not sure which is done on other devices like RT1060/1064). I’ve been able to workaround this with debuggers to successfully run the app from ITCM. Before executing the first instruction, I change the MPU_CTRL register to 0 to disable the MPU. Then I can run the app, which also reinitializes the MPU as needed. For Zephyr, I can do this workaround using GDB debugger with the command below to write to the MPU_CTRL register. (MPU_CTRL address 0xE000ED94) Best regards |
Beta Was this translation helpful? Give feedback.
-
|
Hey, After implementing your solution in my custom board (rt1060-evkb), I get a bus error in z_sys_init_run_level(_SYS_INIT_LEVEL_PRE_KERNEL_1);. Attached here my custom board folder and my project configuration Thank you very much, |
Beta Was this translation helpful? Give feedback.
-
|
That's the output from the debugger: |
Beta Was this translation helpful? Give feedback.
-
|
I see that you created a separate discussion at Can't run zephyr application from SDRAM on RT1060-EVKB. So we can continue in that discussion. Thanks |
Beta Was this translation helpful? Give feedback.
-
|
Hi @aunsbjerg , Segger has updated the JLink tool to resolve this now in v7.52d. Now I'm able to run the application from ITCM, and Segger automatically disables the MPU. Best regards |
Beta Was this translation helpful? Give feedback.
-
|
Hi @DerekSnell, first of all, I would like to apologize for the radio silence, between summer holiday and some high priority hardware issues, application execution was not a high priority. I hope to get back on this topic over the next weeks. Skimming over your responses, it looks like you are describing pretty much exactly what we are looking for! I'll need to test it out on our custom board of course. One follow-up question: Your findings all include a Jlink, which makes sense during development, but for production, we hope to be able to do the flashing via the IMXRT built-in bootloader using tools like uuu. We did some initial testing of this without too much success before stepping back to deal with the aforementioned hardware issues. Do you have any experience with this area? Also, I apologize if this is going too much off topic for this discussion. |
Beta Was this translation helpful? Give feedback.
-
|
Hi @aunsbjerg , While searching for this, I found the related post mimxrt1024-EVK flash and boot on the NXP forums. I posted the details there, as I was able to download the Zephyr application binary to the RT1024 in Serial Download mode and run it that way, without JLink. I used the command-line tools sdphost and blhost, but you should be able to do the same with the GUI tools like mfgtool. Best regards |
Beta Was this translation helpful? Give feedback.
-
|
Thanks! This is exactly what we need! |
Beta Was this translation helpful? Give feedback.
-
|
@DerekSnell, my co-worker is continuing work on this now but has hit a couple of snags regarding allocation of TCM and Zephyr build system. He updated the forum post you pointed to earlier - do you have the time to comment on that post? That would much appreciated! |
Beta Was this translation helpful? Give feedback.
-
|
Hi @DerekSnell I tried to follow the above procedure for RT1160 EVK to built the zephyr MCUBoot image in non-xip mode. a. In menuconfig, change the code location selection under hardware configuration setting
c. While compiling the code, this ITCM define has dependencies macro ie: CODE_DATA_RELOCATION . Need to disable this macro.
d. In .config file(zephyrproject/bootloader/mcuboot/build/zephyr) , set CONFIG_XIP as n . With the west flash command I try to flash the hex file. The jlink debugger throwing error as "FATAL ERROR: command exited with status 1: 'C:\Program Files\SEGGER\JLink\JLink.exe' -nogui 1 -if swd -speed auto -device MIMXRT1166xxx6_M7 -CommanderScript 'C:\Users\VISHNU~1\AppData\Local\Temp\tmpurpch33ojlink\runner.jlink' -nogui 1" kindly suggest is the above procedure which I have tried to built for non-xip image (RT1160 platform) is correct? or kindly share steps to build the image in non-xip mode . Note: I can able to flash the binary (.bin) file, but after reset i am not getting the expected output. |


Beta Was this translation helpful? Give feedback.
-
|
Hi @vishnusudhan , The steps originally shared here for aunsbjerg work for me to have MCUboot execute from ITCM on the MIMXRT1160-EVK board. I used the files in overrides.zip and added to \zephyrproject\bootloader\mcuboot\boot\zephyr\boards to override the defaults for the board. However, this option requires a debugger or bootloader to load this code into ITCM before executing. If I understand your request, you want the whole MCUboot bootloader executable to execute from ITCM. But you want that image stored in flash, and copied to ITCM before the bootloader executes. I don't believe Zephyr's CONFIG_XIP or CODE_DATA_RELOCATION symbols will help with that. Instead, you need a bootloader to first copy the image from flash to ITCM. There are 2 options for this that come to mind: using MCUboot or using the ROM bootloader integrated in the RT MCUs. If using MCUboot, it supports RAM Loading feature. The bootloader will load your application image from the appropriate slot in flash to RAM, and execute from there. The bootloader itself would execute from flash. Is there a reason you want the MCUboot bootloader executable executing from ITCM? If using the ROM bootloader, you can use the boot_data field in the image header for the bootloader to instruct the ROM bootloader to copy the executable from flash to other memory. For more details, see Application Note AN12107. The appnote refers to booting from SD card and executing from RAM, but the same steps can be used to boot from flash, and have the boot_data structure load to ITCM. FYI, the CODE_DATA_RELOCATION symbol is used in Zephyr when you want to relocate specific functions or files to other memory, not the whole image. See the code_relocation example for more details. A good example of this is our flash driver for XIP loads some APIs to SRAM, to execute from there when erasing/programming the flash. However, CODE_DATA_RELOCATION should be disabled when executing from ITCM as you found. This is because the image is already located in ITCM, and does not allocate addition ITCM memory to have duplicate copies both in ITCM. One last thing, you stated you made a Kconfig change "In .config file(zephyrproject/bootloader/mcuboot/build/zephyr)". This .config file is a generated file, that shows the final merged Kconfig symbols used to build the application. But you do not use this file to modify Kconfig settings. For more details which source files to change, see Initial Configuration. Best regards |
Beta Was this translation helpful? Give feedback.
-
|
Hi, To enable HAB encryption for MCUBoot, we need to build MCUBoot as non-XIP image. when try to enable HAB encryption with zephyr MCUBoot build binary shows error as below in SPT. Kindly provide the step to create non-XIP MCUBoot image to enable HAP encryption. |

Beta Was this translation helpful? Give feedback.
-
|
Hi @Sathishkumar-rk , If you still prefer to use the HAB encrypted boot without XIP, you first need to build the image to execute from a RAM location. Then the boot_data structure in the boot header needs to be configured to tell the boot ROM where to copy the image from flash. This discussion here already provides guidance above for building a Zephyr application to execute from ITCM. And AN12056 Encrypted Boot on HABv4 and CAAM Enabled Devices has more details on configuring the boot ROM. |
Beta Was this translation helpful? Give feedback.
-
|
Hi @DerekSnell I followed the few steps, set the below setting in the MCUBOOT code,
With these setting , I can able to flash the MCUBoot & able to execute successfully. But when i try to flash the image in the slot0 location. Attached config file in the zip, kindly suggest , how to overcome this issue? |
Beta Was this translation helpful? Give feedback.
-
|
In SPT, If i try to provide the mcuboot binary(non-XIP) image , i seems i required the address should be provided above 0x2000. so if provided start address in the SPT menu seems its considering the image & can able to flash , but execution mcuboot getting failed upon reset. attached screenshot image in zip folder is there any option available in the zephyr project to set the base address for non-XIP image during compilation? |
Beta Was this translation helpful? Give feedback.
-
|
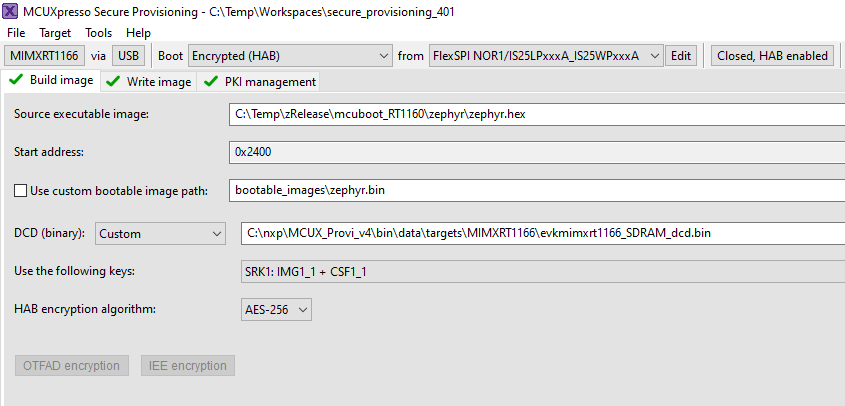
Hi @vishnusudhan , I have MCUboot loaded by SPT and executing from ITCM. Similar to my previous response, attached is As you showed in your screenshot, when using Encrypted HAB, the SPT does not allow an image to start at 0x2000 or below. So I updated the boot_partition to start at 0x2400. This is the next 1KB boundary higher than 0x2000.
Note that I did not burn any fuses into my MCU, so I did not test using Encrypted HAB. But the SPT was able to build the image with Encrypted HAB. And without Encrypted HAB, the SPT created the image to boot with DCD, copy the MCUboot code from flash to ITCM, and execute from ITCM. Best regards |
Beta Was this translation helpful? Give feedback.
-
|
Hi @DerekSnell With the above steps , i can able to load the zephyr MCUBOOT & upon reset ,could able to execute the mcuboot. I need few clarifications for following queries,
|
Beta Was this translation helpful? Give feedback.
-
|
Hi @vishnusudhan , Yes, when the code is moved to RAM, you either need to use a debugger to load the executable to RAM, or use a bootloader like the ROM bootloader with SPT to copy the executable from flash to RAM. You can use a debugger to load this image to ITCM and debug it from there. And I used the JLink when confirming this. For help using a debugger with Zephyr applications, see these Hands-On Labs for Zephyr on i.MX RT. The labs provide steps for debugging with NXP's MCUXpresso IDE or with GDB. I also like using the Segger Ozone debugger with JLink and Zephyr applications. Here is a great blog for using Ozone on RT. There are some considerations when running the app like this on an RT MCU without booting it from the ROM bootloader. When the ROM boots, like from the flash, it can use the DCD to configure the hardware before the application executes. NXP's MCUXpresso SDK examples and our Zephyr RT boards leverage the DCD by default. These apps use the DCD to configure the SDRAM interface, the clocks, and the pins. When the apps start execution, the SDRAM is already configured, and the app can use the SDRAM memory map without needing to initialize it. I found when using the debugger to execute the app from ITCM, it initially started to execute, but crashed at the first function call when pushing to the stack. That was because Zephyr places data and the stack in SDRAM by default on these RT boards. And because I was not using the ROM to boot, SDRAM was not already initialized. To workaround this and test MCUboot in ITCM for you, I moved Zephyr's chosen sram to DTCM, as instructed earlier in this post. That fixed this issue, and I could run MCUboot from ITCM. When you use SPT with the app in ITCM, and SPT includes the DCD in the boot image for flash, the app can still use data in SDRAM. For #3, the usage in flash is still similar to the default setup for MCUboot. The image for MCUboot still needs to be stored in a boot_partition, and the app image in slot0, with slot1 for updates. Where these apps execute from is up to you and your requirements. As you know, the setup that NXP tests on our boards has all these apps eXecuting-in-Place (XiP) from their partitions in flash. If you change this, you need to own the setup, how to change it, and validating it. I do not foresee changes needed in the flash partitions, but I am depending on you to confirm this. Also, I believe MCUboot and the apps can re-use the same ITCM range, similar to how they re-use SDRAM. My understanding is that once MCUboot executes and decides to load the app in slot0, that app takes over execution, and MCUboot no longer needs that code/text in ITCM. So I believe the app can use all of ITCM. But again, I am depending on you to confirm this. Also, refer to application note AN12077 for details on the default size of ITCM at boot, and how to change this if desired. Best regards |
Beta Was this translation helpful? Give feedback.
-
|
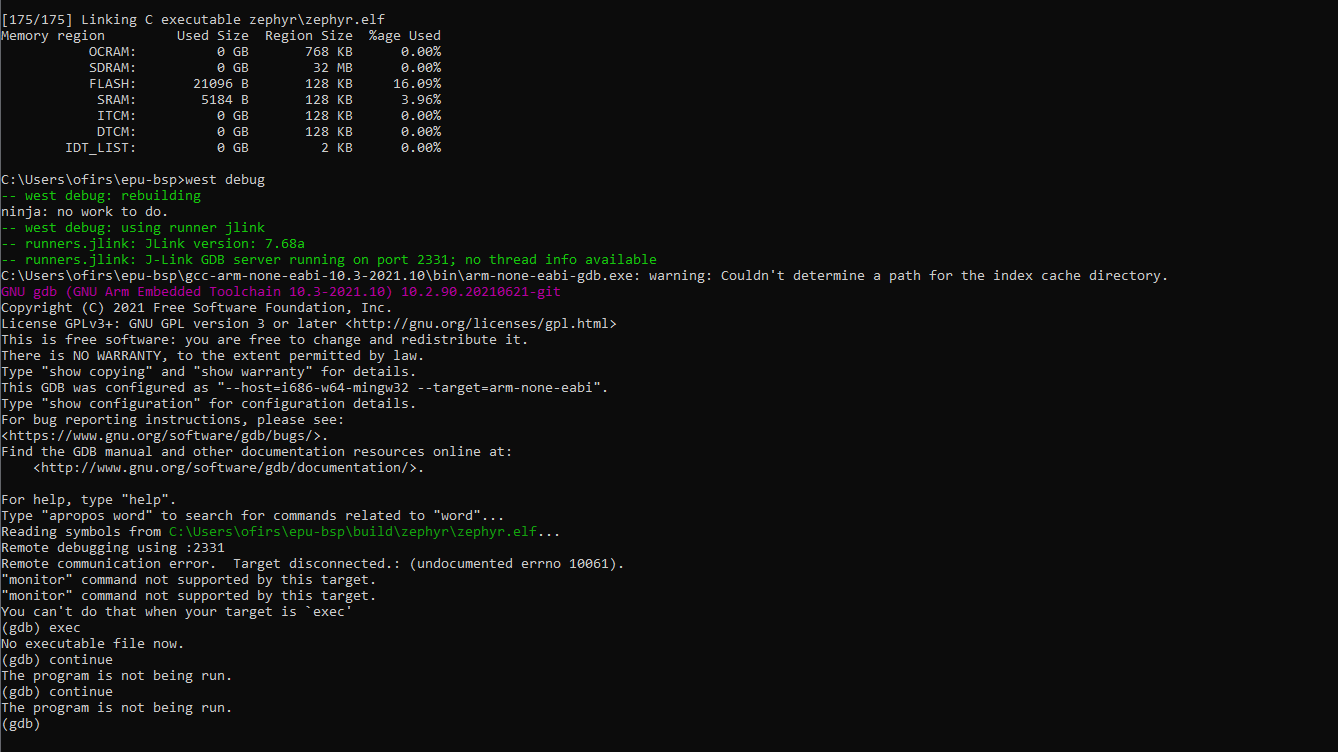
Hey @DerekSnell, I have also problems via GDB (see attached image) |
Beta Was this translation helpful? Give feedback.
-
|
Hi @ofirshe , |
Beta Was this translation helpful? Give feedback.
-
|
Hey @DerekSnell, |
Beta Was this translation helpful? Give feedback.
-
|
Hi @ofirshe , Below is my screenshot when using GDB with the successful connection. I am not familiar with GDB myself (personally, I detest command-line debugging). I used it in these steps because I though it would be easy for anyone to replicate. But if your issue is specific to your GDB installation, there are other debugger options that work well with the RT MCUs, and you could try with this. These
|

Beta Was this translation helpful? Give feedback.
-
|
Hey @DerekSnell, I would like to try another approach. I saw in MCUExpresso IDE that if I check on "Link application to RAM", the PC points on a RAM address (0x200.....). I would like to do the same in zephyr. I saw that one way to do that is by setting CONFIG_XIP=n which is not suggested by you. Do you know a way I can do that in zephyr ? BTW, my debug probe is not Jlink but ARM DSTREAM if you familiar with. |
Beta Was this translation helpful? Give feedback.
-
|
Hi @ofirshe , We have already been discussing here the steps to link the Zephyr application to execute from RAM, specifically from ITCM. I provided the example for this on the MIMXRT1060-EVKB board. CONFIG_XIP=n attempts to place the code in the Zephyr app's sram section. And on the MIMXRT1060-EVKB, sram defaults to the SDRAM. Which we discussed, currently the MPU config for this board does not allow execution from SDRAM. Also note that when setting CONFIG_XIP=n, a bootloader or the app still needs to first copy the executable from flash to RAM. And changing to CONFIG_XIP=n is not necessary when building the application to execute from ITCM, because it is executing from where the code is located, so it is eXecuting In Place (XIP). Now that you shared you are using a Dstream debug probe, that explains why your I have no experience with ArmDS or Dstream. But the ITCM example I provided works for me when loaded from a debugger on the EVK. If that same app does not execute on the EVK when using ArmDS with Dstream, then I would try to rule out if it is a debugger issue, or something else. With the EVK, you can update the on-board debugger to be a JLink probe. Then you can follow the exact steps I provided, and confirm that works on your EVK. Earlier I provided the Lab Guides, and the guide "01-Zephyr_hello_world_Sample_Lab.pdf" includes the detailed steps to use the MIMXRT1060-EVKB with on-board JLink debug probe. Let us know what you find |
Beta Was this translation helpful? Give feedback.
-
|
I wanted to update this post, after learning the method to move the memory for code has changed for the NXP i.MX RT MCUs. After this PR was merged soc: rt: Add flash chosen node functionality, moving the code is controlled by the devicetree chosen node, and not by the For example, the current method to place code in ITCM would use a devicetree (or overlay) like this: |
Beta Was this translation helpful? Give feedback.
-
|
Hi, how can I do this for But I can still see code located in flash in the map file. I have sram0 defined as: I've also tried: with no success :( Thanks! |
Beta Was this translation helpful? Give feedback.
-
|
Hi @sergio-soar-es , First for the Today I tested this using the latest Building the Hope that helps, best regards |
Beta Was this translation helpful? Give feedback.
-
|
Hi all, for everyone who is searching(this for the imx1170):
Still the linker shows after build that the image was built into flash(although flash is linked to itcm and is 256 KB, so yeah, it worked) But I can't find an answer for just linking it entirely withouth wrong linkage names, I tried this:
But no success :( |


Beta Was this translation helpful? Give feedback.
-
|
Adding more details after green_panda reported the following:
I tested this using the First, I do not expect this to work with
The method I used here was with a debugger, and the Next, you need to modify the Zephyr chosen nodes in the devicetree to move the code. I do not like the naming of these chosen nodes by Zephyr, because they are confusing. But these are the two default names that control where code and data is placed:
So I made these changes to mimxrt1064_evk.dts to move the code to SDRAM: Notice, this also moves the data to DTCM. If both are set to SDRAM0, the sample does not execute. And I believe the reason is the linker is not separating all the data from R/O memory in the SDRAM. Therefore, some partitions are probably required to place both With these changes, I built the app using: and this command also works: Then to run the app from SDRAM using Jlink, I used this command: At that point, the hello_world message prints as expected, and the code is indeed executing from SDRAM. Resetting the board causes the previous app written in flash to boot. So the debugger is needed again to load this app in SDRAM. Unfortunately while testing this, I found the PYOCD and LinkServer runners failed to load the app. Likely, they need to be properly configured to load an image to SDRAM, but I am not an expert on how to do that. This is the error I see with PYOCD: And the error with LinkServer: I also removed some of the Kconfig changes you tried, as they caused other issues:
I hope that helps |
Beta Was this translation helpful? Give feedback.
-
|
Hi @DerekSnell, thank you very much for your help. After switching the on board debug probe of the MIMXRT1064-EVK to the J-Link firmware I was able to do west debug and execute from DRAM with to: The next goal is to execute from ITCM. Because of the application size I need to repartition the FlexRAM before the ROM ramloader loads the executable to ITCM. I would like to do this with device configuration data (DCD). To get started, I added a register write to IOMUXC_GPR_GPR17 to the DCD. I did not yet write to IOMUXC_GPR_GPR16 to activate the FlexRAM config in IOMUXC_GPR_GPR17. By default, the FlexRAM config from the fuses is used. But even just by writing to IOMUXC_GPR_GPR17 the ROM seems to refuse to execute the whole DCD. I checked that for example IOMUXC_SW_MUX_CTL_PAD_GPIO_EMC_00 which is part of the default DCD will get written without my DCD modification, but will not be written with my modification through gdb after a hello world sample boot. With modification: The Reference Manual of the RT1064 states in 9.7.2.1 Write data command: What's the problem here? |
Beta Was this translation helpful? Give feedback.
-
|
Hi @green-panda2 , Best regards |
Beta Was this translation helpful? Give feedback.
-
|
Hi @DerekSnell , We tried loading the CM33 application into HyperRAM. It appears that the image is successfully copied and the MCUboot header is correctly decoded; however, it fails to parse the TLV tags. *** Booting MCUboot v2.2.0-141-gd5b0dcb9aaee ***
*** Using Zephyr OS build 16f4d6c23e40 ***
I: Starting bootloader
I: Primary slot: version=0.0.0+0
I: Image 0 Secondary slot: Image not found
I: Image 0 RAM loading to 0x38000000 is succeeded.
D: boot_validate_slot: slot 0, expected_swap_type 0
D: bootutil_img_validate: flash area 0x14014b34
D: bootutil_img_hash
D: bootutil_tlv_iter_begin: type 65535, prot == 0
D: bootutil_img_validate: TLV iteration failed -1
D: boot_scramble_region: 0x14014b34 0 8388608 0
D: boot_erase_region: flash_area 0x14014b34, offset 0, size 8388608, backwards == 0
D: boot_erase_region: device with erase
E: Image in the primary slot is not valid!
I: Removing image 0 from SRAM at address 0x38000000
I: No slot to load for image 0
D: Left boot_go with success == 0
E: Unable to find bootable image
Are there any specific considerations we should take into account for this SoC? On our custom board, the HyperRAM is connected to FlexSPI1 and the Flash is connected to FlexSPI2 (in the reverse configuration compared to the MIMXRT1180_EVK). The project configuration is as follows:
board overlay: I also found another problem in |
Beta Was this translation helpful? Give feedback.
-
|
Hi @javad123javad , Please create a new Discussion for this topic, and this will help us focus the conversation on your use-case. Thanks |
Beta Was this translation helpful? Give feedback.
-
Hi @DerekSnell , Thanks for your comment. I made #98573 for our use case. Best regards, |
Beta Was this translation helpful? Give feedback.
Uh oh!
There was an error while loading. Please reload this page.
-
I'm working on a custom board based on the IMXRT1024 from NXP. The board will be doing some sensor reading and data processing and then pass the processed data on to a Linux host connected via USB.
A wish from the client is that the IMXRT1024 firmware is never actually flashed to ROM but instead always flashed and executed from RAM using USB serial boot. The board would be configured to always boot to serial bootloader mode and wait for the Linux host to flash the firmware.
I've looked a bit at
CONFIG_CODE_DATA_RELOCATION=yin combination withzephyr_code_relocate, but as far as I can tell, that only works on a source-file basis and not on a project basis.Is it possible to build a zephyr application to reside entirely in RAM?
Beta Was this translation helpful? Give feedback.
All reactions