Back to software_installation.md
- About Live Track
- Dashboard template
- Create an account and device
- Configure Pizero Bikecomputer
- Import and connect the dashboard
- Configure dashboard messages
- Enable and verify Live Track
- Data and transport
- Map behavior and customization
- Public sharing
ThingsBoard is an open-source IoT platform. Pizero Bikecomputer uses it to publish the current ride values, recorded track, and loaded course to a web dashboard.
This guide uses the ThingsBoard Live Demo. The dashboard can be viewed in a browser or with the ThingsBoard Live mobile app.
The repository provides one responsive dashboard and its supporting ThingsBoard definitions:
It replaces the former separate track, course, and desktop dashboard templates. The same dashboard contains layouts for desktop and mobile screens. The widget bundle supplies the message composer, while the rule chain connects the composer to ThingsBoard Live notifications.
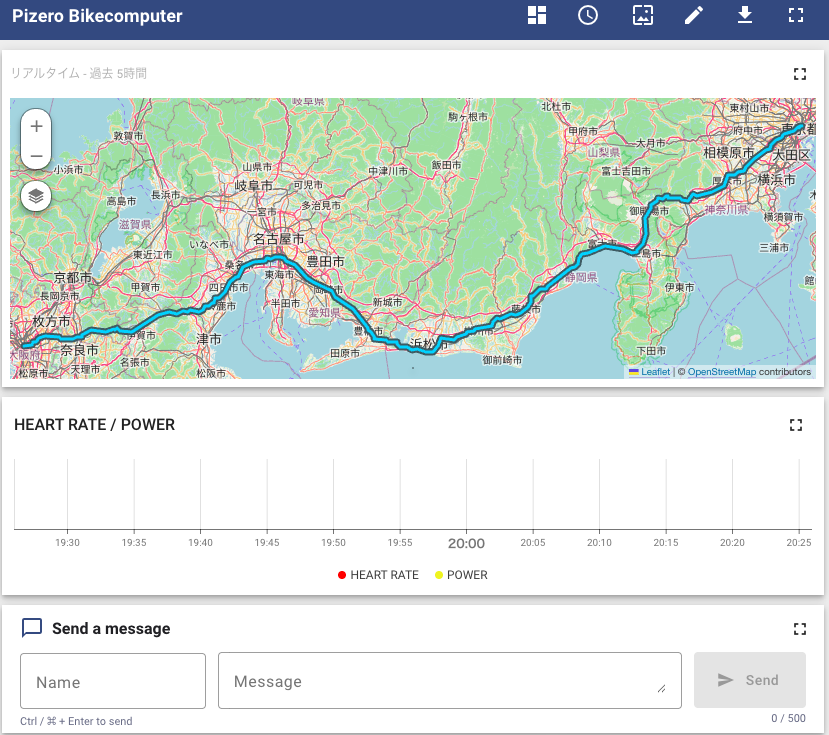
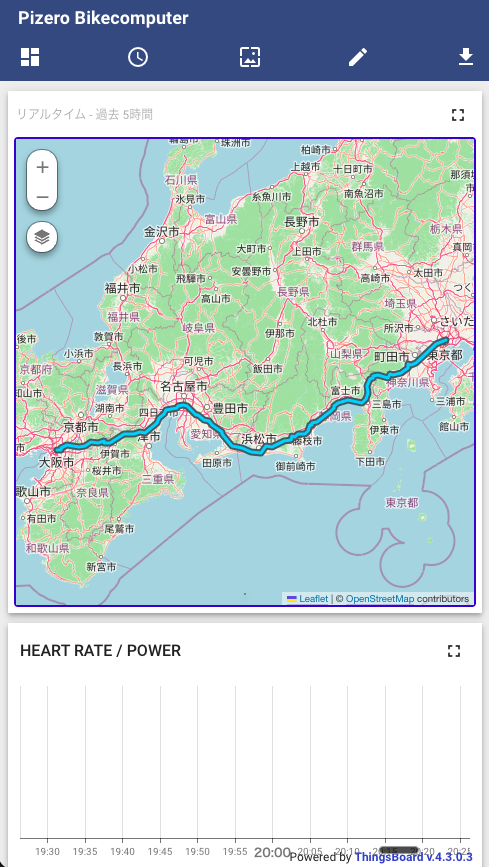
| Section | Layout |
|---|---|
| Map | Recorded track and loaded course, full width |
| History | Heart rate and Power time-series chart, full width |
| Message | Name, message body, and send button, full width |
| Main values | Speed / Heart rate / Power |
| Additional values | Distance / Temperature / Work |
The value widgets use a fixed two-column grid:
| Left | Right |
|---|---|
| Speed | Distance |
| Heart rate | Temperature |
| Power | Work |
The map remains taller than a value row, and the heart-rate/power chart is shown above the message composer. The message composer is shown full width above the two-column value grid.
The exported JSON intentionally contains the zero UUID
00000000-0000-0000-0000-000000000000 instead of a real ThingsBoard device
Entity UUID. This prevents a repository export from identifying the source
device.
After importing the dashboard, connect its Pizero Bikecomputer Entity Alias
to your own device. The widgets will not receive data before this is done.
- Create an account on the ThingsBoard Live Demo and sign in.
- Open Entities > Devices.
- Add a device.
Pizero Bikecomputeris the recommended device name. - Open the new device and copy its device access token.
The access token authenticates data uploads. Treat it as a secret.
Add the device access token to setting.conf:
[THINGSBOARD_API]
TOKEN = YOUR_DEVICE_ACCESS_TOKEN
STATUS = False
demo.thingsboard.io is the default server. STATUS stores the Live Track
on/off state and can normally be changed from the application menu.
Install dependencies with install.sh. Live Track requires the
tb-mqtt-client package installed by that script.
Do not put the access token in dashboard JSON, documentation, command output,
or a Git commit. setting.conf is intentionally excluded from Git.
- Open Resources > Widget library in ThingsBoard.
- Import
dashboards/pizero_bikecomputer_widgets.json. - Open Dashboards in ThingsBoard.
- Select Import dashboard and upload
dashboards/pizero_bikecomputer.json. - Open the imported Pizero Bikecomputer dashboard and enter edit mode.
- Open Entity aliases and edit the
Pizero Bikecomputeralias. - Select the device created above.
- Save the Entity Alias and then save the dashboard.
ThingsBoard menu placement and icon shapes can differ by release, but the required operation is always to replace the zero-UUID single-device alias with your device.
The message composer sends an authenticated POST /api/rule-engine/ request.
The supplied notification rule chain validates that request and creates a
ThingsBoard Live mobile notification. It is deliberately separate from the
tenant's root rule chain so importing it cannot replace the tenant's standard
telemetry, attribute, or RPC processing.
- Open Notification center > Templates.
- Create a Rule node template, for example
Bikecomputer rule message. - Enable the Mobile app delivery method.
- Set its subject to
${notify_title}and its message to${notify_body}. - Import
dashboards/pizero_bikecomputer_rule_chain.json. - Open its Send to ThingsBoard Live node.
- Replace the placeholder notification template with the template created above.
- Replace the placeholder notification target with Tenant administrators, or select another recipient group.
- Save Pizero Bikecomputer Notifications. Do not set it as the tenant's root rule chain.
- Open the tenant's existing root rule chain.
- Add a Rule chain node and select Pizero Bikecomputer Notifications as its target.
- Connect REST API request from Message Type Switch to the new Rule chain node.
- Save the root rule chain.
The imported JSON contains only the four notification-processing nodes. The root rule chain remains tenant-owned and contains just one additional delegation node. If the root chain has no Message Type Switch, add an equivalent message-type routing node first; the dashboard request must enter the notification chain with the REST API request relation.
The two zero-like UUIDs ending in 0001 and 0002 are intentional
placeholders for the notification template and target. They prevent
tenant-specific recipient identifiers from being committed to the repository.
The default target sends to tenant administrators. To support different or multiple destinations, create or select a notification target containing the required ThingsBoard users and choose it in Send to ThingsBoard Live.
The dashboard composer contains two input fields:
- Name is optional and limited to 64 characters. If it is empty,
ThingsBoardis used as the notification title. Its value is retained after a successful send. - Message is required and limited to 500 characters. It is cleared after a successful send.
On both desktop and mobile layouts, the composer is placed between the heart-rate/power history chart and the current-value widgets. On mobile, the Send button is shown beside Name so that it remains visible while editing the message. On desktop, Name and Message are single-line fields with the same height. On mobile, Message remains taller for multi-line input.
For a local functional check, start the application in demo mode:
python3 pizero_bikecomputer.py --demoThen:
- Make sure Speed, Heart rate, or Power has a usable value.
- Start recording.
- Open Menu > Connectivity > Live Track and enable ThingsBoard.
- Wait for the next upload. The normal network interval is 180 seconds.
- In ThingsBoard, open the device's Latest telemetry view and confirm the keys listed below.
- Open the dashboard and confirm the values and recorded track.
If the ThingsBoard Live Track toggle is disabled, check that the device token,
server, and tb-mqtt-client package are available, then restart the
application.
The following values are sampled at equal subdivisions of each interval and at
the interval end. LIVETRACK_SAMPLE_COUNT in modules/helper/livetrack.py
controls the number of samples shared by ThingsBoard and Garmin LiveTrack. Its
default value is 4, so samples are taken every 45 seconds and uploaded
together every 180 seconds:
| Key | Meaning | Unit or format |
|---|---|---|
timestamp |
Display timestamp | MM/DD HH:MM |
speed |
Current speed | km/h, integer |
distance |
Accumulated distance | km, one decimal place |
heartrate |
60-second average heart rate | bpm |
power |
60-second average power | W |
work |
Accumulated work | kJ |
temperature |
Current temperature | °C |
latitude |
Current latitude | decimal degrees |
longitude |
Current longitude | decimal degrees |
The map's recorded track uses the time-series latitude and longitude
values. With the default settings, the visible track therefore has points about
45 seconds apart, uploaded in 180-second batches. It is not the application's
one-second ride log. A failed batch is not carried into the next interval.
The loaded course is stored as the client attribute course_path. It is one
ordered polyline containing [latitude, longitude] pairs:
{
  "course_path": [
    [35.0, 139.0],
    [35.1, 139.1]
  ]
}
Loading or replacing a course overwrites this attribute. Clearing the course sends an empty array:
{
  "course_path": []
}
Only the current course is retained. Loading or clearing a course queues the update without performing network I/O. After START, the update is attempted after a successful telemetry upload and remains pending for the next LiveTrack interval if it fails. Coordinates are rounded to five decimal places. Routes whose compact JSON approaches ThingsBoard's default 65,536-byte MQTT message limit are reduced to the largest evenly sampled point set that fits, with 128 bytes reserved for the MQTT topic and packet metadata. Smaller routes retain every point produced by the course loader. The same bounded payload is used for Gadgetbridge HTTP so MQTT fallback remains possible.
- If Gadgetbridge is connected, the program sends telemetry and
course_paththrough the Gadgetbridge HTTP bridge. - If the HTTP request is unavailable or fails, it falls back to ThingsBoard MQTT through Bluetooth tethering.
The device access token is used for both paths. It must never be written to logs.
The message composer does not send through the bikecomputer device token. It uses the signed-in ThingsBoard user's web session:
Dashboard message composer
  -> POST /api/rule-engine/
  -> Root Rule Chain
  -> Pizero Bikecomputer Notifications
  -> ThingsBoard Live mobile notification
  -> Android notification
  -> Gadgetbridge notification forwarding
The notification target determines which ThingsBoard users receive the
message. The optional Name becomes the notification title; if it is empty,
ThingsBoard is used. Message becomes the notification body. An empty
message cannot be sent.
The Route Map widget automatically fits its bounds to the available track and course data. It provides OpenStreetMap, satellite, and hybrid base layers.
The current overlay styles are:
| Overlay | Style |
|---|---|
| Recorded track | Blue #307FE5, width 4 |
| Course outline | Dark gray-blue #435B63, width 7 |
| Course inner line | Bright cyan #00D4FF, width 3 |
The recorded track is drawn over the course so the traveled portion remains visible when both lines overlap.
To change these settings, edit the Route Map widget:
- change the recorded track under Trips;
- change the two course layers under Polylines;
- change base maps, automatic bounds, or controls under the common map settings.
To share Live Track with another person, use ThingsBoard's dashboard sharing or public-dashboard function. Depending on the ThingsBoard release and tenant settings, the associated device may also need public access.
Making the dashboard public exposes the ride values, recorded locations, and loaded course to anyone with access to the public URL. Confirm that this is acceptable before enabling it.