Open Sound Control
This document is written for the plugin:
- OSC V1.3
-
2025-10-03: V1.3.0.0
- Changed NIC Selection (Receive Mode) from ALL to ANY
- Fixed network compatibility issues for QDS 10.0.X Emulation Mode
- Resolved combobox and listbox integer text field issues for QDS 10.0.X
- Added support for new license types
- Added support for Boolean type arguments (true and false)
- New argument type "INPUT TO BOOLEAN" - converts "false" or 0 to boolean false, converts "true" or 1 to boolean true. Useful for converting input {1} to T/F, like a mute button. Accepts as true: true, "TRUE", "true", 1, 1.0, "1", "1.0"
- Added unique UUID to newly created command names to ensure unique names
- Fixed UI glitches in the command's library page
- Enhanced Internal Components and Named Controls Library - now supports multiple argument types:
- If arg type is string, modifies the .String of the control
- If arg type is boolean (true or false), changes the .Boolean of the control
- If arg type is FLOAT, affects the .Position of the control
- If arg type is INT32, affects the .Value of the control
- If arg type is string and the string is "Trigger", triggers the control
- Enhanced Command Library functionality - clearing the field now deletes/resets the command library. Entering "TEMPLATE" loads a library with examples (loaded by default on first plugin use)
- Added ability to bind UDP port when sending messages to ensure destination can reply on a known port
- Send Mode now sends via Notification incoming messages when BIND PORT is enabled
- Added message forwarding functionality with Forward to IP Address and Forward Port controls
- Receiver in Follower mode now only receives messages from selected PORT
- Receiver in Follower mode no longer disables port controls
- Enhanced message logging - all incoming messages are now printed in the log for better troubleshooting
-
2024-09-25: V1.2.0.0
- Initial release to Asset Manager
- Breaking changes: control's name has changed
- New UI / Pages
- Add Duplicate function in command library
- Add Test function in command library
-
2024-06-21: V1.1.0.0
- Add OSC receive function
- Add the ability to control Named Components and Named Controls via OSC messages
- Add the ability to import/export the command's library in Send mode
-
2024-09-12: V1.0.0.0
- Initial release
This plugin has been developed and tested on:
- Q-SYS Designer version 9.10.2
- Q-SYS Designer version 10.0.X (Emulation Mode supported as of V1.3.0.0)
This plugin brings the power and versatility of the Open Sound Control (OSC) protocol to your fingertips using existing network infrastructures.
The Open Sound Control (OSC), recognized for its robustness and reliability, allows you to exchange commands with a variety of AV equipment or computer using QLab in a seamless and transparent manner.
Features:
- Send and Receive OSC commands
- Use input events to send OSC commands
- Insert multiple instances of the plugin
- Use custom IP Address and/or Connection Port for each instance
- Create custom OSC commands libraries that can be imported and exported easily
- Use inputs placeholders to inject inputs values into your custom OSC Commands
- Use internal OSC Libraries to interact directly with the Q-Sys environment
- Interact with external OSC Devices such as Q-Lab systems and internal components within Q-sys through connection pins or using scripts
Important Notes:
- This plugin is designed exclusively for use with the UDP protocol and does not support TCP
- This plugin does not support OSC bundle; attempting to use it will produce the error "attempt to call a nil value (field 'mod')" in the debug window
License key activated for the main core.
Licenses are issued on a "per core" basis, as in each core needs its own license to run as many instances of the plugin as needed on this particular core and are not transferable from core to core.
License keys can be added, while in Offline mode, in the Properties pane on the right. To purchase licenses, go to https://ad-da.ca.
The plugin can be emulated for free, allowing you to prepare everything without requiring you to have access to a core. However, once you run your design on a core, you will need a license to run the plugin for more than 1 hour.
License key activated for the backup core.
If your main Q-SYS Core fails, the backup Core automatically takes over without needing a license to function as a temporary replacement. However, if the design boots from the backup Core, a valid license is required. Additionally, if the backup Core is restarted (due to power loss or other reasons), the plugin instances cannot initialize without a valid license.
Set the operating mode of the plugin.
Default value: Send
Accepted values:
- Send
- Receive
Set the number of "Command [x]" slots in the Send tab.
Default value: 4
Accepted values: 4 to 32
Set the number of "Input [x]" slots in the Input tab.
Default value: 4
Accepted values: 4 to 32
Set the hierarchy of the plugin as to which one is leading, and which one are following in cases of multiple receiver plugins configuration.
Default value: Leader
Accepted values:
- Leader
- Follower
In Q-SYS, a core cannot have two listeners on the same UDP port. This means that if multiple components need to receive messages from the same port, we need a mechanism to handle this.
To address this, the plugin includes a Leader and Follower receive mode:
Leader Mode: The leader is the primary listener on the specified UDP port. It is the only one directly listening for messages on the port.
Follower Mode: If multiple listeners need to receive messages from the same port, additional listeners should operate in follower mode. A follower connects to the leader to receive messages relayed by the leader. A follower cannot function independently and relies on the leader to get the messages.
Use Case: If you're not trying to listen to the same UDP port as another listener, simply leave the plugin in Leader mode to receive messages directly. No follower mode is necessary in this case.
By implementing this mode, the plugin ensures that multiple components can "listen" to the same UDP port while respecting the core's limitation of only one active listener per port.
Important Note (V1.3.0.0): Only one plugin can bind to a specific UDP port at a time. If the Sender plugin is configured to bind the port, then the Receiver plugin must be set to Follower mode to receive data through the Sender.
Set the number of "OSC Address Pattern [x]" slots available in the OSC Address Tab.
Default value: 4
Accepted values: 4 to 32
Indicates verbose actual status of the plugin.
- OK (Green): The plugin is running
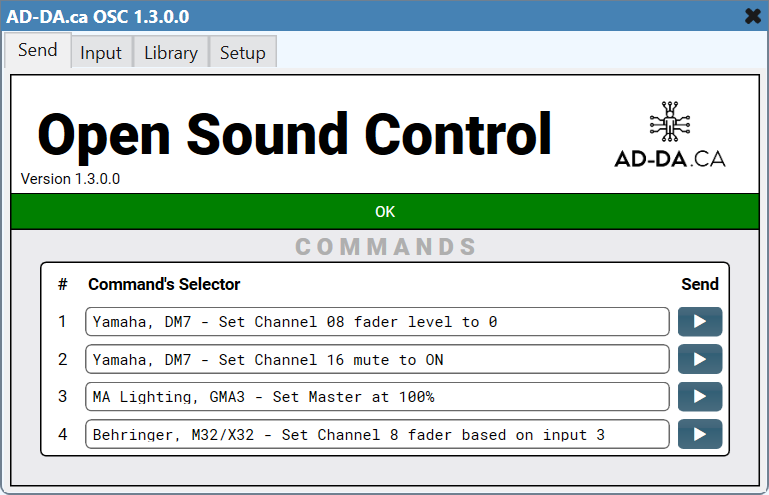
Drop down list used to assign an OSC command from the Commands Library to the corresponding command slot.
Trigger buttons used to manually send the assigned OSC commands.

Text fields showing the current value for each input's control pin.
Toggle button used to activate the "Debounce" function on the corresponding input pin. When activated, the input is filtered by an algorithm that adjust the way the input reacts to rotary or slider controls to limit the transmission of "in-between" OSC Commands while reaching for a specific value.
Toggle button used to activate or deactivate the corresponding input action. When the "Send Command on Input Event" is activated, the assigned command will be sent on each event occurring on this input pin.
Number field used to assign the corresponding send command to each input event handler.
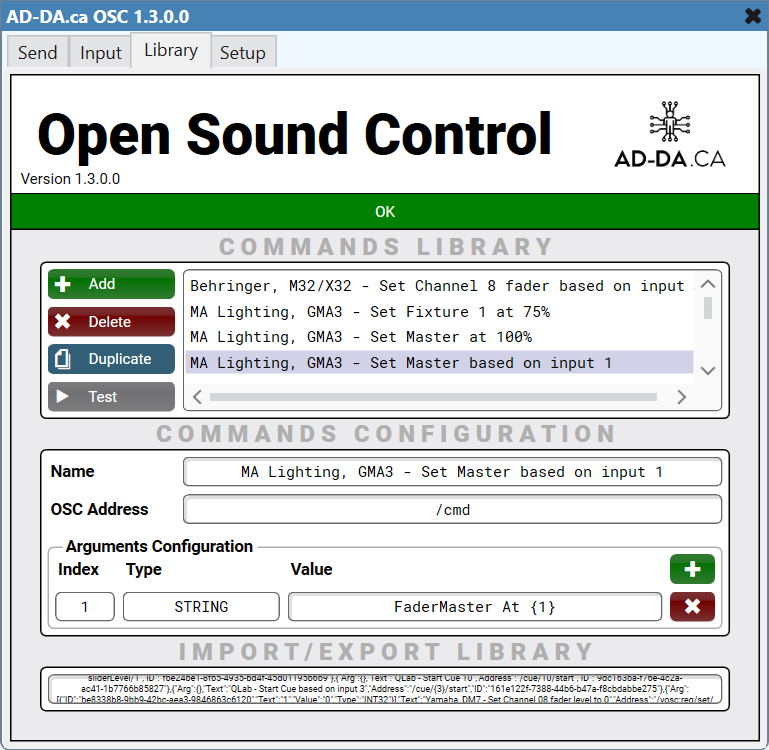
List all commands in current library in alphabetical order.
Button used to create a new command from scratch.
Button used to delete the selected command.
Button used to create a copy of the selected command.
Button used to send the Selected Command.
Text field used to give a name for the command.
Text field used to enter the "OSC Address" part of the OSC Address Pattern. The use of brackets placeholders allows grabbing the corresponding input value (ex: {1} = value of input 1).
Button used to add a new argument.
Drop down list with all the current arguments for the selected command. The list starts empty, and a new number is assigned to each new argument.
Button used to delete the current argument.
Drop down list used to set the argument's type (String, Float32, Integer, Boolean, INPUT TO BOOLEAN).
Text field used to enter the value for the active argument. The use of brackets placeholders allows grabbing the corresponding input value (ex: {1} = value of input 1).
Text field used to export and import (backup and restore) the commands library. To export (backup) content, select all the text and use "Copy/Paste" to save the library to an external text file. To restore a library, simply grab the previously saved library text content and paste it in this field.
Libraries are intended to be Saved and Backup from and to external text files. To restore/load a library, simply paste the library string from your backup file to the library import/Export field and the plugin will then automatically read the content of the field and populate the corresponding fields in the library editor.
New in V1.3.0.0: Clearing this field will delete/reset the command library. Entering "TEMPLATE" will load a library with examples (this is loaded by default when the plugin is first used).
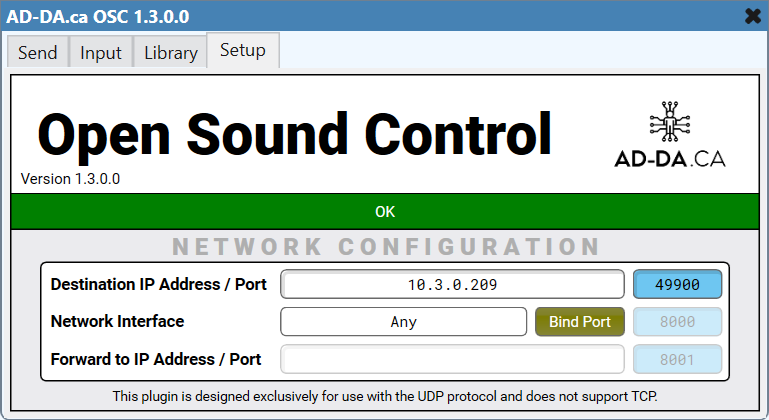
Used to set the IP address of the target OSC device.
Used to set the communication port of the target OSC device.
When enabled, binds the UDP port when sending messages to ensure the destination can reply on a known port. Send via notifications incoming messages to Receive components in follower mode when BIND PORT is enabled.
Used to set the IP address for message forwarding. In Send mode, the port must be bound to activate the forwarding function and a valid IP address must be entered.
Used to set the port for message forwarding. Works in conjunction with the Forward to IP Address setting.
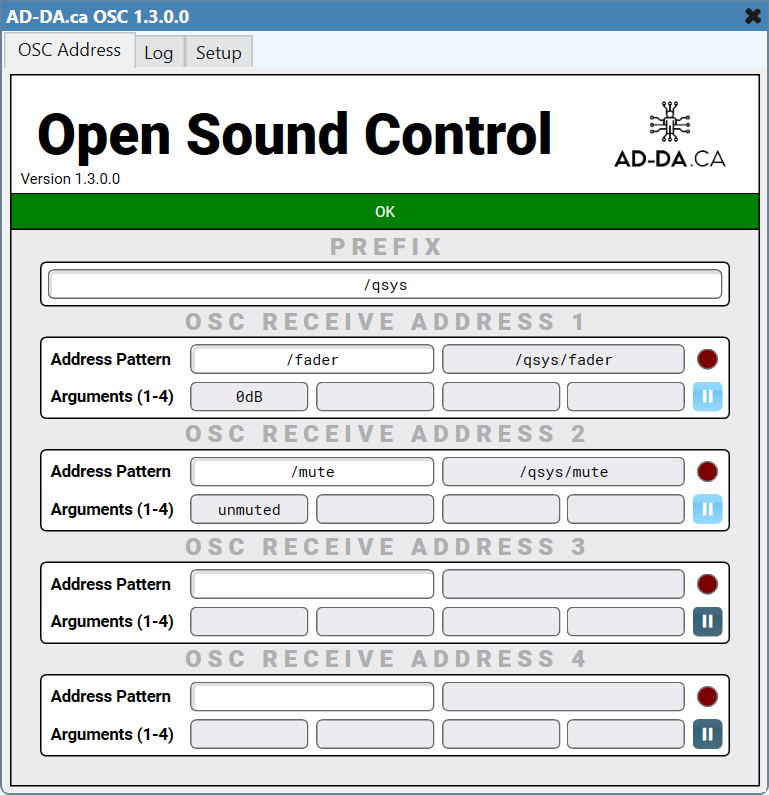
Text field allowing you to put a string that will be concatenated before each OSC Address Pattern to be filtered. This is particularly useful to simplify the OSC Address Pattern defined in the OSC Address Pattern [x] slots.
The use of "*" wildcard enables you to replace any entry, allowing you to target a specific portion of the received command while accepting any value for each wildcarded portion of the OSC Address.
Text field allowing you to enter the OSC Address to listen to. The complete OSC Address is a concatenation of the prefix and the OSC Address Pattern.
Text field showing the actual received OSC Address.
Toggle button used to activate or deactivate the "hold" function that will retain the last received OSC Command that match the corresponding OSC Address pattern.
Led Indicator that will be lit momentarily when a valid OSC Address Pattern is received.
Text Display showing the actual argument [x] for each OSC Address Pattern. A maximum of 4 arguments can be displayed for each OSC Address Pattern slot.

Button to erase all the log content.
Number of log lines to retain.
Enhanced in V1.3.0.0: All incoming messages are now printed in the log for better troubleshooting, not only the configured ones.
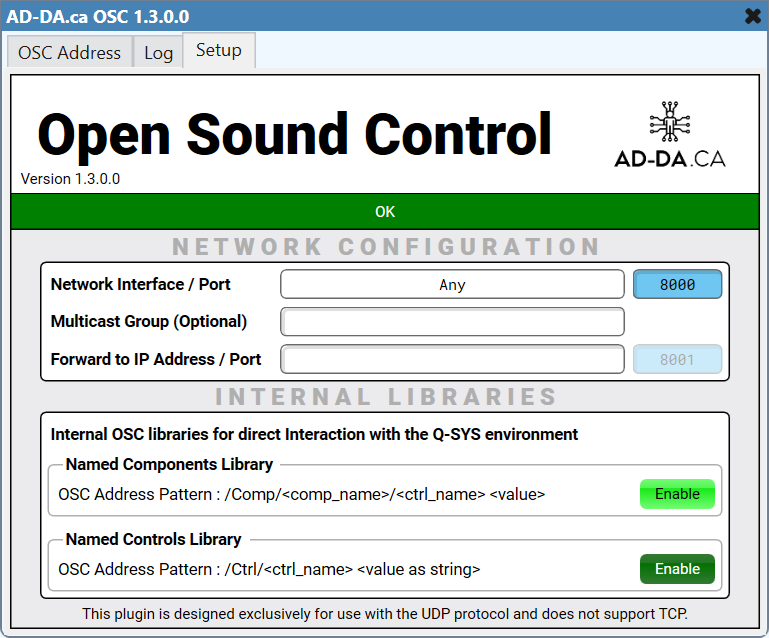
Used to set the IP address of the receiving interface.
Changed in V1.3.0.0: NIC Selection changed from ALL to ANY.
Used to set the communication port of the receiving interface.
Enhanced in V1.3.0.0: Receiver in Follower mode now only receives messages from selected PORT and no longer disables port controls.
Used to set the IP address for message forwarding. In Receive mode, forwarding is only activated when a valid IP address is entered.
Used to set the port for message forwarding. Works in conjunction with the Forward to IP Address setting.
Toggle button used to enable the Internal OSC Libraries function for direct interaction with the Q-SYS environment. When enabled, it allows users to bypass complicated schematic connections and long OSC address patterns by directly interacting with another component using the name that it's being assign to in the "Q-Sys Named Component library".
Important: (*) spaces aren't allowed in <comp_name>, <ctrl_name> and <value_as_string>.
If the control inside the component contains spaces, you need to create a Named Control for this control without spaces and use the Named Control Library instead.
Syntax: /Comp/<comp_name>/<ctrl_name> <value_as_string>
Where:
-
/Comp/- Indicates to the plugin that it will need to access the "Q-Sys Named Components Library" to locate the named component referenced by the next argument. -
<comp_name>- The name of the component (*). -
<ctrl_name>- The name of the control on the<comp_name>component (*). -
<value_as_string>- The first string argument received will be applied to<ctrl_name>control .String
Enhanced in V1.3.0.0: Enhanced argument type handling:
- If arg type is string, modifies the .String of the control
- If arg type is boolean (true or false), changes the .Boolean of the control
- If arg type is FLOAT, affects the .Position of the control
- If arg type is INT32, affects the .Value of the control
- If arg type is string and the string is "Trigger", triggers the control
- Otherwise, if arg type is string, applies to the .String of the control
- Q-SYS Designer 9.4 and lower: While in offline mode, simply rename the actual component block.
- Q-SYS Designer 9.5 and upper: While in offline mode, go to the Properties pane and change "Code Name" to the desired name and make sure "Script Access" is at "Script" or "All".
Toggle button used to enable the Internal OSC Libraries function for direct interaction with the Q-SYS environment. When enabled, it allows users to bypass complicated schematic connections and long OSC address patterns by interacting with the built-in "Q-Sys Named Controls library".
Important: (*) spaces aren't allowed in <ctrl_name> and <value_as_string>.
Syntax: /Ctrl/<ctrl_name> <value_as_string>
Where:
-
/Ctrl/- Indicates to the plugin that it will need to access the "Q-Sys Named Controls Library" to locate the named control referenced by the next argument. -
<ctrl_name>- The name of the control you want to interact with as indicated in the "Q-Sys Named Controls Library". -
<value_as_string>- The first string argument received will be applied to<ctrl_name>control .String
In order for the external system to access the controls, they have to be named.
- Make sure the design is in the design mode. (F7)
- Click the Named Controls accordion bar in the left pane of the Q-SYS workspace. The Named Controls list displays and is empty in new designs.
- Double-click the Schematic Element for which you want to make the controls available. The Control Panel displays.
- Select one or more controls that you want to make available and drag them into the Named Controls list. You can press Ctrl+A to select all the controls. When you press Ctrl+A, all the non-control items are selected as well, but are ignored by Q-SYS when dragged into the list.
- As you drag controls into the Named Controls list, the list is populated with the control's name, for example, CrossoverLowBandGain. The name is used by the external system to access this control.
- To help you identify controls already in the Named Controls list, each control you place in the list is marked graphically in the Control Panel by a small gray circle on the lower right corner of the control in the Control Panel from which it came. This identifier is available only in the Design mode.
- Rename the control if desired.
| Pin Name | Value | String | Pins Available |
|---|---|---|---|
| Connection (Send Mode) | |||
| IP Address | (String) | Input / Output | |
| Port | (String) | Input / Output | |
| Forward to IP Address | (String) | Input / Output | |
| Forward Port | (String) | Input / Output | |
| Input (Send Mode) | |||
| Input [x] Debounce | 0 1 |
false true |
Input / Output |
| Input [x] Event Handler | 0 1 |
false true |
Input / Output |
| Input [x] Pin | (String) | Input | |
| Input [x] Send Command Number | (String) | Input / Output | |
| Send (Send Mode) | |||
| Send [x] Command | (String) | Input / Output | |
| Send [x] Trigger | (String) | Input / Output | |
| Connection (Receive Mode) | |||
| Interface | (String) | Input / Output | |
| Port | (String) | Input / Output | |
| Forward to IP Address | (String) | Input / Output | |
| Forward Port | (String) | Input / Output | |
| Log (Receive Mode) | |||
| Clear | (String) | Input / Output | |
| Count | (Integer) | Input / Output | |
| Data | (String) | Input / Output | |
| OSC Address (Receive Mode) | |||
| OSC Address [x] Args [y] | (String) | Output | |
| OSC Address [x] Address | (Integer) | Input / Output | |
| OSC Address [x] Hold | 0 1 |
false true |
Input / Output |
| OSC Address [x] Led | 0 1 |
false true |
Output |
| OSC Address [x] Received | 0 1 |
false true |
Output |
| OSC Address Prefix | (String) | Input / Output | |
| Setup (Receive Mode) | |||
| Named Components | 0 1 |
false true |
Output |
| Named Controls | 0 1 |
false true |
Output |
| General | |||
| Disable | 0 1 |
false true |
Input / Output |
| Library | (String) | Input / Output | |
| Status | OK | Output |
Support: support@ad-da.ca
Copyright © 2025 AD-DA.CA
![]()