Tutorial 1: Starting a new project.
Our example project for the tutorial series is a bank teller and ATM machine. This sample project will allow you to create an account with a teller, view your accounts and withdraw money from the ATM. All rather simple.
To start:
Refer to Tutorial: Install Visual Studio requirements
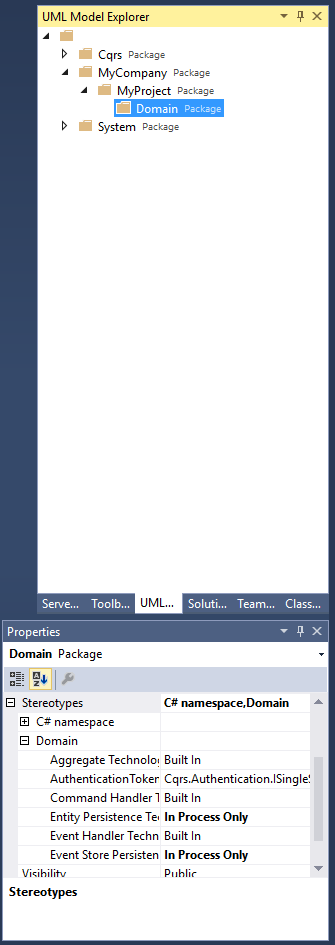
Locate the UML Model Explorer. Here you will see three nodes, Cqrs, MyCompany and System. Cqrs and System are models mapping to .net framework requirements and the core Cqrs package requirements. Inside the MyCompany node you will find a MyProject node. At this point you should be able to visualise how these match to recommended conventions for namespacing your code. Changing the names of these node will change the namespaces of all the generated code.
If you navigate to the "Domain" node and open the "Properties" dialog you will see the "Domain" stereotype has been applied. Expanding this stereotype will show you several configuration options that will be applied to all domain code. For the sake of this example we will be using an in-process persistence layer (i.e. no database) and the standard built-in framework components.
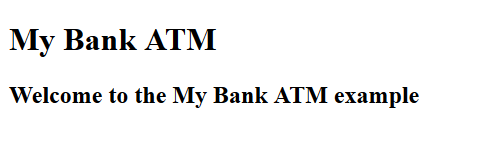
At this point you should be able to compile the solution and run the sample website seeing the below simple message.
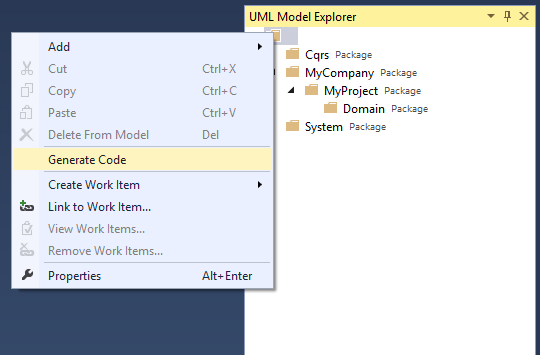
Right click on the root level node in the UML Model Explorer and select "Generate Code". This will automatically generate all the core level code necessary for you. No need to mash a keyboard to code things that should be done for you. Here is where you will see how using this platform will save you hours of work.
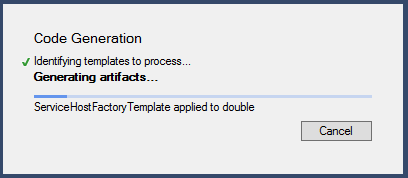
Once the code generate is completed:
Navigate to the \MyCompany.MyProject.Domain.Ninject\MyCompany\MyProject\Configuration folder
Create a new class BaseModule and include the following code to complete the Ninject configuration (later we'll explain why we leave the final running configuration up to you).
using cdmdotnet.Logging;
using cdmdotnet.Logging.Configuration;
using Ninject.Modules;

namespace MyCompany.MyProject.Configuration
{
	public class BaseModule : NinjectModule
	{
		public override void Load()
		{
			Bind<ILoggerSettings>()
				.To<LoggerSettingsConfigurationSection>()
				.InSingletonScope();

			RegisterLogger();
		}

		/// <summary>
		/// Register the <see cref="ILogger"/>
		/// </summary>
		protected virtual void RegisterLogger()
		{
			Kernel.Unbind<ILogger>();

			Bind<ILogger>()
				.To<ConsoleLogger>()
				.InSingletonScope();
		}
	}
}
Next, navigate to the MyCompany.MyProject.Web.Mvc\App_Start\NinjectWebCommon.cs file.
Add the following namespaces
MyCompany.MyProject.Domain.Configuration and MyCompany.MyProject.Configuration
Replace the internal static void RegisterServices(IKernel kernel) method with the following content:
		Cqrs.Ninject.Configuration.NinjectDependencyResolver.ModulesToLoad.Clear();

		// Base Module
		Cqrs.Ninject.Configuration.NinjectDependencyResolver.ModulesToLoad.Add(new BaseModule());

		// Core Module
		Cqrs.Ninject.Configuration.NinjectDependencyResolver.ModulesToLoad.Add(new CqrsModule<ISingleSignOnToken, SingleSignOnTokenValueHelper>());
		// Event Store Module
		Cqrs.Ninject.Configuration.NinjectDependencyResolver.ModulesToLoad.Add(new InProcessEventStoreModule<ISingleSignOnToken>());
		// Command Bus Module
		Cqrs.Ninject.Configuration.NinjectDependencyResolver.ModulesToLoad.Add(new InProcessCommandBusModule<ISingleSignOnToken>());
		// Event Bus Module
		Cqrs.Ninject.Configuration.NinjectDependencyResolver.ModulesToLoad.Add(new InProcessEventBusModule<ISingleSignOnToken>());
		// Domain Core Module
		Cqrs.Ninject.Configuration.NinjectDependencyResolver.ModulesToLoad.Add(new DomainNinjectModule());
		Cqrs.Ninject.Configuration.NinjectDependencyResolver.Start(kernel, true);

		// Tell ASP.NET MVC 3 to use our Ninject DI Container
		DependencyResolver.SetResolver(new NinjectDependencyResolver(kernel));
You should be able to compile the solution and run the sample website again. Nothing will have changed visually, but the core of the Cqrs platform is now running.
You have now completed the first tutorial. Your code is now ready for tutorial 2.