This project demonstrates how to build an ESP32-based Internet Radio that streams audio directly from the internet using Wi-Fi connectivity. The system uses a MAX98357A I2S amplifier board to deliver high-quality digital audio output through speakers, creating a standalone internet radio device.
- ✅ Wi-Fi Connectivity: Streams audio directly from internet radio stations
- ✅ High-Quality Audio: Uses I2S digital audio interface for crystal clear sound
- ✅ Digital Class D Amplifier: MAX98357A provides 92% efficiency and up to 3.2W output power
- ✅ Simple Setup: Minimal components required
- ✅ Expandable: Can be enhanced with display, volume control, and station switching
- ✅ Low Power: ESP32's efficient power management
- ✅ Plug & Play: Automatic connection and streaming
- Components Required
- Hardware Setup
- Circuit Diagram
- Software Installation
- Code Explanation
- Configuration
- Testing
- Troubleshooting
- Future Enhancements
- References
| Component | Quantity | Description |
|---|---|---|
| ESP32 Development Board | 1 | Main microcontroller with Wi-Fi |
| MAX98357A I2S Amplifier | 1 | Digital Class D amplifier module |
| 8Ω Speaker (0.5W-1W) | 1 | Audio output device |
| USB Cable | 1 | For programming and power |
| 5V 1A Power Adapter | 1 | External power supply |
| Jumper Wires | Several | For connections |
| Breadboard (Optional) | 1 | For prototyping |
- Efficiency: 92%
- Output Power: Up to 3.2W into 4Ω load at 5V
- Operating Voltage: 2.5V to 5.5V
- Features: Click/pop noise reduction, short circuit protection, thermal protection
- Audio Modes: Left, Right, or (Left/2 + Right/2) output
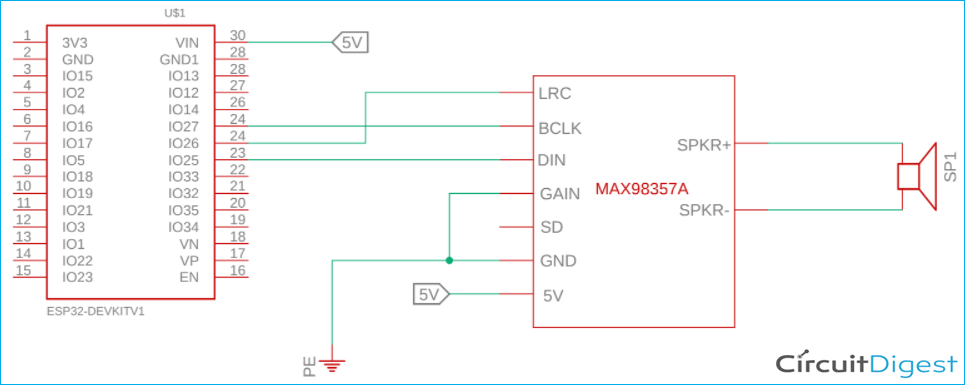
| MAX98357A Pin | ESP32 Pin | Description |
|---|---|---|
| LRC | GPIO 26 | Left/Right Clock (Word Select) |
| BCLK | GPIO 27 | Bit Clock Input |
| DIN | GPIO 25 | Digital Data Input |
| GAIN | GND | Gain Control (GND = 12dB, VDD = 6dB) |
| SD | - | Shutdown (Leave floating for normal operation) |
| GND | GND | Ground |
| VIN | 5V | Power Supply |
ESP32          MAX98357A         Speaker
-----          ---------         -------
GPIO25   ----> DIN
GPIO26   ----> LRC
GPIO27   ----> BCLK
5V       ----> VIN
GND      ----> GND
GND      ----> GAIN
                 +     ---------> Speaker +
                 -     ---------> Speaker -
Download and install the latest version of Arduino IDE from arduino.cc
- Open Arduino IDE
- Go to File > Preferences
- Add this URL to "Additional Board Manager URLs":
https://raw.githubusercontent.com/espressif/arduino-esp32/gh-pages/package_esp32_index.json - Go to Tools > Board > Board Manager
- Search for "ESP32" and install "esp32 by Espressif Systems"
- Download the ESP32-audioI2S library from GitHub:
https://github.com/schreibfaul1/ESP32-audioI2S - In Arduino IDE, go to Sketch > Include Library > Add .ZIP Library
- Select the downloaded library ZIP file
#include "Arduino.h"  // Core Arduino functions
#include "WiFi.h"     // Wi-Fi connectivity
#include "Audio.h" // ESP32-audioI2S library#define I2S_DOUT 25 // Data out pin
#define I2S_BCLK 27 // Bit clock pin
#define I2S_LRC 26 // Left/Right clock pin- WiFi.begin(): Connects ESP32 to Wi-Fi network
- audio.setPinout(): Configures I2S pins
- audio.setVolume(): Sets playback volume (0-100)
- audio.connecttohost(): Connects to streaming URL
- audio.loop(): Maintains audio streaming in main loop
Replace the following lines in the code with your network credentials:
String ssid = "Your_WiFi_SSID";
String password = "Your_WiFi_Password";Change the streaming URL to your preferred station:
audio.connecttohost("http://your-radio-station-url.com/stream");- BBC Radio 1:
http://bbcmedia.ic.llnwd.net/stream/bbcmedia_radio1_mf_p - Capital FM:
http://vis.media-ice.musicradio.com/CapitalMP3 - SmoothRadio:
http://vis.media-ice.musicradio.com/SmoothUKMP3
Adjust the volume level (0-100):
audio.setVolume(75); // Set to 75% volume- Connect ESP32 to computer via USB
- Select correct board: Tools > Board > ESP32 Dev Module
- Select correct port: Tools > Port > [Your ESP32 Port]
- Click Upload button
- Open Serial Monitor (9600 baud) to view connection status
- ESP32 connects to Wi-Fi (LED indicator may blink)
- Serial monitor shows connection status
- Audio streaming begins automatically
- Clear audio output through speaker
- Audio should be clear without distortion
- No clicking or popping sounds during startup
- Consistent streaming without interruptions
| Problem | Possible Cause | Solution |
|---|---|---|
| No audio output | Wrong pin connections | Check I2S pin wiring |
| Compilation error | Missing library | Install ESP32-audioI2S library |
| Wi-Fi connection fails | Wrong credentials | Verify SSID and password |
| Audio distortion | Power supply issue | Use adequate 5V power supply |
| Streaming stops | Internet connectivity | Check network stability |
- Check Serial Monitor: Look for error messages
- Verify Connections: Use multimeter to check continuity
- Test Speaker: Connect speaker to another audio source
- Power Supply: Ensure stable 5V supply
- Library Version: Use latest ESP32-audioI2S library
- OLED Display: Show current station and song info
- Rotary Encoder: Volume control and station selection
- Web Interface: Configure stations via browser
- Multiple Stations: Store and switch between favorites
- Bluetooth Support: Add Bluetooth audio capability
- SD Card Support: Play local audio files
- Touch Interface: Capacitive touch controls
- Voice Control: Integration with voice assistants
- Equalizer: Software-based audio processing
- Sleep Timer: Auto-shutdown functionality
- Alarm Clock: Wake up with internet radio
- Recording: Save streams to SD card
- Streaming Server: Broadcast your own content
For permanent installation, consider designing a custom PCB with:
- ESP32 module
- MAX98357A integration
- Power regulation circuit
- Control interfaces
- Speaker terminal blocks
- ESP32: ~240mA (during Wi-Fi streaming)
- MAX98357A: ~10-500mA (depending on volume)
- Total System: ~250-750mA at 5V
- Recommended PSU: 5V 1A minimum
- ESP32-audioI2S Library: GitHub Repository
- Projects: ESP32 Projects
- MAX98357A Datasheet: Analog Devices Documentation
- ESP32 Documentation: Espressif Official Docs
This project is based on open-source resources and is intended for educational and hobbyist use.
Feel free to contribute improvements, bug fixes, or additional features. Create pull requests or open issues for discussion.
Project Status: ✅ Tested and Working
Difficulty Level: Beginner to Intermediate
Estimated Build Time: 2-3 hours
Last Updated: August 2025
#include "Arduino.h"
#include "WiFi.h"
#include "Audio.h"

#define I2S_DOUT 25
#define I2S_BCLK 27
#define I2S_LRC 26

Audio audio;

String ssid = "Your_WiFi_SSID";
String password = "Your_WiFi_Password";

void setup() {
    Serial.begin(115200);

    WiFi.disconnect();
    WiFi.mode(WIFI_STA);
    WiFi.begin(ssid.c_str(), password.c_str());

    while (WiFi.status() != WL_CONNECTED) {
        delay(1500);
        Serial.print(".");
    }

    Serial.println("WiFi connected");

    audio.setPinout(I2S_BCLK, I2S_LRC, I2S_DOUT);
    audio.setVolume(100); // 0...100
    audio.connecttohost("http://vis.media-ice.musicradio.com/CapitalMP3");
}

void loop() {
    audio.loop();
}
Happy Making! 🎵🔊