This project demonstrates how to interface and control two DC motors (or a stepper motor) with an Arduino using the DRV8833 Dual Motor Driver Module. The DRV8833 is an efficient, MOSFET-based H-bridge motor driver that supports bidirectional control and PWM speed regulation.
- Control two DC motors or one stepper motor with Arduino
- PWM-based speed control
- Direction control via H-Bridge configuration
- Overcurrent, thermal shutdown, and undervoltage lockout protection
- Low voltage operation (2.7V to 10.8V) with up to 1.5A RMS output current
- Low voltage drop due to MOSFET H-bridge design
| Component | Description |
|---|---|
| Arduino Pro Mini (or any) | Microcontroller for control |
| DRV8833 Motor Driver | Dual-channel MOSFET H-bridge IC |
| DC Motors | Up to 2 DC motors or 1 stepper motor |
| Potentiometers (x2) | For speed control of each motor |
| Push Button | For motor direction control |
| Battery (8.4V) | Power supply for motors |
| Breadboard + Jumpers | For prototyping connections |
| Heatsink (optional) | For thermal management under high load |
The DRV8833 uses PWM (Pulse Width Modulation) to control motor speed by varying the duty cycle of the voltage applied to the motor.
Direction control is achieved using the H-bridge configuration — reversing polarity changes the rotation direction.
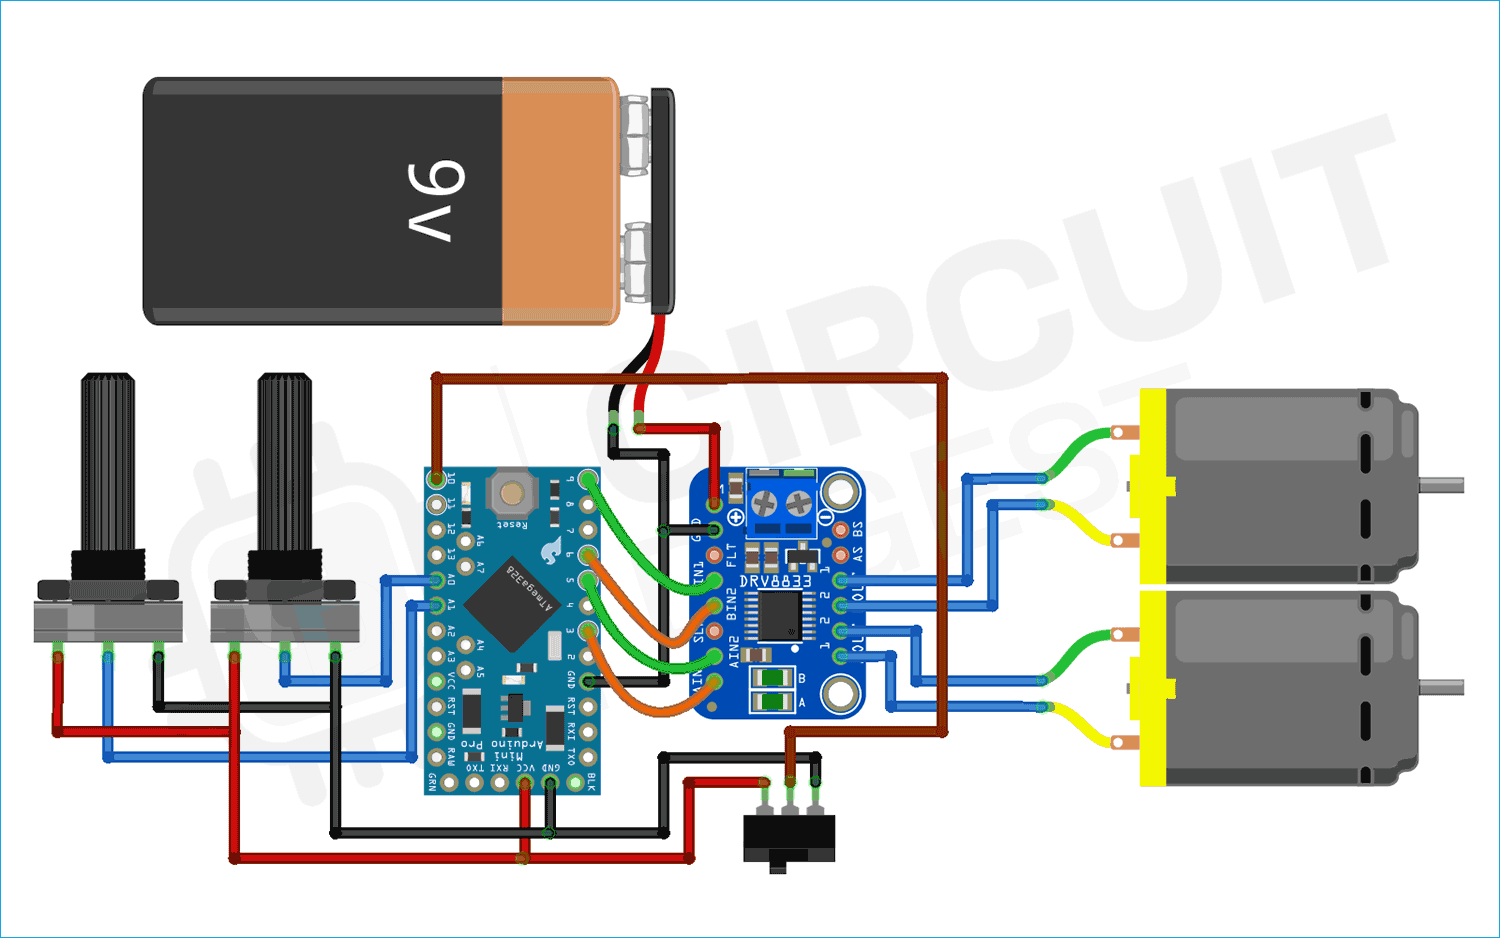
- Arduino pins 9, 6, 5, 3 → DRV8833 IN1, IN2, IN3, IN4
- DRV8833 OUT1 & OUT2 → Motor 1 terminals
- DRV8833 OUT3 & OUT4 → Motor 2 terminals
- DRV8833 VCC → Battery positive (max 10.8V)
- DRV8833 GND → Common ground with Arduino
- EEP (Sleep Pin) → Logic HIGH to enable driver
- Push Button → Arduino pin 10 for direction toggle
- Potentiometers → Arduino A0 and A1 for speed control
| Issue | Cause | Solution |
|---|---|---|
| IC very hot | High current draw | Add heatsink, reduce motor load |
| Thermal shutdown | Overcurrent condition | Check motor stall, add current limiting |
| Erratic operation | Voltage drop in supply | Use larger capacity battery/supply |
| Motor stuttering | EMI from motors | Add 0.1µF capacitors across motor terminals |
- Small mobile robots
- Two-wheel drive robotic cars
- Motorized pan-tilt camera systems
- Automated toys
- Low-voltage stepper motor control
- Add Bluetooth or Wi-Fi remote control
- Integrate with sensors for autonomous navigation
- Use OLED/LCD for speed and direction display
- Implement closed-loop speed control using encoders
| Parameter | DRV8833 | L293D |
|---|---|---|
| Supply Voltage Range | 2.7V – 10.8V | 4.5V – 36V |
| Continuous Current/Ch. | 1.5A RMS | 600mA |
| Peak Current | 2A | 1.2A |
| Voltage Drop (Typical) | 0.3V @ 1A | 2.0V @ 1A |
| H-Bridge Technology | N-Channel MOSFET | Bipolar Transistor |
| Current Regulation | Built-in | External required |
| PWM Frequency | Up to 250kHz | Up to 5kHz |
#define mode_pin  10
#define IN1_PIN 9
#define IN2_PIN 6
#define IN3_PIN 5
#define IN4_PIN 3

void setup() {
  pinMode(IN1_PIN, OUTPUT);
  pinMode(IN2_PIN, OUTPUT);
  pinMode(IN3_PIN, OUTPUT);
  pinMode(IN4_PIN, OUTPUT);
  pinMode(mode_pin, INPUT);
  digitalWrite(IN1_PIN, LOW);
  digitalWrite(IN2_PIN, LOW);
  digitalWrite(IN3_PIN, LOW);
  digitalWrite(IN4_PIN, LOW);
}

void loop() {
  int speed1 = analogRead(A0);
  int speed2 = analogRead(A1);

  if (digitalRead(mode_pin) == LOW) {
    digitalWrite(IN3_PIN, LOW);
    analogWrite(IN4_PIN, speed1);
    digitalWrite(IN1_PIN, LOW);
    analogWrite(IN2_PIN, speed2);
  }

  if (digitalRead(mode_pin) == HIGH) {
    digitalWrite(IN4_PIN, LOW);
    analogWrite(IN3_PIN, speed1);
    digitalWrite(IN2_PIN, LOW);
    analogWrite(IN1_PIN, speed2);
  }
}- 📖 Complete Tutorial on Circuit Digest
- 📄 DRV8833 Datasheet
- 🧠 More Motor Control Projects
- ⚙️ Arduino Projects
If you found this helpful, please ⭐ star this repository and share it with others!
Built with 💡 by Circuit Digest
Making Electronics Simple
DRV8833 Arduino control dual motor driver module PWM motor speed control
Arduino motor interfacing MOSFET H-bridge driver robotics motor driver
DC motor control low voltage motor driver Arduino projects