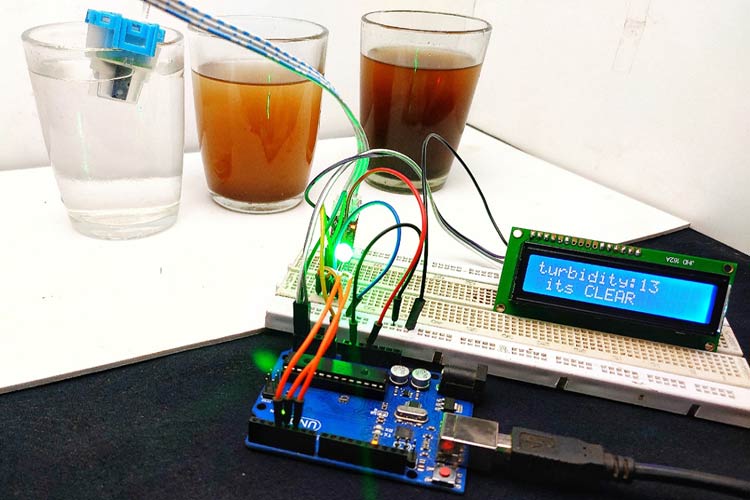
🔗 Measuring Turbidity of Water using Arduino and Turbidity Sensor
- Real-time measurement of water turbidity.
- LCD display for live turbidity percentage.
- RGB LED indication for Clear, Cloudy, and Dirty water.
- Analog sensor output directly compatible with Arduino.
- Extendable with IoT or additional water quality sensors.
| Component | Quantity | Purpose |
|---|---|---|
| Turbidity Sensor Module | 1 | Main sensing element |
| Arduino Uno / Nano | 1 | Microcontroller |
| 16×2 I2C LCD Display | 1 | Data visualization |
| RGB LED (Common Cathode) | 1 | Status indication |
| Breadboard | 1 | Circuit prototyping |
| Jumper Wires | 10–15 | Connections |
| Resistors (220Ω) | 3 | LED current limiting |
- The turbidity sensor shines light through the water sample using an IR LED.
- A photodiode/receiver detects the intensity of transmitted light.
- Cloudy water scatters the light, reducing intensity → higher turbidity.
- The sensor outputs an analog voltage proportional to water clarity.
- Arduino reads this voltage on pin A0 and maps it to a 0–100% turbidity scale.
- Results are displayed on the 16×2 I2C LCD and indicated with the RGB LED:
- Green → Clear water
- Blue → Cloudy water
- Red → Dirty water
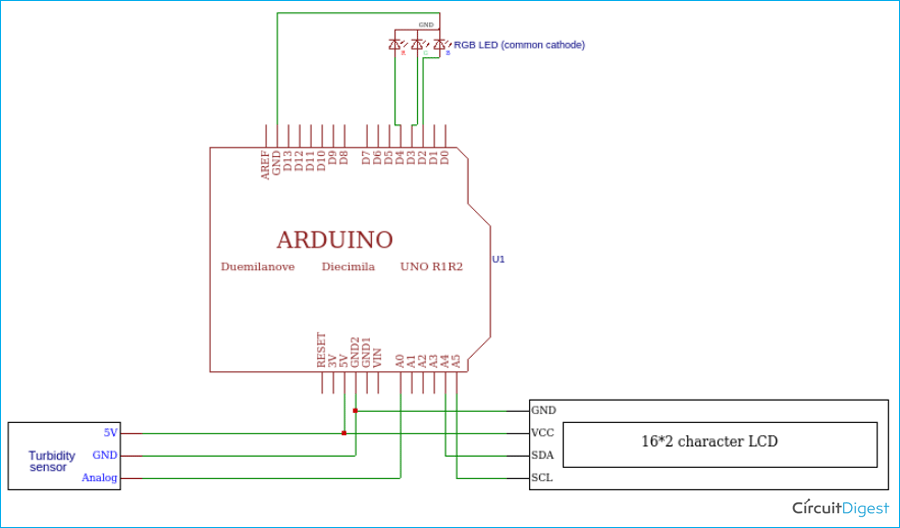
| Module / Pin | Arduino Pin |
|---|---|
| Turbidity Sensor VCC | 5V |
| Turbidity Sensor GND | GND |
| Turbidity Sensor OUT | A0 |
| I2C LCD SDA | A4 |
| I2C LCD SCL | A5 |
| RGB LED (Red) | D5 |
| RGB LED (Green) | D3 |
| RGB LED (Blue) | D4 |
| Issue | Possible Cause | Solution |
|---|---|---|
| LCD not displaying values | Wrong I2C address | Scan and update LCD address |
| Sensor always reads 0% | Probe not submerged / loose wiring | Check water sample & wiring |
| Wrong LED indication | Incorrect pin mapping in code | Verify pin connections in sketch |
| Unstable readings | Electrical noise / loose wires | Use shorter wires & proper GND |
- Drinking water quality testing.
- Industrial wastewater monitoring.
- Environmental water pollution detection.
- Educational water science experiments.
- Add pH, TDS, and temperature sensors for complete water quality analysis.
- IoT integration with ESP8266/ESP32 for remote monitoring.
- Data logging to cloud or SD card.
- Calibration with standard turbidity solutions for higher accuracy.
| Parameter | Value | Notes |
|---|---|---|
| Operating Voltage | 5V DC | Arduino compatible |
| Current Consumption | ≤ 30mA | Low power |
| Output Type | Analog (0–5V) | Direct to Arduino |
| Detection Range | 0–4000 NTU | Typical water range |
| Response Time | < 500ms | Fast measurement |
| Operating Temperature | -30°C to 80°C | Wide range |
- 📘 Measuring Turbidity of Water using Arduino and Turbidity Sensor
- 🔧 Arduino IDE
- 📄 Arduino Uno Datasheet
- 📄 Turbidity Sensor Datasheet
- 💡 IoT-based Water Quality Monitoring using ESP8266
- 💡 Arduino pH Meter Project
For technical questions, visit the CircuitDigest Forums.
Explore more projects at CircuitDigest.
Arduino Turbidity Sensor Water Quality Measurement Arduino Project IoT Water Monitoring NTU Measurement Arduino UNO Turbidity Meter