The Pagbantay backend is a serverless FastAPI application that uses SQLAlchemy with CockroachDB , following the Clean Architecture pattern.
It supports Alembic migrations and is ready for deployment to AWS Lambda using Mangum.
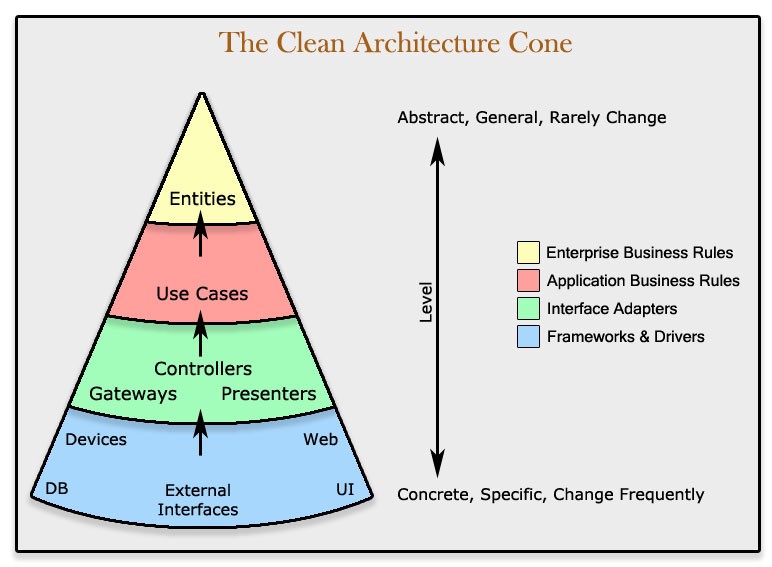
This project follows the Clean Architecture pattern, which separates the code into different layers of different logic. This setup is common in real-world projects because it keeps the code organized, easier to test, and flexible for changes.
Read more about Clean Architecure
For Python3.11:
-
Install Python 3.11 if you have not yet:
- Python3.11 - Windows installer (64-bit)
- Open downloaded file
- Make sure to check
Add python.exe to PATH - Click Install Now
-
Verify installation
- Locate Python 3.11:
where python3.11 # Windows
which python3.11 # Linux/Ubuntu
It should output something like
Your_Path\python3.11.exe -
Create venv
python3.11 -m venv venv
-
Then activate:
source venv/bin/activate   # Mac/Linux
venv\Scripts\activate      # Windows
A "(venv)" prefix indicates that you are in a virtual environment:
(venv) C:\YourDirectory... -
To exit the virtual environment (venv):
deactivate
Install python dependencies:
pip install -r requirements.txt-
Configure base schema at
/models/base.py -
Generate a Migration Script:
alembic revision --autogenerate -m "your message"- Migration files will appear under
alembic/versions/ - Filename may look like
somecode_your_message.py
- Migration files will appear under
-
Apply the migration (Push to Database):
alembic upgrade head
-
Go to the AWS Sign-In Page
-
Log in using the IAM user credentials provided by the AWS account owner/admin
-
After logging in, you can now view and access AWS services through the console.
-
Install AWS CLI v2 if you have not yet:
- Follow the Official AWS CLI Installation Guide
-
Verify installation:
aws --version
-
Configure AWS CLI:
aws configure
-
Enter credentials as prompted (follow format below):
AWS Access Key ID [None]: <your-access-key-id>
AWS Secret Access Key [None]: <your-secret-access-key>
Default region name [None]: ap-southeast-1
Default output format [None]: json
(Note: Your Access Keys are found along with the login credentials that you were given)
You have now successfuly configured AWS CLI with IAM
-
Ensure
Node 14or later is installed -
Install Serverless Framework:
npm install -g serverless@3.39.0
-
Verify installation:
serverless --version
-
Install serverless plugins:
npm install
-
Install Python Requirements Plugin:
sls plugin install -n serverless-python-requirements
-
Set-up Docker
- Follow the Docker Installation Guide
- Ensure that Docker is running
-
Set AWS Profile
- Use the project's AWS profile
export AWS_PROFILE=pagbantay-user -
Deploy the backend:
serverless deploy # or shorthand sls deploy -
Check if deployment is successful:
- After deployment, you should be given a URL
- Visit URL in browser and append
/docsat the end - It should render correctly (see screenshot below):
