Step by step instructions for creating your own DAQModule package under v1
This page is intended to provide a step-by-step guide to setting up a work area in which you create software modules that run within Version 1 of the DUNE DAQ software application framework (appfwk v1). These modules are often called DAQModules since that is the C++ base class that they inherit from. If you are impatient to get started, you can jump to the Step-by-step Instructions now.
New users should probably continue reading this introduction, though, to learn a little bit of background information.
This page draws from, and references, several other Wiki pages in the appfwk repository. Links to these pages are listed in the text in the relevant places, and they are a good source of additional information for interested readers. Here are some of these references collected for you in one place on this page:
and last, but certainly not least
This page assumes a basic understanding of how modules are combined to form processes within appfwk v1.
A brief recap can be found in the following snippet.
As a refresher:
- a DAQProcess contains one or more DAQModules
- when multiple DAQModules are present within a DAQProcess, they communicate with each other via Queues (the diagrams that are included later on this page might help explain this)
- there are two classes that wrap Queues to provide the ability to push data onto the queue (DAQSink) or pull data from a queue (DAQSource). An individual DAQModule will only access one side of each Queue. If the module pushes data onto the queue, it will use an instance of the DAQSink class (which wraps the desired Queue), and if the module pops data from the queue, it will use an instance of the DAQSource class.
- the DAQModules that run within a given process (and the Queues between them) are specified in a JSON process configuration file. An example of one such file is given below. The creation of the DAQModules and Queues is handled by the appfwk.
- at this point in time, we expect that most users will be developing DAQModules and simply using existing Queues from the appfwk.
- at the moment, there aren't any centrally-provided libraries, tools, or recommendations for inter-process communication. We expect to address this topic soon, but for now, developers can either focus on single-process examples, or use other software for inter-process communication. The instructions on this page focus on single-process examples.
- please remember that there have been a number of compromises or simplifications in the functionality that is provided by appfwk v1. We have made a good faith attempt to provide a good start on the internal interfaces and layout of DAQProcesses, but things will definitely change over time, and we will be gathering feedback from everyone on ways that things might be improved. (Of course, we already have a fairly good list based on the experience of creating v1.)
Here are the suggested steps for setting up a work area, in which you can create your new package:
- Choose a computer/cluster to work on that has access to
/cvmfs/dune.opensciencegrid.org/dunedaq/DUNE/products(more details on compiling and running code with the appfwk are provided on the Compiling and Running page)- this CVMFS area is where several necessary dependent software packages are stored (for now)
-
lxplus.cern.chhas been used successfully for this purpose
- Log into that computer/cluster, create a fresh directory to work in, and
cdinto that directory (I'll call this yourWORK_DIR.) - Run the following four commands (these are based on commands from the Compiling and Running page)
curl -O https://raw.githubusercontent.com/DUNE-DAQ/daq-buildtools/v1.0.0/bin/quick-start.shchmod +x quick-start.shsed -r -i 's/edits_check=true/edits_check=false/' quick-start.sh-
./quick-start.shDon't be concerned about the "User assumes the risk that the script may make out-of-date assumptions" warning you see. It's because you're not using the newest version of quick-start.sh, you're using the v1.0.0 version. After you've runquick-start.shwe'll account for this by making sure the downloaded repos are pointing to the v1.0.0 codebase: for pkg in appfwk ers daq-buildtools; do cd $pkg; git checkout v1.0.0; cd .. ; done
- Set up the build environment for this
WORK_DIRby running the following command:source ./setup_build_environment
- Build the core packages that the
quick-start.shsript installed in your working directory by running this command:./build_daq_software.sh- please note that you'll likely see some messages like
nlohmann_json NOT FOUND!. This is not a cause for alarm. The build process automatically downloads and builds the nlohmann::json package for you, after it notices that it wasn't found. - there may also be a warning message about an unused variable in
ers/src/Issue.cxx. Again, this is nothing to worry about.
- If you would like to try running the example application(s) from the core appfwk repository, you can do that now. There are instructions later on this page for doing that.
At this point, you could either check out the example DAQModule package, build it, and run the the example application, or you could start creating your own package.
These instructions will walk you through doing both, but of course you can skip to the latter by scrolling to the dedicated section.
Here are the steps for adding the appfwk Example package to your work area, building it, and running the example application... (For information on the DAQModules that are contained in the example application and how they interact, please see this section later on this page.)
-
cdinto your work area directory (WORK_DIR), if you aren't there already - run the following command to clone the example package:
git clone https://github.com/DUNE-DAQ/listrev.git
- ...and make sure you've got the v1.0.0 version of it
cd listrevgit checkout v1.0.0cd ..
- add the following line to the bottom of the top-level CMakeLists.txt file (in
WORK_DIR)add_subdirectory(listrev)
- [if not already done in the current shell] set up the build environment for your work area
source ./setup_build_environment
- rebuild the software in your work area by running
./build_daq_software.sh
In order to run the example package follow the instruction in the dedicated section.
Here are the commands to create your own software package that depends on appfwk:
- create a new directory underneath
WORK_DIR(we'll call thisYOUR_PKG_DIR) - copy the
CMakeLists.txtfile from the example package intoYOUR_PKG_DIR(you can fetch it from here)- edit this CMakeLists.txt file to change all of the instances of the string "listrev" to your package name
- (we'll do a couple more edits in a bit, but you can save and close this file now
- create a
srcdirectory underneathYOUR_PKG_DIR - copy one of the DAQModules from the example package into the
srcdirectory - edit
YOUR_PKG_DIR/CMakeLists.txt to remove the ListReverser and ReversedListValidator add_library and target_link_libraries lines- you should also comment out the
point_build_to( test )andfile(COPY test/list_reversal_app.json DESTINATION test)lines
- you should also comment out the
- add the following line to the bottom of the top-level CMakeLists.txt file (in
WORK_DIR)add_subdirectory(YOUR_PKG_DIR)
-
cdtoWORK_DIR - [if not already done in the current shell] set up the build environment for your work area
source ./setup_build_environment
- rebuild the software in your work area by running
./build_daq_software.sh
- at this point, you'll have a decent start on your own DAQModule package. Of course, you'll need to rename and modify the
RandomDataListGeneratorDAQModule to do whatever you want your first DAQModule to do. And, when you get the point of running your DAQProcess that uses your DAQModule(s), you'll need to create a JSON process configuration file to use for that, but hopefully the listrev example package will help.
From the C++ point of view, DAQ modules are implementation of a DAQ Module interface.
That means that apart from the constructor (that receives a name) only one method has to be implemented: init().
The function has to handle all those configuration items that are not supposed to be reconfigurable during the run.
Optionally it can configure all those variables that can be overridden during run time.
The most important thing that init has to do is to call register_command in order to associate functions to each command that the module is expected to support.
Each function has to be a set of operations that changes the internal status of the module according to the command that it is implementing.
The prototype of each function is in the form
void do_something( const vector<string> & args ) ;The function can be virtual and the system is able to pick the most downstream specification.
Assuming that the name of the module you are developing is MyNewDAQModule a call to associate the command "start" to a function called do_start will be
register_command("start", & MyNewDAQModule::do_start);It is expected that the operations of the DAQ Module are carried on in other threads under the control of the DAQModule itself.
DAQModules need to be created with a factory pattern simply via their name.
In the application framework this is done using CETlib.
In order to do that, each implementation (cpp file) needs to have a call to the macro DEFINE_DUNE_DAQ_MODULE(<name_including_namespace>) for example
DEFINE_DUNE_DAQ_MODULE(dunedaq::appfwk::DummyModule)In order to generate a shared object library that is linkable in runtime from the application framework, the name of the library has to be the in the form <package>_<module_name_no_namespace>_duneDAQModule.
This can be achieved simply adding a line in the CMakeLists.txt file of your project in the form add_library(<package>_<module_name_no_namespace>_duneDAQModule path/to/my/file.cpp).
For example:
add_library(appfwk_DummyModule_duneDAQModule test/DummyModule.cpp)Assuming you installed your software as described in the previous sections, these are the instructions to run the code:
- set up the runtime environment setup script by running this command:
source ./setup_runtime_environment- please note that this needs to be done from
WORK_DIR
- run the example application using the following command:
build/appfwk/apps/daq_application -c QueryResponseCommandFacility -j build/listrev/test/list_reversal_app.json
- once the program is running, and you see the "Enter a command" prompt, you can type in commands like the following:
-
configure- This command pretends to set the values of configurable parameters like the number of integers in each randomly generated list
-
start- This command is passed to the three DAQModules in a well-specified order (specified in the JSON process configuration file). First, the validator is started, then the reverser, then the generator. Once the generator is started, it begins creating lists of integers and passing them to the other two DAQModules.
- On the console, you will see ERS LOG messages from each of the DAQModules saying that they started (so you can confirm that the start order is correct), and then you will see ERS DEBUG messages that tell you what each of the DAQModules is doing as they process the lists of integers.
-
stop- This command stops the three DAQModules, in the reverse order that they were started (like the start order, the stop order is specified in the JSON process config file).
- You will need to type this command into the console a little blindly, since the ERS DEBUG messages will be printing to the console as the program runs.
- After each of the three DAQModules has finished, they print an ERS INFO message to the console with a summary of what they accomplished.
-
unconfigure- This command pretends to tear-down whatever configuration was established in the configure step.
-
quit- This command exits the program.
-
The idea behind the listrev example is to have one DAQModule that generates a list of random integers, another DAQModule that reverses a copy of the list, and a third DAQModule that compares copies of the original and reversed lists to validate that they are equivalent, modulo the reversal.
This is shown in the following diagrams. The first one provides a little description of what each of the DAQModules is doing, and the second one shows the class names of the DAQModules and the configured names of the DAQModules and the Queues, as they are identified in the JSON process configuration file.

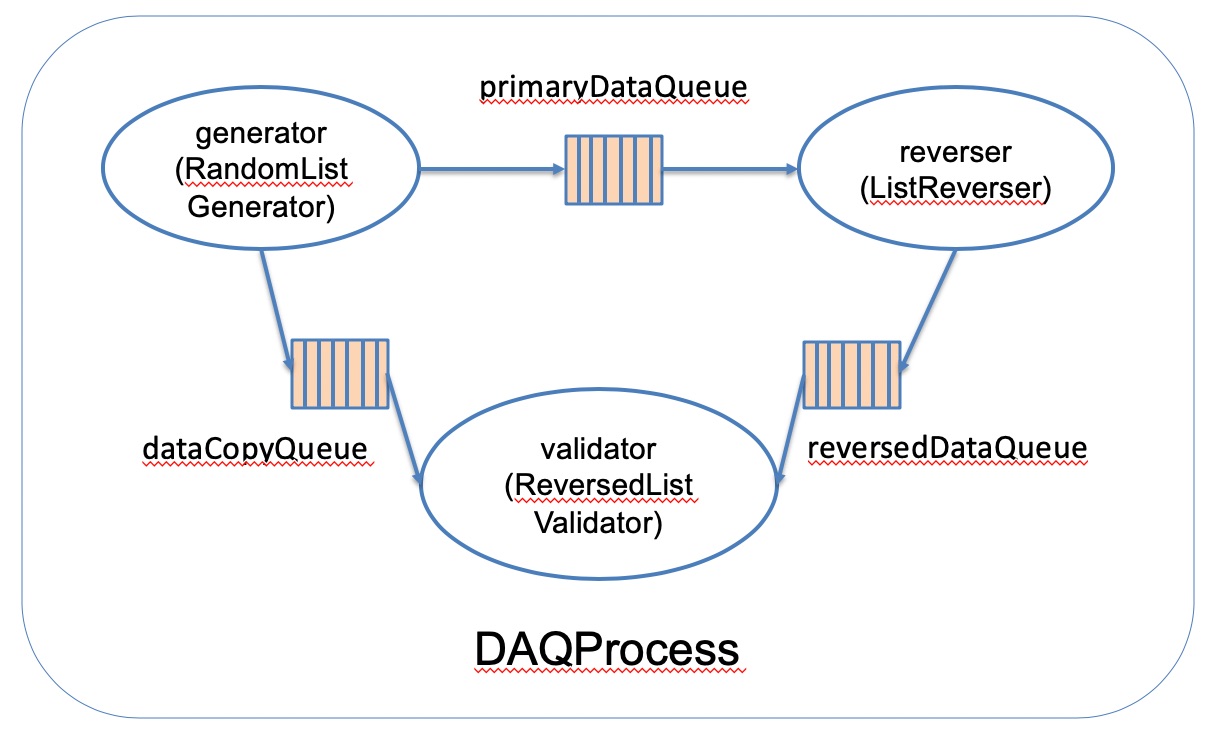
A copy of the listrev JSON process configuration file is shown below (the official copy of this file in the repo is here). As you can see, the Queues are specified first, then the DAQModules, and the DAQModules include the configuration of which Queues they make use of.
- The
capacityandkindparameters within the queue declarations are required. The names of the queues (e.g.primaryDataQueue) are your choice. - The
user_module_typeparameter in the module declarations is required. The names of the parameters that specify the queues to the modules are up to you. As you can see in this example, different parameter names are used to specify the queues to the three different modules. (Of course, what the DAQModule code does with the queue names is standardized. An example of that is shown in this snippet of listrev code.)
{
  "queues": {
    "primaryDataQueue": {
      "capacity": 10,
      "kind": "FollySPSCQueue"
    },
    "reversedDataQueue": {
      "capacity": 10,
      "kind": "FollySPSCQueue"
    },
    "dataCopyQueue": {
      "capacity": 10,
      "kind": "FollySPSCQueue"
    }
  },
  "modules": {
    "generator": {
      "user_module_type": "RandomDataListGenerator",
      "outputs": [ "primaryDataQueue", "dataCopyQueue" ]
    },
    "reverser": {
      "user_module_type": "ListReverser",
      "input": "primaryDataQueue",
      "output": "reversedDataQueue"
    },
    "validator": {
      "user_module_type": "ReversedListValidator",
      "reversed_data_input": "reversedDataQueue",
      "original_data_input": "dataCopyQueue"
    }
  },
  "commands": {
    "start": [ "validator", "reverser", "generator" ],
    "stop": [ "generator", "reverser", "validator" ]
  }
}
As mentioned earlier on this page, when you run the listrev example, you will see ERS messages printed out in the console. ERS is the Error Reporting Service from the ATLAS experiment. Within the DUNE DAQ, we have our own fork of that package, and you will see a clone of the DUNE DAQ ERS repo when you look at the directories underneath WORK_DIR. For further information on ERS, you can see this journal article (PDF).
In addition to ERS messages, there are TRACE messages in the listrev example code. The current model for using ERS and TRACE is described in a section of the Style Guide, and the example code follows those guidelines. For example, the example DAQModules usee ERS Issues for warnings, errors, and fatal errors, and TRACE messages for messages that developers would use for debugging or verifying the behavior of the code. The periodic progress reports are implemented as ERS DEBUG messages, although admittedly, they could just as easily been implemented as TRACE messages. The choice there was simply a practical one - that ERS messages are displayed on the console by default, whereas TRACE messages typically go to a memory area by default so that they use very little system resources. (TRACE messages can trivially be directed to the console, but that would have been just one more step in the instructions above.)
Users who are interested in seeing the TRACE messages from the listrev example code, or their own DAQModules when the time comes, can use the following steps:
- before running the program, set the TRACE_FILE environmental variable to point to a file underneath your
WORK_DIRexport TRACE_FILE=<WORK_DIR>/log/${USER}_dunedaq.trace
- run the program
- look at the TRACE levels that are enabled for each TRACE_NAME (TRACE_NAMEs are used to help identify which source file the messages were sent from)
tlvls
- enable the TRACE levels that you would like to see appear in the TRACE memory buffer with commands like the following:
tonM -n RandomDataListGenerator 10tonM -n RandomDataListGenerator 15
- view the messages in the TRACE memory buffer. I appreciate seeing the timestamps in human-readable form, so I typically pipe the output of
tshowtotdeltaas shown here (both are provided by the TRACE package)tshow | tdelta -ct 1 | more- Note that the messages from the TRACE buffer are displayed in reverse time order (most recent message first)
This short introduction to TRACE only describes a small fraction of its capabilities, and interested users are encouraged to read the Quick Start guide, the User's Guide, and other documentation provided here.
In a fresh shell, here are the steps that you would use to run the Fanout example in the appfwk repo after you have run quick-start.sh and built the software using build_daq_software.sh:
-
cdto yourWORK_DIR - run the following commands to set up the build and runtime environments:
source ./setup_build_environmentsource ./setup_runtime_environment
- run the following command to start the example:
build/appfwk/apps/daq_application -c QueryResponseCommandFacility -j appfwk/test/producer_consumer_dynamic_test.json
- enter commands like the following:
configurestartstopquit