CIS357 Mobile Application Development, Dr. Engelsma
BeFit is a personal development and goal tracking iOS mobile app. Users take photos within the app and when they feel fit, can generate a timelapse of their progression. BeFit uses Apples Capture API to gain access to the camera features.
| MainViewController | CameraViewController |
|
|
We will be using the Xcode IDE so this must be installed prior to getting started. Create a new blank "app" project once installed.
We will also be using Pods to manage dependencys needed within the application. Instructions on how to install pods in your project can be found here...https://guides.cocoapods.org/using/getting-started.html After installing Pods, install Spitfire using the instructions linked here... https://cocoapods.org/pods/Spitfire Spitfire will be used to generate the timelapse.
We will begin by laying out the storyboard for the application. Add a NavigationController to the storyboard and delete the TableViewController that comes attached. Move the "Storyborad Entry Point" to the NavigationController and set the ViewController as the initial route by control-dragging from the NavigationController to the ViewController. For clarity purposes, the ViewController class was renamed to MainViewController.
The app will have one more ViewController to implement the camera. Create a new CocoTouch class named CameraViewController and add a ViewController to the storyboard setting the class to CameraViewController.
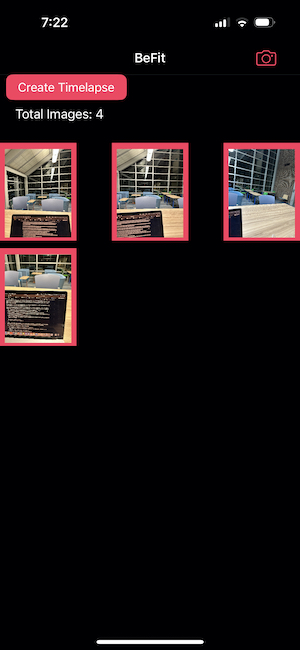
We can now begin populating our Views with UI elements. As seen from Figure 1, the MainViewController consists of a camera button, a timelapse button, a lable of total image count, and a grid of the images taken. Do the following to populate the MainViewController screen.
- Add a button to the Right Button Bar in the Navigator Items. Remove all text and change image to camera.
- Add a new button constrained to top left of Safe Area, this will be our "Create Timelapse" button.
- Add a label of standard distance away from the "Create Timelapse" button, this will display the total images in the grid
- Inorder to display the grid of images, we will use a UICollectionView. Add a UICollectionView constrained to the edges of Safe Area and 4 points from the bottom of the total images label
- Within the UICollectionViewCell add a UIImageView constrained to all sides.
- Create a new CocoTouch class called ImageCell of the type UICollectionViewCell. Control-drag from the UIImageView to the ImageCell class to create a new outlet.
class ImageCell: UICollectionViewCell {
    @IBOutlet weak var imageView:UIImageView!
}
Inorder to transition from the MainViewController scene to the CameraViewController scene, we need to create a segue from the camera button to the CameraViewController. Control-drag from the camera button to the CameraViewController and select "show."
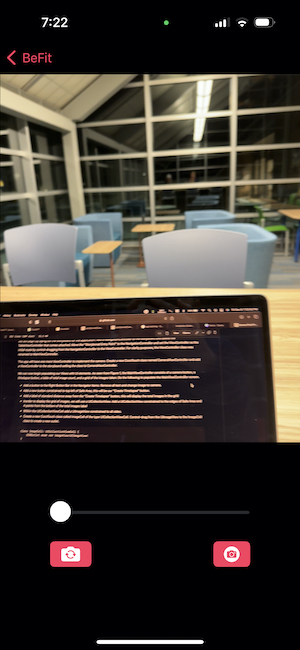
We can now populate the CameraViewController scene with UI elements.
- Add a UIImageView constrained to top and sides of Safe Area and of AspectRation
- Add a VerticalStackView constrained to the bottom and sides of Safe Area and bottom of UIIMageView to contain all the camera buttons
- Add a Slider to the stack view to control zoom, set slider initial value to 0
- And HorizontalStackView within the VerticalStackView to contain two buttons.
- Add both buttons to HorizontalStackView removing text from both and setting one button image to "repeat" and the other buttons image to "camera." These will be used to flip the camera and take a picture.
All UI elements are now in the storyboard and it is time to get started on features.
First import these modules:
- UIKit
- Spitfire
- Photos
After that we create three IBOutlets for the TimelapseButton, ImageCollectionView, and the TotalImagesLabel. Here is the code in action:
@IBOutlet  weak  var  TimelapseButton: UIButton!

@IBOutlet  weak  var  ImageCollectionView: UICollectionView!

@IBOutlet  weak  var  TotalImagesLabel: UILabel!
Control click each of those and drag them to the storyboard to connect them.
After that we need to connect the Reuse identifier and create the array of images that will be used later, put this code at the top of the class:
let  reuseIdentifier = "ImageCell"

var images : [UIImage] = []
After that we also want to set the spitfire delegate as self, for the multi image to video Timelapse with this code:
lazy var spitfire: Spitfire = {
	return Spitfire(delegate: self)
}()
Next lets set up our viewDidLoad function:
super.viewDidLoad()
self.ImageCollectionView.dataSource = self
TimelapseButton.setTitle("Create Timelapse", for: .normal)
The second line sets the collection view to use this class as the data source and the third line sets the Timelapse button to create Timelapse, since the text will change as a Timelapse is being created.
Next we create an action that will be run when the Timelapse button is pressed with this code:
@IBAction  func  CreateTimelapsePressed(_ sender: Any) {
	TimelapseButton.setTitle("Creating...", for: .normal)
	spitfire.makeVideo(with: images, fps: Int32(20))
}
Remember to control drag to link this to the create Timelapse button. The code will set the button title to creating and also call spitfire to make the video with the image array we set up earlier.
Next we will put some helper methods for saving the video that can be found at this link: https://stackoverflow.com/questions/29482738/swift-save-video-from-nsurl-to-user-camera-roll
Here is the code, paste this at the bottom of the MainViewController class :
func saveVideoToAlbum(_ outputURL: URL, _ completion: ((Error?) -> Void)?) {
	requestAuthorization {
		PHPhotoLibrary.shared().performChanges({
			let request = PHAssetCreationRequest.forAsset()
			request.addResource(with: .video, fileURL: outputURL, options: nil)
		}) { (result, error) in
			DispatchQueue.main.async {
				if let error = error {
					print(error.localizedDescription)
				} else {
					let dialogMessage = UIAlertController(title: "Saved Successfully", message: "", preferredStyle: .alert)
					// Create OK button with action handler
					let ok = UIAlertAction(title: "OK", style: .default, handler: { (action) -> Void in
						self.TimelapseButton.setTitle("Create Timelapse", for: .normal)
					})

					dialogMessage.addAction(ok)
					self.present(dialogMessage, animated: true, completion: nil)
				}
				completion?(error)
			}
		}
	}
}

func  requestAuthorization(completion: @escaping ()->Void) {
	if  PHPhotoLibrary.authorizationStatus() == .notDetermined {
		PHPhotoLibrary.requestAuthorization { (status) in
			DispatchQueue.main.async {
				completion()
			}
		}
	} else  if  PHPhotoLibrary.authorizationStatus() == .authorized{
		completion()
	}
}
We also added an UIAlertController to notify the user when the video has been saved successfully, and we include a button to close the window. This is only shown if there are no errors and starts at the line let dialogMessage
Also be sure to add this key value pair into the info.plist file:
Key: Privacy - Photo Library Usage Description
Value: This app needs access to photos to save the timelapse
This is used for letting the user choose the apps access to the photo library.
Now lets create an extension to the MainViewController that inherits from SpitfireDelegate. The line will look like this:
extension  MainViewController : SpitfireDelegate {
}
Now we need to implement three functions as the delegate, the first being videoProgress:
func  videoProgress(progress: Progress) {
	if (progress.isFinished) {
		DispatchQueue.main.async {
			self.TimelapseButton.setTitle("Saving...", for: .normal)
		}
	}
}
This will check to see if the video is being processed, and then set the buttons text to " Saving..."
The next function we need to implement is videoCompleted:
func  videoCompleted(url: URL) {
	self.saveVideoToAlbum(url) { (error) in
		print(error.debugDescription)
	}
}
This code just calls the previous methods we got from stack overflow to save the video with the url spitfire gives us. If there are any errors it will print them to the console.
The last function we need to implement in this extension is videoFailed that will throw a SpitfireError object in case of failure, we just print out the error and set the Timelapse button text to "Try Again?" here is the code:
func  videoFailed(error: SpitfireError) {
	TimelapseButton.setTitle("Try again?", for: .normal)
	print(error)
}
Now we just have two more extensions for the main view controller to implement, the first is UICollectionViewDataSource:
extension  MainViewController : UICollectionViewDataSource {
}
There are three functions that we need to implement in this extension, they will all be used to control the CollectionView.
The first function is numberOfItemsInSection:
func collectionView(_ collectionView: UICollectionView, numberOfItemsInSection section: Int) -> Int {
	return images.count
}
All this does is create the number of cells based on the number of images.
the next is Deqeue cell, this creates a new cell based on the ImageCell and updates the image in the cell to the correct index of the image array:
func  collectionView(_ collectionView: UICollectionView, cellForItemAt indexPath: IndexPath) -> UICollectionViewCell {
	let cell = collectionView.dequeueReusableCell(withReuseIdentifier: reuseIdentifier, for: indexPath) as! ImageCell
	cell.imageView.image = images[indexPath.row]
	return cell
}
All thats left is setting the number of sections to 1, since we will only be adding images to one section we don't need to worry about returning anything else:
func numberOfSections(in collectionView: UICollectionView) -> Int {
	return 1
}
Now here is the last extension needed for main view controller, and it is the CameraViewControllerDelagate:
extension  MainViewController : CameraViewControllerDelegate {
}
In this we use a function that will receive images taken from the camera and add them to the image array, here is the function:
func  imageCaptured(image: UIImage) {
	// Add image to array of images
	images.append(image)

	// Update TotalImages label
	TotalImagesLabel.text = "Total	Images: \(images.count)"

	// Reload collection view to update with new image
	ImageCollectionView.reloadData()
}
Now with all of that built we just need to include a segue for the camera using prepare for segue above the saveVideoToAlbum code in the MainViewController. Here is the segue:
override func prepare(for segue: UIStoryboardSegue, sender: Any?) {
	if segue.identifier == "cameraSegue" {
		if let dest = segue.destination as? CameraViewController {
			dest.cameraDelegate = self
		}
	}
}
Be sure to double check your segue id in the storyboard and make sure it matches up with cameraSegue named here.
Now you have the MainViewController code all complete!
To get started import these modules
import UIKit
import AVFoundation
The sole goal for the CameraViewController is to return an UIImage to the MainViewController. This is accomplished by creating a delegate protocol defined globaly above the CameraViewController.
protocol CameraViewControllerDelegate: AnyObject {
    func imageCaptured(image: UIImage)
}
Next add the following properties to the CameraViewController.
weak var cameraDelegate: CameraViewControllerDelegate?

let session = AVCaptureSession()
var capturePhotoOutput: AVCapturePhotoOutput!
var previewLayer: AVCaptureVideoPreviewLayer?

var captureDevice: AVCaptureDevice?
var frontCamera: AVCaptureDevice?
var backCamera: AVCaptureDevice?
The cameraDelegate is responsible for impleneting the protocol passing the captured UIImage to the MainViewController. The rest of the properties pertain to displaying the camera and taking a photo. An AVCaptureSession is the basis for all media capture in iOS. It manages your app’s exclusive access to the OS capture infrastructure and capture devices, as well as the flow of data from input devices to media outputs. https://developer.apple.com/documentation/avfoundation/capture_setup/setting_up_a_capture_session AVCapturePhotoOutput provides an interface for capturing still photos. https://developer.apple.com/documentation/avfoundation/avcapturephotooutput AVCaptureVideoPreviewLayer is used to display a preview of the content that the camera captures. https://developer.apple.com/documentation/avfoundation/avcapturevideopreviewlayer AVCaptureDevice is the device responsible for capturing input. https://developer.apple.com/documentation/avfoundation/avcapturedevice
Next add the following outlets and connect them to their appropriate elements in the storyboard.
@IBOutlet weak var zoomSlider: UISlider!
@IBOutlet weak var previewImageView: UIImageView!
When the view loads we must setup the Capture session and before we can do so we need to request authorization from the user to access the camera.
override func viewDidLoad() {
    super.viewDidLoad()

    var valid = false

    switch AVCaptureDevice.authorizationStatus(for: .video) {
        case .authorized: // The user has previously granted access to the camera.
            valid = true

        case .notDetermined: // The user has not yet been asked for camera access.
            AVCaptureDevice.requestAccess(for: .video) { granted in
                if granted {
                    valid = true
                }
            }

        case .denied: // The user has previously denied access.
            return

        case .restricted: // The user can't grant access due to restrictions.
            return

    @unknown default:
        return
    }
    // Once authorization valid
    if valid {
            self.setupCaputure()
    }
}

func setupCaputure() {
    self.setupCaptureSession()
    self.setupPreviewLayer()
}
This switch statement checks whether authorization has been granted and either return's meaning user can't access camera or proceeds to setupCapture(). To setup capture we first must setup a capture session and then we will setup a preview layer. For easy of reading we have seperated these into two methods.
func setupCaptureSession() {
    session.sessionPreset = .photo

    setupDevice()

    guard let captureDevice = self.captureDevice else {
        return
    }

    guard let captureDeviceInput = try? AVCaptureDeviceInput(device: captureDevice) else {
        return
    }

    self.capturePhotoOutput = AVCapturePhotoOutput()

    session.addInput(captureDeviceInput)

    if session.canAddOutput(capturePhotoOutput) {
        session.addOutput(capturePhotoOutput)
    }
}
The setupCaptureSession method sets the session preset to photo and then calls setupDevice() to set the AVCapture Devices. The guard statement makes sure the captureDevice is setup properly and then gets the captureDeviceInput using AVCaptureDeviceInput with the captureDevice as the device parameter. Add this captureDeviceInput to the session. Check if the session can add output and if it can add the capturePhotoOutput to the session. The capture session is now configured and is ready to start. Inorder to setup the devices used add the following code:
func setupDevice() {
        let deviceDiscoverySession = AVCaptureDevice.DiscoverySession(deviceTypes: [AVCaptureDevice.DeviceType.builtInWideAngleCamera], mediaType: AVMediaType.video, position: AVCaptureDevice.Position.unspecified)

        let devices = deviceDiscoverySession.devices

        for device in devices {
            if device.position == AVCaptureDevice.Position.back {
                backCamera = device
            } else if device.position == AVCaptureDevice.Position.front {
                frontCamera = device
            }
        }

        captureDevice = frontCamera

    }
This code starts a device discovery session to discover all devices with mediaType AVMediaType.video. These devices are then sorted by location to either front or back camera. The current capture device is then set to default as front camera.
We can now implement the preview layer
func setupPreviewLayer() {
    self.previewLayer = AVCaptureVideoPreviewLayer(session: session)

    let bounds:CGRect = previewImageView.layer.frame
    previewLayer!.videoGravity = AVLayerVideoGravity.resizeAspectFill
    previewLayer!.bounds = bounds
    previewLayer!.position = CGPointMake(CGRectGetMidX(bounds), CGRectGetMidY(bounds))

    self.previewLayer!.frame = previewImageView.bounds

    previewImageView.layer.insertSublayer(previewLayer!, at: 0)

    DispatchQueue.global(qos: .background).async {
        self.session.startRunning()
    }

}
setupPreviewLayer starts by setting the previewLayer to AVCaptureVideoPreviewLayer with the session we configured earlier. We then get the bounds that image can display and style the preview layer and fit within the bounds. We then add this layer into previewImageView. Now that everything is plumbed together we can start a background thread to start the session. This is necessary because the Capture session runs asyncrounsly so the UI would freeze if trying to run from the main thread.
override func viewDidDisappear(_ animated: Bool) {
    session.stopRunning()
}
Now on viewDidDisappear we can stop running the session to save memory. As of now the app should display the camera preview. Next we need to connect the buttons to zoom, take a picture, and flip the camera.
@IBAction func flipCamera(_ sender: Any) {
    // Get current input
    guard let input = session.inputs.first else { return }

    // Remove current input
    session.removeInput(input)

    // Get new input
    let newCamera = (captureDevice == backCamera) ? frontCamera : backCamera

    do {
        let newInput = try AVCaptureDeviceInput(device: newCamera!)
        session.addInput(newInput)
        captureDevice = newCamera
    } catch {
        print(error)
    }
}
First connect the action to the flip camera button. The guard gets the current input of the session then removes that input from the session. A new input is created using the opposite device of the current captureDevice. New input is then created from this device and added to the session and the captureDevice is updated to reflect the change.
@IBAction func zoomAction(_ sender: Any) {
    guard let captureDevice = self.captureDevice else {
        print("Failed to get the capture device")
        return
    }

    do {
        try captureDevice.lockForConfiguration()

        let zoomFactor: CGFloat = CGFloat(truncating: zoomSlider.value as NSNumber)

        captureDevice.ramp(toVideoZoomFactor: zoomFactor, withRate: 5.0)
        captureDevice.unlockForConfiguration()
} catch {
                print("Failed to zoom in: \(error.localizedDescription)")
            }
}
Next connect the zoom action to the slider using preset "onValueChanged." The zoom function gets the current captureDevice and locks it for configuration. Then the zoom factor is calculated from the slider value. The capture device then calls ramp to meet the zoom factor provided. Finally the captureDevice is unlocked.
@IBAction func takePicture(_ sender: Any) {
    guard let capturePhotoOutput = capturePhotoOutput else {
        print("Failed to get the capture photo output")
        return
    }

    let photoSettings = AVCapturePhotoSettings()
    // Call AVCapturePhotoOutput api to take picture
    capturePhotoOutput.capturePhoto(with: photoSettings, delegate: self)

}
Inorder to take a picture, connect the action to the button and get the capturePhotoOutput. Instatiate a new AVCapturePhotoSettings with no changes. Now call AVCapturePhotoOutput to capture photo. The AVCapturePhotoOutput implements the AVCapturePhotoCaptureDelegate to get the UIImage.
extension CameraViewController : AVCapturePhotoCaptureDelegate {

    func photoOutput(_ output: AVCapturePhotoOutput, didFinishProcessingPhoto photo: AVCapturePhoto, error: Error?) {
        guard error == nil else {
            print("Failed to capture photo: \(error!.localizedDescription)")
            return
        }

        guard let imageData = photo.fileDataRepresentation() else {
            print("Failed to get the image data")
            return
        }

        guard let image = UIImage(data: imageData) else {
            print("Failed to create the image")
            return
        }

        // Do something with the image here...
        if let del = cameraDelegate {
            print("Camera Image Cap")
            del.imageCaptured(image: image)
        }
        _ = self.navigationController?.popViewController(animated: true)

    }
}
Create an extension on the MainViewController that implements the AVCapturePhotoCaptureDelegate. This checks for errors in capture and makes sure the image data is retrievable. Once the UIImage is gathered it is passed into the imageCaptured function of the CameraViewControllerDelegate to pass image to MainViewController. Finally the navigationController pops the view to the MainViewController completing the CamerViewController!
Here are our resource links: https://stackoverflow.com/questions/29482738/swift-save-video-from-nsurl-to-user-camera-roll https://cocoapods.org/pods/Spitfire https://developer.apple.com/documentation/avfoundation/capture_setup/avcam_building_a_camera_app https://developer.apple.com/tutorials/sample-apps/imagegallery?language=_11