Create a simple game
Before diving into the APIs provided by Ockero, let's create a very simple "game" to introduce the first concepts of creating game using Ockero.
In this page we'll look at:
- Creating the Game scene
- Drawing Sprites
- Drawing Text
- Handel User input
- Camera
- Playing sound effects
- Game Level
- Physics using JBox2D
Refer to the page Getting Started.
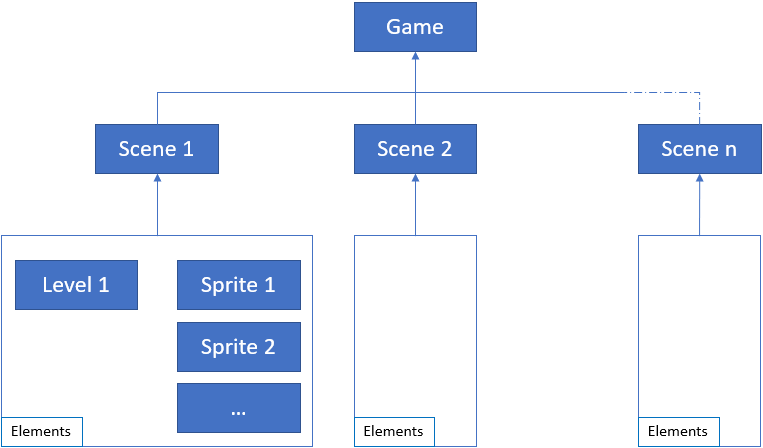
The Ockero game graph consist of 4 main objects: the Game, the Scene, the Level and the Sprites Objects.
The Game object it is the entry point for your app and it holds the complete elements for a Ockero game. It will be created using the Ockero DSL syntax.
Let's create a Game window with 800*600 as dimension and "Ockero" as Window name.
fun main() {
  game(800, 600, "Ockero") {
      whenInit {} // Global initialization block, applicable on the complete game session.
      whenUpdate {} // Global update block
      render {} // Global render block
      whenDestroy {} // In this block you can free used resources at the game block level.
  }.start() // Start the Ockero session
}
In the "whenInit" block will the game initialization take place. The "whenUpdate" block you can put the game code that needs to be updated periodically. In the "render" block you can add game elements that needs to be rendered, like Text or Sprites. while the game sessions is disposed the "whenDestroy" block will be called internally, in this block you can destroy the objects loaded during the Ockero session.
The Scene object can be created inside or outside the game block and it will be added to the game using the "+" operator. The game block can contain 0 or n scenes. Like the Game block the Scene block will contains also following DSL blocks:
- "whenInit"
- "whenUpdate"
- "render"
- "whenDestroy"
val scene1 = scene("Level 1") {
    whenInit {
    }

    whenUpdate {
    }

    render {
    }
}

fun main() {
  game(800, 600, "Ockero") {
      +scene1 // The scene object is added to the game using the + operator
      whenInit {
         setActiveScene("Level 1") // set the active scene in case we have multiple scene object created
      }
      whenUpdate {}
      render {}
      whenDestroy {}
  }
}We need a few images and sound to make our game look nice and pretty. To make the assets available to the game, we have to place them in the folder resources/textures for images and resources/sounds for sound effects (more on that later).
To draw Sprite on the scene, first we need to crate a Sprite object that hold the Texture information and the position where to draw it. The assest used in this tutorial are present under Ockero-Samples
Lets create a sprite using the following image:

In Ockero we can create a static Sprite or an animated Sprite using a Sprite sheet. In this example we will crate an animated Sprite.
The Sprite sheet in this example contains 8*8 images, the first animation have the start index 1 and the end index 2. (image 1 form the top left to the image 2 from the top left) In this example we will be content with only tow animations frames.
val enemy= animatedsprite(8,8){ // The Sprite sheet contains 8*8 images
    texturePath="/textures/enemy.png" // Resource path
    xPos=800f // X position of the Sprite
    yPos=690f // Y position of the Sprite
    delay=5 // Animation speed

    // Add a new Frame
    frame {
        name="orange" // Name of the Frame
        start=1 // Start index, first sub image from the top left
        end=2  // End index, second image from the top left
        loop=true // loop the animation
    }
    // Add a new Frame
    frame {
        name="orange_die"
        start=3 // Third image from the top left
        end=3 // Third image from the top left
        loop=false
    }
    // Set the default animation to start with
    activeAnimationName="orange"

}
The new created animation Sprite can be added to the scene using the "+" operator:
val scene1 = scene("Level 1") {
   +enemy // Add the new Sprite to the scene using the + operator
   ...
}We need first to set the Font to use in the Game session. Ockero will generate the font from the java.awt library. The font object is a global object and it should be initialized in the game block.
The code should looks like this:
game(800, 600, "Ockero") {
        ...
        whenInit {
            font.init(Font("Comic Sans MS", Font.PLAIN, 16), true) // Initialize the font object from the java.awt.Font.
            ...
        }
        render {
            g.drawText("This is a text", 10f, 10f) // In the render block we will draw the text string using the drawText method from the g object.
}All of the input facilities are accessed via blow DSL blocks. The User input blocks can be added to the game or the scene blocks.
game(800,600, "Ockero"){
    whenMouseButtonPressed {  }
    whenMouseMoved {  }
    whenKeyDown {  }
    whenKeyReleased {  }
    whenKeyPressed {  }
}
Or
scene("Level 1"){
    whenMouseButtonPressed {  }
    whenMouseMoved {  }
    whenKeyDown {  }
    whenKeyReleased {  }
    whenKeyPressed {  }
}
Example:
whenKeyPressed {
        when(key.id){
            Keys.KEY_UP -> mario.moveY(-5f)
            Keys.KEY_DOWN -> mario.moveY(5f)
            Keys.KEY_LEFT -> mario.moveX(-5f)
            Keys.KEY_RIGHT -> mario.moveX(5f)
        }
}In Ockero is the Camera a global object. It will be automatically created during the start up of an Ockero session. To change the camera position you just need to call the setPosition and the update function in the whenUpdate block:
whenUpdate {
        camera.setPosition(100,0f)
        camera.update()
}game(WIDTH, HEIGHT, "Ockero") {
whenInit {
AudioPlayer.init() // Init the AudioPlayer object
AudioPlayer.setListenerData(0f, 0f, 0f) // Set the audio listener position
var marioSound = Source().apply { // Create the source object
init(AudioPlayer.loadSound("/audio/bg.wav")) // load the audio file
setLooping(true) // set sound looping to true
}
marioSound.play() // play the sound source
}
whenUpdate {
}
whenDestroy {
AudioPlayer.cleanUp() // Clean up all sound buffers
}
}.start()Ockero is supporting Level files created within the map editor Tiled. The supported Tiled file configuration is:
- File extension: JSON
- Orientation: Orthogonal
- Stagger Axis: Y
- Stagger index: Odd
- Tile Layer Format: CSV
- Embedded Tile set: True
- Tile Render Order: Left Down
- Compression level: -1
A level Obejct is added to the scene block using the following syntax:
val scene1 = scene("Level 1") {
    level { // Add a level object to the scene block
        path="/levels/mario_level.json" // Set the path to the level json file
    }
}
The mario_level.json file can be found here:Ockero-Samples. The level file will be automatically analyzed and display within the scene object. A level object is added only ones to a scene block and it can't be added directly into the game block.
The level object is then accessible within a scene block through the variable level:
val scene1 = scene("Level 1") {
    level { // Add a level object to the scene block
        path="/levels/mario_level.json" // Set the path to the level json file
    }
    whenInit {
        var objectLayer = level?.tileMap?.layers?.get(1) as ObjectLayer // Access the second Tiled map layer from the level file mario_level.json
    }

}TODO
The complete example code can be found here.