
This medical application leverages advanced machine learning models to predict results across a wide range of medical tests with high accuracy. By analyzing patient data, the app delivers real-time predictions, offering healthcare providers valuable insights to aid in diagnosis and treatment decisions. The integration of predictive analytics enhances the efficiency of medical testing, allowing for early detection of conditions and personalized healthcare recommendations. The app's user-friendly interface ensures seamless interaction for both medical professionals and patients, making it a versatile tool for improving clinical outcomes and optimizing healthcare workflows.
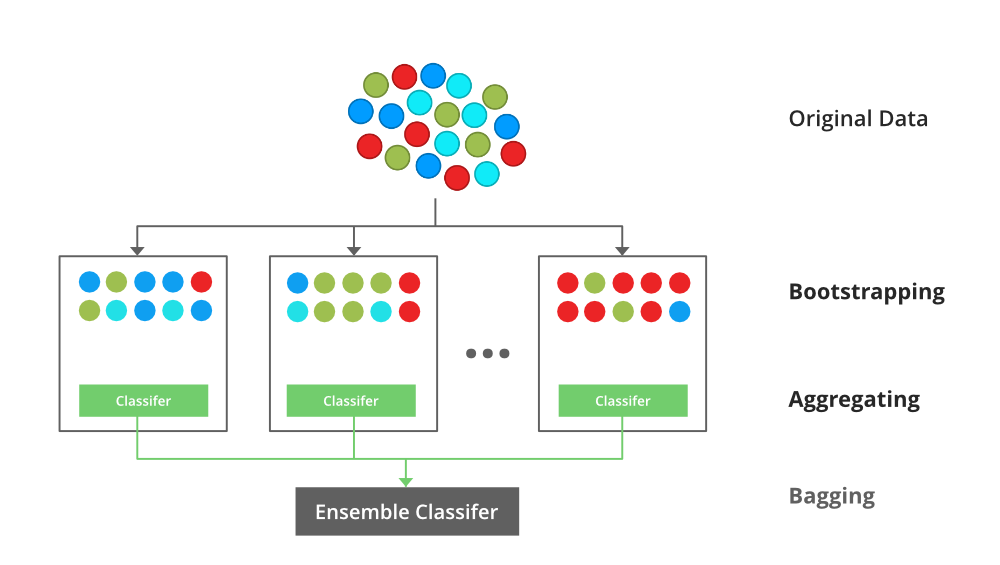
XGBoost, or Extreme Gradient Boosting, is a machine learning algorithm designed for speed and performance. It builds many decision trees in sequence, where each new tree tries to correct the mistakes made by the previous ones. This process improves accuracy and helps in making better predictions. XGBoost is popular because it's fast, handles missing data well, and works great with large datasets. It's used in a variety of tasks like classification, regression, and ranking. Its efficiency and accuracy have made it a go-to choice for many data scientists and machine learning competitions.
This medical application leverages machine learning to accurately predict a wide range of medical test outcomes, offering an efficient diagnostic support tool for healthcare professionals. By analyzing patient data and medical histories, the app applies advanced machine learning models to provide reliable predictions for various medical tests, improving diagnostic speed and accuracy. The model has been trained on extensive datasets, ensuring high prediction accuracy. This tool aims to assist doctors in decision-making, reduce diagnostic errors, and enhance patient care by providing quick, data-driven insights in real-time clinical settings.

Reference
- https://www.researchgate.net/publication/313110938_A_smartphone_based_application_to_improve_the_health_care_system_of_Bangladesh
- https://bmcmedinformdecismak.biomedcentral.com/articles/10.1186/1472-6947-12-67
So, before execution we have some pre-requisites that we need to download or install i.e., anaconda environment, python and a code editor. Anaconda: Anaconda is like a package of libraries and offers a great deal of information which allows a data engineer to create multiple environments and install required libraries easy and neat.
Download link:

Python: Python is a most popular interpreter programming language, which is used in almost every field. Its syntax is very similar to English language and even children and learning it nowadays, due to its readability and easy syntax and large community of users to help you whenever you face any issues.
Download link:

https://www.python.org/downloads/
Code editor: Code editor is like a notepad for a programming language which allows user to write, run and execute program which we have written. Along with these some code editors also allows us to debug, which usually allows users to execute the code line by line and allows them to see where and how to solve the errors. But I personally feel visual code is very good to work with any programming language and makes a great deal of attachment with user.
Download links:

Let us define an environment and why we need different environments. An environment is a collection of libraries that are required to run our project. When we already have an environment with the necessary libraries, why do we need a new environment? To avoid version mismatches, we create a new environment for each project. For example, in your previous project, you used "tf env" with tensorflow 2.4 and keras 2.4, but in your current project, you must use tensorflow 2.6 and keras 2.6. If you continue your project in the "tf env" environment, there will be a version mismatch and you will need to update tensorflow and keras, but this will cause problems with the previous project's execution. To avoid this, we create a new environment with tensorflow 2.6 and keras 2.6 and resume our project.
- Type “conda create –n <<name_of_your_env>>” example: conda create -n env
- It will ask to proceed with the environment location, type ‘y’ and press enter.
- When you press ‘y’, the environment will be created. To activate your environment type conda activate <<your_env_name>> . E.g., conda activate myenv.
- You can see that the environment got changed after conda activate myenv line. It changed from “base” to “myenv” which means you are now working in “myenv” environment.
- To install a library in your virtual environment type pip install <library_name>. e.g., pip install pandas
- Instead of installing libraries one by one you can even install by bunch, i.e., we have a txt file called requirements.tx which consists of all the libraries required to proceed with the project, so we can use it.
- so, before installing requirements.txt, make sure you are in the specific path where your requirements.txt is located, basically this file is located in the folder where our executable files are located, so we need to move to that directory by following command. cd C:\folder_name
- Here A -> drive, folder name -> path where your executable file is saved
- I go to that file path in anaconda using cd command
- Go to drive where your project file is.
- Go to the path of your project using cd
- Type pip install –r requirements.txt
- And all your required libraries will be downloaded and you can start your project.
- But if you want to use jupyter notebook on the new environment you have to set it up for the new environment.
- After you have installed all the libraries and created an environment, you need an editor to run the code, that is starting jupyter notebook, as soon as you enter jupyter notebook in the terminal you will definitely get this error. “Jupiter” is not recognized as an internal or external command. So, to solve it it we have 2 commands.
- conda install –c conda-forge jupyterlab
- conda install –c anaconda python Now you are ready to use jupyter on this environment and start with your project!

Note: Make sure you have added path while installing the software’s.
- Install the prerequisites/software’s required to execute the code.
- Press windows key and type in anaconda prompt a terminal opens up.
- Before executing the code, we need to create a specific environment which allows us to install the required libraries necessary for our project. • Type conda create -name “env_name”, e.g.: conda create -name project_1 • Type conda activate “env_name, e.g.: conda activate project_1
- Make sure you are in the correct path in your terminal, where you have saved your executable file/folder. E.g.: cd A:\project\AI\Completed\project_name, then press enter.
- Install necessary libraries from requirements.txt file provided.
- Run pip install -r requirements.txt or conda install requirements.txt (Requirements.txt is a text file consisting of all the necessary libraries required for executing this python file. If it gives any error while installing libraries, you might need to install them individually.)
- Type app.py in your anaconda terminal to get the results.
Dataset Download Link:
Dataset is already been provided in notebooks folder just open the respective files to download.

- We might face an issue while installing specific libraries.
- Make sure you have the latest version of python or 3.8, since sometimes it might cause version mismatch.
- Adding path to environment variables in order to run python files and anaconda environment in code editor, specifically in visual studio code.
All the required data hasn't been provided over here. Please feel free to contact me for any issues.