
![]()
- Overview
- Installation
- Usage
- Doxygen Configuration
- Examples
- SW Documentation
- Used Libraries
- Issues, Ideas And Bugs
- License
- Contribution
lobster-doxygen is a python commandline tool to extract requirement annotations from doxygen comments using doxygen's XML output format. It produces the LOBSTER common interchange format as output. A major advantage of lobster-doxygen is that the XML input files can come from every doxygen supported programming language, including C, C++, Python, Java, Objective-C, PHP, Fortran, and more. This allows a straightforward and standardized integration into the LOBSTER TRLC toolchain. Note, at the moment C and C++ are in focus!
Using doxygen aliases inside source code comments makes tracing from code quite simple. The following aliases are supported:
-
@implements{<REQ-ID>}to link to requirments for tracing. -
@justification{<JUSTIFY-PLEASE>}to justify why no tracing is required, but the code fragment is needed.
Note
lobster-doxygen is not a standalone solution, but a component extending the BMW LOBSTER tooling. Understanding of the LOBSTER tool purpose and usage is required to benefit from lobster-doxygen.
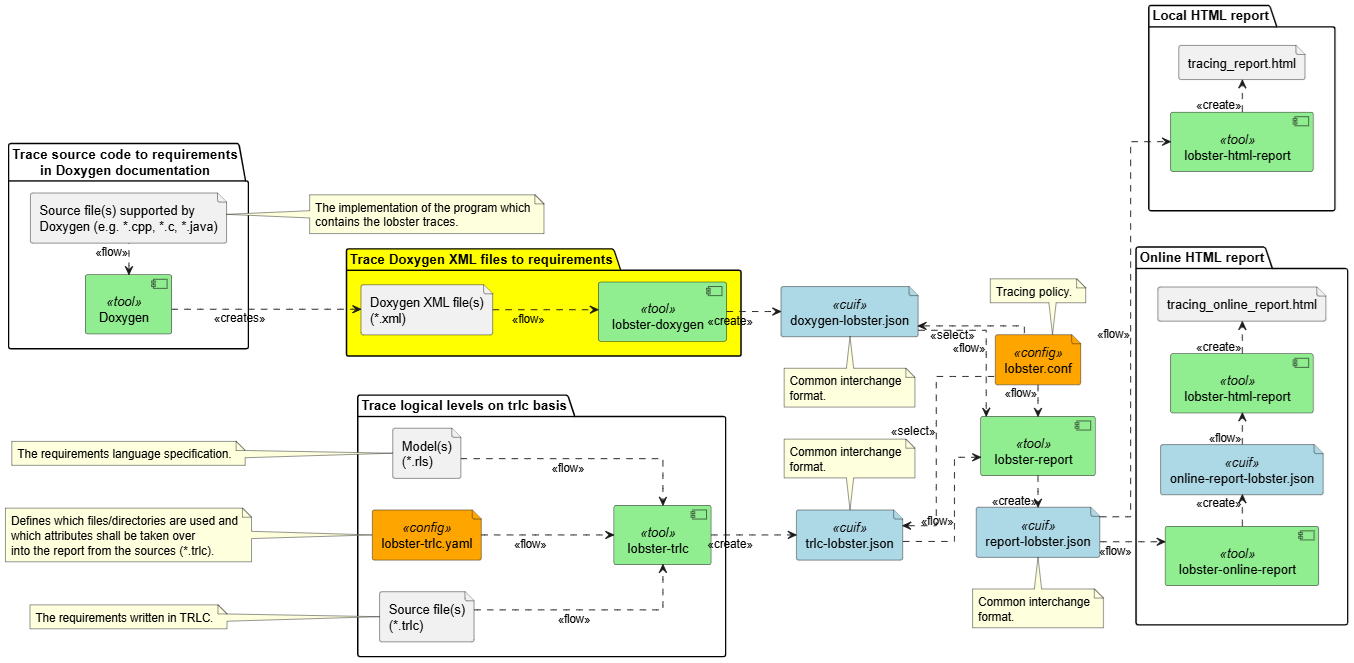
The following diagram shows how lobster-doxygen fits into the LOBSTER toolchain. It provides a data flow path from source code to the LOBSTER common interchange format.
For information about using the lobster-doxygen tool in a safety-related project, see the safety manual.
git clone https://github.com/NewTec-GmbH/lobster-doxygen.gitto clone repository.cd lobster-doxygento go to root directory.- It is recommended to use a virtual environment:
- In VS-Code:
Ctrl+Shift+Ptype Python: Create Environment: selectVenv.- When asked, select the Python version you want to work with, based on the versions installed in your machine.
- When asked, select
devto be installed. This will set-up the development environment, including all the tools used in this template. - In the background, VS Code will install all the dependencies. This may take some time.
- To activate the virtual environment, close all terminal panels inside of VS-Code.
You can double check if the virtual environment is active, e.g. by
pip -Vthe displayed path should point to your virtual environment.
- In PowerShell:
python -m venv .venvto create the virtual environment..venv\Scripts\Activate.ps1to activate it.pip install -e .to install required packages.pip install -e .[dev]to install additional packages for development.
- Under Linux / MacOS:
python -m venv .venvto create the virtual environment.source .venv/bin/activateto activate it.pip install -e .to install required packages.pip install -e .[dev]to install additional packages for development. For more details about handling Venv, see Python venv: How To Create, Activate, Deactivate, And Delete
- In VS-Code:
lobster-doxygen is a command line application that is configured via command line arguments.
usage: lobster-doxygen [-h] [--version] [-o OUTPUT] [-v] doxygen_xml_folder

Convert doxygen XML output to lobster common interchange format.

- The source code header requires a doxygen header with at least the @file tag.
  - Rational: The doxygen XML output will consider the aliases on file level only if the file has the @file tag.
- Tracing supports the following levels:
  - Class/Struct/Union/Namespace
  - Method
  - Function
- Tracing on file level is possible, but not recommended and therefore the tool will abort with an error.

To specify a requirement use @implements{REQ}.
To specify a justification use @justification{JUSTIFICATION}.

positional arguments:
  doxygen_xml_folder        Path to the doxygen XML output folder.

options:
  -h, --help            show this help message and exit
  --version             show program's version number and exit
  -o OUTPUT, --output OUTPUT
                        Output file name. Default: lobster.json
-v, --verbose Enable verbose output.The following example shows how requirement annotations in source code will look like, using doxygen annotation.
/**
 * @brief This is my class.
 *
 * @implements{SwRequirement.myClass}
 */
class MyClass;

/**
 * @brief This is my function.
 *
 * @implements{SwRequirement.myFunc}
 */
extern myFunc();

/**
 * @brief This is my class to show a justification.
 *
 * @justification{This is my justification ...}
 */
class JustifyMeClass;
Please be aware of how to document in general using doxygen, see the attention hint in the doxygen documentation. Otherwise traces may be missed or undocumented code will be hidden.
In order to feed lobster-doxygen with the correct data, Doxygen needs to be configured.
The following ALIASES definitions inside the Doxyfile are needed to support the requirement annotations:
ALIASES                = "implements{1}=@xrefitem implements \"Implements\" \"Requirement Traceability\" Requirement: \1" \
                         "justification{1}=@xrefitem justified \"Justified\" \"Justification Overview\" Justification: \1"
Change the extract settings as follows to instruct Doxygen to use all entities in documentation:
EXTRACT_ALL = YESEXTRACT_PRIVATE = YESEXTRACT_PRIV_VIRTUAL = YESEXTRACT_PACKAGE = YESEXTRACT_STATIC = YESEXTRACT_LOCAL_CLASSES = YESEXTRACT_LOCAL_METHODS = YESEXTRACT_ANON_NSPACES = YESFinally enable the XML output generation:
GENERATE_XML = YESOnce doxygen has run successfully, the xml directory can be used as the doxygen_xml_folder when calling lobster-doxygen.
An example Doxyfile can be found in the examples directory.
Check out the Examples subpage for using the included example(s).
More information on the deployment and architecture can be found in the documentation subpage.
For Detailed Software Design run $ /doc/detailed-design/make html to generate the detailed design documentation that then can be found
in the folder /doc/detailed-design/_build/html/index.html
Used 3rd party libraries which are not part of the standard Python package:
| Library | Description | License |
|---|---|---|
| toml | Parsing TOML | MIT |
| trlc | Treat Requirements Like Code | GPL-3.0 |
| doxmlparser | Parsing Doxygen XML | GPLv2 |
| rich | Console output | MIT |
If you have further ideas or you found some bugs, great! Create an issue or if you are able and willing to fix it by yourself, clone the repository and create a pull request.
The whole source code is published under GNU General Public License Version 3. Consider the different licenses of the used third party libraries too!
Unless you explicitly state otherwise, any contribution intentionally submitted for inclusion in the work by you, shall be licensed as above, without any additional terms or conditions.