
SauerWebUI is a mod for Sauerbraten that brings web technologies to the Cube Engine, allowing users to create interfaces entirely in HTML, CSS, and JavaScript, and to use any library available for those environments.
And of course, you can execute CubeScript from JavaScript and vice versa!
Also, for now, there are some miscellaneous experiments that you will see below.
There is currently a pre-compiled binary available for Windows x64 only (tested with Windows 10 22H2):
Download SauerWebUI (27-07-2025) ZIP
Download SauerWebUI (27-07-2025) installer
The installation is meant to go alongside the vanilla client, that's why essential folders like packages are not included.
When running the installer, select the folder where your Sauerbraten is (make sure you are not accidentally creating a directory inside it).
If you are using the ZIP, just extract it to your Sauerbraten installation folder, no files will be overwritten.
If you want to build, there is a Visual Studio 2022 project file in src/vs/.
If you can help with a setup to build on Linux, it would be appreciated.
It won't work if you install it side by side with a P1xbraten installation (reasons I still don't know), so I recommend installing it alongside the vanilla installation.
- WUI
- Miscellaneous Commands
-
guiimagestring <base64 string> [command] <size> <overlay 0/1> -
Monster Commands
monstername <text>monstermodel <modelpath>monstervwep <modelpath>monsterweapon <value>monsterspeed <value>monsterhealth <value>monsterfreq <value>monsterlag <ms>monsterrate <ms>monsterpain <ms>monsterloyalty <value>monsterbscale <value>monsterweight <value>monsterpainsound <value>monsterdiesound <value>monsterpuppet <1/0>level_monsterai = [command]
-
Cutscene Commands
cutscene elementsplaycutsceneat <file> <start> <end>cutsceneplaybackstart <file> <start> <end>cutscenerecordstart <file>cutscenerecordover <file>cutscenerecordcontinuecutscenerecordpausecutscenerecordendcutscenerecordload <file>cutscenerecordrestartcutscenerecordsettime <minute:second>cutscenerecordsetframe <frame>cutscenecamdebug <1/0>cutscenecamdebugsize <0.25/4.0>cutscenecamdebugpath <1/0>cutscenecamdebugpathstep <1/100>cutscenecamlerpfromcutscenecamlerpto <ms>cutscenecamclear <direction>cutsceneactorclear <id>cutscenecurrentframecutsceneframeslencutscenecurrentfilecutscenestate <state> <time>
-
-
This command can be executed within a CubeScript environment, allowing you to run JavaScript code in its own function scope (so variables won’t interfere with others unless you assign them to global objects).
Example:
 newgui test [
 	guibutton "say hello" [
 		javascript [
 			console.log("hello from JS! 2 + 2 =", 2+2);
 		]
 	]
 ]
 showgui test
To share functions between different scopes, simply define them on the global
window.object (once it's available, i.e., afterdata/wui/wui.cfgis loaded).Example:
 javascript [
 	function say_hello(name) {
 		console.log(`hello, ${name}! from another scope`);
 	}

 	window.say_hello = say_hello; // Share function globally
 ]

 newgui test [
 	guibutton "say hello" [
 		javascript [
 			say_hello(@(escape (getname))); // Now accessible
 		]
 	]
 ]
 showgui test
As you can see, you can use some escape tricks to pass data from CubeScript into JavaScript functions before they are executed.
-
There is an (incomplete) library available at
data/wui/wui_lib.jsthat contains some JavaScript functions for creating interfaces and communicating with CubeScript. Everything is still experimental and rough, but it can serve as a starting point if you want to help :)-
window.cubescript(code, callback);Executes CubeScript from the JavaScript environment. Example:let cubescript = ` echo "^f8Hello from ^f2CubeScript!" result (concat "five times two =" (* 5 2)) `; window.cubescript(cubescript, (result => { console.log(`CubeScript result is: \f0${result}`); }))
-
window.wui.createMenu(id, element, x, y, title, options);Creates a menu positioned at x y with an optional title.
elementis a document element containing the menu body, example:function _create_menu() { const body = document.createElement('div'); body.innerHTML = "<h2>hello</h2>"; window.wui.createMenu('mainmenu', body, '50%', '50%', 'Title', { allowExit: true }); window.wui.showMenu('mainmenu'); }
50%means the menu will be displayed at the center of the screen if a mouse event is not specified.Possible
optionsinclude:- allowDrag
- allowExit
- allowFullscreen
-
window.wui.showMenu(id, event); -
window.wui.hideMenu(id, keep_cursor); -
window.wui.clearMenu(id, keep_cursor);Displays, hides, or deletes a specific menu by its id. If an event is obtained through something like a button click, it can be passed so that the menu is positioned at the mouse location. If keep_cursor is set to 1, the cursor will be kept visible when the menu disappears.
-
window.wui.createButton(text, onClick);Creates a button with the specified text. When clicked, it triggers the
onClickcallback. -
window.wui.createTextInput(placeholder, onChange);Creates a single-line text input field with a placeholder. Triggers the
onChangecallback when the text changes. -
window.wui.createTextArea(placeholder, onChange);Creates a multi-line text area with a placeholder. Triggers the
onChangecallback when the text changes. -
window.wui.clearAll();Removes all menus currently created by WUI.
-
window.gameassetsJust a quick and provisional class to hold local paths relative to the installation folder and other useful things.
window.gameassets.path_packageswindow.gameassets.path_mapswindow.gameassets.allmapnames
-
-
Basically the same as the
javascriptcommand, but allows you to execute any JavaScript file from a folder (and CubeScript files as originally supported).
If you have a better idea for an interface, or improvements for the current one, feel free to suggest them. While much of the current functionality revolves around the default WUI, the goal is to allow multiple interfaces to coexist, so players can choose which one to use at any given time.
There are some experimental files in the data/wui folder, some of which don’t lead to anything yet. Play around with them and see if you can get anything useful :)
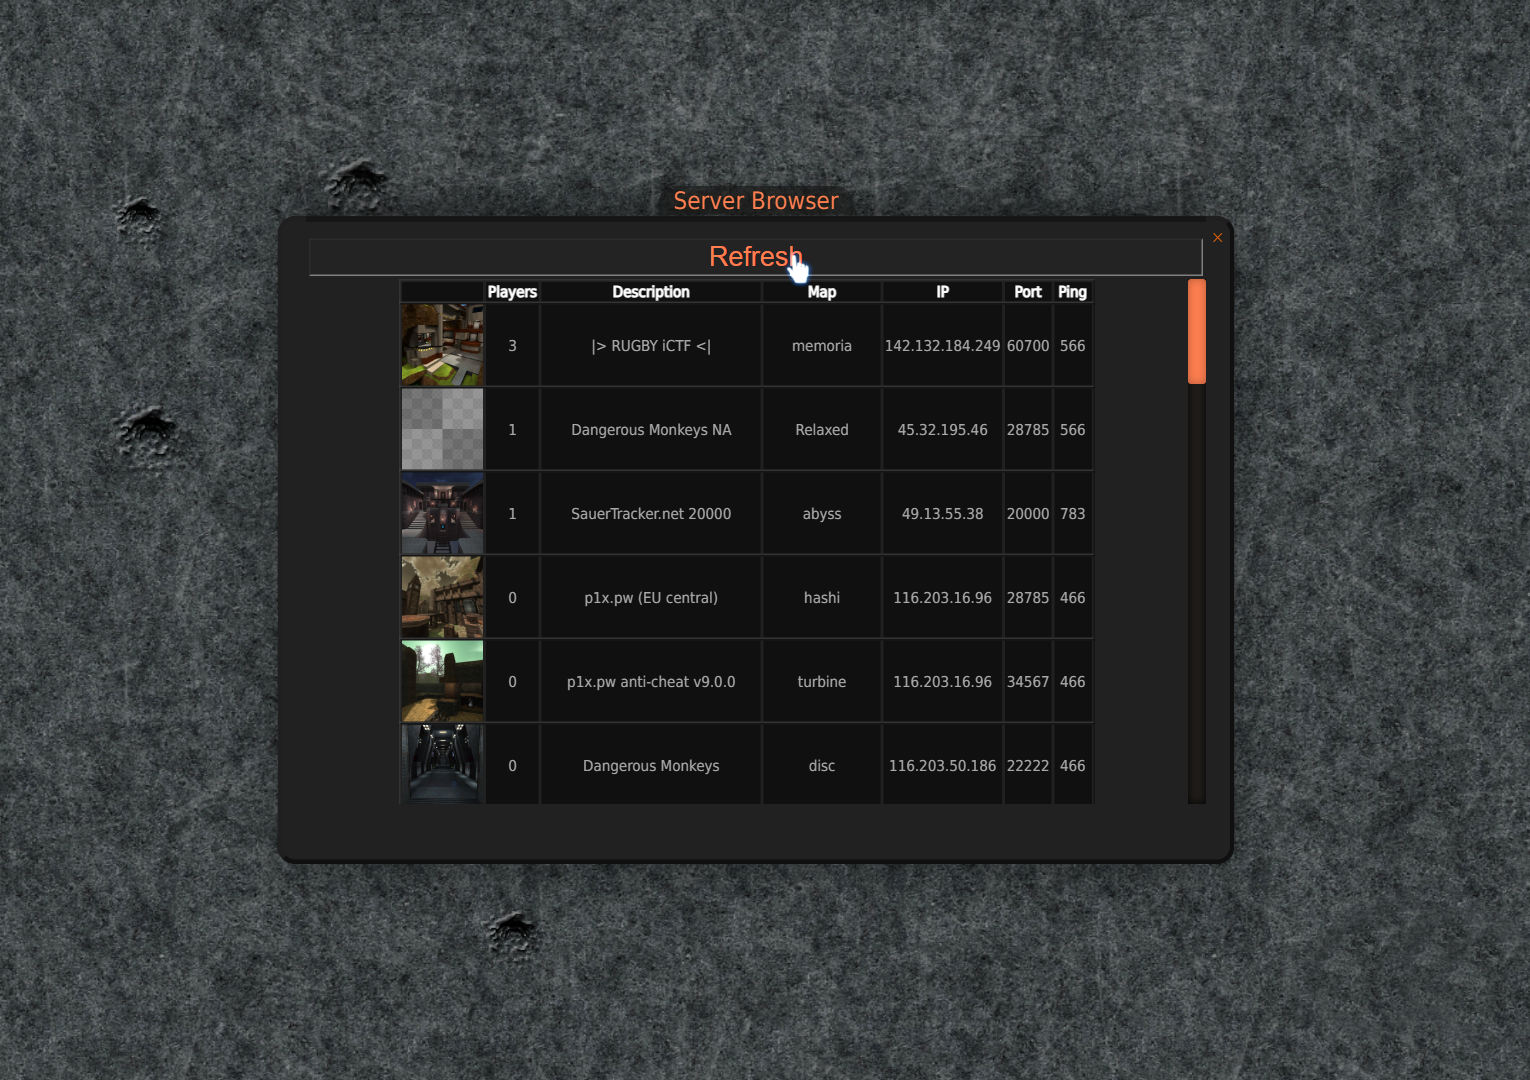 an experimental server browser packed with workarounds
-
Works similarly to
guiimage, but instead of specifying a file path for the image, you can provide a string containing an image encoded in base64. -
Just like
guiimagestring, but allows loading an image from a url. -
It is now possible to set the size of a guitext using the third parameter of the command, or the fourth parameter in the case of guibutton (1 is the default size).
-
Text supports a new color marker in addition to the traditional
^f0-^f8. Simply insert^<rgb:255/0/255>before any text to specify a custom color using the RGB format. -
Allows adding a new selection to the existing ones, enabling manipulation of multiple geometry or texture regions at once, including non-contiguous areas. (requires
multiselmode 1) -
Enables experimental multi-selection mode (
addselection). -
Iterate through all existing variables that match 'prefix' and store them in 'var' when executing the command, similar to
looplist. -
Remove all variables that match 'prefix', preventing them from being saved in the config.cfg file.
-
Map variable to create an automatic menu with download buttons for external assets. It is sent via sendmap and can go in your map.cfg by following the json format:
 mapassets [
 	{
 		"assetname": "My_Custom_Asset",
 		"assetsrc": "https://github.com/CubeScript/Sauer-Vslot-Text-Sender/releases/download/v0.1/vsts.zip",
 		"assetthumb": "https://avatars.githubusercontent.com/u/9287152?s=40&v=4",
 		"assetversion": 1
 	},
 	{
 		"assetname": "Skin-Colorizer",
 		"assetsrc": "https://github.com/CubeScript/Sauer-Skin-Colorizer/releases/download/v0.4-lite/skincolorizer.zip",
 		"assetthumb": "https://github.com/SalatielSauer/misc/raw/master/skincolorizerlite_demo3.gif?raw=true",
 		"assetversion": 1
 	}
 ]
As soon as the map loads (
mapstart), the player will be prompted with a menu allowing them to download each asset, which will be added to thehome/assets/<asset name>folder. Assets must have a unique name. You can suggest asset updates by bumping theassetversion.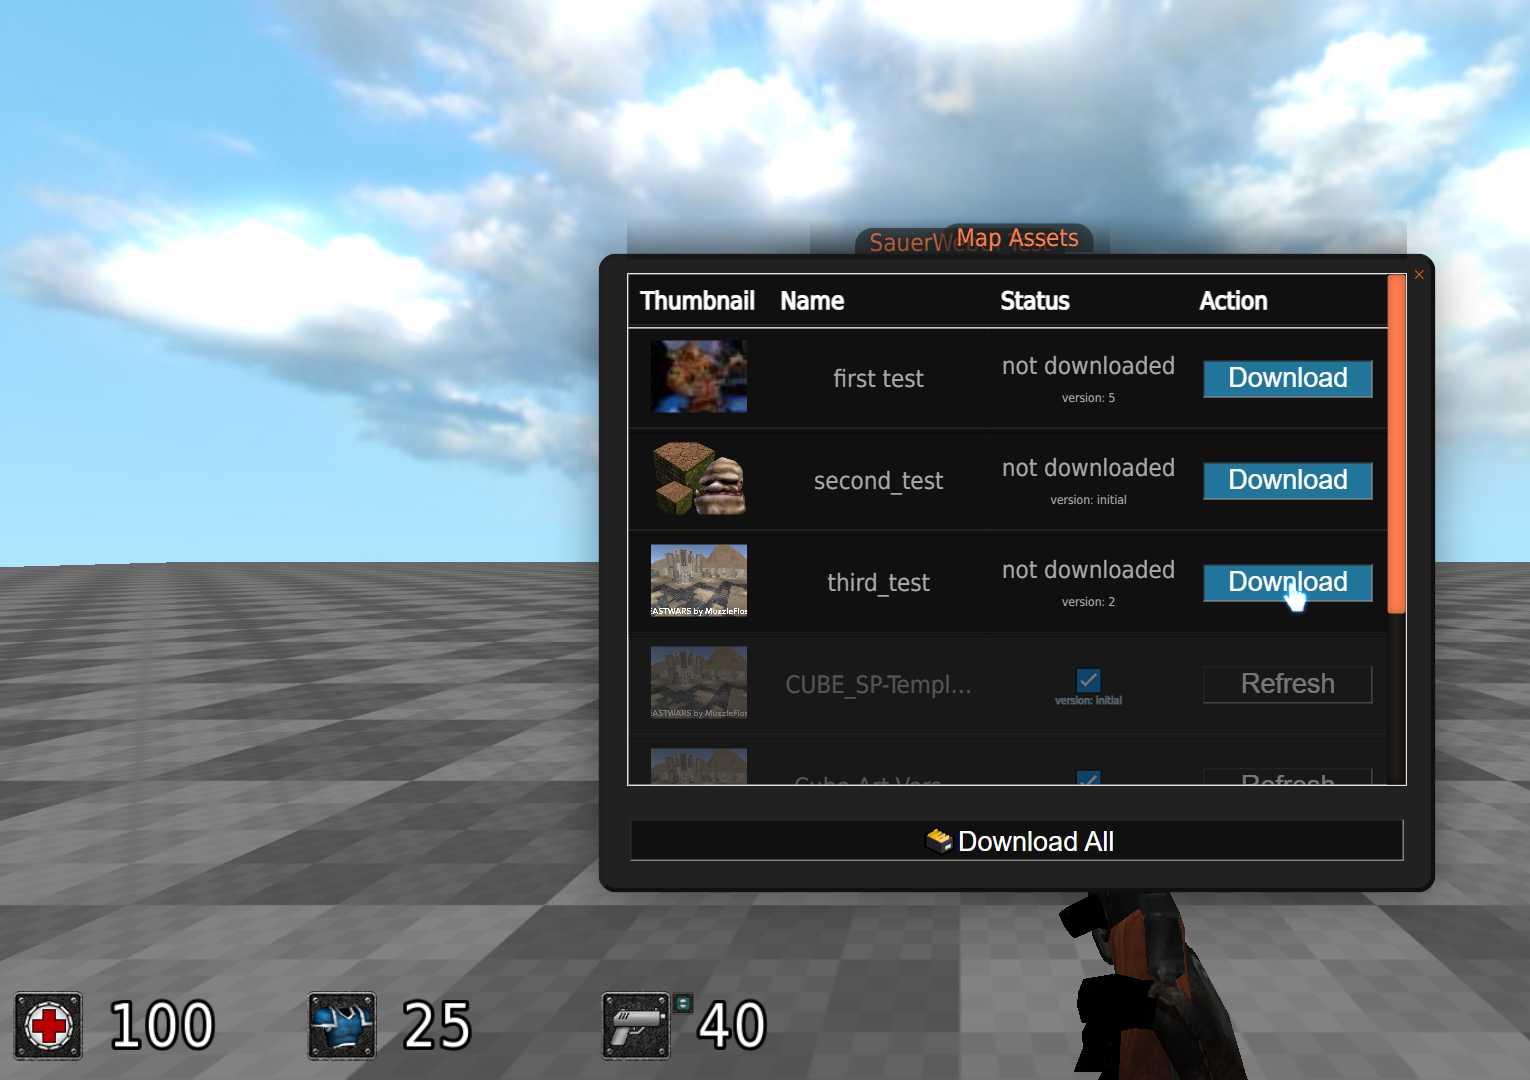
-
Allows sharing map cfgs with other players via sendmap; the commands will be executed automatically during getmap.
If the current
mapcfgmap variable is empty and you have a local map.cfg file, the contents of your local map.cfg will automatically be added to themapcfgmap variable during sendmap.Only a limited list of commands is available, and you can see them below.
-
Similar to
do, but executes CubeScript with a limited list of allowed commands. Some of the available commands are:"texture", "safemmodel", "addzip", "removezip", "shader", "setshader", "defuniformparam", "findfile", "texturereset", "mapmodelreset", "maptitle", "echo", "sub*", "str*", "at" "indexof", "if", "concat*","format", "get*", "ent*", "timeremaining", "mdl*", "md2*", "md3*", "md5*", "obj*", "smd*", "iqm*" -
Create custom map variables that are stored along with the map file.
-
Retrieve the value of a map variable (such as those created with
setmapvar). -
Defines a CubeScript that must return a string to be displayed on particle number 14 (
/newent particles 14 2), example:setmapvar particletex_2 [ format "hello %1" (getname) ]The second attribute of the particle (after its name) defines the mapvar ID.
The third attribute defines the size of the text.
The fourth attribute defines the color.
The fifth atrribute defines the orientation (0 = camera, 1 = left, 2 = right, 3 = back, 4 = front, 5 = bottom, 6 = top).

-
Imports an .obj model file as cubes in a voxelized style and places it in the current selection, the larger the size, the more detailed the geometry will be.

-
Replaces the current map's lightmap with an external image (the image must be "indexed colors" type; see below for how to convert it using GIMP). It will look for lightmaps with the same names generated by
/dumplms. -
Similar to
writeobj, but exports a map as an .obj file containing lightmap coordinates. You can then use Blender to import the obj file with UV coordinates. -
Exports all mapmodels of the current map as a single .obj including their textures in a .mtl file.
-
Exports all materials of the current map as a single .obj, each with a different color.
-
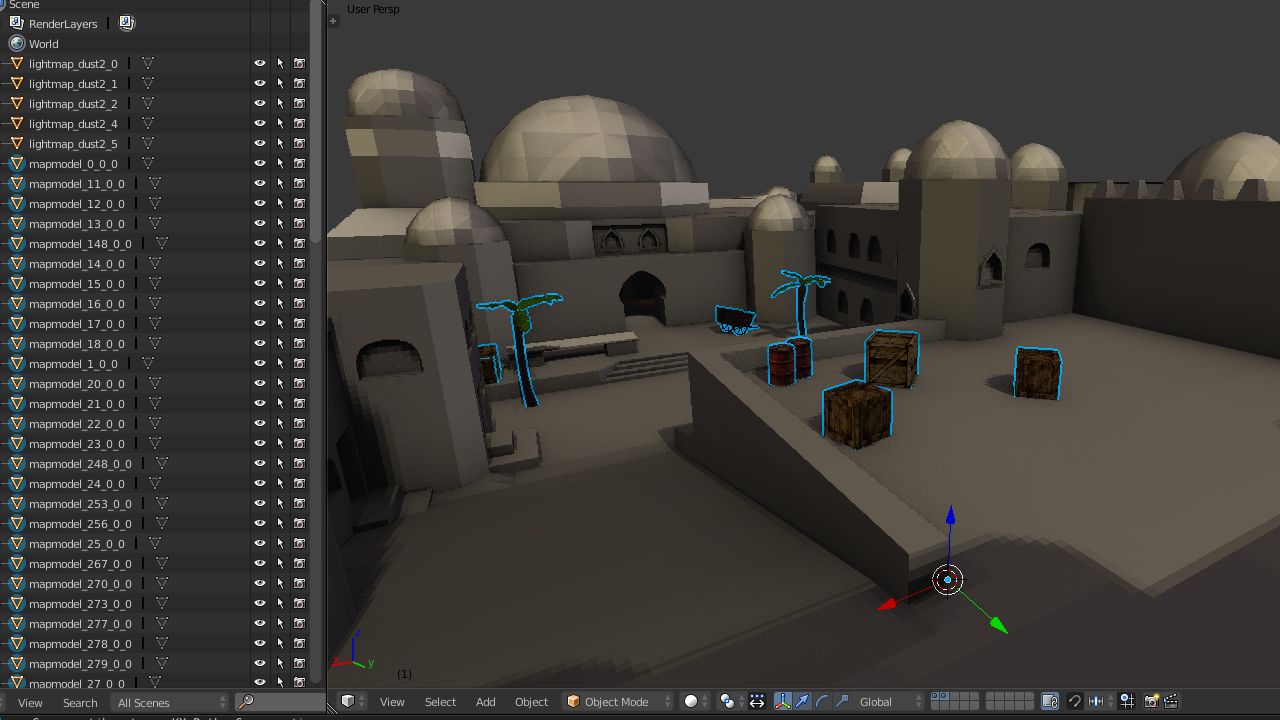
Similar to
writeobjuvmap, but converts the map to a custom format preserving the skybox, mapvars, textures, and lightmaps. It can then be imported into Blender using the OBPY Importer addon. -
Similar to
dumpmmodels, but exports all mapmodels of the current map as a single .obpy.
how to process lightmaps using GIMP

-
Load a monster definition from a cfg file. The cfg should use the
monstercommands below to describe the monster. -
Clear previously loaded monster definitions (and any spawned monsters).
Show monster* commands
-
Sets the display name for the monster.
-
Model used when rendering the monster.
-
Optional weapon model attached for third person view.
-
Weapon used when attacking. Provide the integer value of the weapon enum. Values are:
0GUN_FIST,1GUN_SG,2GUN_CG,3GUN_RL,4GUN_RIFLE,5GUN_GL,6GUN_PISTOL,7GUN_FIREBALL,8GUN_ICEBALL,9GUN_SLIMEBALL,10GUN_BITE,11GUN_BARREL. -
Spawn frequency used by DMSP.
-
Delay between starting to attack and firing.
-
Delay between decision updates when pursuing a target.
-
Time the monster remains in the pain state after being hit.
-
Higher values make it less likely to retaliate against allied monsters.
-
Bounding box scale (affects the monster's size).
-
Weight used in physics calculations.
-
Integer sound id played when the monster is hurt.
Example values:
32S_PAINO,33S_PAINR,35S_PAINE,37S_PAINS ... -
Integer sound id played upon death.
Example values:
23S_DIE1,34S_DEATHR,36S_DEATHE,38S_DEATHS,40S_DEATHB. -
Enables experimental
level_monsterai: -
Experimental command to get SP data and run monster actions.
 level_monsterai = [
 	local id etype edist evis egun ehealth earmour estate eyawpitch myawpitch mpos mgun mhealth mstate mmillis mmove manger mblocked

 	id        = $arg1     // monster tag
 	etype     = $arg2     // enemy type
 	edist     = $arg3     // enemy distance
 	evis      = $arg4     // enemy visible
 	egun      = $arg5     // enemy gun
 	ehealth   = $arg6     // enemy health
 	earmour   = $arg7     // enemy armour
 	estate    = $arg8     // enemy state
 	eyawpitch = $arg9     // enemy yaw pitch
 	myawpitch = $arg10    // monster yaw pitch
 	mpos      = $arg11    // monster position
 	mgun      = $arg12    // monster weapon
 	mhealth   = $arg13    // monster health
 	mstate    = $arg14    // monster state
 	mmillis   = $arg15    // lastmillis
 	mmove     = $arg16    // monster movement
 	manger    = $arg17    // monster anger
 	mblocked  = $arg18    // monster blocked

 	// result 0 				// default AI
 	// result [1 "x y z"] 		// attack position (or enemy by default)
 	// result [2 move strafe] 	// apply monster movement
 	// result [3 jumping] 		// monster jump
 	// result [4 yaw pitch] 	// monster yaw / pitch
 	// result [5 sound]			// play sound ID

 	// push the monster when it is closer
 	result (? (< $edist 20) (? $evis [2 -1 -1] [2 1 1]) [2 0 0])
 ]
-
Display a copy of the minimap icons centered on the screen, that way you don’t need to look at the corner. The appearance can be adjusted with
radaroverlaysizeandradaroverlayopacity. -
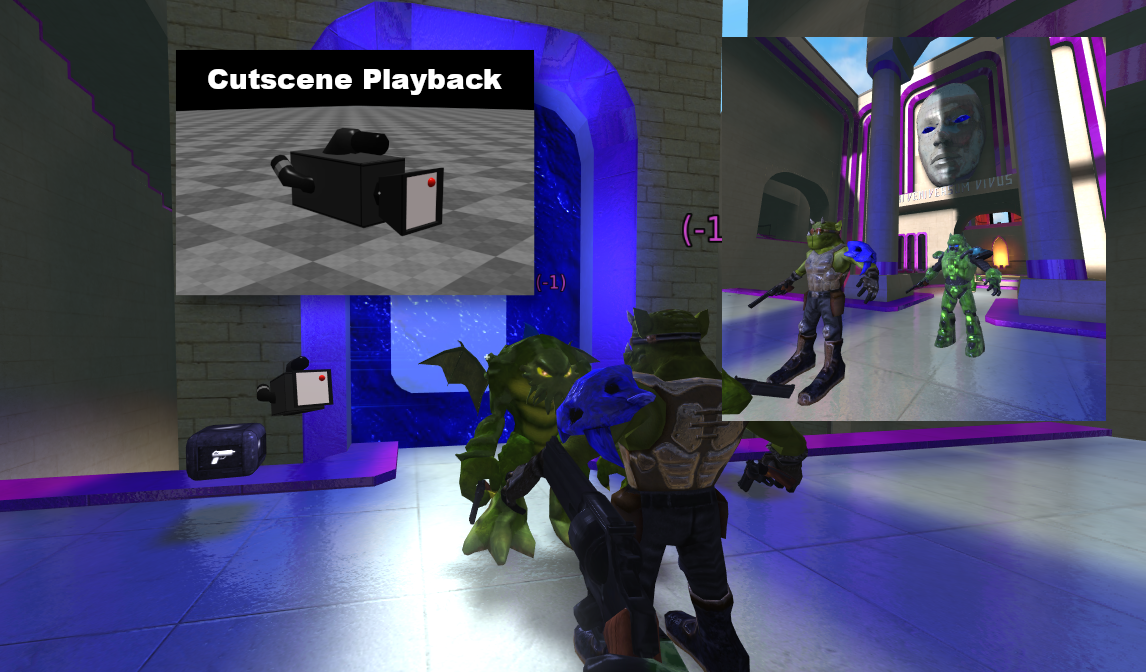
SauerWUI has an experimental recording system that resembles demos, but with more freedom of control over the camera and actors.
Cutscenes are saved and read from .ctscn files (which are just plain text). These .ctscn files support some additional elements that, at the moment, can only be added by editing them manually:
-
These functionalities only work when read from a
.ctscnfile using commands likecutsceneplaybackstartorplaycutsceneat.-
Loads a mapmodel from the
pathfolder (starting from packages/models) when reaching theframeand removes it afterduration(milliseconds).
The[callback]command is executed, passing inarg1the frames since the element was displayed.
It's possible to modify characteristics of the element by returning its parameters from the callback:[result "x y z yaw pitch scale animation collide]example:
 mapmodel 1 "snoutx10k" [
 	result "512 512 512 0 0 320 idle 0"
 ] 2500
this way you can modify these characteristics in real time during the cutscene:
 mapmodel 1 "snoutx10k" [
 	format "512 512 %1 %1 0 5 idle 0" (+ 512 (divf $arg1 25))
 ] 2500
-
Allows adding a postfx shader that will be added at
frameand kept for the duration ofduration.
Shaders can be created using the commandshader 0 "name" [<vertex>] [<fragment>].
See some examples: Sauer Concept Shaders and Sauer Vslot Text Sender. -
Displays a text starting at
framein positionxandyforduration, with scalescale.
Texts must be returned from the callback:subtitle 1 [ format "Hello %1!" $getname ] 500 500 3000 1
-
When reaching
frame, ifconditionis true, loops fromstarttoendthe audio file located atpath. Leaveendas 0 if you don't want to cut the audio.audio 0 "packages/sounds/fanatic/forest.wav" 0 0 10000 []
-
Displays an image from
pathpositioned atxandyfordurationwith sizescale.image 1 "packages/mitaman/mm-auggiedog.jpg" 50 40 4000 10
-
Similar to
do, executes the contents ofcommandas soon asframeis reached.runcommand 1 [echo "hello"]
-
-
-
Plays a cutscene from
<start>to<end>(inminute:secondformat) and restores control afterward. -
Like
playcutsceneatbut leaves the camera free so you can move while actors play back. -
Starts recording a cutscene to
<file>. If you are in spectator mode, camera motion is also recorded. -
Loads
<file>and records new frames alongside the existing cutscene. Use it to record multiple actors. -
Continues a recording from the current frame (deletes all subsequent frames).
-
Toggles pause for the current cutscene. You can still move the camera or actors when paused.
-
Finishes the current recording and closes the file.
-
Loads another cutscene and appends its frames to the current session.
-
Restarts playback or recording from the beginning.
-
Seeks to the given position in the cutscene.
-
Seeks to the given frame in the cutscene.
-
Displays the current camera feed in the upper right corner.
-
Sets the size of the camera feed preview.
-
Displays the path of the recorded camera in the current cutscene.
-
Sets the distance between the visualization segments of the camera path.
-
Sets the starting point of the camera interpolation animation (see
cutscenecamlerptobelow). -
Sets the end point of the camera interpolation and the time to reach it (see
cutscenecamlerpfromabove). -
Clears the camera frames in the forward (1), backward (-1), or all (0) directions.
-
Removes all frames from the actor with the given
id(the id is displayed above the actor). -
Returns the current cutscene frame and the time in min:sec format.
-
Returns the total size of the current cutscene in frames.
-
Returns current cutscene file name.
-
-
-
There is currently a global shader parameter that returns the current state of the cutscene and its frames. Check out a use case in
packages/models/camera/obj.cfgcutscenestate.x == 0: not playing; cutscenestate.x == 1: recording; cutscenestate.x == 2: paused; cutscenestate.x == 3: playing; cutscenestate.y : frames since cutscene start.
-
-
If you use VSCode, there is an extension available that handles syntax highlighting for JavaScript embedded in CubeScript (inside javascript [ ] blocks): CS+JS syntax highlighting for VSCode.
SauerWebUI is a mod of Cube 2 Sauerbraten and uses CEF (Chromium Embedded Framework).
Chromium Embedded Framework
Copyright (c) 2008-2020 Marshall A. Greenblatt. Portions Copyright (c)
2006-2009 Google Inc. All rights reserved.
-------------------------------------------
Cube 2 Sauerbraten
Copyright (c) 2001-2020 Wouter van Oortmerssen, Lee Salzman, Mike Dysart, Robert Pointon, and Quinton Reeves.