- whoami : Provide the username of system
- other general use commands are : ls , cd , pwd , cd .. .
- ls : list directories.
- cd : change directory
Everything in linux is file even the command are the files even the command are the compiled files
bin contain binary files
- cat : concatenate, can use to view the contents inside the file
- cp : copy --syntax : cp nameOfFile newName
- rm : remove
- sbin contain top secret command
- sudo addUser newUser --> this will add new user
- To view root folder you need special permissions ,only super user have access to access this file
Linux file system has a hierarchal file structure as it contains a root directory and its subdirectories. All other directories can be accessed from the root directory. A partition usually has only one file system, but it may have more than one file system.
-
/ (root filesystem): It is the top-level filesystem directory. It must include every file needed to boot the Linux system before another filesystem is mounted. Every other filesystem is mounted on a well-defined and standard mount point because of the root filesystem directories after the system is started.
-
/boot: It includes the static kernel and bootLoader configuration and executable files needed to start a Linux computer.
-
/bin: This directory includes user executable files.
-
/dev: It includes the device file for all hardware devices connected to the system. These aren't device drivers; instead, they are files that indicate all devices on the system and provide access to these devices.
-
/etc: It includes the local system configuration files for the host system.
-
/lib: It includes shared library files that are needed to start the system.
-
/home: The home directory storage is available for user files. All users have a subdirectory inside /home.
-
/mnt: It is a temporary mount point for basic fileSystems that can be used at the time when the administrator is working or repairing a filesystem.
-
/media: A place for mounting external removable media devices like USB thumb drives that might be linked to the host.
-
/opt: It contains optional files like vendor supplied application programs that must be placed here.
-
/root: It's the home directory for a root user. Keep in mind that it's not the '/' (root) file system.
-
/tmp: It is a temporary directory used by the OS and several programs for storing temporary files. Also, users may temporarily store files here. Remember that files may be removed without prior notice at any time in this directory.
-
/sbin: These are system binary files. They are executables utilized for system administration.
-
/usr: They are read-only and shareable files, including executable libraries and binaries, man files, and several documentation types.
-
/var: Here, variable data files are saved. It can contain things such as MySQL, log files, other database files, email inboxes, web server data files, and much more.
Shell is interpreter program which can be used to execute commands of OS
kernel is middleware between hardware and software
sudo cat /etc/shadow print username : x : 1001 : 1001 UID : groupId here x stand for shadow file
- adduser username will add the user into the system
- cat /etc/passwd print user on the system
- usermod will modify the user account
- sudo usermod username --shell /bin/bash
- su - username will switch to username
- sudo visudo will edit the sudoers file
- sudo userdel username will delete the user
- sudo groupadd groupName
- cat /etc/group to view group
- sudo usermod -aG groupName username
- sudo gpasswd -d username remove user from the group
- sudo groupdel groupName
daemons are responsible for working of your linux services and they are hidden in background , processes is instance of running programs
- ps -aux | grep sublime : will list all processes running for the sublime text editor
- daemons are the processes that we don't start
- any process will have 'd' at the end of process will be daemon
- systemd is master daemon, its working includes services management, initialization of system and it is also responsible for starting other daemon processes
- pstree will print the process tree
- systemd call other daemon as units
- sudo systemctl stop nameOfDaemon
- sudo systemctl status nameOfDaemon
- sudo systemctl disable nameOfDaemon
- sudo systemctl enable nameOfDaemon
- sudo systemctl list-units
- sudo systemctl list-unit-files | grep filename : will display the daemon which is not active by default
- sudo journalctl -xe : will do the system logs for demons
- ps -u username | grep processName
- grep stands for global regular expression print
- kill processId : kill the process
- pgrep processName : return process Id
- top : runtime processes
- htop : same as top but more detailed
- ctrl + z will sleep foreground processes you can see all sleeping processes by command 'jobs'
- bg jobId will run the sleeping process in background
- fg jobId will run the sleeping process in foreground process
- kill command sends the signal there are bunch of signals use kill -l
- kill -id processID
- pkill -9 processName ex: pkill -9 ping
Offensive security is the process of breaking into computer systems, exploiting software bugs, and finding loopholes in applications to gain unauthorized access to them.In a defensive cyber role, you could be investigating infected computers or devices to understand how it was hacked, tracking down cybercriminals, or monitoring infrastructure for malicious activity.
- We will use a command-line application called "GoBuster" to brute-force FakeBank's website to find hidden directories and pages. GoBuster will take a list of potential page or directory names and tries accessing a website with each of them; if the page exists, it tells you.
- gobuster -u http://fakebank.com -w wordlist.txt dir
- In the command above, -u is used to state the website we're scanning, -w takes a list of words to iterate through to find hidden pages.
The name "Linux" is actually an umbrella term for multiple OS's that are based on UNIX (another operating system). Thanks to UNIX being open-source, variants of Linux comes in all shapes and sizes - suited best for what the system is being used for.
For example, Ubuntu & Debian are some of the more commonplace distributions of Linux because it is so extensible. I.e. you can run Ubuntu as a server (such as websites & web applications) or as a fully-fledged desktop. For this series, we're going to be using Ubuntu.
If we remember the filename, we can simply use find -name passwords.txt where the command will look through every folder in our current directory for that specific file like so:
We can use grep to search the entire contents of this file for any entries of the value that we are searching for. Going with the example of a web server's access log, we want to see everything that the IP address "81.143.211.90" has visited (note that this is fictional)
Linux operators are a fantastic way to power up your knowledge of working with Linux. There are a few important operators that are worth noting. We'll cover the basics and break them down accordingly to bite-sized chunks.
At an overview, I'm going to be showcasing the following operators:
| Symbol / Operator | Description |
| & | This operator allows you to run commands in the background of your terminal. |
| && | This operator allows you to combine multiple commands together in one line of your terminal. |
| > | This operator is a redirector - meaning that we can take the output from a command (such as using cat to output a file) and direct it elsewhere. |
| >> | This operator does the same function of the |
Let's cover these in a bit more detail.
This operator allows us to execute commands in the background. For example, let's say we want to copy a large file. This will obviously take quite a long time and will leave us unable to do anything else until the file successfully copies.
The "&" shell operator allows us to execute a command and have it run in the background (such as this file copy) allowing us to do other things!
This shell operator is a bit misleading in the sense of how familiar is to its partner "&". Unlike the "&" operator, we can use "&&" to make a list of commands to run for example command1 && command2. However, it's worth noting that command2 will only run if command1 was successful.
This operator is what's known as an output redirector. What this essentially means is that we take the output from a command we run and send that output to somewhere else.
A great example of this is redirecting the output of the echo command that we learned in Task 4. Of course, running something such as echo howdy will return "howdy" back to our terminal — that isn't super useful. What we can do instead, is redirect "howdy" to something such as a new file!
Let's say we wanted to create a file named "welcome" with the message "hey". We can run echo hey > welcome where we want the file created with the contents "hey" like so:
<
This operator is also an output redirector like in the previous operator (>) we discussed. However, what makes this operator different is that rather than overwriting any contents within a file, for example, it instead just puts the output at the end.
Following on with our previous example where we have the file "welcome" that has the contents of "hey". If were to use echo to add "hello" to the file using the > operator, the file will now only have "hello" and not "hey".
The >> operator allows to append the output to the bottom of the file — rather than replacing the contents like so:
The in-browser functionality was used in Linux Fundamentals Part 1 to get you directly connected to your first ever Linux machine without any hassle.
In fact, the in-browser functionality uses the exact same protocol that we are going to be using today. This protocol is called Secure Shell or SSH for short and is the common means of connecting to and interacting with the command line of a remote Linux machine.
We will be deploying two machines in this room:
- Your Linux machine
- The TryHackMe AttackBox
What is SSH & how Does it Work?
Secure Shell or SSH simply is a protocol between devices in an encrypted form. Using cryptography, any input we send in a human-readable format is encrypted for travelling over a network -- where it is then unencrypted once it reaches the remote machine, such as in the diagram below.

You can learn about the various types of encryption on a TryHackMe room. But for now, we only need to understand that:
- SSH allows us to remotely execute commands on another device remotely.
- Any data sent between the devices is encrypted when it is sent over a network such as the Internet
the way to connect to remote services using ssh is ssh username@ip
Files and folders with "." are hidden files.
| Command | Full Name | Purpose |
| touch | touch | Create file |
| mkdir | make directory | Create a folder |
| cp | copy | Copy a file or folder |
| mv | move | Move a file or folder |
| rm | remove | Remove a file or folder |
| file | file | Determine the type of a file |
rm is extraordinary out of the commands that we've covered so far. You can simply remove files by using rm. However, you need to provide the -R switch alongside the name of the directory you wish to remove.
You can use these features of nano by pressing the "Ctrl" key (which is represented as an ^ on Linux)
Downloading Files
A pretty fundamental feature of computing is the ability to transfer files. For example, you may want to download a program, a script, or even a picture. Thankfully for us, there are multiple ways in which we can retrieve these files.
We're going to cover the use of wget . This command allows us to download files from the web via HTTP -- as if you were accessing the file in your browser. We simply need to provide the address of the resource that we wish to download. For example, if I wanted to download a file named "myfile.txt" onto my machine, assuming I knew the web address it -- it would look something like this:
wget https://assets.tryhackme.com/additional/linux-fundamentals/part3/myfile.txt
Transferring Files From Your Host - SCP (SSH)
Secure copy, or SCP, is just that -- a means of securely copying files. Unlike the regular cp command, this command allows you to transfer files between two computers using the SSH protocol to provide both authentication and encryption.
Working on a model of SOURCE and DESTINATION, SCP allows you to:
- Copy files & directories from your current system to a remote system
- Copy files & directories from a remote system to your current system
Provided that we know usernames and passwords for a user on your current system and a user on the remote system. For example, let's copy an example file from our machine to a remote machine, which I have neatly laid out in the table below:
| Variable | Value |
| The IP address of the remote system | 192.168.1.30 |
| User on the remote system | ubuntu |
| Name of the file on the local system | important.txt |
| Name that we wish to store the file as on the remote system | transferred.txt |
With this information, let's craft our scp command (remembering that the format of SCP is just SOURCE and DESTINATION)
scp important.txt [email protected]:/home/ubuntu/transferred.txt
And now let's reverse this and layout the syntax for using scp to copy a file from a remote computer that we're not logged into
| Variable | Value |
| IP address of the remote system | 192.168.1.30 |
| User on the remote system | ubuntu |
| Name of the file on the remote system | documents.txt |
| Name that we wish to store the file as on our system | notes.txt |
The command will now look like the following: scp [email protected]:/home/ubuntu/documents.txt notes.txt
Serving Files From Your Host - WEB
Ubuntu machines come pre-packaged with python3. Python helpfully provides a lightweight and easy-to-use module called "HTTPServer". This module turns your computer into a quick and easy web server that you can use to serve your own files, where they can then be downloaded by another computing using commands such as curl and wget.
Python3's "HTTPServer" will serve the files in the directory that you run the command, but this can be changed by providing options that can be found in the manual pages. Simply, all we need to do is run python3 -m http.server to start the module! In the screenshot below, we are serving from a directory called "webserver", which has a single named "file".
           tryhackme@linux3:/tmp# python3 -m http.server
Serving HTTP on 0.0.0.0 port 8000 (http://0.0.0.0:8000/) ...
Now, let's use wget to download the file using the computer's IP address and the name of the file. One flaw with this module is that you have no way of indexing, so you must know the exact name and location of the file that you wish to use. This is why I prefer to use Updog. What's Updog? A more advanced yet lightweight webserver. But for now, let's stick to using Python's "HTTP Server".
tryhackme@linux3:/tmp# wget http://127.0.0.1:8000/file2021-05-04 14:26:16 http://127.0.0.1:8000/file Connecting to http://127.0.0.1:8000... connected. HTTP request sent, awaiting response... 200 OK Length: 51095 (50K) [text] Saving to: ‘file’
file 100%[=================================================>] 49.90K --.-KB/s in 0.04s
2021-05-04 14:26:16 (1.31 MB/s) - ‘file’ saved [51095/51095]
In the screenshot above, we can see that wget has successfully downloaded the file named "file" to our machine. This request is logged by SimpleHTTPServer much as any web server would, which I have captured in the screenshot below.
           tryhackme@linux3:/tmp# python3 -m http.server
Serving HTTP on 0.0.0.0 port 8000 (http://0.0.0.0:8000/) ...
127.0.0.1 - - [04/May/2021/14:26:09] "GET /file HTTP/1.1" 200 -
We can use the friendly ps command to provide a list of the running processes as our user's session and some additional information such as its status code, the session that is running it, how much usage time of the CPU it is using, and the name of the actual program or command that is being executed:
To see the processes run by other users and those that don't run from a session (i.e. system processes), we need to provide aux to the ps command like so: ps aux
How do Processes Start?
Let's start off by talking about namespaces. The Operating System (OS) uses namespaces to ultimately split up the resources available on the computer to (such as CPU, RAM and priority) processes. Think of it as splitting your computer up into slices -- similar to a cake. Processes within that slice will have access to a certain amount of computing power, however, it will be a small portion of what is actually available to every process overall.
Namespaces are great for security as it is a way of isolating processes from another -- only those that are in the same namespace will be able to see each other.
We previously talked about how PID works, and this is where it comes into play. The process with an ID of 0 is a process that is started when the system boots. This process is the system's init on Ubuntu, such as systemd, which is used to provide a way of managing a user's processes and sits in between the operating system and the user.
For example, once a system boots and it initialises, systemd is one of the first processes that are started. Any program or piece of software that we want to start will start as what's known as a child process of systemd. This means that it is controlled by systemd, but will run as its own process (although sharing the resources from systemd) to make it easier for us to identify and the likes.
With our process backgrounded using either Ctrl + Z or the & operator, we can use fg to bring this back to focus like below, where we can see the fg command is being used to bring the background process back into use on the terminal, where the output of the script is now returned to us.
Users may want to schedule a certain action or task to take place after the system has booted. Take, for example, running commands, backing up files, or launching your favourite programs on, such as Spotify or Google Chrome.
We're going to be talking about the cron process, but more specifically, how we can interact with it via the use of crontabs . Crontab is one of the processes that is started during boot, which is responsible for facilitating and managing cron jobs.

A crontab is simply a special file with formatting that is recognised by the cron process to execute each line step-by-step. Crontabs require 6 specific values:
| Value | Description |
| MIN | What minute to execute at |
| HOUR | What hour to execute at |
| DOM | What day of the month to execute at |
| MON | What month of the year to execute at |
| DOW | What day of the week to execute at |
| CMD | The actual command that will be executed. |
Let's use the example of backing up files. You may wish to backup "cmnatic"'s "Documents" every 12 hours. We would use the following formatting:
0 */12 * * * cp -R /home/cmnatic/Documents /var/backups/
An interesting feature of crontabs is that these also support the wildcard or asterisk (*). If we do not wish to provide a value for that specific field, i.e. we don't care what month, day, or year it is executed -- only that it is executed every 12 hours, we simply just place an asterisk.
This can be confusing to begin with, which is why there are some great resources such as the online "Crontab Generator" that allows you to use a friendly application to generate your formatting for you! As well as the site "Cron Guru"!
Crontabs can be edited by using crontab -e, where you can select an editor (such as Nano) to edit your crontab.


The file system used in modern versions of Windows is the New Technology File System or simply NTFS. Before NTFS, there was FAT16/FAT32 (File Allocation Table) and HPFS (High Performance File System).
You still see FAT partitions in use today. For example, you typically see FAT partitions in USB devices, MicroSD cards, etc. but traditionally not on personal Windows computers/laptops or Windows servers.
NTFS is known as a journaling file system. In case of a failure, the file system can automatically repair the folders/files on disk using information stored in a log file. This function is not possible with FAT.
NTFS addresses many of the limitations of the previous file systems; such as:
Supports files larger than 4GB Set specific permissions on folders and files Folder and file compression Encryption (Encryption File System or EFS)
Another feature of NTFS is Alternate Data Streams (ADS).
Alternate Data Streams (ADS) is a file attribute specific to Windows NTFS (New Technology File System).
Every file has at least one data stream ($DATA), and ADS allows files to contain more than one stream of data. Natively Window Explorer doesn't display ADS to the user. There are 3rd party executables that can be used to view this data, but Powershell gives you the ability to view ADS for files.
From a security perspective, malware writers have used ADS to hide data.
Not all its uses are malicious. For example, when you download a file from the Internet, there are identifiers written to ADS to identify that the file was downloaded from the Internet.
To learn more about ADS, refer to the following link from MalwareBytes here. Note
HPFS is only supported under Windows NT versions 3.1, 3.5, and 3.51. Windows NT 4.0 does not support and cannot access HPFS partitions. Also, support for the FAT32 file system became available in Windows 98/Windows 95 OSR2 and Windows 2000.
FAT is by far the most simplistic of the file systems supported by Windows NT. The FAT file system is characterized by the file allocation table (FAT), which is really a table that resides at the very "top" of the volume. To protect the volume, two copies of the FAT are kept in case one becomes damaged. In addition, the FAT tables and the root directory must be stored in a fixed location so that the system's boot files can be correctly located.
A disk formatted with FAT is allocated in clusters, whose size is determined by the size of the volume. When a file is created, an entry is created in the directory and the first cluster number containing data is established. This entry in the FAT table either indicates that this is the last cluster of the file, or points to the next cluster.
Updating the FAT table is very important as well as time consuming. If the FAT table is not regularly updated, it can lead to data loss. It is time consuming because the disk read heads must be repositioned to the drive's logical track zero each time the FAT table is updated.
There is no organization to the FAT directory structure, and files are given the first open location on the drive. In addition, FAT supports only read-only, hidden, system, and archive file attributes.
FAT uses the traditional 8.3 file naming convention and all filenames must be created with the ASCII character set. The name of a file or directory can be up to eight characters long, then a period (.) separator, and up to a three character extension. The name must start with either a letter or number and can contain any characters except for the following:
. " / \ [ ] : ; | = ,
If any of these characters are used, unexpected results may occur. The name cannot contain any spaces.
The following names are reserved:
CON, AUX, COM1, COM2, COM3, COM4, LPT1, LPT2, LPT3, PRN, NUL
All characters will be converted to uppercase.
It is not possible to perform an undelete under Windows NT on any of the supported file systems. Undelete utilities try to directly access the hardware, which cannot be done under Windows NT. However, if the file was located on a FAT partition, and the system is restarted under MS-DOS, the file can be undeleted. The FAT file system is best for drives and/or partitions under approximately 200 MB, because FAT starts out with very little overhead. For further discussion of FAT advantages, see the following:
Windows NT Server "Concepts and Planning Guide," Chapter 5, section titled "Choosing a File System"
Windows NT Workstation 4.0 Resource Kit, Chapter 18, "Choosing a File System"
Windows NT Server 4.0 Resource Kit "Resource Guide," Chapter 3, section titled "Which File System to Use on Which Volumes"
Preferably, when using drives or partitions of over 200 MB the FAT file system should not be used. This is because as the size of the volume increases, performance with FAT will quickly decrease. It is not possible to set permissions on files that are FAT partitions.
FAT partitions are limited in size to a maximum of 4 Gigabytes (GB) under Windows NT and 2 GB in MS-DOS.
For further discussion of other disadvantages of FAT, see the following:
Windows NT Server "Concepts and Planning Guide," Chapter 5, section titled "Choosing a File System"
Windows NT Workstation 4.0 Resource Kit, Chapter 18, "Choosing a File System"
Microsoft Windows NT Server 4.0 Resource Kit "Resource Guide," Chapter 3, section titled "Which File System to Use on Which Volumes"
The HPFS file system was first introduced with OS/2 1.2 to allow for greater access to the larger hard drives that were then appearing on the market. Additionally, it was necessary for a new file system to extend the naming system, organization, and security for the growing demands of the network server market. HPFS maintains the directory organization of FAT, but adds automatic sorting of the directory based on filenames. Filenames are extended to up to 254 double byte characters. HPFS also allows a file to be composed of "data" and special attributes to allow for increased flexibility in terms of supporting other naming conventions and security. In addition, the unit of allocation is changed from clusters to physical sectors (512 bytes), which reduces lost disk space.
Under HPFS, directory entries hold more information than under FAT. As well as the attribute file, this includes information about the modification, creation, and access date and times. Instead of pointing to the first cluster of the file, the directory entries under HPFS point to the FNODE. The FNODE can contain the file's data, or pointers that may point to the file's data or to other structures that will eventually point to the file's data.
HPFS attempts to allocate as much of a file in contiguous sectors as possible. This is done in order to increase speed when doing sequential processing of a file.
HPFS organizes a drive into a series of 8-MB bands, and whenever possible a file is contained within one of these bands. Between each of these bands are 2K allocation bitmaps, which keep track of which sectors within a band have and have not been allocated. Banding increases performance because the drive head does not have to return to the logical top (typically cylinder 0) of the disk, but to the nearest band allocation bitmap to determine where a file is to be stored.
Additionally, HPFS includes a couple of unique special data objects:
The Super Block is located in logical sector 16 and contains a pointer to the FNODE of the root directory. One of the biggest dangers of using HPFS is that if the Super Block is lost or corrupted due to a bad sector, so are the contents of the partition, even if the rest of the drive is fine. It would be possible to recover the data on the drive by copying everything to another drive with a good sector 16 and rebuilding the Super Block. However, this is a very complex task.
The Spare Block is located in logical sector 17 and contains a table of "hot fixes" and the Spare Directory Block. Under HPFS, when a bad sector is detected, the "hot fixes" entry is used to logically point to an existing good sector in place of the bad sector. This technique for handling write errors is known as hot fixing.
Hot fixing is a technique where if an error occurs because of a bad sector, the file system moves the information to a different sector and marks the original sector as bad. This is all done transparent to any applications that are performing disk I/O (that is, the application never knows that there were any problems with the hard drive). Using a file system that supports hot fixing will eliminate error messages such as the FAT "Abort, Retry, or Fail?" error message that occurs when a bad sector is encountered.
Note
The version of HPFS that is included with Windows NT does not support hot fixing.
HPFS is best for drives in the 200-400 MB range. For more discussion of the advantages of HPFS, see the following:
Windows NT Server "Concepts and Planning Guide," Chapter 5, section titled "Choosing a File System"
Windows NT Workstation 4.0 Resource Kit, Chapter 18, "Choosing a File System"
Windows NT Server 4.0 Resource Kit "Resource Guide," Chapter 3, section titled "Which File System to Use on Which Volumes"
Because of the overhead involved in HPFS, it is not a very efficient choice for a volume of under approximately 200 MB. In addition, with volumes larger than about 400 MB, there will be some performance degradation. You cannot set security on HPFS under Windows NT.
HPFS is only supported under Windows NT versions 3.1, 3.5, and 3.51. Windows NT 4.0 cannot access HPFS partitions.
For additional disadvantages of HPFS, see the following:
Windows NT Server "Concepts and Planning Guide," Chapter 5, section titled "Choosing a File System"
Windows NT Workstation 4.0 Resource Kit, Chapter 18, "Choosing a File System"
Windows NT Server 4.0 Resource Kit "Resource Guide," Chapter 3, section titled "Which File System to Use on Which Volumes"
From a user's point of view, NTFS continues to organize files into directories, which, like HPFS, are sorted. However, unlike FAT or HPFS, there are no "special" objects on the disk and there is no dependence on the underlying hardware, such as 512-byte sectors. In addition, there are no special locations on the disk, such as FAT tables or HPFS Super Blocks.
The goals of NTFS are to provide:
Reliability, which is especially desirable for high end systems and file servers
A platform for added functionality
Support POSIX requirements
Removal of the limitations of the FAT and HPFS file systems
To ensure reliability of NTFS, three major areas were addressed: recoverability, removal of fatal single sector failures, and hot fixing.
NTFS is a recoverable file system because it keeps track of transactions against the file system. When a CHKDSK is performed on FAT or HPFS, the consistency of pointers within the directory, allocation, and file tables are being checked. Under NTFS, a log of transactions against these components is maintained so that CHKDSK need only roll back transactions to the last commit point in order to recover consistency within the file system.
Under FAT or HPFS, if a sector that is the location of one of the file system's special objects fails, then a single sector failure will occur. NTFS avoids this in two ways: first, by not using special objects on the disk and tracking and protecting all objects that are on the disk. Secondly, under NTFS, multiple copies (the number depends on the volume size) of the Master File Table are kept.
Similar to OS/2 versions of HPFS, NTFS supports hot fixing.
One of the major design goals of Windows NT at every level is to provide a platform that can be added to and built upon, and NTFS is no exception. NTFS provides a rich and flexible platform for other file systems to be able to use. In addition, NTFS fully supports the Windows NT security model and supports multiple data streams. No longer is a data file a single stream of data. Finally, under NTFS, a user can add his or her own user-defined attributes to a file.
NTFS is the most POSIX.1 compliant of the supported file systems because it supports the following POSIX.1 requirements:
Case-sensitive naming:
Under POSIX, README.TXT, Readme.txt, and readme.txt are all different files.
Additional time stamp:
The additional time stamp supplies the time at which the file was last accessed.
Hard links:
A hard link is when two different filenames, which can be located in different directories, point to the same data.
First, NTFS has greatly increased the size of files and volumes, so that they can now be up to 2^64 bytes (16 exabytes or 18,446,744,073,709,551,616 bytes). NTFS has also returned to the FAT concept of clusters in order to avoid HPFS problem of a fixed sector size. This was done because Windows NT is a portable operating system and different disk technology is likely to be encountered at some point. Therefore, 512 bytes per sector was viewed as having a large possibility of not always being a good fit for the allocation. This was accomplished by allowing the cluster to be defined as multiples of the hardware's natural allocation size. Finally, in NTFS all filenames are Unicode based, and 8.3 filenames are kept along with long filenames.
NTFS is best for use on volumes of about 400 MB or more. This is because performance does not degrade under NTFS, as it does under FAT, with larger volume sizes.
The recoverability designed into NTFS is such that a user should never have to run any sort of disk repair utility on an NTFS partition. For additional advantages of NTFS, see the following:
Windows NT Server "Concepts and Planning Guide," Chapter 5, section titled "Choosing a File System"
Windows NT Workstation 4.0 Resource Kit, Chapter 18, "Choosing a File System"
Windows NT Server 4.0 Resource Kit "Resource Guide," Chapter 3, section titled "Which File System to Use on Which Volumes"
It is not recommended to use NTFS on a volume that is smaller than approximately 400 MB, because of the amount of space overhead involved in NTFS. This space overhead is in the form of NTFS system files that typically use at least 4 MB of drive space on a 100-MB partition.
Currently, there is no file encryption built into NTFS. Therefore, someone can boot under MS-DOS, or another operating system, and use a low-level disk editing utility to view data stored on an NTFS volume.
It is not possible to format a floppy disk with the NTFS file system; Windows NT formats all floppy disks with the FAT file system because the overhead involved in NTFS will not fit onto a floppy disk.
For further discussion of NTFS disadvantages, see the following:
Windows NT Server "Concepts and Planning Guide," Chapter 5, section titled "Choosing a File System"
Windows NT Workstation 4.0 Resource Kit, Chapter 18, "Choosing a File System"
Windows NT Server 4.0 Resource Kit "Resource Guide," Chapter 3, section titled "Which File System to Use on Which Volumes"
File and directory names can be up to 255 characters long, including any extensions. Names preserve case, but are not case-sensitive. NTFS makes no distinction of filenames based on case. Names can contain any characters except for the following:
? " / \ < > * | :
Currently, from the command line, you can only create file names of up to 253 characters.
Note
Underlying hardware limitations may impose additional partition size limitations in any file system. Particularly, a boot partition can be only 7.8 GB in size, and there is a 2-terabyte limitation in the partition table.
For more information about the supported file systems for Windows NT, see the Windows NT Resource Kit.
link : https://www.malwarebytes.com/blog/news/2015/07/introduction-to-alternate-data-streams
What are Alternate Data Streams? Alternate Data Streams (ADS) are a file attribute only found on the NTFS file system.
In this system a file is built up from a couple of attributes, one of them is $Data, aka the data attribute. Looking at the regular data stream of a text file there is no mystery. It simply contains the text inside the text file. But that is only the primary data stream.
This one is sometimes referred to as the unnamed data stream since the name string of this attribute is empty ( “” ) . So any data stream that has a name is considered alternate.
These data streams suffer from a bad reputation since they have been used and abused to write hidden data. Varying from data about where a file came from to complete malware files (e.g. Backdoor.Rustock.A)
If you are up for an experiment, we can easily create and read an alternate data stream.
Streams The first tool you can use was developed by Sysinternals (later bought by Microsoft) and is called Streams (nomen est omen).
voorbeeld In the example above we used the echo command to create an empty file called example with an alternate data stream called showme.
By using streams we can check which files have alternate data-streams. In the results visible in the above command prompt, $Data is the name of the attribute (as discussed earlier) and the 8 tells us the size.
But since we are looking at it, we obviously would like to see what is inside the alternate data streams. Unfortunately, streams do not offer that option.
Get-Item If you are using Windows 8 (or newer) there is a built-in option to read ADS. You can use PowerShell commands to achieve this. For those that have no experience with it, you can start it by typing PowerShell in the Run box (Windows key + R) and follow the lines in this screenshot.
powershell Set-item Another thing that you can do with Powershell is add streams to a file. The Powershell command syntax is:
set-content - path {path to the file} - stream {name of the stream} Doing so will initiate a cmdlet where you can enter the content of the stream under Value[i]
PSsetcontent Search for ADS If you want to search a directory or drive for ADS you can use this command in the root of the target:
gci -recurse | % { gi $_.FullName -stream * } | where stream -ne ':$Data' PSsearch Be warned that if you include the Windows directory in your search you will likely receive an enormous list.
Remove ADS A word of warning here. Removing ADS is not always advisable. Some of them are needed for the proper use of the software that created the streams. So make sure you have done your research before removing them. The syntax is:
remove-item –path {path to the file} –stream {name of the stream} Malwarebytes Anti-Malware scans for and removes unwanted ADS (as Rootkit.ADS)
Summary Alternate Data Streams (ADS) have been given a bad reputation because their capability to hide data from us on our own computer, has been abused by malware writers in the past. Hopefully this article will clear up some of the questions and mystique you had about ADS.
<<<<<<< HEAD "Environment variables store information about the operating system environment. This information includes details such as the operating system path, the number of processors used by the operating system, and the location of temporary folders".
Dynamic Link Library (DLL) files are shared library files used by Windows programs — both utilities built into Windows and third-party programs you install — to perform various functions.
How does UAC work? When a user with an account type of administrator logs into a system, the current session doesn't run with elevated permissions. When an operation requiring higher-level privileges needs to execute, the user will be prompted to confirm if they permit the operation to run.
Let's look at the program on the account you're currently logged into, the built-in administrator account—Right-click to view its Properties.
In the Security tab, we can see the users/groups and their permissions to this file. Notice that the standard user is not listed.
=======
4108875ec1be1a7d41fdef6a56ccb0750ca2eefc
The System Configuration utility (MSConfig) is for advanced troubleshooting, and its main purpose is to help diagnose startup issues.
We're continuing with Tools that are available through the System Configuration panel.
The Computer Management (compmgmt) utility has three primary sections: System Tools, Storage, and Services and Applications.
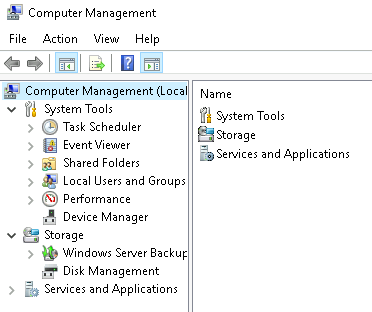
System Tools
Let's start with Task Scheduler. Per Microsoft, with Task Scheduler, we can create and manage common tasks that our computer will carry out automatically at the times we specify.
A task can run an application, a script, etc., and tasks can be configured to run at any point. A task can run at log in or at log off. Tasks can also be configured to run on a specific schedule, for example, every five mins.
To create a basic task, click on Create Basic Task under Actions (right pane).

Next is Event Viewer.
Event Viewer allows us to view events that have occurred on the computer. These records of events can be seen as an audit trail that can be used to understand the activity of the computer system. This information is often used to diagnose problems and investigate actions executed on the system.

- The pane on the left provides a hierarchical tree listing of the event log providers. (as shown in the image above)
- The pane in the middle will display a general overview and summary of the events specific to a selected provider.
- The pane on the right is the actions pane.
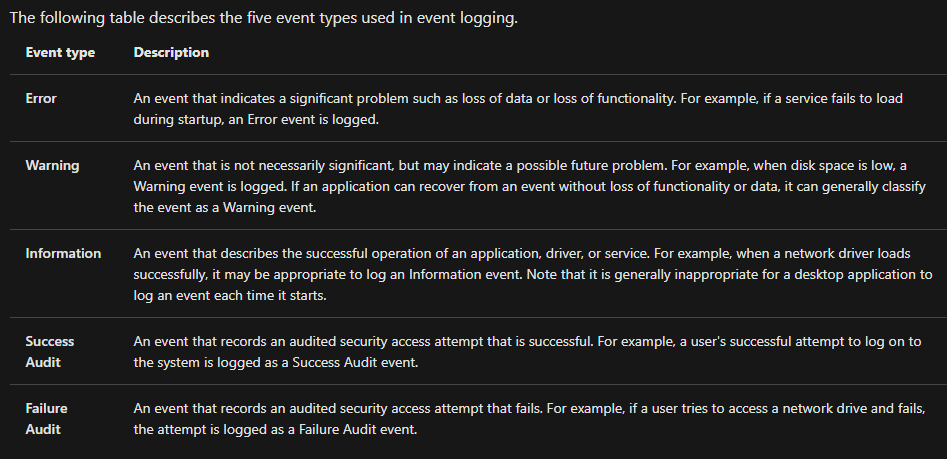
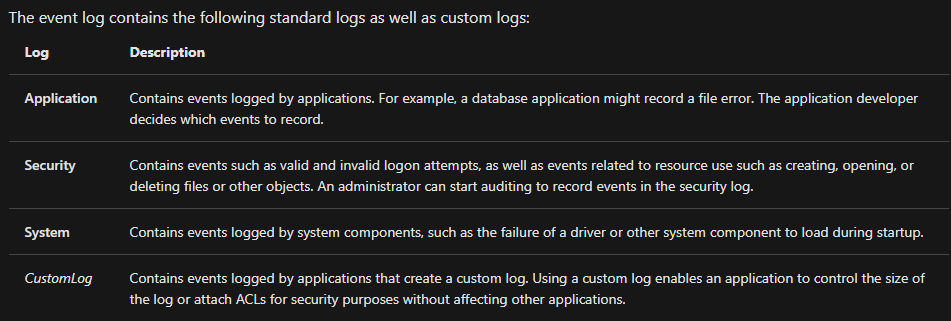
For more information about Event Viewer and Event Logs, please refer to the Windows Event Log room.
Shared Folders is where you will see a complete list of shares and folders shared that others can connect to.

In the above image, under Shares, are the default share of Windows, C$, and default remote administration shares created by Windows, such as ADMIN$.
As with any object in Windows, you can right-click on a folder to view its properties, such as Permissions (who can access the shared resource).
Under Sessions, you will see a list of users who are currently connected to the shares. In this VM, you won't see anybody connected to the shares.
All the folders and/or files that the connected users access will list under Open Files.
The Local Users and Groups section you should be familiar with from Windows Fundamentals 1 because it's lusrmgr.msc.
In Performance, you'll see a utility called Performance Monitor (perfmon).
Perfmon is used to view performance data either in real-time or from a log file. This utility is useful for troubleshooting performance issues on a computer system, whether local or remote.

Device Manager allows us to view and configure the hardware, such as disabling any hardware attached to the computer.

Storage
Under Storage is Windows Server Backup and Disk Management. We'll only look at Disk Management in this room.
Note: Since the virtual machine is a Windows Server operating system, there are utilities available that you will typically not see in Windows 10.

Disk Management is a system utility in Windows that enables you to perform advanced storage tasks. Some tasks are:
- Set up a new drive
- Extend a partition
- Shrink a partition
- Assign or change a drive letter (ex. E:)
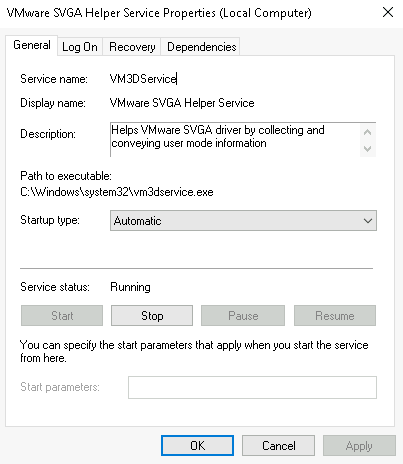
Services and Applications

Recall from the previous task; a service is a special type of application that runs in the background. Here you can do more than enable and disable a service, such as view the Properties for the service.
WMI Control configures and controls the Windows Management Instrumentation (WMI) service.
Per Wikipedia, "WMI allows scripting languages (such as VBScript or Windows PowerShell) to manage Microsoft Windows personal computers and servers, both locally and remotely. Microsoft also provides a command-line interface to WMI called Windows Management Instrumentation Command-line (WMIC)."
Note: The WMIC tool is deprecated in Windows 10, version 21H1. Windows PowerShell supersedes this tool for WMI.
We're continuing with Tools that are available through the System Configuration panel.
What is the System Information (msinfo32) tool?
Per Microsoft, "Windows includes a tool called Microsoft System Information (Msinfo32.exe). This tool gathers information about your computer and displays a comprehensive view of your hardware, system components, and software environment, which you can use to diagnose computer issues."
The information in System Summary is divided into three sections:
- Hardware Resources
- Components
- Software Environment
System Summary will display general technical specifications for the computer, such as processor brand and model.

The information displayed in Hardware Resources is not for the average computer user. If you want to learn more about this section, refer to the official Microsoft page.

Under Components, you can see specific information about the hardware devices installed on the computer. Some sections don't show any information, but some sections do, such as Display and Input.

In the Software Environment section, you can see information about software baked into the operating system and software you have installed. Other details are visible in this section as well, such as the Environment Variables and Network Connections.

Recall from the Windows Fundamentals 1 room (The Windows\System32 Folder task) where Environment Variables was briefly touched on.
Per Microsoft, "Environment variables store information about the operating system environment. This information includes details such as the operating system path, the number of processors used by the operating system, and the location of temporary folders.
The environment variables store data that is used by the operating system and other programs. For example, the WINDIR environment variable contains the location of the Windows installation directory. Programs can query the value of this variable to determine where Windows operating system files are located".
Click on Environment Variables to see the assigned values for the virtual machine.

Another method to view environment variables is Control Panel > System and Security > System > Advanced system settings > Environment Variables OR Settings > System > About > system info > Advanced system settings > Environment Variables.

The detour is over. Let's redirect our attention back to msinfo32 and pick up where we left off.
Towards the very bottom of this utility, there is a search bar. Please give it a go. Select Components and search for IP address.

Traffic flows into and out of devices via what we call ports. A firewall is what controls what is - and more importantly isn't - allowed to pass through those ports. You can think of it like a security guard standing at the door, checking the ID of everything that tries to enter or exit
What is BitLocker?
Per Microsoft, "BitLocker Drive Encryption is a data protection feature that integrates with the operating system and addresses the threats of data theft or exposure from lost, stolen, or inappropriately decommissioned computers".
On devices with TPM installed, BitLocker offers the best protection.
Per Microsoft, "BitLocker provides the most protection when used with a Trusted Platform Module (TPM) version 1.2 or later. The TPM is a hardware component installed in many newer computers by the computer manufacturers. It works with BitLocker to help protect user data and to ensure that a computer has not been tampered with while the system was offline".
Refer to the official Microsoft documentation to learn more about BitLocker here.
Note: The BitLocker feature is not included in the attached VM.
computer network is interconnectin between computer devices that can share data and resoures. this network devices use system rules to connect called connection protocols
The OSI (Open Systems Interconnection) Model is a standardised model which we use to demonstrate the theory behind computer networking. In practice, it's actually the more compact TCP/IP model that real-world networking is based off; however the OSI model, in many ways, is easier to get an initial understanding from.
The OSI model consists of seven layers:
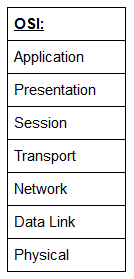
There are many mnemonics floating around to help you learn the layers of the OSI model -- search around until you find one that you like.
I personally favour: Anxious Pale Shakespeare Treated Nervous Drunks Patiently
Let's briefly take a look at each of these in turn:
Layer 7 -- Application:
The application layer of the OSI model essentially provides networking options to programs running on a computer. It works almost exclusively with applications, providing an interface for them to use in order to transmit data. When data is given to the application layer, it is passed down into the presentation layer.
Layer 6 -- Presentation:
The presentation layer receives data from the application layer. This data tends to be in a format that the application understands, but it's not necessarily in a standardised format that could be understood by the application layer in the receiving computer. The presentation layer translates the data into a standardised format, as well as handling any encryption, compression or other transformations to the data. With this complete, the data is passed down to the session layer.
Layer 5 -- Session:
When the session layer receives the correctly formatted data from the presentation layer, it looks to see if it can set up a connection with the other computer across the network. If it can't then it sends back an error and the process goes no further. If a session can be established then it's the job of the session layer to maintain it, as well as co-operate with the session layer of the remote computer in order to synchronise communications. The session layer is particularly important as the session that it creates is unique to the communication in question. This is what allows you to make multiple requests to different endpoints simultaneously without all the data getting mixed up (think about opening two tabs in a web browser at the same time)! When the session layer has successfully logged a connection between the host and remote computer the data is passed down to Layer 4: the transport Layer.
Layer 4 -- Transport:
The transport layer is a very interesting layer that serves numerous important functions. Its first purpose is to choose the protocol over which the data is to be transmitted. The two most common protocols in the transport layer are TCP (Transmission Control Protocol) and UDP (User Datagram Protocol); with TCP the transmission is connection-based which means that a connection between the computers is established and maintained for the duration of the request. This allows for a reliable transmission, as the connection can be used to ensure that the packets all get to the right place. A TCP connection allows the two computers to remain in constant communication to ensure that the data is sent at an acceptable speed, and that any lost data is re-sent. With UDP, the opposite is true; packets of data are essentially thrown at the receiving computer -- if it can't keep up then that's its problem (this is why a video transmission over something like Skype can be pixelated if the connection is bad). What this means is that TCP would usually be chosen for situations where accuracy is favoured over speed (e.g. file transfer, or loading a webpage), and UDP would be used in situations where speed is more important (e.g. video streaming).
With a protocol selected, the transport layer then divides the transmission up into bite-sized pieces (over TCP these are called segments, over UDP they're called datagrams), which makes it easier to transmit the message successfully.
Layer 3 -- Network:
The network layer is responsible for locating the destination of your request. For example, the Internet is a huge network; when you want to request information from a webpage, it's the network layer that takes the IP address for the page and figures out the best route to take. At this stage we're working with what is referred to as Logical addressing (i.e. IP addresses) which are still software controlled. Logical addresses are used to provide order to networks, categorising them and allowing us to properly sort them. Currently the most common form of logical addressing is the IPV4 format, which you'll likely already be familiar with (i.e 192.168.1.1 is a common address for a home router).
Layer 2 -- Data Link:
The data link layer focuses on the physical addressing of the transmission. It receives a packet from the network layer (that includes the IP address for the remote computer) and adds in the physical (MAC) address of the receiving endpoint. Inside every network enabled computer is a Network Interface Card (NIC) which comes with a unique MAC (Media Access Control) address to identify it.
MAC addresses are set by the manufacturer and literally burnt into the card; they can't be changed -- although they can be spoofed. When information is sent across a network, it's actually the physical address that is used to identify where exactly to send the information.
Additionally, it's also the job of the data link layer to present the data in a format suitable for transmission.
The data link layer also serves an important function when it receives data, as it checks the received information to make sure that it hasn't been corrupted during transmission, which could well happen when the data is transmitted by layer 1: the physical layer.
Layer 1 -- Physical:
The physical layer is right down to the hardware of the computer. This is where the electrical pulses that make up data transfer over a network are sent and received. It's the job of the physical layer to convert the binary data of the transmission into signals and transmit them across the network, as well as receiving incoming signals and converting them back into binary data.
As the data is passed down each layer of the model, more information containing details specific to the layer in question is added on to the start of the transmission. As an example, the header added by the Network Layer would include things like the source and destination IP addresses, and the header added by the Transport Layer would include (amongst other things) information specific to the protocol being used. The data link layer also adds a piece on at the end of the transmission, which is used to verify that the data has not been corrupted on transmission; this also has the added bonus of increased security, as the data can't be intercepted and tampered with without breaking the trailer. This whole process is referred to as encapsulation; the process by which data can be sent from one computer to another.

Notice that the encapsulated data is given a different name at different steps of the process. In layers 7,6 and 5, the data is simply referred to as data. In the transport layer the encapsulated data is referred to as a segment or a datagram (depending on whether TCP or UDP has been selected as a transmission protocol). At the Network Layer, the data is referred to as a packet. When the packet gets passed down to the Data Link layer it becomes a frame, and by the time it's transmitted across a network the frame has been broken down into bits.
When the message is received by the second computer, it reverses the process -- starting at the physical layer and working up until it reaches the application layer, stripping off the added information as it goes. This is referred to as de-encapsulation. As such you can think of the layers of the OSI model as existing inside every computer with network capabilities. Whilst it's not actually as clear cut in practice, computers all follow the same process of encapsulation to send data and de-encapsulation upon receiving it.
The processes of encapsulation and de-encapsulation are very important -- not least because of their practical use, but also because they give us a standardised method for sending data. This means that all transmissions will consistently follow the same methodology, allowing any network enabled device to send a request to any other reachable device and be sure that it will be understood -- regardless of whether they are from the same manufacturer; use the same operating system; or any other factors.
The TCP/IP model is, in many ways, very similar to the OSI model. It's a few years older, and serves as the basis for real-world networking. The TCP/IP model consists of four layers: Application, Transport, Internet and Network Interface. Between them, these cover the same range of functions as the seven layers of the OSI Model.

Note: Some recent sources split the TCP/IP model into five layers -- breaking the Network Interface layer into Data Link and Physical layers (as with the OSI model). This is accepted and well-known; however, it is not officially defined (unlike the original four layers which are defined in RFC1122). It's up to you which version you use -- both are generally considered valid.
You would be justified in asking why we bother with the OSI model if it's not actually used for anything in the real-world. The answer to that question is quite simply that the OSI model (due to being less condensed and more rigid than the TCP/IP model) tends to be easier for learning the initial theory of networking.
The two models match up something like this:

The processes of encapsulation and de-encapsulation work in exactly the same way with the TCP/IP model as they do with the OSI model. At each layer of the TCP/IP model a header is added during encapsulation, and removed during de-encapsulation.
Now let's get down to the practical side of things.
A layered model is great as a visual aid -- it shows us the general process of how data can be encapsulated and sent across a network, but how does it actually happen?
When we talk about TCP/IP, it's all well and good to think about a table with four layers in it, but we're actually talking about a suite of protocols -- sets of rules that define how an action is to be carried out. TCP/IP takes its name from the two most important of these: the Transmission Control Protocol (which we touched upon earlier in the OSI model) that controls the flow of data between two endpoints, and the Internet Protocol, which controls how packets are addressed and sent. There are many more protocols that make up the TCP/IP suite; we will cover some of these in later tasks. For now though, let's talk about TCP.
As mentioned earlier, TCP is a connection-based protocol. In other words, before you send any data via TCP, you must first form a stable connection between the two computers. The process of forming this connection is called the three-way handshake.
When you attempt to make a connection, your computer first sends a special request to the remote server indicating that it wants to initialise a connection. This request contains something called a SYN (short for synchronise) bit, which essentially makes first contact in starting the connection process. The server will then respond with a packet containing the SYN bit, as well as another "acknowledgement" bit, called ACK. Finally, your computer will send a packet that contains the ACK bit by itself, confirming that the connection has been setup successfully. With the three-way handshake successfully completed, data can be reliably transmitted between the two computers. Any data that is lost or corrupted on transmission is re-sent, thus leading to a connection which appears to be lossless.
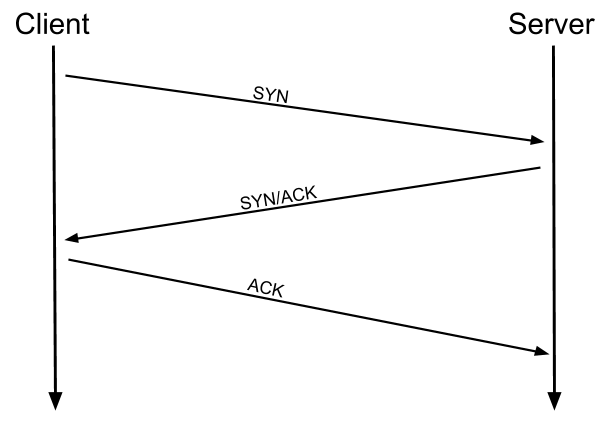

(Credit Kieran Smith, Abertay University)
We're not going to go into exactly how this works on a step-to-step level -- not in this room at any rate. It is sufficient to know that the three-way handshake must be carried out before a connection can be established using TCP.
History:
It's important to understand exactly why the TCP/IP and OSI models were originally created. To begin with there was no standardisation -- different manufacturers followed their own methodologies, and consequently systems made by different manufacturers were completely incompatible when it came to networking. The TCP/IP model was introduced by the American DoD in 1982 to provide a standard -- something for all of the different manufacturers to follow. This sorted out the inconsistency problems. Later the OSI model was also introduced by the International Organisation for Standardisation (ISO); however, it's mainly used as a more comprehensive guide for learning, as the TCP/IP model is still the standard upon which modern networking is based.
At this stage, hopefully all of the theory has made sense and you now understand the basic models behind computer networking. For the rest of the room we're going to be taking a look at some of the command line networking tools that we can use in practical applications. Many of these tools do work on other operating systems, but for the sake of simplicity, I'm going to assume that you're running Linux for the rest of this room. The first tool that we're going to look at will be the ping command.
The ping command is used when we want to test whether a connection to a remote resource is possible. Usually this will be a website on the internet, but it could also be for a computer on your home network if you want to check if it's configured correctly. Ping works using the ICMP protocol, which is one of the slightly less well-known TCP/IP protocols that were mentioned earlier. The ICMP protocol works on the Network layer of the OSI Model, and thus the Internet layer of the TCP/IP model. The basic syntax for ping is ping <target>. In this example we are using ping to test whether a network connection to Google is possible:

Notice that the ping command actually returned the IP address for the Google server that it connected to, rather than the URL that was requested. This is a handy secondary application for ping, as it can be used to determine the IP address of the server hosting a website. One of the big advantages of ping is that it's pretty much ubiquitous to any network enabled device. All operating systems support it out of the box, and even most embedded devices can use ping!
Have a go at the following questions. Any questions about syntax can be answered using the man page for ping (man ping on Linux).
The logical follow-up to the ping command is 'traceroute'. Traceroute can be used to map the path your request takes as it heads to the target machine.
The internet is made up of many, many different servers and end-points, all networked up to each other. This means that, in order to get to the content you actually want, you first need to go through a bunch of other servers. Traceroute allows you to see each of these connections -- it allows you to see every intermediate step between your computer and the resource that you requested. The basic syntax for traceroute on Linux is this: traceroute <destination>
By default, the Windows traceroute utility (tracert) operates using the same ICMP protocol that ping utilises, and the Unix equivalent operates over UDP. This can be altered with switches in both instances.

You can see that it took 13 hops to get from my router (_gateway) to the Google server at 216.58.205.46
Now it's your turn. As with before, all questions about switches can be answered with the man page for traceroute
(man traceroute).
Domain Names -- the unsung saviours of the internet.
Can you imagine how it would feel to remember the IP address of every website you want to visit? Horrible thought.
Fortunately, we've got domains.
We'll talk a little bit more about how this works in the next task, but for now suffice to know that a domain translates into an IP address so that we don't need to remember it (e.g. you can type tryhackme.com, rather than the TryHackMe IP address). Domains are leased out by companies called Domain Registrars. If you want a domain, you go and register with a registrar, then lease the domain for a certain length of time.
Enter Whois.
Whois essentially allows you to query who a domain name is registered to. In Europe personal details are redacted; however, elsewhere you can potentially get a great deal of information from a whois search.
There is a web version of the whois tool if you're particularly averse to the command line. Either way, let's get started!
(Note: You may need to install whois before using it. On Debian based systems this can be done with sudo apt update && sudo apt-get install whois)
Whois lookups are very easy to perform. Just use whois <domain> to get a list of available information about the domain registration:

This is comparatively a very small amount of information as can often be found. Notice that we've got the domain name, the company that registered the domain, the last renewal, and when it's next due, and a bunch of information about nameservers (which we'll look at in the next task).
Your Turn
We talked about domains in the previous task -- now lets talk about how they work.
Ever wondered how a URL gets converted into an IP address that your computer can understand? The answer is a TCP/IP protocol called DNS (Domain Name System).
At the most basic level, DNS allows us to ask a special server to give us the IP address of the website we're trying to access. For example, if we made a request to www.google.com, our computer would first send a request to a special DNS server (which your computer already knows how to find). The server would then go looking for the IP address for Google and send it back to us. Our computer could then send the request to the IP of the Google server.
Let's break this down a bit.
You make a request to a website. The first thing that your computer does is check its local "Hosts File" to see if an explicit IP->Domain mapping has been created. This is an older system than DNS and much less commonly used in modern environments; however, it still takes precedence in the search order of most operating systems. If no mapping has been manually created, the computer then checks its local DNS cache to see if it already has an IP address stored for the website; if it does, great. If not, it goes to the next stage of the process.
Assuming the address hasn't already been found, your computer will then send a request to what is known as a recursive DNS server. These will automatically be known to the router on your network. Many Internet Service Providers (ISPs) maintain their own recursive servers, but companies such as Google and OpenDNS also control recursive servers. This is how your computer automatically knows where to send the request for information: details for a recursive DNS server are stored in your router or computer. This server will also maintain a cache of results for popular domains; however, if the website you've requested isn't stored in the cache, the recursive server will pass the request on to a root name server.
Before 2004 there were precisely 13 root name DNS servers in the world. These days there are many more; however, they are still accessible using the same 13 IP addresses assigned to the original servers (balanced so that you get the closest server when you make a request). The root name servers essentially keep track of the DNS servers in the next level down, choosing an appropriate one to redirect your request to. These lower level servers are called Top-Level Domain servers.
Top-Level Domain (TLD) servers are split up into extensions. So, for example, if you were searching for tryhackme.com your request would be redirected to a TLD server that handled .com domains. If you were searching for bbc.co.uk your request would be redirected to a TLD server that handles .co.uk domains. As with root name servers, TLD servers keep track of the next level down: Authoritative name servers. When a TLD server receives your request for information, the server passes it down to an appropriate Authoritative name server.
Authoritative name servers are used to store DNS records for domains directly. In other words, every domain in the world will have its DNS records stored on an Authoritative name server somewhere or another; they are the source of the information. When your request reaches the authoritative name server for the domain you're querying, it will send the relevant information back to you, allowing your computer to connect to the IP address behind the domain you requested.
When you visit a website in your web browser this all happens automatically, but we can also do it manually with a tool called dig . Like ping and traceroute, dig should be installed automatically on Linux systems.
Dig allows us to manually query recursive DNS servers of our choice for information about domains:
dig <domain> @<dns-server-ip>
It is a very useful tool for network troubleshooting.

This is a lot of information. We're currently most interested in the ANSWER section for this room; however, taking the time to learn what the rest of this means is a very good idea. In summary, that information is telling us that we sent it one query and successfully (i.e. No Errors) received one full answer -- which, as expected, contains the IP address for the domain name that we queried.
Another interesting piece of information that dig gives us is the TTL (Time To Live) of the queried DNS record. As mentioned previously, when your computer queries a domain name, it stores the results in its local cache. The TTL of the record tells your computer when to stop considering the record as being valid -- i.e. when it should request the data again, rather than relying on the cached copy.
The TTL can be found in the second column of the answer section:

It's important to remember that TTL (in the context of DNS caching) is measured in seconds, so the record in the example will expire in two minutes and thirty-seven seconds.
Have a go at some questions about DNS and dig.