


Reservations makes it easy to manage the checking in and out of equipment, much like a library! Here are some of the things Reservations can do:
- manage your inventory of equipment, including storing serial numbers, manuals and other documents, and more.
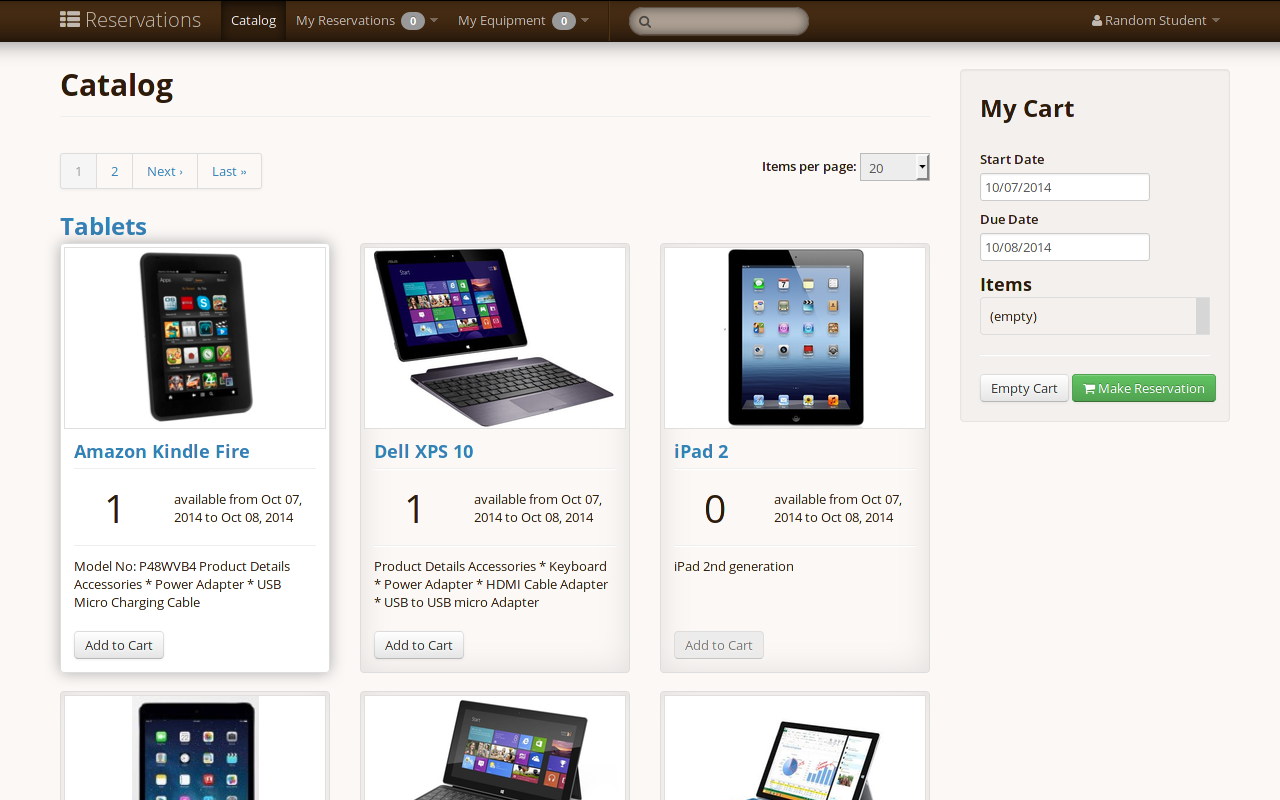
- present an attractive catalog of equipment, including pictures, so people can browse and search your equipment.
- allow people to reserve equipment in advance, according to rules you set.
- enforce rules on who can reserve what equipment, and for how long.
- manage checking in/out equipment, including unique checklists for each item.
There are two mains steps to setting up Reservations: setting up a deployment server, and installing the Reservations application.
You'll need the following to run Reservations:
- Ruby 2.1
- Bundler
- a database server (MySQL or any database supported by Rails)
- ImageMagick
- GhostScript
- a CAS authentication system (optional)
First, checkout a copy of Reservations using git:
cd /your/code/directory
git clone https://github.com/YaleSTC/reservations.git
cd reservations
Reservations uses Bundler to manage dependencies, so if you don't have it, get it, then install dependencies:
gem install bundler
bundle install
You'll need to edit config/database.yml to point to your database, including the correct username and password. See Rails Guides for common database examples. We package a few example files in the config/ folder for Ubuntu, Fedora, and OS X.
Then, create the database and load the database structure:
rake db:create
rake db:schema:load
Finally, start the app locally:
rails server
Just point your browser to localhost:3000 to use Reservations.
Reservations is built using Ruby on Rails, and can be set up (deployed) like most Rails apps. You'll need a server running with the following software:
- Ruby 2.1
- database server (MySQL is preferred, but any database supported by Rails should work, including PostgreSQL)
- web server (apache or nginx both work well)
- Rails application server (usually Passenger Phusion aka mod_rails)
For a general guide to setting up your web and application servers, including hosting providers, see the Rails Deployment Guide.
By default, Reservations uses e-mail addresses and passwords to authenticate users. It also supports the CAS authentication system, using the gem devise_cas_authenticatable. If you want to use CAS authentication you must set the CAS_AUTH environment variable to some value. Attempting to switch between authentication methods after initial setup is highly discouraged and will likely fail. If this is necessary, you may need to install a fresh copy of the application and manually migrate over user data (see our wiki for more details).
To point the gem to the correct CAS server, modify the following setting in your app's config/initializers/devise.rb (near the bottom of the file):
  # configure the base URL of your CAS server
  config.cas_base_url = "https://secure.its.yale.edu/cas/"
Change the :cas_base_url value to your CAS server's base URL; also note that many CAS servers are configured with a base URL that looks more like “cas.example.foo/cas”.
You will need to generate a fresh secret key for cookie encryption and signing. Run rake secret and paste the output into config/intializers/secret_token.rb. Do not make this key available to the public, otherwise anyone will be able to sign on as anyone to Reservations.
You will need to also configure the email config in config/initializers/setup_mail.rb. Replace 0.0.0.0:3000 with the relevant hostname. This will allow links in emails to point to the correct places.
Finally, Reservations ships with the default config time set to Eastern Time (US and Canada). To change the time, edit config/application.rb
config.time_zone = 'Eastern Time (US & Canada)'.
- System administrators and end-users may like to review our help documentation.
- Developers interested in getting involved with Reservations can find information on our project wiki
If you have any suggestions, or would like to report an issue, please either:
- Create an issue for this repository on Github
- or, if you don't have a GitHub account, use our issue submission form