Northern Mechatronics Software Development Kit 2.0 (NMSDK2) {#northern-mechatronics-software-development-kit-2-0-nmsdk2}
The NMSDK2 is a platform library for the Northern Mechatronics NM180100 LoRa BLE module. It provides support for LoRa direct, LoRa real-time, LoRaWAN, and BLE wireless connectivity and a FreeRTOS framework for rapid application development across a wide range of use cases and environments.
Northern Mechatronics recommends you complete the following steps when using the NMSDK2:
- Install Microsoft Visual Studio Code
- Set up GitHub (Optional)
- Download NMSDK2 source code
- Install recommended VS Code extensions
- Install and Configure MSYS2
- Download and Install GNU Arm Toolchain 11.3Rel1 Compiler
- Download and Configure Python 3
We recommend installing the following tools to debug your application:
- Download the J-Link Software and Documentation pack
- Connect the J-Link Debug Probe to your NM180310 or NM180100EVB
Microsoft Visual Studio Code (VS Code) is a source-code editor made by Microsoft for Windows, Linux, and macOS. We recommend using it as your integrated development environment (IDE) of choice due to its ease of use.
To install VS Code:
- Download the latest version of VS Code from the Download page. Choose the correct version for your operating system.
- On the Select Additional Tasks screen of the installation wizard, enable the Add to PATH (requires shell restart) checkbox.
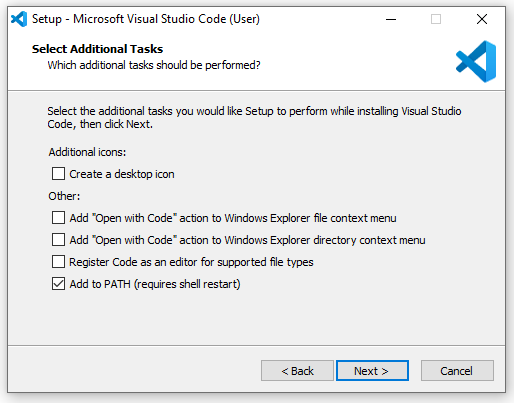
- Click the Install button.
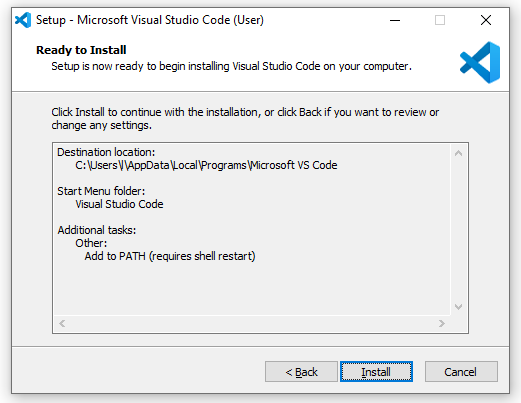
- VS Code should now be installed.
For your source control, we recommend using GitHub. It works seamlessly with the command line interface (CLI) offered through VS Code. It also has a desktop version available for download, offering a feature-rich user interface that simplifies version control for those less familiar with git commands.
Get the latest version of GitHub Desktop from their Downloads page.
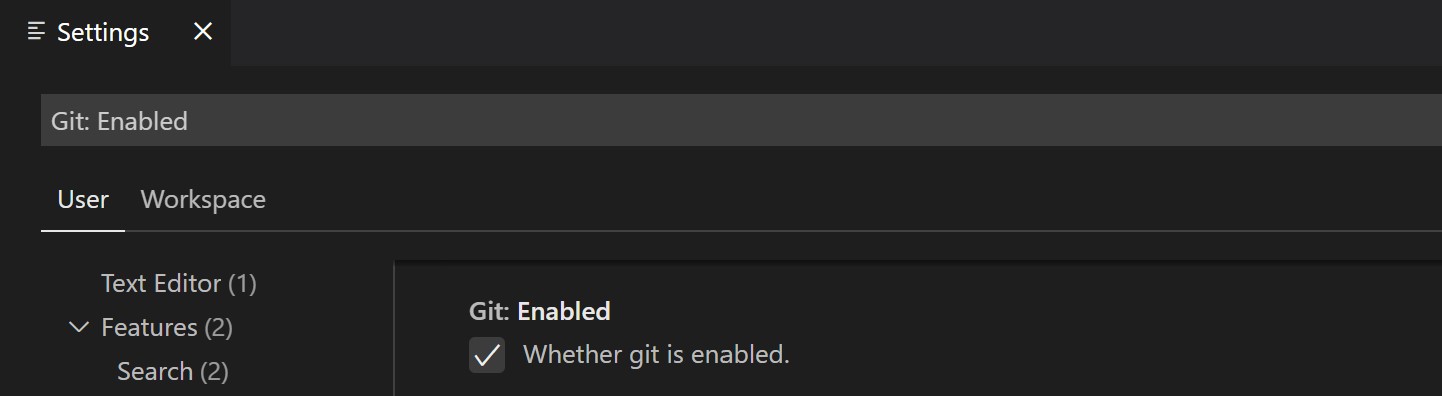
Once GitHub is downloaded, perform these steps to enable it in VS Code:
- Make sure you have already created your account on GitHub.
- Open VS Code.
- Click on Settings or the gear icon.
- Type “Git: Enabled” in the search bar.
- Ensure the Git: Enabled checkbox is enabled:
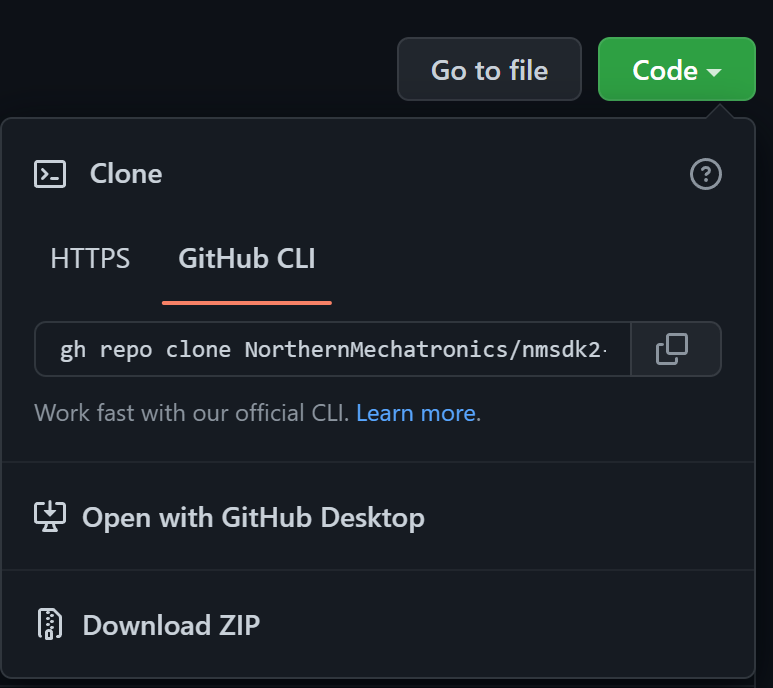
Once you have your preferred IDE and source control in place, it’s time to access the NMSDK2 source code.
- Navigate to the main page of the NMSDK2 repository.
- Above the list of files, click Code.

- Copy the URL for the repository.
- Open VS Code.
- Open the command palette with the key combination of Ctrl + Shift + P.
- At the command palette prompt, enter
gitcl, select the Git: Clone command, and press Enter. - When prompted for the Repository URL, select clone from GitHub, then press Enter.
- If you are asked to sign into GitHub, complete the sign-in process.
- Enter the copied URL for the repository in the Repository URL field.
- Select (or create) the local directory into which you want to clone the project.
- When you receive the notification asking if you want to open the cloned repository, select Open.
After opening the repository folder in VS Code for the first time, you may be prompted to install Git.

To download and install Git, follow these steps:
- Click the Download Git button, or go directly to the Git Downloads page.
- Download the 62-bt or 32-bit version of Git depending on your operating system.
- Select VS Code as the Git’s default editor
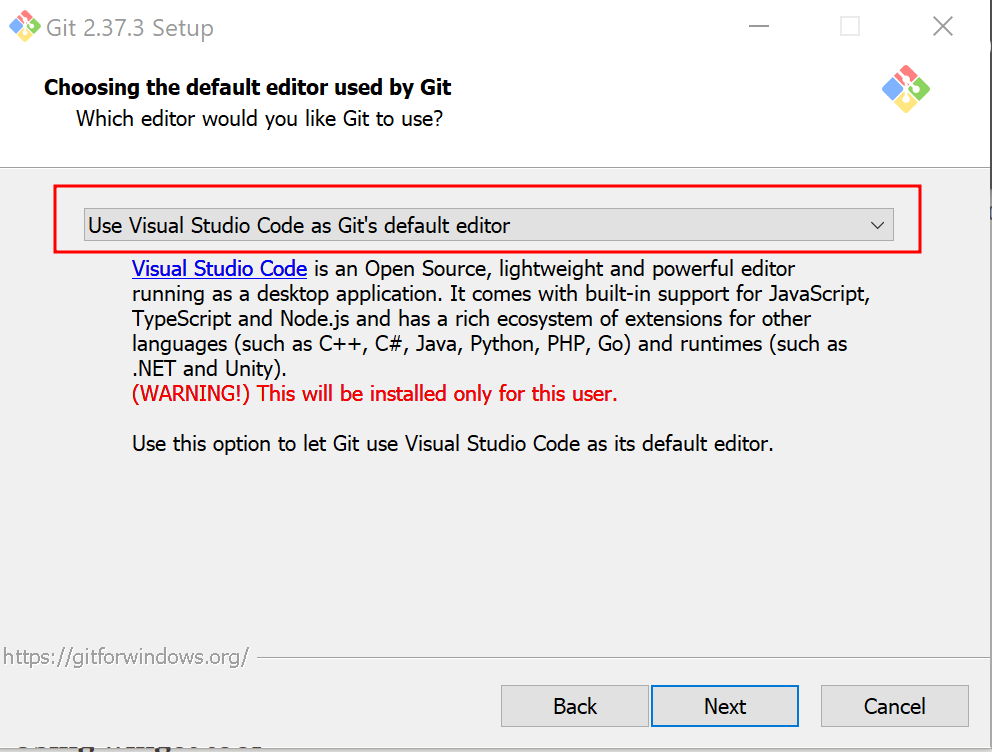
- Leave all other settings as default for the rest of the install options.
VS Code extensions let you add languages, debuggers, and tools to your installation to support your development workflow. We recommend installing several extensions. To view the recommended VS Code extensions, follow these steps:
- Open VS Code.
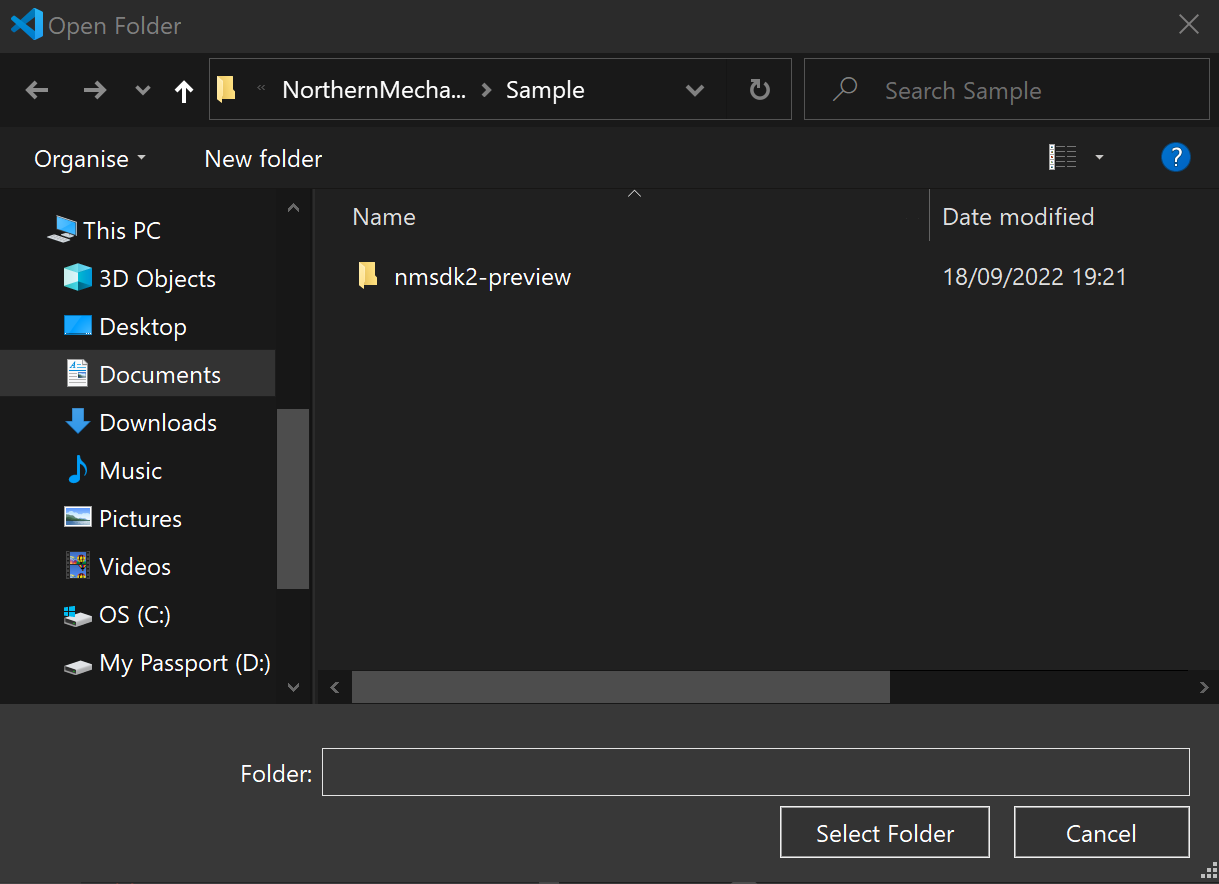
- Click on File in the menu bar, then Open Folder.
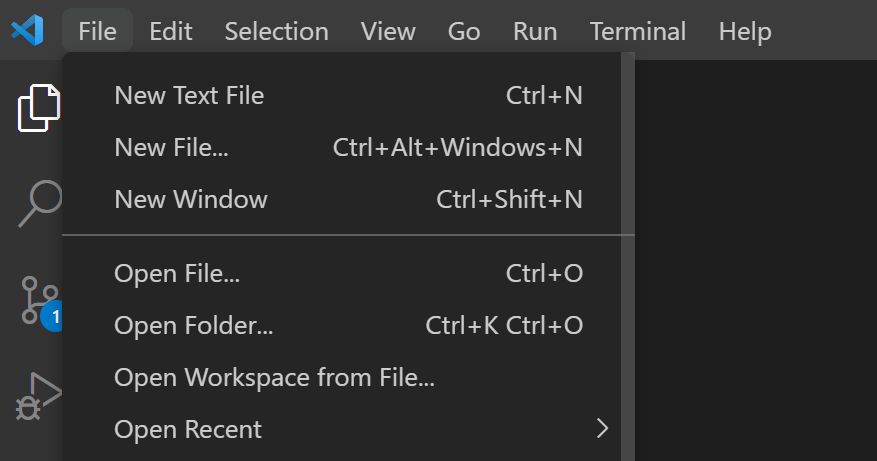
- Open the folder that contains your local version of the project.
- When the project is opened, you should see the following pop-up message:
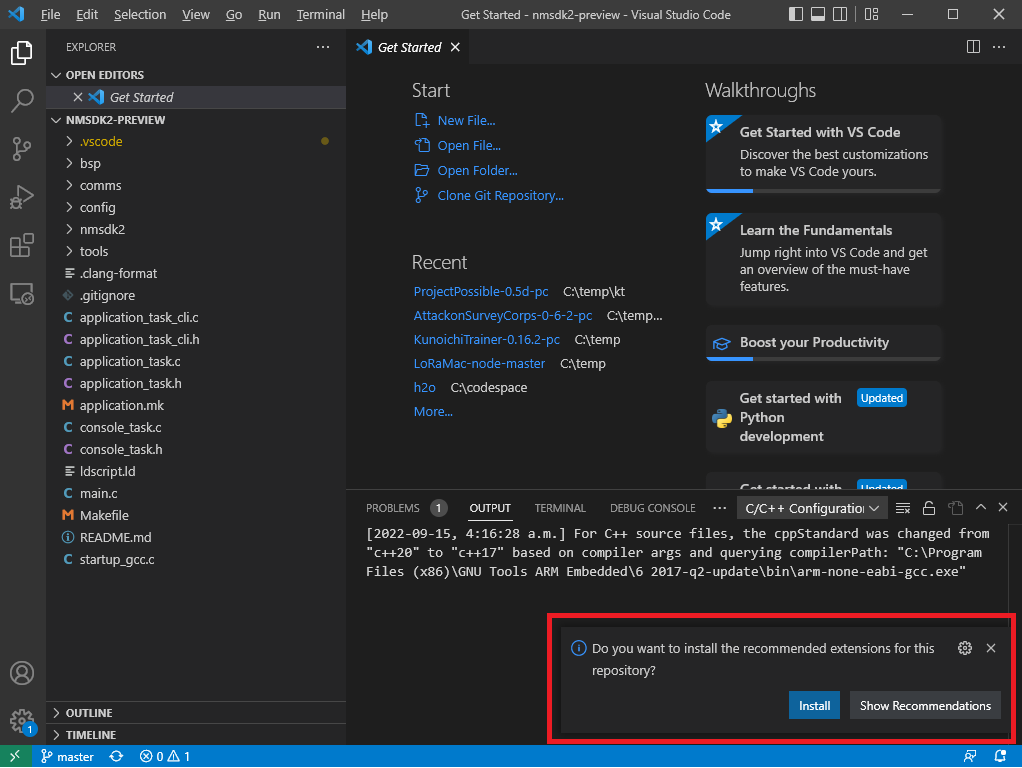
If no pop-up appears, follow these instructions to install our recommended extensions:
- Open the downloaded NMSDK2 source code repository folder in VS Code.
- Click the Gear icon in the bottom-left of VS Code.
- Select Extensions.
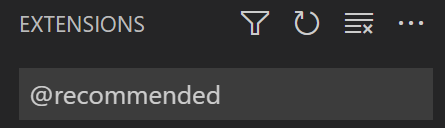
- In the search bar that shows the prompt Search Extensions in Marketplace, enter the text “@recommended”.
- Download all of the extensions that appear under the Workplace Recommendations heading.
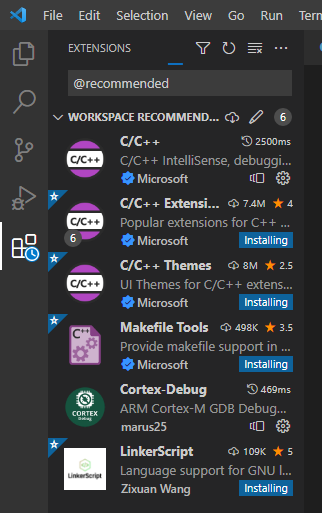
If you cannot view these items listed in your workspace, manually install the following extensions:
- C/C++
- C/C++ Extensions
- C/C++ Themes
- Makefile Tools
- Cortex-Debug
- LinkerScript
MSYS2 is a collection of tools and libraries providing you with an easy-to-use environment for building, installing, and running native Windows software. Install MSYS2 on your machine by following the MSYS2 Getting Started guide. Verify the installation was successful by executing the following command in your terminal:
$ gcc --version
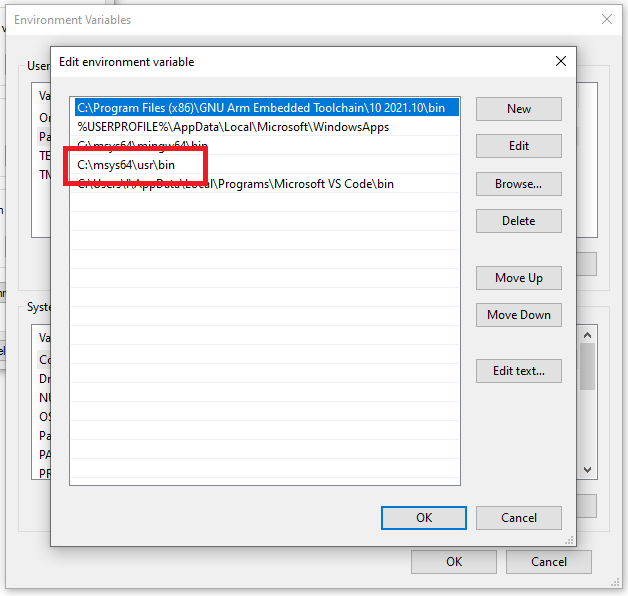
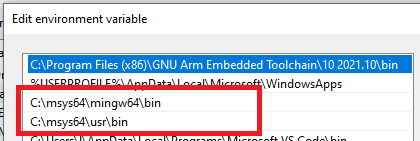
To make the MYSYS2 commands available everywhere, you need to add them to the “path” variable. The following instructions are for Windows 10 machines. Add the MYSYS2 executable to your PATH:
- In the Start menu search box, type the text “edit the system environment variables”.
- Click the Environment Variables… button.
- Click the New… button.
- Click Browse Directory and add the following location of the
binfolder under theusrdirectory to your path. The location will depend on where you chose to install and configure MSYS2.- The default location for Windows 64-bit systems is:
C:\msys64\usr\bin. - The default location for Windows 32-bit systems is:
C:\msys32\usr\bin.
- The default location for Windows 64-bit systems is:
Download and Install GNU Arm Toolchain 11.3Rel1 Compiler {#download-and-install-gnu-arm-toolchain-11-3rel1-compiler}
The GNU Arm Embedded Toolchain is a ready-to-use, open-source suite of tools for C, C++, and assembly programming. We recommend downloading the compiler for use with our SDK.
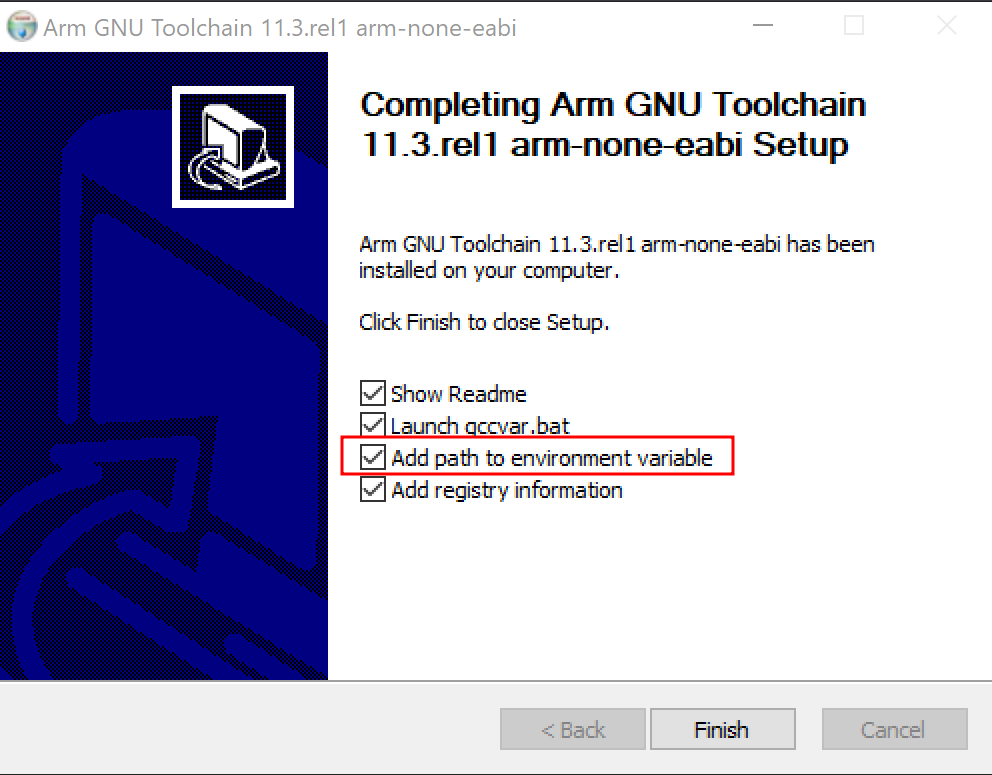
Download and install GNU Arm Toolchain version 11.3.Rel1:
- Navigate to the Arm Downloads page and download version 11.3.Rel1.
- Download the following version: arm-gnu-toolchain-11.3.rel1-mingw-w64-i686-arm-none-eabi.exe
- Add the compiler to your PATH using the Add path to environment variable checkbox.
Python is an interpreted, object-oriented, high-level programming language with dynamic semantics. Python is required for the support scripts that come with the SDK.
To install Python:
- Download the latest version of Python 3 from the Downloads page.
- User the Installation Wizard to add Python 3 to your PATH.
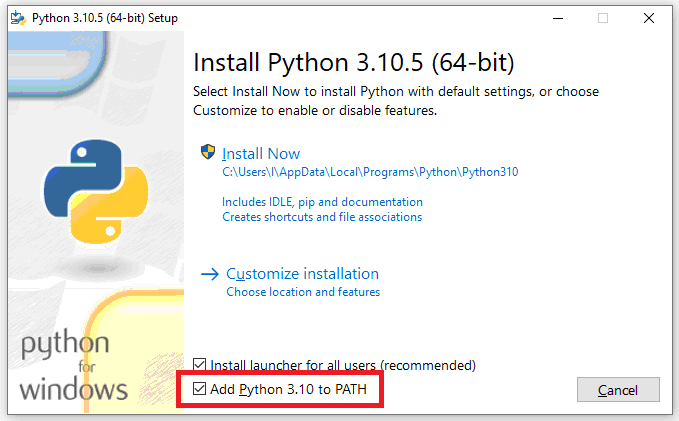
- Verify that the installation was successful by running the following command in your terminal:
python --version
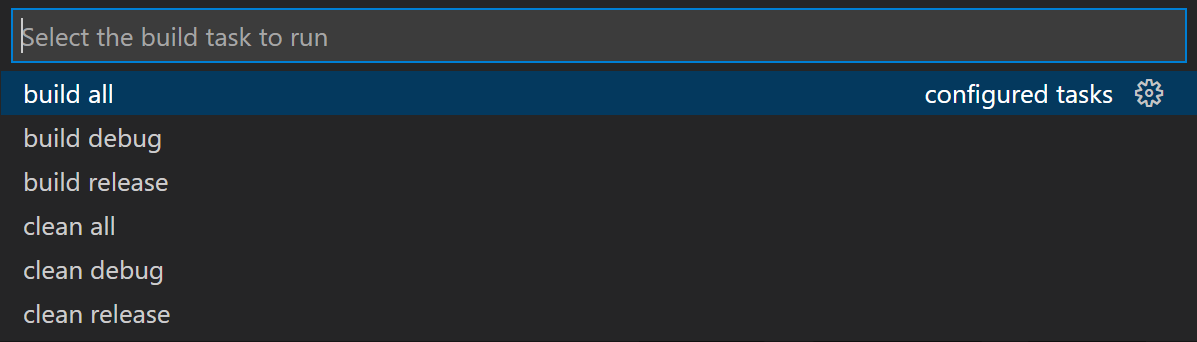
With the build prerequisitesin place, it is time to perform a build of the SDK.
To build the SDK for the first time:
- Open VS Code.
- Click on Terminal in the menu bar.
- Click on Run Build Task…
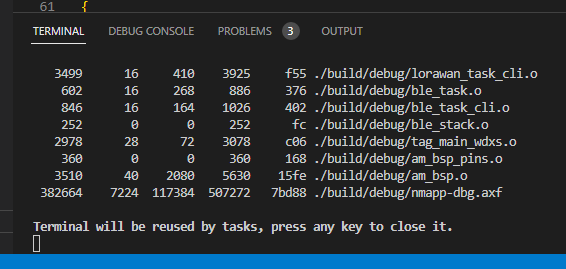
- Select build debug.
- The output of this operation should resemble the following image:
SEGGER J-Links are the most widely used line of debug probes on the market. These Debuggers can communicate at high speed with a large number of supported target CPU cores.
To successfully debug your application using the SEGGER J-Link tools, follow these steps:
- Download the J-Link Software and Documentation pack.
- Connect the J-Link debug probe to your NM180310 or NM180100EVB.
- Debug in VS Code.
Download the J-Link Software and Documentation pack {#download-the-j-link-software-and-documentation-pack}
Download the official J-Link Software and Documentation pack. The exact version will depend on your operating system. Download the version that applies to you from the J-Links Download page.
Connect the J-Link Debug Probe to your NM180310 or NM180100EV {#connect-the-j-link-debug-probe-to-your-nm180310-or-nm180100ev}
When you have acquired the J-Link Debug Probe, and downloaded the associated J-Link debugging software, it is time to connect the J-Link debugger and your NM180310 or NM180100EV.

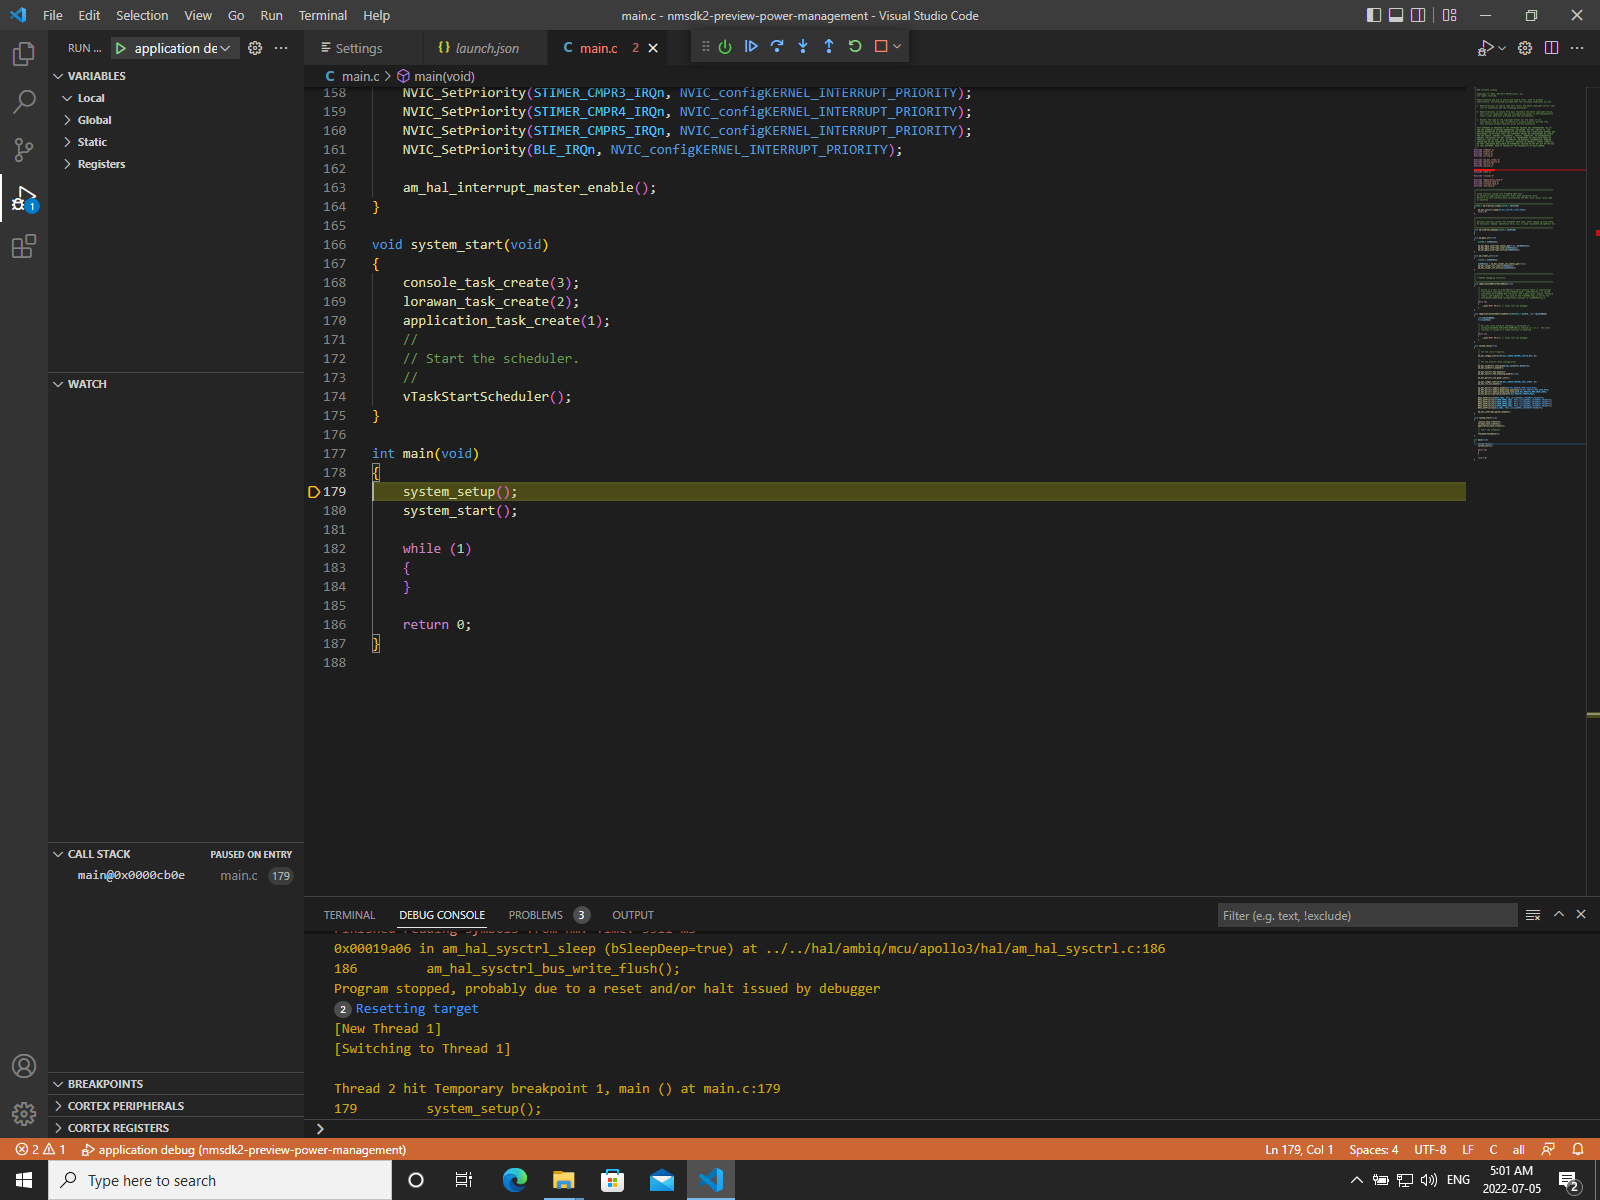
To start debugging in VS Code:
- Select Run in the menu bar.
- Click Start Debugging.

- When debugging has started, your screen should look like the following screenshot.
This section contains a list of common errors and issues our users face:
- Device not connected
- JLinkGDBServerCL.exe not found
- Python not found
- GNU GCC not found
- Make not found
If you see the following error message of “undefined GDB Server Quit Unexpectedly”, it is because the J-Link debug device is not being detected.
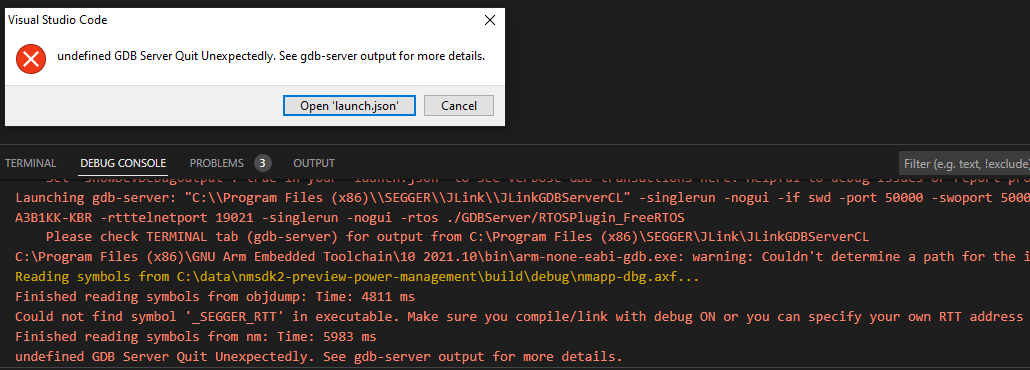
Follow these steps to resolve the issue:
- Disconnect the device fully.
- Wait for at least 10 seconds.
- Reconnect the device
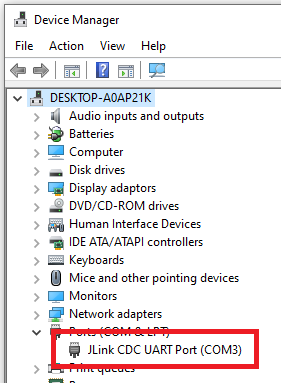
- Check the connection has been established in the Device Manager:
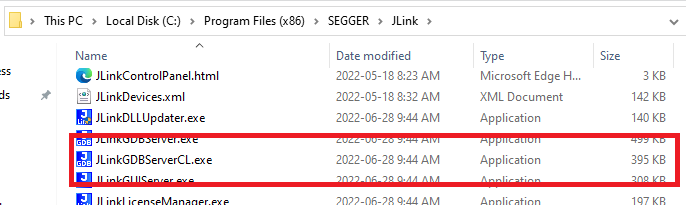
If you see the following error: “Failed to launch undefined GDB Server: Error: spawn C:\Program Files(x86)\SEGGER\JLink\JLinkGDBServerCL ENOENT”, it’s because the JLinkGDBServerCL.exe executable cannot be found.

To solve this issue, check the JLinkGDBServerCL.exe was successfully installed under the SEGGER > JLink folder:
You may encounter an error message in your console containing the text “Python was not found”:
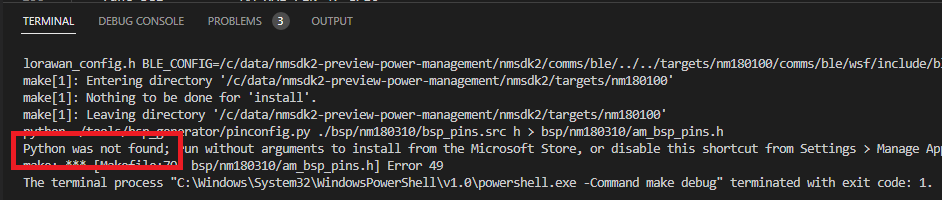
Complete the following steps to verify the installation of Python was successful.
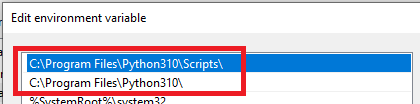
- Check that Python has been added to your PATH.
- Check the installation folder for the Python executable:

You may see this message in the Output tab of your terminal:

You may see a similar error in the Terminal tab itself:
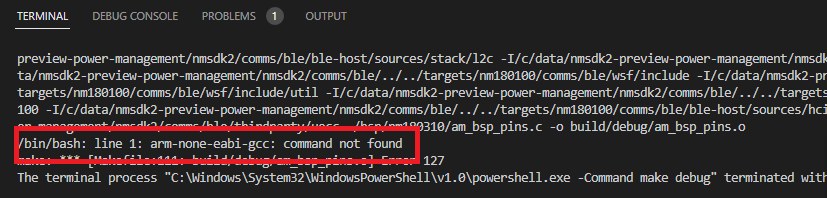
Perform the following checks to rectify the issue:
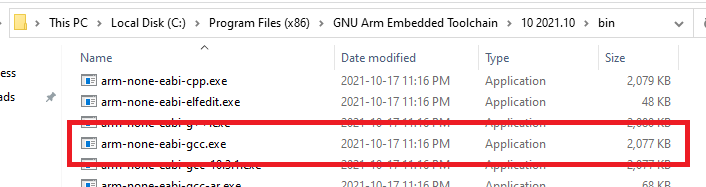
- Check the GNU Arm Toolchain Compiler has been added to your Environment Variable path:

- Check the bin folder contains the arm-none-eabi-gcc.exe executable:
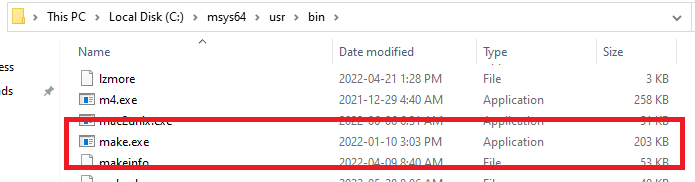
If you see an error in the terminal containing the text “The term 'make' is not recognized as the name of a cmdlet, function, script file, or operable program”, there may be an issue with your MSYS2 installation.

Check the following aspects of the installation:
- Check the bin folder for MYSY2 has been added to your path:
- Check the installation folder contains the make.exe executable: