This is a tutorial about the installation of Homeassistant Supervised on your Raspberry Pi 5 running Raspberry Pi OS 64bit.
If something doesn't work, make sure to check out the Troubleshooting Section at the bottom of this README.
Warning
Homeassistant Supervised will deprecated with Version 2025.12. After that Homeassistant Supervised - nor Homeassistant Core - will receive updates or official support. You can still install it and use it afterwards, but this is not recommended by Homeassistant. More info here
Didn't find a fix for your Problem? Feel free to open an issue in this repository!
Found something, that wasn't described good or wrong? Feel free to open an issue in this repository!
It's pretty simple:
want_addons = True or False
want_control_over_system = True or False

if want_addons:
   if want_control_over_system:
      print("Get HA-Supervised")
   else:
     print("Get HA-OS")
else:
   print("Get HA-Core")
Or in words: To use add-ons, you must opt for either Home Assistant OS (HA-OS) or Home Assistant Supervised (HA-Supervised). Either limiting your system's potential and underutilizing your Raspberry Pi 5 (likely using less than 10% of its capabilities), or retaining control over your system without being constrained by the operating system.
If you do not require add-ons and only prioritize integrations, Home Assistant Core (HA-Core) is a suitable choice. Or click here to see an overview of all installation methods
When am I running an unsupported System? For the entire list, take a look here
What could be the problem with having an unsupported system?
- No support from HA-Mods
- No way of reporting bugs. more Info
- Access to the Terminal of your Raspberry Pi 5 (SSH recommended)
- OS: Raspberry Pi OS (based on Debian Bookworm) (can be checked with
hostnamectl)
Operating System: Debian GNU/Linux 12 (bookworm)
          Kernel: Linux 6.1.0-rpi8-rpi-v8
    Architecture: arm64
- Unrestricted Internet Access for your Raspberry Pi 5
- Privileges to change to root
Important
The following script is still in BETA. This means, it might not work, and produce unexpected or unwanted behavior.
Note
The script is only tested with execution as root user. The script is only tested on an arm64 architecture with Raspberry Pi OS (based on Debian Bookworm). The script still requires a few interactions. After every reboot you will have to log into the root user and the script should start automatically again from where it left off.
It is possible to install Homeassistant Supervised by using my script. It might not work for everyone. If the script didn't work for you, please open a issue here and let me know. To download and run the script, execute the following:
sudo wget https://github.com/HuckleberryLovesYou/Homeassistant-Supervised-on-Raspberry-Pi-5/raw/main/installHomeassistant.sh -O installHomeassistant.sh && sudo chmod +x installHomeassistant.sh && sudo ./installHomeassistant.shAdd the configurations to the config.txt and cmdline.txt files and reboot by using this command.
sudo bash -c 'grep -q "kernel=kernel8.img" /boot/firmware/config.txt || sed -i "1s/^/kernel=kernel8.img\n/" /boot/firmware/config.txt; grep -q "apparmor=1 security=apparmor" /boot/firmware/cmdline.txt || (sed -z "$ s/\n$//" /boot/firmware/cmdline.txt > /tmp/cmdline.txt && mv /tmp/cmdline.txt /boot/firmware/cmdline.txt && printf " apparmor=1 security=apparmor" >> /boot/firmware/cmdline.txt)' && sudo rebootDownload and Install Docker-ce and Docker compose.
sudo apt install curl -y && sudo curl -fsSL https://get.docker.com -o get-docker.sh && sudo sh get-docker.sh && sudo rm get-docker.sh && sudo apt install -y libffi-dev libssl-dev python3-dev python3 python3-pip && sudo apt install docker-compose -y && sudo systemctl enable docker && user=$(whoami) && sudo usermod -aG docker $user && sudo mkdir -p $HOME/docker-dataYou can check if the docker-installation works by using the following command
sudo docker run hello-worldTip
If you want to run Portainer as well, take a look here.
Change to root:
sudo su -Update all Packages on your Device, install all the required Dependencies and fix name resolution by using the following command
apt update -y && apt upgrade -y && apt install apparmor jq wget curl udisks2 libglib2.0-bin network-manager dbus systemd-journal-remote cifs-utils lsb-release nfs-common systemd-resolved -y && systemctl restart systemd-resolved.serviceNow, we'll download OS-Agent, required by Homeassistant by using the following command.
Note
The following command will always download the latest release of OS-Agent automatically from here for aarch64.
wget -O os-agent_linux_aarch64.deb $(curl -s https://api.github.com/repos/home-assistant/os-agent/releases/latest | grep "browser_download_url.*linux_aarch64.deb" | cut -d '"' -f 4)To install os-agnet, we use dpkg with the install parameter
dpkg -i os-agent_linux_aarch64.debYou can test if the installation was successful by running:
sudo apt install -y libglib2.0-bin && gdbus introspect --system --dest io.hass.os --object-path /io/hass/osThis should NOT return an error. You can check your output with the correct Output here
Download the Homeassistant Supervised Installer by using the following command:
Note
The following command will always download the latest release of Homeassistant Supervised from here
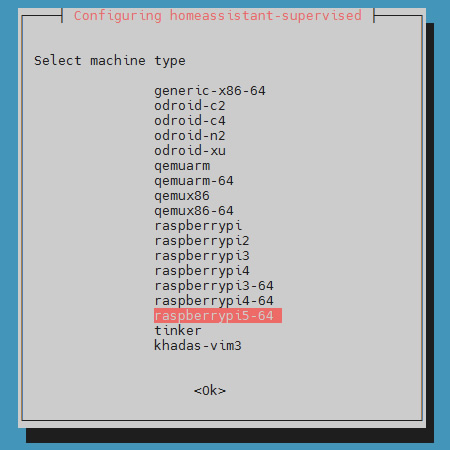
wget -O homeassistant-supervised.deb https://github.com/home-assistant/supervised-installer/releases/latest/download/homeassistant-supervised.debTo install execute the following command. During the Installation, you get asked “Select machine type”. Choose the "raspberrypi5-64" version like shown here
apt install ./homeassistant-supervised.deb -yNear the end there should be this output.
[info] Install supervisor startup scripts
[info] Install AppArmor scripts
[info] Start Home Assistant Supervised
[info] Installing the ‘ha’ cli
[info] Switching to cgroup v1
[info] Within a few minutes you will be able to reach Home Assistant at:
[info] http://homeassistant.local:8123 or using the IP address of Raspberry Pi
[info] machine: http://<Your Pi’s IP Address>:8123
After setup is finished without errors, you can go on.
Restart your entire system with the following command.
rebootTip
If you get the error "Depends: docker-ce but it is not installable" take a look at here #5
Access your Homeassistant-GUI by entering the following in your browser’s address bar. Make sure to use http and NOT https. You can also use the hostname that you set, like shown in the second example. To find out your Pi's IP you can use the following command. The standard homeassistant port is 8123.
echo "http://$(hostname -I | cut -d ' ' -f 1):8123"E.g.: http://192.168.2.5:8123
echo "http://$(hostname):8123"E.g.: http://raspberrypi:8123
If something goes wrong with the Installation of Homeassistant Installer, you can try to uninstall the OS-Agent with the following
sudo dpkg -r os-agentAfter that you can download the right version for your device here . Now, install the OS-Agent again.
dpkg -i os-agent_linux_aarch64.debYou should now be able to follow the steps above again
If Homeassistant is running, it checks all running containers, for containers which are named after big Docker-Swarm UI's. To bypass this check, you will have to rename the image of portainer, as well as the container name. To do this, follow these steps:
Note
If you have any Portainer images/container on your device, you may delete them (after backing them up).
Now pull the latest image of portainer using the following command:
sudo docker pull portainer/portainer-ce:latestNow, rename the downloaded image to e.g. 'iamnotportainer'
sudo docker tag portainer/portainer-ce:latest iamnotportainerNow start a new docker container using docker compose
compose.yaml
services:
  portainer:
    image: iamnotportainer
    container_name: iamnotportainer
    ports:
      # - 8000:8000 # uncomment this line, if you have portainer agents running
      - 9443:9443
    volumes:
      - <Your oath to files here>:/data
      - /var/run/docker.sock:/var/run/docker.sock
    restart: always

volumes:
  data:
You can now check, if the container was named e.g. iamnotportainer using the following command.
sudo docker ps -aAfter that you can restart Homeassistant from the GUI
If the error persists, you can execute the following errors, to restart docker:
sudo systemctl daemon-reload && sudo systemctl restart dockerThis section is reffering to #21. For further information check out the issue. This problem might also cause no YouTube playback. To fix this problem follow these steps:
- Go to
Settings > Add-ons > ADD-ON Store - Add the the Repository 'https://github.com/OPHoperHPO/hassio-addons' to Homeassistant like the following:

- Add the Add-on like shown in the following:
 'Update add-on list' may take a few minutes or some retires
 - Click on 'Install' to install the add-on
- Take a look in the logs of the add-on and search for the following line to ensure the fix worked:
[ALSA&PULSEAUDIO FIX][INFO] Module module-suspend-on-idle loaded successfully!


If you get the following message in your docker logs:
level=error msg="add cg to OOM monitor" error="cgroups: memory cgroup not supported on this system"
Fix it by adding "cgroup_memory=1" and "cgroup_enable=memory" in /boot/firmware/cmdline.txt:
sudo nano /boot/firmware/cmdline.txtAdd this to cmdline.txt:
cgroup_memory=1 cgroup_enable=memoryAnd now reboot your system:
sudo rebootFor further information, take a look here and here
Referring to issue #9