This repository contains an implementation of a Vision Transformer (ViT) model from scratch using PyTorch. The Vision Transformer architecture is a significant advancement in the field of computer vision, leveraging the Transformer model originally designed for natural language processing (NLP) to process image data effectively.
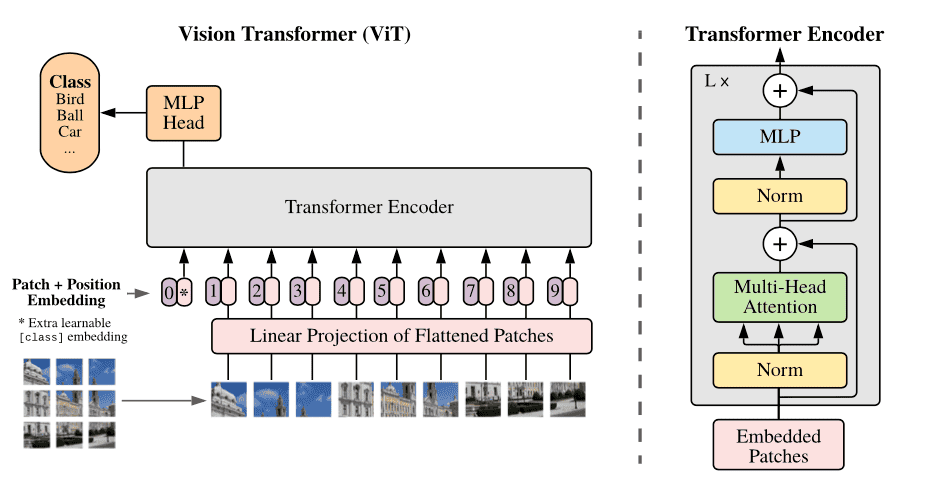
The Vision Transformer model was introduced in the paper "An Image is Worth 16x16 Words: Transformers for Image Recognition at Scale" by Dosovitskiy et al. This model adapts the Transformer architecture to handle image data by splitting images into patches and treating them as a sequence of tokens, similar to words in NLP. This repository provides a clear and straightforward implementation of the ViT model to help you understand its inner workings and experiment with its components.
This comprehensive and practical guide will take you through the process of setting up and using the Vision Transformer model from this repository, helping you to grasp the intricacies of this powerful architecture. By following the tutorial, you'll be well-equipped to delve into the world of Vision Transformers and leverage them for various computer vision applications.

To get started, clone the repository and install the required dependencies. It is recommended to use a virtual environment to manage dependencies.
git clone https://github.com/atikul-islam-sajib/ViT-Scratch.git
cd ViT-Scratchpython -m venv env
source env/bin/activate # On Windows, use `env\Scripts\activate`
pip install -r requirements.txtThe repository provides scripts and notebooks to help you understand and experiment with the ViT. Below is an example script that demonstrates how to initialize the ViT, create random input tensors, and print the shapes of the embedding and output tensors.
.
├── Dockerfile
├── LICENSE
├── README.md
├── artifacts
│   ├── checkpoints
│   │   ├── best_model
│   │   │   └── __init__.py
│   │   └── train_models
│   │       └── __init__.py
│   ├── files
│   │   ├── __init__.py
├── config.yml
├── data
│   ├── processed
│   │   ├── __init__.py
│   │   └── dataloader.pkl
│   └── raw
│       └── __init__.py
├── mypy.ini
├── notebooks
│   ├── ModelProtype.ipynb
│   └── Model_Inference.ipynb
├── requirements.txt
├── setup.py
├── src
│   ├── ViT.py
│   ├── cli.py
│   ├── dataloader.py
│   ├── encoder_block.py
│   ├── feedforward_network.py
│   ├── helper.py
│   ├── inference.py
│   ├── layer_normalization.py
│   ├── loss.py
│   ├── multihead_attention.py
│   ├── patch_embedding.py
│   ├── positional_encoding.py
│   ├── scaled_dot_product.py
│   ├── tester.py
│   ├── trainer.py
│   ├── transformer.py
│   └── utils.py
└── unittest
    └── test.py
For detailed documentation on the implementation and usage, visit the -> ViT Tutorial Notebook
dataset/  # Folder name must be 'dataset'
├── folder1/
│   ├── 2.png
│   ├── 3.png
│   ├── ...
├── folder2/
│   ├── 2.png
│   ├── 3.png
│   ├── ...
├── folder3/
│   ├── 2.png
│   ├── 3.png
│   ├── ...
- The folder name must be
dataset. - Each
folder*(e.g.,folder1,folder2,folder3, etc.) will contain the image data. - Inside each
folder*, the images are named sequentially (e.g.,2.png,3.png,4.png,5.png, etc.). - The structure is designed to group related images within each folder, which may represent different categories, classes, or datasets for a specific purpose.
- Ensure that all image files are correctly named and placed in their respective folders to maintain the integrity and organization of the dataset.
usage: cli.py [-h] [--image_path IMAGE_PATH] [--channels CHANNELS] [--image_size IMAGE_SIZE] [--batch_size BATCH_SIZE]
              [--split_size SPLIT_SIZE] [--labels LABELS] [--patch_size PATCH_SIZE] [--nheads NHEADS]
              [--num_encoder_layers NUM_ENCODER_LAYERS] [--dropout DROPOUT] [--dim_feedforward DIM_FEEDFORWARD] [--epsilon EPSILON]
              [--activation ACTIVATION] [--bias BIAS] [--epochs EPOCHS] [--lr LR] [--beta1 BETA1] [--beta2 BETA2] [--momentum MOMENTUM]
              [--step_size STEP_SIZE] [--gamma GAMMA] [--threshold THRESHOLD] [--device DEVICE] [--adam ADAM] [--SGD SGD]
              [--l1_regularization L1_REGULARIZATION] [--l2_regularization L2_REGULARIZATION]
              [--elasticnet_regularization ELASTICNET_REGULARIZATION] [--verbose VERBOSE] [--mlflow MLFLOW] [--train] [--test]

Cli For Vit Model

optional arguments:
  -h, --help            show this help message and exit
  --image_path IMAGE_PATH
                        Path to the image dataset
  --channels CHANNELS   Number of channels in the image
  --image_size IMAGE_SIZE
                        Size of the image
  --batch_size BATCH_SIZE
                        Batch size for the dataloader
  --split_size SPLIT_SIZE
                        Split size for the dataloader
  --labels LABELS       Number of labels
  --patch_size PATCH_SIZE
                        Patch_size size
  --nheads NHEADS       Number of heads
  --num_encoder_layers NUM_ENCODER_LAYERS
                        Number of encoder layers
  --dropout DROPOUT     Dropout rate
  --dim_feedforward DIM_FEEDFORWARD
                        Dimension of feedforward
  --epsilon EPSILON     Epsilon
  --activation ACTIVATION
                        Activation function
  --bias BIAS           Bias
  --epochs EPOCHS       Number of epochs
  --lr LR               Learning rate
  --beta1 BETA1         Beta1
  --beta2 BETA2         Beta2
  --momentum MOMENTUM   Momentum
  --step_size STEP_SIZE
                        Step size
  --gamma GAMMA         Gamma
  --threshold THRESHOLD
                        Threshold
  --device DEVICE       Device initialization
  --adam ADAM           Adam optimizer
  --SGD SGD             Sgd optimizer
  --l1_regularization L1_REGULARIZATION
                        L1 regularization
  --l2_regularization L2_REGULARIZATION
                        L2 regularization
  --elasticnet_regularization ELASTICNET_REGULARIZATION
                        Elasticnet regularization
  --verbose VERBOSE     Verbose
  --mlflow MLFLOW       Mlflow
  --train               Train
  --test                Test
python cli.py --image_path ./data.zip --channels 3 --image_size 224 --batch_size 64 --split_size 0.8 --labels 10 --patch_size 16 --nheads 8 --num_encoder_layers 6 --dropout 0.1 --dim_feedforward 2048 --epsilon 1e-8 --activation relu --bias True --epochs 50 --lr 0.001 --beta1 0.9 --beta2 0.999 --momentum 0.9 --step_size 10 --gamma 0.1 --threshold 0.5 --device "cpu" --adam True --SGD False --l1_regularization 0.0 --l2_regularization 0.0 --elasticnet_regularization 0.0 --verbose True --mlflow False --trainpython cli.py --image_path ./data.zip --channels 3 --image_size 224 --batch_size 64 --split_size 0.8 --labels 10 --patch_size 16 --nheads 8 --num_encoder_layers 6 --dropout 0.1 --dim_feedforward 2048 --epsilon 1e-8 --activation relu --bias True --epochs 50 --lr 0.001 --beta1 0.9 --beta2 0.999 --momentum 0.9 --step_size 10 --gamma 0.1 --threshold 0.5 --device "cuda" --adam True --SGD False --l1_regularization 0.0 --l2_regularization 0.0 --elasticnet_regularization 0.0 --verbose True --mlflow False --trainpython cli.py --device "cpu" --testpython cli.py --device "cuda" --testConfigure the Project:
path:
  RAW_DATA_PATH: "./data/raw/"
  PROCESSED_DATA_PATH: "./data/processed/"
  FILES_PATH: "./artifacts/files/"
  TRAIN_MODELS_PATH: "./artifacts/checkpoints/train_models/"
  BEST_MODEL_PATH: "./artifacts/checkpoints/best_model/"
  OUTPUTS_PATH: "./artifacts/outputs/test_image/"
  METRICS_PATH: "./artifacts/metrics/"

dataloader:
  image_path: None
  channels: 3
  image_size: 128
  batch_size: 32
  split_size: 0.30
  labels: ["glioma", "meningioma", "notumor", "pituitary"]

MLFLow:
  MLFLOW_TRACKING_URI: "https://dagshub.com/atikul-islam-sajib/ViT-Scratch.mlflow"
  MLFLOW_USERNAME: "atikul-islam-sajib"
  MLFLOW_PASSWORD: "74d9f47e6bc7f8a7a170d258186fcdf18a099a99"

ViT:
  patch_size: 8                     # Size of each image patch
  nheads: 8                         # Number of attention heads
  dim_feedforward: 2048             # Dimension of the feedforward network
  num_layers: 6                     # Number of transformer layers
  dropout: 0.1                      # Dropout rate
  eps: 1e-05                        # Epsilon value for normalization layers
  activation: "relu"                # Activation function


trainer:
  epochs: 100                       # Number of training epochs
  lr: 2e-5                          # Learning rate
  beta1: 0.5                        # Beta1 hyperparameter for Adam optimizer
  beta2: 0.999                      # Beta2 hyperparameter for Adam optimizer
  momentum: 0.90                    # Momentum for optimizers
  weight_decay: 0.001               # Weight decay for regularization
  step_size: 100                    # Step size for learning rate scheduler
  gamma: 0.85                       # Multiplicative factor for learning rate decay
  threshold: 2                      # Threshold for model saving purposes
  device: "mps"                     # Device to use for training (e.g., MPS, CPU, GPU)
  adam: True                        # Use Adam optimizer
  SGD: False                        # Use SGD optimizer
  pixelLoss: False                  # Use pixel-wise loss
  l1_regularization: False          # Use L1 regularization
  l2_regularization: False          # Use L2 regularization
  elasticnet_regularization: False  # Use Elastic Net regularization
  lr_scheduler: True                # Enable learning rate scheduler
  verbose: True                     # Enable verbose logging
  mlflow: True                      # Enable MLflow tracking
-
Generate a Personal Access Token on DagsHub:
- Log in to DagsHub.
- Go to your user settings and generate a new personal access token under "Personal Access Tokens".
-
Configuration in config.yml: Ensure the MLFlow configuration is defined in the
config.ymlfile. The relevant section might look like this:MLFlow: MLFLOW_TRACKING_URL: "https://dagshub.com/<username>/<repo_name>.mlflow" MLFLOW_TRACKING_USERNAME: "<your_dagshub_username>" MLFLOW_TRACKING_PASSWORD: "<your_dagshub_token>"
Make sure to replace
<username>,<repo_name>,<your_dagshub_username>, and<your_dagshub_token>with your actual DagsHub credentials.
To start training and logging the experiments to DagsHub, run the following command:
python src/cli.py -- train
python src/cli.py -- test
You can access the MLflow experiment tracking UI hosted on DagsHub using the following link:
ViT Experiment Tracking on DagsHub
If you prefer to run the MLflow UI locally, use the following command:
mlflow uiContributions to improve this implementation of ViT are welcome. Please follow the standard fork-branch-pull request workflow.
The project is made available (e.g., MIT License).