Getting Started with Axiom
This tutorial walks you through the steps of creating a new Axiom project and running it on a development machine.
Before you can create a new project and run it, you'll need the following installed on your machine:
- Docker and Docker-Compose, which ship together for Mac and Windows (for Linux you'll need to install Docker and then download the Compose binary).
- Java 8
- Leiningen 2. (I use 2.7.1).
The easiest way to start an Axiom project is using our Leiningen template:
$ lein new axiom-cli your-project
Generating fresh 'lein new' axiom-clj project.
This will create a new project name you-project, which will have the following structure:
$ cd your-project
$ find . -type d
./.gitignore
./axiom.log
./CHANGELOG.md
./doc/intro.md
./docker-compose.yml
./LICENSE
./project.clj
./README.md
./resources/public/index.html
./resources/public/tests.html
./src/your_project/core.clj
./src/your_project/core.cljs
./test/runners/browser.cljs
./test/runners/doo.cljs
./test/runners/tests.cljs
./test/your_project/core_test.clj
./test/your_project/core_test.cljs
This project already contains a small todo application, which you can read play around with before removing it and writing your own.
Axiom needs DynamoDB, RabbitMQ and Zookeeper to work. Fortunately, you do not need to install them individually.
The project you created contains a docker-compose.yml file, which contains the specifications for three Docker containers, one for each service (DynamoDB, which is a hosted AWS service is replaced with aws-dynamodb-local, server software provided by Amazon for developing software that uses DynamoDB outside the AWS environment).
To launch the services, run:
$ docker-compose up -dThe first time you run this, Docker will download images for the three containers. Depending on your network connection this may take a short while. Once it's done, it will launch the three containers and exit.
Now you're all set to run Axiom. From within the root of your project, type:
$ lein axiom runThis will start Axiom itself.
On another shell, type:
$ lein figwheelThis will launch Figwheel, which will allow you to modify the client-side code and see the changes live.
Now, go to http://localhost:3449/index.html?#?_identity=foo.
Port 3449 is Figwheel's default port, so you'll be asking Figwheel, not Axiom, for index.html.
But the ClojureScript code that will load with the page will connect to Axiom through WebSockets.
The #?_identity=foo part is used by the ClojureScript code on the page.
The part after the ? is passed to Axiom as-is.
Axiom is using its development settings, in which authentication is done without by trusting users (not something you should do anywhere other than development).
In this URL, we authenticate as foo.
Feel free to change the _identity value to your own name.
You will need to refresh the browser for the change to take effect.
As the page opens, you are supposed to see a button with the caption "New Task".

Click that button and you should get a text box, in which you can enter a task.
Write something like Learn Axiom.
Create a new task and write Create an app.
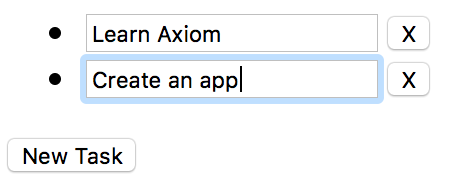
Now refresh the page. The content you wrote is supposed to be restored after the refresh. This is because it is persisted on the database (dynamodb-local).
To see how this part of the application has been written see the comments in the client-side code.
So far, we only used Axiom as a way to store the state generated by the client. To unleash Axiom's full potential we need to also deploy server-side logic.
The file ./test/your_project/core_test.clj contains unit tests for the server-side logic. It uses a dedicated DSL for exercising the logic, and the Midje testing framework for the actual tests.
To launch the tests, run:
$ lein midjeThis will fail.
Exception in thread "main" java.io.FileNotFoundException: Could not locate perm/QmNYKXgUt64cvXau5aNFqvTrjyU8hEKdnhkvtcUphacJaf__init.class or perm/QmNYKXgUt64cvXau5aNFqvTrjyU8hEKdnhkvtcUphacJaf.clj on classpath., compiling:(your_project/core.clj:1:1)
	at clojure.lang.Compiler.load(Compiler.java:7391)
	at clojure.lang.RT.loadResourceScript(RT.java:372)
	at clojure.lang.RT.loadResourceScript(RT.java:363)
	at clojure.lang.RT.load(RT.java:453)
        ........
It failed because the Clojure namespace perm/QmNYKXgUt64cvXau5aNFqvTrjyU8hEKdnhkvtcUphacJaf was not found.
Axiom has its own module system named permacode, which uses content addressing, meaning that the name of the module is actually a hash of its content.
If you want, you can inspect the contents of the missing namespace by using lein axiom pprint:
$ lein axiom pprint QmNYKXgUt64cvXau5aNFqvTrjyU8hEKdnhkvtcUphacJaf
Aug 27 2017 21:10:13:612 IDT [II] [rabbit] Binding queue migrator.core/clause-migrator to routing key f.65f37ab74f4c3fb697e980e25648895e153d79f7.#
Aug 27 2017 21:10:14:055 IDT [II] [rabbit] Binding queue database-event-storage to routing key f.#
((ns
  cloudlog.core
  [:require [permacode.symbols :as symbols]]
  [:require [permacode.core]]
  [:require [clojure.set :as set]]
  [:require [clojure.string :as string]]
  [:require
   [perm.QmQodG29316hRLwuJVGpCP3CW7VCJEE5KTpK6ABDBDUT1H :as unify]]
  [:require
   [perm.QmYANgLvtDmSc2PM5nJ2w2ZEHTs5R1tq71rW49LhnUX86P :as graph]]
  [:require
   [perm.QmWSUHFf5f7GdfmzQKyFQfZ6iGdfYbjj89enAcPLfkHPax :as interset]])
 (permacode.core/pure
  (declare generate-rule-func)
  (defmacro
   by
   [set body]
   (clojure.core/seq
    (clojure.core/concat
     (clojure.core/list 'clojure.core/when)
     (clojure.core/list
      (clojure.core/seq
       (clojure.core/concat
        (clojure.core/list 'clojure.core/contains?)
        (clojure.core/list
         (clojure.core/seq
          (clojure.core/concat
           (clojure.core/list 'clojure.core/->)
           (clojure.core/list '$input$)
           (clojure.core/list 'clojure.core/meta)
           (clojure.core/list :writers))))
        (clojure.core/list set))))
     (clojure.core/list body))))
     .........
As you can see, this module :requires other modules identified using hashes.
To make this module and all its (recursive) dependencies available for this project, use lein axiom deps:
$ lein axiom deps
Aug 27 2017 21:14:02:195 IDT [II] [rabbit] Binding queue migrator.core/clause-migrator to routing key f.65f37ab74f4c3fb697e980e25648895e153d79f7.#
Aug 27 2017 21:14:02:584 IDT [II] [rabbit] Binding queue database-event-storage to routing key f.#
/path/to/your-project/src/perm/QmNYKXgUt64cvXau5aNFqvTrjyU8hEKdnhkvtcUphacJaf.clj
/path/to/your-project/src/perm/QmQodG29316hRLwuJVGpCP3CW7VCJEE5KTpK6ABDBDUT1H.clj
/path/to/your-project/src/perm/QmYANgLvtDmSc2PM5nJ2w2ZEHTs5R1tq71rW49LhnUX86P.clj
/path/to/your-project/src/perm/QmWSUHFf5f7GdfmzQKyFQfZ6iGdfYbjj89enAcPLfkHPax.clj
The required modules were added to our project.
Now you can try testing again:
$ lein midje
All checks (3) succeeded.The logic itself is written in a DSL named Cloudlog. Look at the source file ./test/your_project/core_test.clj to see the logic defined in this app.
Although the logic is written, it is not yet in play in the application.
To put it in play we need to do two things.
First, we need to use lein axiom deploy to deploy it to Axiom:
$ lein axiom deploy
Aug 27 2017 21:24:10:432 IDT [II] [rabbit] Binding queue migrator.core/clause-migrator to routing key f.65f37ab74f4c3fb697e980e25648895e153d79f7.#
Aug 27 2017 21:24:10:840 IDT [II] [rabbit] Binding queue database-event-storage to routing key f.#
Aug 27 2017 21:24:11:476 IDT [II] [rabbit] Publishing {:kind :fact, :name "axiom/perm-versions", :key "dev-2157850", :data [{your-project.core perm.QmfDFAnNMUatUFCD7PrbxrobTKRAq33nvh5FadwfP6Bbu5} {"/cljs/out/goog/math/size.js" "QmXEo8HEiVcbkUpimWR7p8iVZRdWWFy9J4koMoPNV6DLtV", "/cljs/out/goog/base.js" "QmaPAVxwMvAzpaBiNqquhPW4XgDtSeGzw9ubmJ9dMwfbCj", "/cljs/out/cljs/core/async/impl/channels.js.map" "QmQYnS1mknsKhhwnG6zkZMwo5sKqn3bHyVcHQnxptRKuXc", "/cljs/out/chord/format.js" .....
......
Deployed a new version: dev-2157850
Add &_ver=dev-2157850  to your URL
The second part is to follow the instruction at the bottom of the output (note that the number that is printed by each deploy is random, so add the number provided by your deploy to the URL). Then refresh the browser.
Two lines will appear below the button, depicting the text of your two tasks:
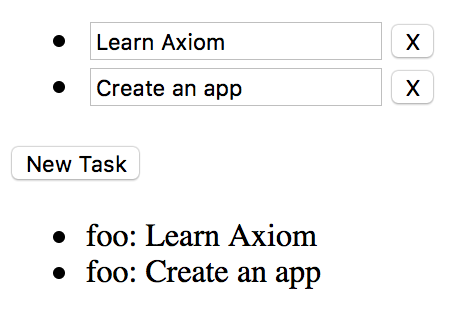
These are query results calculated by the logic.
Edit the tasks you created, delete one, add one, etc. See how the results are updated in real time.
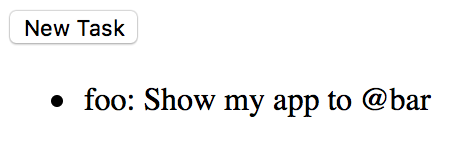
Now create a task saying: Show my app to @bar.
Then "authenticate" as bar by modifying the _identity value in the URL to _identity=bar (leave the _ver value unchanged), and refreshing the browser.
You'll notice that the user bar got notice that we have mentioned him (or her?) in our task.