Setting up Raspberry Pi
Great, now you have a Raspberry Pi. Lets get it going.
##Overview
Getting a Pi out of the box unfortunately does not quite give you a working computer. Here we will go over basic setup of the Operating System, connecting to Internet, and getting the Pi in working state.
##General Notes A case on the Pi will prevent the bottom, metal pins from resting on a conductive surface.
You will need a 5V power supply that can support ~2A of current. You can expect your Pi to take between 1-2A depending on the computer's load.
##Heat Sinks Here is an image of why you might want a heat sink. If you do not have them, you should be all right.
Make sure that you use thermal adhesive, and apply to heat sinks to CPU and Network/USB chip.
##Installing the Operating System (Rasbian) Raspbian is the Linux distribution recommended for our device. We will need it to use our computer.
You can purchase a SD card with Noobs installed, or you can follow these instructions to setup your own SD card.
After, insert the SD card to the bottom of the Raspberry Pi, connect HDMI, a mouse, and a keyboard, then power it on.
You should see:

Continue through the Noobs application and your Raspberry Pi should be up and running.
##Basic Setup Keyboard and local time needs to be set up following installation.
Open a terminal, and
sudo raspi-config
###Keyboard Please see here for full instructions and associated pictures
###Timezone and Clock
- Navigate to "Internationalisation Options"
- "Change Timezone"
- Then select country and city
##Connecting to the internet This was a headache for me, hopefully it will not be for you.
Connecting is straightforward if you have a standard wired connection or "select network, enter password" Wifi (see: WPA-Personal).
Things are more complicated if you have a static IP or are trying to connect on Airbears2.
DO NOT change your /etc/network/interfaces file. Forum help for changing this file is for older versions of Rasbian and should be unnecessary.
###Standard Connection
- Click network button in top right corner
- Select your network
- Enter password if necessary
###Ethernet with a Static IP address Note, most ethernet connections will work without these instructions.
You will need an IP address, a subnet mask, a router/gateway, a DNS server, and a domain.
- Right click network button in top right corner
- Select "Wifi Network Settings"
- Configure -> "interface:eth0"
- Enter information
Here is an example:

NOTE: If your subnet mask looks like: "255.255.255.xxx". we will need to convert to CIDR notation. Please use this tool and paste the CIDR notation address.
###WPA-Enterprise (Airbears2, UC Berkeley’s campus wifi)
Airbears2 poses a different challenge. To log in, a username and password is required.
To connect, we will need to modify a network configuration file. The internet recommends to set up Wifi on an Android phone, and copy/paste the created configuration file. For convenience, I have included sample config file.
Open the file with:
sudo nano /etc/wpa_supplicant/wpa_supplicant.conf
And add the following:

Double check your file, then "ctrl + X" to exit, "y" to save, "enter" to save.
Restart your Pi to reload network changes.
##Once Connected to the Internet
"apt-get" is a helpful installer for a linux machine. We should update the current applications before proceeding. Note that this process may take ~15 minutes. Also, it has frozen before, and I needed to CTRL-Z to exit. Then I rebooted and started again.
Run
sudo apt-get update
And
sudo apt-get -y upgrade
You can install any application using
sudo apt-get install _______
##Helpful Resources: SSH'ing to Raspberry Pi
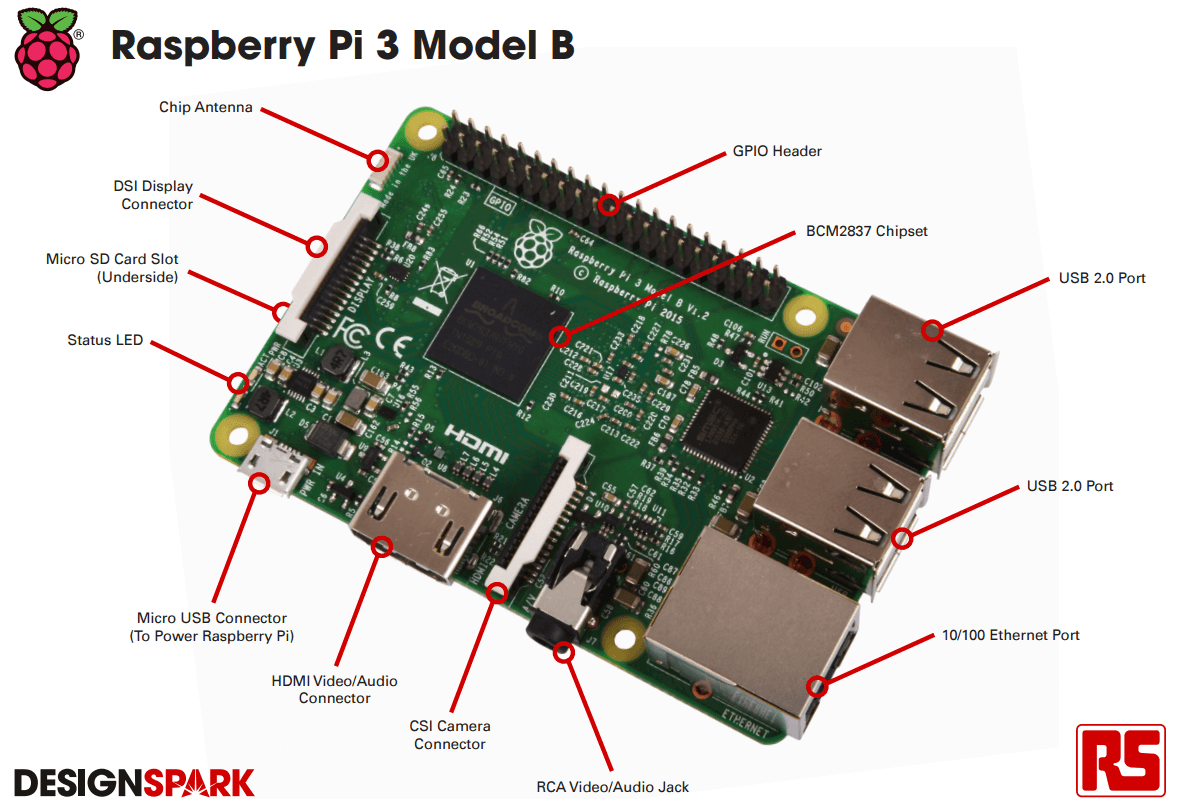
####References [1]Raspberry Pi 3 diagram from RS online Raspberry Pi 3 page