- camera_mount_CAD : folder containing the files to design and 3D print a customized camera mount
- sync_saver : ROS2 custom node with cpp
- Read AEDAT.py : python script that converts the DAVIS346 data acquisitions (.aedat4 file) into a dataset format (.csv file for IMU and events, .png for frames) (NOT USED)
- zed_camera.yaml : zed camera config file
- CPSP-project.pdf : the exam presentation's slides
-
Jetpack 6.1
check version
cat /etc/nv_tegra_release -
Cuda 11.4
check version
nvcc --version -
ROS2 foxy on Ubuntu 20.4.6
https://docs.ros.org/en/foxy/Installation/Alternatives/Ubuntu-Development-Setup.html
-
ZED SDK 4.0.8
https://www.stereolabs.com/en-it/developers/release/archives
-
zed-ros2-wrapper humble-v4.0.8
https://github.com/stereolabs/zed-ros2-wrapper/releases/tag/humble-v4.0.8
version: humble-v4.0.8
mkdir -p ~/ros2_ws/src/
cd ~/ros2_ws/src/
git clone --branch humble-v4.0.8 --recursive https://github.com/stereolabs/zed-ros2-wrapper.git
cd ..
sudo apt update
rosdep update
rosdep install --from-paths src --ignore-src -r -y
# dependencies
cd ~/ros2_ws/src/
git clone https://github.com/ros-drivers/nmea_msgs.git
# --recursive include zed-ros2-interfaces
# git clone --branch humble-v4.0.8 --recursive https://github.com/stereolabs/zed-ros2-interfaces.git
# check
cd ..
rosdep install --from-paths src --ignore-src -r -y

colcon build --symlink-install --cmake-args=-DCMAKE_BUILD_TYPE=Release --parallel-workers $(nproc)

# add env
echo source $(pwd)/install/local_setup.bash >> ~/.bashrc # automatically source the installation in every new bash (optional)
source ~/.bashrcros2 launch zed_wrapper zed_camera.launch.py camera_model:=<camera_model>
# zed mini
ros2 launch zed_wrapper zed_camera.launch.py camera_model:=zedm# show topic
ros2 topic list
# echo topic context
ros2 topic echo /camera/left/image_rect_color --no-arrrosdep install -i --from-path node_ros2 --rosdistro foxy -yros2 foxy need OpenCV 4.2
conflict with OpenCV4.5:
# Uninstall cv_bridge that comes with ROS
sudo apt remove ros-foxy-cv-bridge

# Compile cv_bridge from source code (need to match your OpenCV 4.5)
mkdir -p ~/cv_bridge_ws/src
cd ~/cv_bridge_ws/src
git clone -b foxy https://github.com/ros-perception/vision_opencv.git
cd ..
colcon build --packages-select cv_bridge --cmake-args -DCMAKE_BUILD_TYPE=Release
source install/setup.bash

# Recompile your package
cd ~/Project_Dataset
colcon build --packages-select sync_saversudo apt install libopencv-dev
sudo apt install libyaml-cpp-dev-
preparing the Jetson device for DVS camera USB connection
- create a file: /etc/udev/rules.d/99-davis.rules
File contents should be: SUBSYSTEM=="usb", ATTR{idVendor}=="0403", ATTR{idProduct}=="6014", MODE="0666", GROUP="plugdev"
- next, use these commands to reload the rules and sudo udevadm control --reload-rules sudo udevadm trigger
-
prepare all the dependencies
needed by libcaer_driver inside the worksace: git clone https://github.com/ros-event-camera/event_camera_msgs
inside the worksace: git clone https://github.com/ros-event-camera/dvs_msgs.git
inside the worksace: git clone https://github.com/ros-event-camera/libcaer_vendor.git
Adjustments to be made in order to allow a successful build despite incompatibilities with ROS foxy
-
Changes were made to cmake file change this file in your workspace: src/libcaer_vendor/CMakeLists.txt
replace find_package(ament_cmake_vendor_package REQUIRED) with find_package(ament_cmake REQUIRED) comment or remove the lines with: ament_vendor(libcaer ...)
Make sure you don't delete these find_package(ament_cmake REQUIRED) ament_package()
Remove or comment this line
ament_environment_hooks("${CMAKE_CURRENT_SOURCE_DIR}/env-hooks/libcaer_vendor.sh") -
Changes to package.txt file
- Remove or comment out any use of ament_vendor in the file src/libcaer_vendor/package.xml
- Remove this line if found present <buildtool_depend>ament_vendor</buildtool_depend>
-
changes to package.xml
change this file: src/libcaer_vendor/package.xml
delete these lines: <build_depend>ament_cmake_vendor_package</build_depend> <exec_depend>ament_cmake_vendor_package</exec_depend> ament_cmake_vendor_package
https://github.com/ros-event-camera/libcaer_driver/tree/master NOTE: install the repo from source to overcome issues of incompatibility with ros2 foxy
# match OpenCV4.5
source /home/menna/cv_bridge_ws/install/setup.bash
# compile package
colcon build --packages-select sync_saver --symlink-install --cmake-args -DCMAKE_BUILD_TYPE=Release# run zed_wrapper node
# env have been added
ros2 launch zed_wrapper zed_camera.launch.py camera_model:=zedm config_file:=zed_camera.yaml
# run sync node
# env have not been added
source install/local_setup.bash
ros2 run sync_saver sync_saverTopics to subscribe to:
- "/zed/zed_node/left/image_rect_color"
- "/zed/zed_node/right/image_rect_color"
- "/zed/zed_node/imu/data"
-
Source the workspace:
source install/setup.bash -
Launch the recording node
ros2 launch libcaer_driver driver_node.launch.py device_type:=davis
-
Record events
ros2 bag record /event_camera/events
NOTE: Recording is saved in folder ~/ros2_ws/rosbag2_{date}_{time} Data is in .db3 format
Subscribe to the zed_wrapper node, synchronized the messages using sync_saver, and saved them to create a dataset.
The dataset structure is as follows:
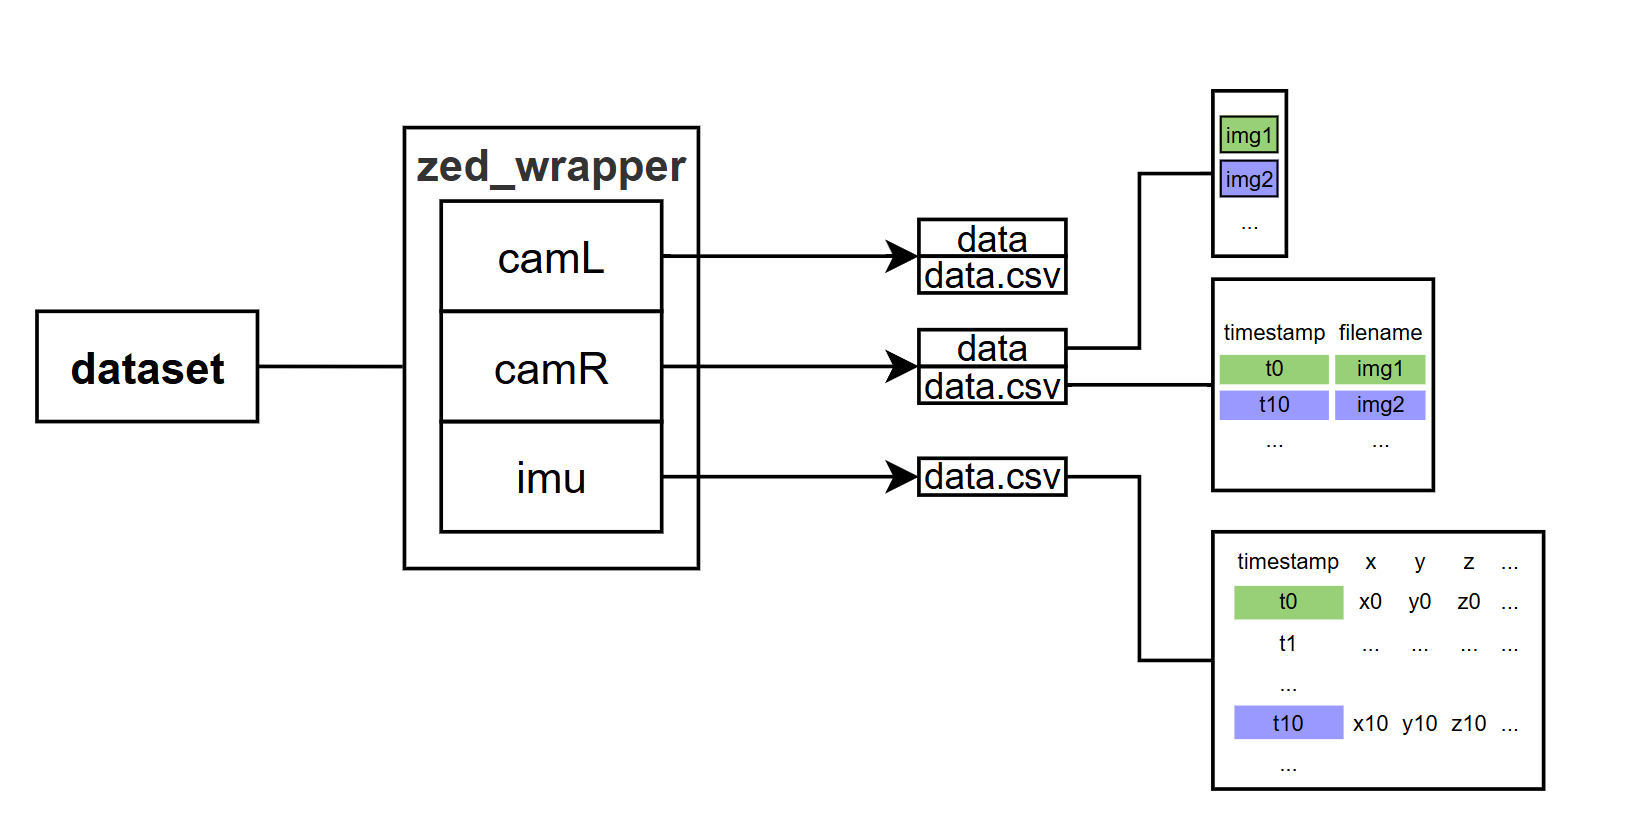
ROS2 foxy
Create package
ros2 pkg create --build-type ament_cmake <package_name>
ros2 pkg create --build-type ament_cmake --node-name my_node my_package
Build package
colcon build --packages-select my_package
colcon build --packages-select sync_saver
colcon build --symlink-install --packages-select sync_saver
Source package
source install/local_setup.bashUse package
ros2 run my_package my_node
ros2 run sync_saver sync_saverThe original building design is from RoboRacer, refer to their bill of materials for the majority of the components needed: https://roboracer.ai (/build/Building the RoboRacer Car/Bill of Materials)
⚠️ Please notice: there are 3 custom pieces that cannot be directly purchased.
- The antenna mount must be 3D printed, design files here: https://drive.google.com/drive/folders/1sy-XiJJ4hmhEKf5qQbUaPYY6Aw-L31Gk?usp=drive_link
- The platform deck where all the computing elements are screwed on must be lasercut, design files here: https://drive.google.com/drive/folders/1NU4FZzvMEGKCOFzDBvnjyePnnSMvsZPG?usp=drive_link
- The powerboard is not a single piece: the bill of materials lists all its components (resistors, capacitors, etc.) but you must solder them on the circuit board by yourself.
Several variations were made to the original project in order to obtain a design more suited for our purposes: analyze an environment and extrapolate a dataset from it. Thanks to these adjustments, the overall project becomes much simpler.
- VESC motor controller
- Hokuyo Lidar
- Traxxas Slash 4X4 "Ultimate" (the car)
- Lipo batteries
- 3-headed cable (it takes power from the battery port and gives it to the car's motor and to the powerboard's power port)
- Platform deck (lasercut)
- NVIDIA Jetson Orin Nano
- WiFi module
- SSD card
- Powerboard (assembled)
- power cable (it gives power to the Jetson)
- Antennas
- Antenna mount (3D print)
- coaxial cables
- DAVIS346 event camera: https://shop.inivation.com/collections/davis346/products/davis346-academic-rate?variant=31410896961590
- ZED Mini stereo camera: https://www.stereolabs.com/en-it/store/products/zed-mini
- Camera mount (3D printed): details here
⚠️ Please notice:
- You have to craft yourself the 3-headed cable, pay attention to the type of ports it needs to connect to.
- The coaxial cables come alongside the antennas only if you buy them from the link provided in the bill of materials.
- The WiFi module does not come alongside the Jetson, you must purchase it yourself.
- The camera mount is not purchasable, use the files in the linked sub-folder to 3D print your own piece.
The original building is designed to be completely autonomous and controlled remotely by a PC. ROS 2 is used exclusively for manouvering the vehicle and managing the synchronization of the different devices (Jetson, VESC, Lidar, Servo); it DOES NOT perform an analysis of the surrounding environment (no cameras are involved).
The modified building is designed to accomplish an elaboration of the surroundings while moving the car, in order to acquire a dataset from the environment.
- The car is driven using its own radio command, that comes alongside the car when you purchase it, and it is set in training mode in order to limit its speed and avoid accidents (the instructions to do that are on the car's user manual).
- Jetson, antennas and powerboard are mounted on the platform deck, but they only get powered by the battery and are not involved in the driving of the car. ROS 2 is used to acquire data from the DAVIS346 camera and the ZED camera, synchronize the two datastreams and save the data into the Jetson's file system. The camera mount is screwed on the platform deck and the two cameras can be screwed on it.
In this way, the car's only purpose is to move around the two cameras and the Jetson while they perform their computations.
After you acquire all the materials, the easiest way to procede is to follow these 3 YT videos that show the building procedure step-by-step:
- lower level chassis: https://www.youtube.com/watch?v=IoWHUGFfrRE
- setup of autonomy elements on the upper level chassis: https://www.youtube.com/watch?v=L-V-0zzkl10
- putting all together: https://www.youtube.com/watch?v=vNVFCq688ck
These videos show the building procedure of the original design. However, since it's based on the original one, they also cover most of the building procedure of the modified design. While referring to the videos, follow the instructions below to build the correct hardware.
- DO NOT remove the connector box and the original motor controller. Keep the pre-existent configuration of the car's servo and motor, you will use them to drive the car with its radio command.
- Remove the nerf bars and install the standoffs for the platform deck exactly as shown in the video.
- Assembling the Jetson: unbox the NVIDIA Jetson, mount the WiFi module with a screw and connect the SSD Card exactly as shown in the video.
- Antenna preparation: install the standoffs on the antenna mount, insert the coaxial cables in the antenna mount and connect them with the antennas exactly as shown in the video.
- SKIP the VESC mounting completely.
- Mounting the antennas: screw the other end of the standoffs to the rear part of the platform deck in order to fix the antennas on it exactly as shown in the video.
- Mounting the Jetson: fix the Jetson on the platform deck using some standoffs and connect the coaxial cables to the WiFi module exactly as shown in the video.
- Mounting the powerboard: use some standoffs to fix the powerboard on the platform deck as shown in the video (the VESC is not present, use the holes you prefer to mount the powerboard).
- INSTEAD OF mounting the Lidar, fix the camera mount on the front part of the platform deck in the same position (the 3D print camera mount has the same holes of the Lidar).
- Put the battery inside the lower chassis exactly as shown in the video.
- Mount the platform deck on the car by screwing it to the standoffs you previously installed on the lower chassis exactly as shown in the video.
- SKIP all the connections between the various components and the VESC.
- SKIP the connection between the Lidar and the powerboard.
- You can fix the ZED camera and the DAVIS346 camera to the camera mount using screws, velcro, tape, etc. Then you can connect them both to the USB ports of the Jetson, using the cables provided when you purchased the cameras.
- Connect one of the 12V ports of the powerboard to the power port of the Jetson using the specific power cable.
- Provide power supply using the 3-headed cable:
- connect the receiving head to the battery port to get power;
- connect the first transmitting head to the power port of the powerboard;
- connect the second transmitting head to the motor of the car.
- Test the car assembly and write down the list of missing parts
- Assemble the car with missing pieces and add the two cameras
- Testing DVS with laptop
- Python script to read DVS data (NOT USED)
- Re-asseble the existing ESC module, test the car with the RC control, impose safe speed limit
- In ROS2 sychronize the acquisition of DVS and stereo data
- Read DVS from Jetson using ROS2
- Read sterocamera (ground-truth) from Jetson using ROS2
- Read stereocamera from laptop
- Setup NVIDIA Jetson
- Read DVS from Jetson using ROS2