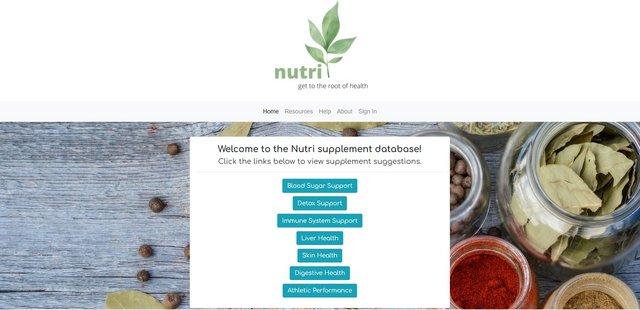
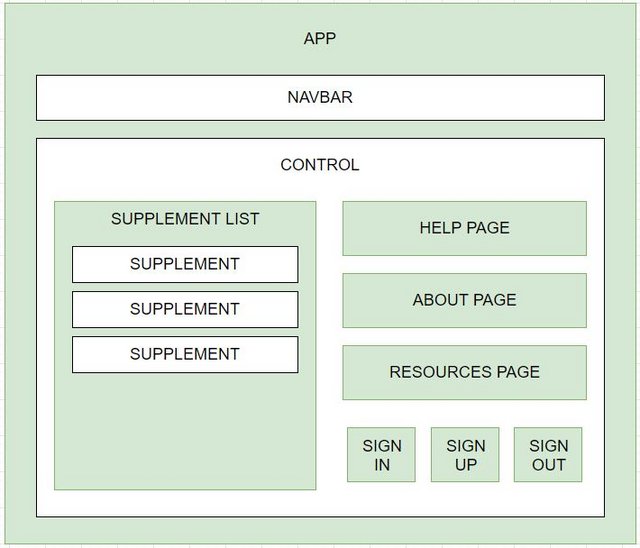
A website to search for supplements that are suitable for supporting the health of people with certain malodies. Nutri is short for 'nutrients'. This project consists of a React/Redux frontend with a backend which communicates with C# API.

VS Code
React
Redux
ES6
C# 7.3.0
.NET Core 2.1.0
Entity Framework Core 2.2.6
MySQL Workbench 8.0 for Windows
Postman
Swashbuckle
Swagger
No known bugs at this time.
| User Story # | Behavior | Actualized |
|---|---|---|
| 1 | As a user, I want to click on a malody from a list to see related supplements. | True |
To open the project on your local machine, you will need to download and install a code editor. The most popular choices are Atom and Visual Studio Code. Visual Studio Code is the code editor used to create this application.
- Follow above steps to install necessary software.
- Open web browser and go to https://github.com/cschweig2/Nutri-Capstone.
- After clicking the green "code" button, you can copy the URL for the repository.
- Open a terminal window, such as Command Prompt or Git Bash, and navigate to the folder you wish to keep this project in.
4a. Type in this command:git clone, followed by the URL you just copied. The full command should look like this:git clone https://github.com/cschweig2/Nutri-Capstone. - View the code on your favorite text editor.
- Click here to view project repository.
- Click "Clone or download" to find the "Download ZIP" option.
- Click "Download ZIP" and extract files.
- Open the project in a text editor by clicking on any file in the project folder.
Click to View
In the project directory, you can run:
Installs node modules required to get started.
Runs the app in the development mode.
Open http://localhost:3000 to view it in the browser.
The page will reload if you make edits.
You will also see any lint errors in the console.
Launches the test runner in the interactive watch mode.
See the section about running tests for more information.
Builds the app for production to the build folder.
It correctly bundles React in production mode and optimizes the build for the best performance.
The build is minified and the filenames include the hashes.
Your app is ready to be deployed!
See the section about deployment for more information.
Note: this is a one-way operation. Once you eject, you can’t go back!
If you aren’t satisfied with the build tool and configuration choices, you can eject at any time. This command will remove the single build dependency from your project.
Instead, it will copy all the configuration files and the transitive dependencies (webpack, Babel, ESLint, etc) right into your project so you have full control over them. All of the commands except eject will still work, but they will point to the copied scripts so you can tweak them. At this point you’re on your own.
You don’t have to ever use eject. The curated feature set is suitable for small and middle deployments, and you shouldn’t feel obligated to use this feature. However we understand that this tool wouldn’t be useful if you couldn’t customize it when you are ready for it.
You can learn more in the Create React App documentation.
To learn React, check out the React documentation.
Click to View
- Download the 64-bit .NET Core SDK (Software Development Kit) by following this link: https://dotnet.microsoft.com/download/thank-you/dotnet-sdk-2.2.203-windows-x64-installer.
1a. Follow prompts to begin your download. The download will be a .exe file. Click to install when it is finished downloading. - After clicking the downloaded .exe file, follow the prompts in the installer and use suggested default settings.
- You can confirm a successful installation by opening a command line terminal and running the command
$ dotnet --version, which should return a version number.
- Download the .NET Core SDK by following this link: https://dotnet.microsoft.com/download/thank-you/dotnet-sdk-2.2.106-macos-x64-installer.
1a. Follow prompts to begin your download. The download will be a .pkg file. Click to install when it is finished downloading. - After clicking the downloaded .pkg file, follow the prompts in the installer and use suggested default settings.
- You can confirm a successful installation by opening a command line terminal and running the command
$ dotnet --version, which should return a version number.
- Enter the command
dotnet tool install -g dotnet-scriptin the command line of a terminal window, such as Terminal for macOS or PowerShell for Windows.
- Download and install the version of MySQL Workbench suitable for your machine.
- Follow this link to view the Postman website and download/install.
- Navigate to the
NutriAPIproject folder and enterdotnet ef database updatein the command line, which will create the database in MySQL Workbench using the migrations from theMigrationsfolder.
- Navigate to the
NutriAPIfolder and enterdotnet restorein the command line to install packages. - After packages are installed in each of these folders, navigate to the
NutriAPIproject folder and enterdotnet buildin the command line to build the program.
Use Postman (see Installation Requirements section above) or Swagger (see below) to explore API endpoints.
Explore the API endpoints with Swagger Documentation:
- Enter
dotnet runin the command line to launch the server. - Use a browser to navigate to
http://localhost:5000/swagger/.
This API is CORS enabled. CORS is a W3C standard that allows a server to relax the same-origin policy. This is not a security feature, CORS relaxes security. For more information, click here.
Base URL: https://localhost:5000
GET /api/1.0/{component}
POST /api/1.0/{component}
GET /api/1.0/{component}/{id}
PUT /api/1.0/{component}/{id}
DELETE /api/1.0/{component}/{id}
https://localhost:5000/api/1.0/supplements/1
{
    "supplementId": 1,
    "type": "Herb",
    "name": "Milk Thistle",
    "dosing": "According to research, the therapeutic threshold may be around 225mg per day.",
    "contraindications": "Milk Thistle may lower blood sugar levels in people with type 2 diabetes. Those with allergies to plants in the same family as Milk Thistle (ragweed, marigold, etc.) may experience a reaction.",
    "maladies": "Liver Health"
}
Access supplements listed in the database.
GET /api/1.0/supplements
POST /api/1.0/supplements
GET /api/1.0/supplements/{id}
PUT /api/1.0/supplements/{id}
DELETE /api/1.0/supplements/{id}
GET /api/1.0/supplements/random
Click to View
| Parameter | Type | Default | Required | Description |
|---|---|---|---|---|
| type | string | none | false | Returns supplements by type (Vitamin or Herb) |
| name | string | none | false | Returns supplement by name (Milk Thistle, Vitamin D, etc.) |
| maladies | string | none | false | Returns supplement by maladies associated with it (Diabetes, Heart Health, etc.) |
https://localhost:5000/api/1.0/supplements/?type=herb
{
    "supplementId": 1,
    "type": "Herb",
    "name": "Milk Thistle",
    "dosing": "According to research, the therapeutic threshold may be around 225mg per day.",
    "contraindications": "Milk Thistle may lower blood sugar levels in people with type 2 diabetes. Those with allergies to plants in the same family as Milk Thistle (ragweed, marigold, etc.) may experience a reaction.",
    "maladies": "Liver Health"
}
If you run into any issues, you can contact the creator at [email protected], or make contributions to the code on GitHub via forking and creating a new branch.
| Author | GitHub Profile | Contact Email |
|---|---|---|
| Chelsea Becker | https://github.com/cschweig2 | [email protected] |
This software is licensed under the MIT license.
Copyright (c) 2021 Chelsea Becker