an open-source cross-platform application for creating synchronized tv wall installation

- this software is distributed by UNDERSCORES - compiled downloads for ubuntu, windows, mac and arm64 are available to purchase from underscores.shop
- the source code can be viewed and compiled from here
- consider donating to the underscores project to help us continue creating for the commons
- input video from connected devices (webcams, capture cards etc) or over NDI
- output video across multiple monitors, in grids for tv wall controllers and over NDI for differnet hardware setups
- create tv wall mapping using measurements, mouse, keyboard or directly editing human readable
config.json - runs on linux, windows, mac and sbc's such as raspberry and orange pi's
- code is open-source so you can modify it / add features that suit your needs
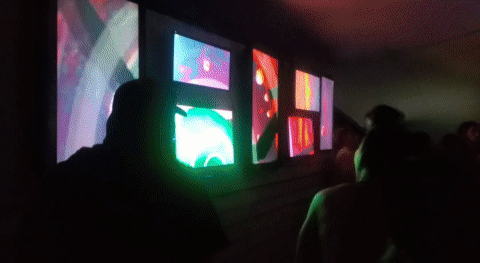
this application was originally written for an installation i worked on with the dojo stage at Twisted Frequency Festival NYE 2023. we used 8 recycled tvs, a cheap aliexpress hdmi_controller and this software to achieve the synchronized tv wall effect seen here:
you can find some more background on this install and process here: WORKS IN PROGRESS 02 - talk about tv_wall_mapper software and installation

hardware options
to achieve the synchronized tv wall effect you need a seperate video output per tv in the wall. depending on the requirements of your installation there are a few different ways you can combine this software with hardware to achieve the desired results. feel free to email me if you would like individual consulting on this.

if you only need to map a few tvs or have graphics cards that allow multiple display outputs this can be the simplest way to achieve the effect

- connect each display output to an input on one of your tv's (you may need to convert the signal format depending on if they are natively compatable)
- in tv_wall_mapper interface set the
NUMBER OF MONITORSto the number of physical outputs you have connected - in tv_wall_mapper interface, for each
MONITOR Xset theMONITOR DISPLAYto the physical output it corresponds to - in tv_wall_mapper interface, for each
MONITOR Xset theTV LAYOUTto1 - finally use the tv_wall_mapper interface to create the map between the physical layout of your tv's (more on this in software settings below)
pros/cons of this hardware option:
- quite simple for a small amount of displays - becomes less fesable the more tv's you want
- cheapest if using hardware you already have
- gpu's can be an expensive way to add display outputs
- it is likely to need to convert signals if using tv's without display ports etc...

you can buy quite affordable off-the-shelf hardware for taking a single HDMI video input and splitting this into a grid of multiple HDMI video outputs. although there are many of these the only ones i personally have tested look like this:
- 2x2 HDMI Video Wall Controller for around 25euros
- 3x3 HDMI Video Wall Controller for around 60euros


- connect a single output from the computer to the video wall controller input
- connect each of the video wall controller outputs to an input on one of your tv's (NOTE: these controllers only output HDMI 1080p @60Hz - this is not compatable with some older tv's and a converter may be needed)
- in tv_wall_mapper interface, for the monitor you connected set the
TV LAYOUTto2x2or3x3(depending on the controller you are using) - finally use the tv_wall_mapper interface to create the map between the physical layout of your tv's (more on this in software settings below)
pros/cons of this hardware option:
- best value for mapping larger tv walls ( 9 outputs for 60euros )
- can save on cabling by installing controller close to tv wall (only short cables from tvs to controller)
- will need addition signal convertions unless all the tvs support 1080p @60Hz
- can add many more outputs by combining this method with the multiply display outputs covered above (ie 3x 3x3 controllers plus a computer with 3 hdmi outputs can map 27 tvs !)

NOTE: this method is untested by me but in theory should work
since the tv_wall_mapper software supports sending and recieving network video over NDI another option would be to install a Single Board Computer (such as a raspberry pi) to each tv in the wall - then that SBC can run the mapping software, recieve the source video over NDI and output the mapped video directly to the tv.
NDI video can easliy be split into multiple signals to send to each SBC using a cheap network switch (for example heres a 16 port switch for only 25euros)
NOTE: currently the software is supported on 64bit versions of raspberry pi - it runs well on pi4 and up. however i tested it on a pi_zero2 and although it runs it needs to be too low resolution to be usable
possilbe use case:
i plan to test running this app on an Orange Pi Zero 3 which cost around 20euro each.

(big) if i confirm this runs ok this could be a viable alternative to the __ hardware controller__ approach:
- is cheap enough to buy multiple (6x tvs = only 120euros on hardware)
- they have rj45 ethernet ports built in
- can output multiple video formats (including potentially composite video) - meaning you may save on signal converters
- ethernet cables cheaper / longer than HDMI cables
- possible to add PoE to these to save on power cabling
- can reuse the SBC for more other tasks than a hardware controller
to set the tv_wall_mapper app to work for this hardware arrangement you can first create the mapping:
- and then set
NUMBER OF MONITORSto1andTV LAYOUTto1 - then the same config file can be copied across all the SBCs - you can find all the settings stored as human readable JSON file in
bin/data/config.json - the only setting that needs to change between the SBCs is
FIRST TV ON OUTPUT:= whichever tv this SBC is connecting to
how to use this app
tv_wall_mapper app can take input source from video devices on your computer (such as webcams and external capture cards)
if you have the NDI SDKs installed it will also be able to take input source from NDI
many programs for creating video such as resolume and touchdesigner can output to NDI (and to VIRTUAL CAMERA) giving you options for linking with tv_wall_mapper
if you are unsure where you will be getting source video from a good program to start with is OBS - this can play videos, screencapture and much more plus can output to VIRTUAL CAMERA with obs virtual cam and to NDI with OBS NDI plugin installed.
NOTE: currently there is a known bug where windows version of tv_wall_mapper crashes when taking input from obs virtual cam - if you want to input source from obs on windows you will need to use NDI
the map is how you input where the tvs are placed relative to each other so that the software can correctly crop the image required for each one.
start by setting the NUMBER OF TVS to match your install.
after you have physically set up your tvs you will need to take some measurements with a tape measure:
-
canvas width and canvas height is the total size of the space that the video is being mapped onto - if you imagine that the tv_wall is one big screen (with gaps between the tvs) then this is the size of that screen. a good place to start is to imagine the
X AXISas the horizontal line running across from the top-most pixel of the installation, and theY AXISas the vertical line running up from left most pixel of the installation -
you can also measure and enter the
TV I WIDTHandTV I HEIGHTfor each tv found underTV VALUESheading if you click on theTV I -
finally you can measure the
TV I X POS- the distance fromY AXISto first pixel on tv i, andTV I Y POS- the distance fromX AXISto first pixel on tv i
NOTE: the position measurements do not need to be exact - this will likely be adjusted slightly - its more important to get good width/height measurements so the ratios are correct

once these are entered the MAPTEST view in the app - black box with blue/red squares representing tvs - should be looking like your tv wall
- if you select testcard 01 from
VIDEO SOURCEand the monitor settings are correct you should now see a test card being spread out over the tvs in the wall. small adjustments so size/position can be made here so lines appear to line up between tvs.
this info can be seen in the app by clicking the HELP tab at top of the interface:
MAPPING WITH A MOUSE:
- CLICK on a TV to select it (RED is selected)
- CLICK and drag a TV to position
- hold SHIFT and drag to resize it
- or RIGHT CLICK and drag to resize it MAPPING WITH A KEYBOARD:
- press ALT plus LEFT/RIGHT to select a TV
- press ARROW KEYS to position it
- press SHIFT plus ARROW KEYS to resize it
- press ALT plus UP/DOWN to set grid size (how much each press moves)
- NOTE: TVs with width less than height are automatically rotated
- NOTE: resizing can be negative to support all possible orientations OTHER KEYBOARD SHORTCUTS:
- press F to toggle ON/OFF FULLSCREEN
- press R to toggle ON/OFF FPS ON OUTPUT
- HELP - this opens/closes info about mapping controls
- save config - saves the current config to a json file (located at
bin/data/config.json) - load config - loads the config from the file at
bin/data/config.json - refresh inputs/outputs - this checks for any new
VIDEO SOURCEorMONITOR DISPLAYs since the app started - useful if you hotplug a capture card or new monitor - VIDEO SOURCE - select where the source video is coming from - can take input from cameras/capture cards or from a NDI source
- INPUT RESOLUTION - this displays the source resolution - usually it will match the monitor or a resolution that
VIDEO SOURCEsupports - NUMBER OF TVS - set the amount of tvs being used in the tv wall
- HIDE MAPTEST - removes the MAPTEST - box showing the mapping - from the interface
- HIDE PREVIEW - removes the PREVIEW - box showing video output - from the interface
- OVERWRITE DEFAULTS - lets you play around with
INPUT WIDTH,INPUT HEIGHTandFRAMERATEon the video source - could be useful if having performance issues - NUMBER OF MONITORS - sets the amount of seperate windows this app should create - allowing you to map different parts of input source to different displays - see using a computer with multiple display outputs in hardware options for more info
- MONITOR 0 | MONITOR 1 | ... - lets you toggle between the different monitor outputs so they can be configured seperately (ie it is possible that one monitor will be going to a 2x2 video wall so needs
TV LAYOUT: 2x2but another is going straight to a tv so needsTV LAYOUT: 1) - only show tvs for this monitor - toggle whether all tvs are shown in the MAPTEST or filter them only for this monitor
- OUTPUT TO MONITOR - toggle whether this monitor should have a window showing its output
- OUTPUT TO NDI - toggle whether this monitor should output its content to NDI (useful if sending video over network rather than HDMI)
- MONITOR DISPLAY - select which connected display this monitor should output to
- monitor fullscreen - toggles this monitors window to being fullscreen - fullscreen is needed for tv wall effect but it could be easier when setting things up to havee it windowed
- show framerate - outputs the framerate of the app to this monitor - could be useful when testing that the tv wall is responsive enough
- TV LAYOUT - use this setting when the monitor is outputing to a tv wall controller so multiple tv images are sent in
2x2or3x3grid (see using cheap Aliexpress TV Video wall Controllers under hardware options) - NUMBER OF TVS ON OUTPUT - this should automatically update with TV LAYOUT (ie
2x2= 4,3x3= 9 etc) however could be useful if you are only mapping say 7 tvs from a 3x3 controller etc... - FIRST TV ON OUTPUT - this can be useful if you want to use the same mapping across multiple devices running _tv_wall_mapper app and just need to set which tv each one is mapping (see using a cheap sbc per tv and a network switch under hardware options)
- CANVAS WIDTH - this is the width of the "screen" that video is mapped onto - if the tv wall was one big screen
- CANVAS HEIGHT - this is the height of the "screen" that video is mapped onto - if the tv wall was one big screen
- SELECTED TV - this is the currently highlighted tv in MAPTEST (red) - the one that will be affected by key presses etc
- GRID SIZE - this is the amount one key press will move the
SELECTED TV - TV I - click on a tv to see values for it:
- TV I WIDTH - set the physical width of
TV I - TV I HEIGHT - set the physical height of
TV I - TV I X POS - set the distance from left most pixel to
Y AXIS - TV I Y POS - set the distance from top most pixel to
X AXIS
how to install from source
you can support this project by buying compiled versions of this app from underscores.shop [put link to shop page here] - with a compiled version you only need to download & unzip a folder, then just run the app - no installing required!
you can also install and compile it yourself from the source code and instructions provided below. if this software is useful to you consider giving back by donating or contributing in other ways.
the app has been tested on:
- linux (pop_os, ubuntu, debian & xubuntu)
- windows 10
- mac_os Monterey (intel) - currently untested on ARM
- raspberry_pi_4 running raspios-bookworm-arm64
- orange_pi_5 running debian
this code is written in openFrameworks - an open source cpp library for creative coding. for the most part you can followw their install instructions for your chosen platform.
- install and compile openFrameworks12 - in a terminal:
cd ~
wget https://github.com/openframeworks/openFrameworks/releases/download/0.12.0/of_v0.12.0_linux64gcc6_release.tar.gz
mkdir openframeworks
tar vxfz of_v0.12.0_linux64gcc6_release.tar.gz -C openframeworks --strip-components 1
cd openframeworks/scripts/linux/<YOUR DISTRIBUTION HERE>/
sudo ./install_dependencies.sh -y
make Release -C ~/openframeworks/libs/openFrameworksCompiled/project
- install NDI SDK (if using NDI - recommended):
download NDI SDK and unzip: NDI SDK for Linux
then copy the sdk into usr/lib: sudo cp ~/NDI\ SDK\ for\ Linux/lib/x86_64-linux-gnu/* /usr/lib/
- download tv_wall_mapper and dependanices:
<INSTALL GIT IF YOU DO NOT HAVE IT>
cd ~/openframeworks/apps/myApps
git clone git@github.com:cyberboy666/tv_wall_mapper.git
cd tv_wall_mapper
./install_addons.sh
make
now it is compiled can run with make run or with ./bin/tv_wall_mapper
follow the openframeworks visual studio guide:
- download visual studio community 2019 and install with desktop development with c++ plus other settings as listed on that oF page
install openframeworks and tv_wall_mapper:
- download and install git for windows
- download and unzip openframeworks 12 for visual studio
- open up
git bashand navigate to the openframeworks folder:
cd ~/path/to/of12_folder/
cd apps/myApps/
git clone git@github.com:cyberboy666/tv_wall_mapper.git
cd tv_wall_mapper
./install_addons.sh
install NDI SDK (if using NDI - recommended)
- download the sdk
- you may need to copy
Processing.NDI.Lib.x64.dllfrom here intotv_wall_mapper/binif it doesnt load automatically
build tv_wall_mapper app:
- open the openframeworks ProjectGenerator in top level of openframeworks folder
- from here import the tv_wall_mapper folder and generate project
- now you can open the project in visual studio with the file
tv_wall_mapper.sln - inside visual studio find BUILD / RUN
follow the openframeworks xcode guide:
- download xcode (14.1 or later) + Xcode's command line tools... (check internet archive if you can not access apple store)
- download and unzip openframeworks 12 for xcode
- open up terminal and navigate to the openframeworks folder:
cd ~/path/to/openframeworks
cd apps/myApps/
git clone git@github.com:cyberboy666/tv_wall_mapper.git
cd tv_wall_mapper
./install_addons.sh
install NDI SDK (if using NDI - recommended)
- download the sdk
build tv_wall_mapper app:
- open the openframeworks ProjectGenerator in top level of openframeworks folder
- from here import the tv_wall_mapper folder and generate project
- now you can open the project in xcode with the file
Project.xcconfig - inside xcode find BUILD / RUN
- download the the raspberry pi os image:
2024-03-15-raspios-bookworm-arm64.img.xzand flash to the sd card - once the rpi is booted / connected to internet etc then you can download openframeworks:
cd ~
wget https://github.com/openframeworks/openFrameworks/releases/download/0.12.0/of_v0.12.0_linuxaarch64_release.tar.gz
mkdir openframeworks
tar vxfz of_v0.12.0_linuxaarch64_release.tar.gz -C openframeworks --strip-components 1
cd openframeworks/scripts/linux/debian/
sudo ./install_dependencies.sh -y
make Release -C ~/openframeworks/libs/openFrameworksCompiled/project
- install NDI SDK (if using NDI - recommended):
download NDI SDK and unzip: NDI SDK for Linux
then copy the sdk into usr/lib: sudo cp ~/NDI\ SDK\ for\ Linux/lib/aarch64-rpi4-linux-gnueabi/* /usr/lib/
- download tv_wall_mapper and dependanices:
<INSTALL GIT IF YOU DO NOT HAVE IT>
cd ~/openframeworks/apps/myApps
git clone git@github.com:cyberboy666/tv_wall_mapper.git
cd tv_wall_mapper
./install_addons.sh
TURN ON FLAG TO COMPILE FOR GLES
since openframeworks12 on rpi doesnt work rn with standard glsl we need to switch to using GLES - this limits the program to only having one window so it can not be used with multiple display outputs
cd cd ~/openframeworks/apps/myApps/tv_wall_mapper
nano src/ofApp.h
and UNCOMMENT LINE 9:
#define PROJECT_TARGET_OPENGLES
and save (CTRL+X, Y, ENTER) - now compile the program:
make
now it is compiled can run with make run or with ./bin/tv_wall_mapper