Beginner Setup Guide
This guide should help you setup the Pokemon BDSP AutoMusic tool. This is tailored to people with no dev experience. If you have dev experience, you're probably better off with the instructions in the README.
Note: This tutorial assumes you are using Windows. I have never tested this tool on other operating systems.
The first step is installing Java. I currently only support Java 11. You can download Java 11 here. You will download the JDK instead of the JRE, even though you technically only need the JRE (but the JRE is honestly harder to find these days).
You should look for the appropriate installer for your system. For example, if you're on Windows and have a 64 bit machine, you should get this one (the exact version might differ slightly:

You are encouraged to download the .msi file (and not the .zip file), since this will provide you with a step by step wizard that will guide you in installing java.
When the installation finishes, you should open the Windows command prompt. You can use the Windows search icon (in your task bar) to find it:

Once you open it, type java -version and press enter. Look at the output. It should look similar this:

If you see output that is similar to the one above and the version is 11, you can move to the next step.
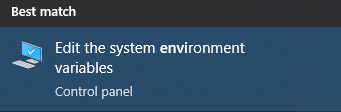
If the command prompt complaints about not finding java you need to add it to your PATH environment variable. You can do this by using the search icon again:
This should open a window like this:
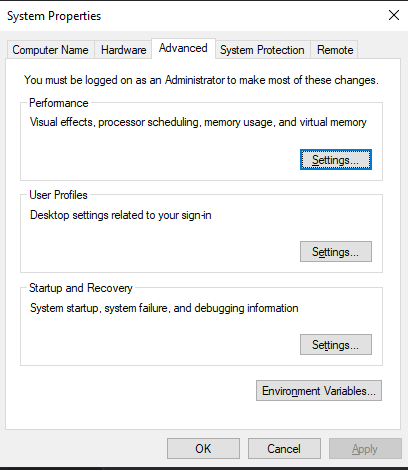
You then click on Environment Variables, which should open another window, listing all your environment variables (user and system). You then need to update your Path variable (user or system, doesn't really matter here). Add a new entry to the Path variable with the full path to your java executable. This should be something like this: C:\Program Files\Java\jdk-11\bin (you should use the Windows explorer to actually look for it, since the jdk-11 folder might have a different name).
Once your PATH is updated, you can retry the previous command (you will need to close and re-open your command prompt).
Now that you have Java setup, you should download the latest release of the tool here. The file you need to download is the .jar file.
Now that you have the tool downloaded, you should try to boot it, to validate what we did so far. Open the command prompt and run:
java -jar <jar-file> replacing <jar-file> with the path to the JAR file you downloaded. The output should look like this:

The output tells us that we are missing some required options. This is totally normal, since we didn't give it anything yet. We now need to setup the following options: -d, -w, -h, -gw, -gh, -gx, -gy, -s and -st. The following sections dive on these options.
One of the required options (-s) is a path to a song manifest file. You need to create a songManifest.properties file with the following content:
twinleaf-town-day=C:\\path\\to\\twinleaf-town-day.wav
twinleaf-town-night=C:\\path\\to\\twinleaf-town-day.wav
route-201-day=C:\\path\\to\\route-201-day.wav
route-201-night=C:\\path\\to\\route-201-day.wav
battle-wild=C:\\path\\to\\battle-wild.wav
lake=C:\\path\\to\\lake.wav
choose-starter=C:\\path\\to\\choose-starter.wav
sandgem-town-day=C:\\path\\to\\sandgem-town-day.wav
sandgem-town-night=C:\\path\\to\\sandgem-town-day.wav
pokemon-center-day=C:\\path\\to\\pokemon-center-day.wav
pokemon-center-night=C:\\path\\to\\pokemon-center-day.wav
poke-mart=C:\\path\\to\\poke-mart.wav
pokemon-lab=C:\\path\\to\\pokemon-lab.wav
battle-trainer=C:\\path\\to\\battle-trainer.wav
victory-trainer=C:\\path\\to\\victory-trainer.wav
jubilife-city-day=C:\\path\\to\\jubilife-city-day.wav
jubilife-city-night=C:\\path\\to\\jubilife-city-day.wav
route-203-day=C:\\path\\to\\route-203-day.wav
route-203-night=C:\\path\\to\\route-203-day.wav
battle-rival=C:\\path\\to\\battle-rival.wav
oreburgh-gate=C:\\path\\to\\oreburgh-gate.wav
oreburgh-mine=C:\\path\\to\\oreburgh-mine.wav
oreburgh-city-day=C:\\path\\to\\oreburgh-city-day.wav
oreburgh-city-night=C:\\path\\to\\oreburgh-city-day.wav
pokemon-gym=C:\\path\\to\\pokemon-gym.wav
battle-gym-leader=C:\\path\\to\\battle-gym-leader.wav
victory-gym-leader=C:\\path\\to\\victory-gym-leader.wav
battle-galactic-grunt=C:\\path\\to\\battle-galactic-grunt.wav
victory-galactic=C:\\path\\to\\victory-galactic.wav
floaroma-town-day=C:\\path\\to\\floaroma-town-day.wav
floaroma-town-night=C:\\path\\to\\floaroma-town-day.wav
route-205-day=C:\\path\\to\\route-205-day.wav
route-205-night=C:\\path\\to\\route-205-day.wav
battle-galactic-commander=C:\\path\\to\\battle-galactic-commander.wav
eterna-forest=C:\\path\\to\\eterna-forest.wav
eterna-city-day=C:\\path\\to\\eterna-city-day.wav
eterna-city-night=C:\\path\\to\\eterna-city-day.wav
galactic-eterna-building=C:\\path\\to\\galactic-eterna-building.wav
route-206-day=C:\\path\\to\\route-206-day.wav
route-206-night=C:\\path\\to\\route-206-day.wav
hearthome-city-day=C:\\path\\to\\hearthome-city-day.wav
hearthome-city-night=C:\\path\\to\\hearthome-city-day.wav
route-209-day=C:\\path\\to\\route-209-day.wav
route-209-night=C:\\path\\to\\route-209-day.wav
solaceon-town-day=C:\\path\\to\\solaceon-town-day.wav
solaceon-town-night=C:\\path\\to\\solaceon-town-day.wav
route-210-day=C:\\path\\to\\route-210-day.wav
route-210-night=C:\\path\\to\\route-210-day.wav
veilstone-city-day=C:\\path\\to\\veilstone-city-day.wav
veilstone-city-night=C:\\path\\to\\veilstone-city-day.wav
valor-lakefront-day=C:\\path\\to\\valor-lakefront-day.wav
valor-lakefront-night=C:\\path\\to\\valor-lakefront-day.wav
canalave-city-day=C:\\path\\to\\canalave-city-day.wav
canalave-city-night=C:\\path\\to\\canalave-city-day.wav
route-216-day=C:\\path\\to\\route-216-day.wav
route-216-night=C:\\path\\to\\route-216-day.wav
snowpoint-city-day=C:\\path\\to\\snowpoint-city-day.wav
snowpoint-city-night=C:\\path\\to\\snowpoint-city-day.wav
galactic-hq=C:\\path\\to\\galactic-hq.wav
battle-galactic-boss=C:\\path\\to\\battle-galactic-boss.wav
deep-within-galactic-hq=C:\\path\\to\\deep-within-galactic-hq.wav
mount-coronet=C:\\path\\to\\mount-coronet.wav
spear-pillar=C:\\path\\to\\spear-pillar.wav
legendary-appears=C:\\path\\to\\legendary-appears.wav
catastrophe=C:\\path\\to\\catastrophe.wav
lake-caverns=C:\\path\\to\\lake-caverns.wav
battle-dialga-palkia=C:\\path\\to\\battle-dialga-palkia.wav
battle-azelf-mesprit-uxie=C:\\path\\to\\battle-azelf-mesprit-uxie.wav
sunyshore-city-day=C:\\path\\to\\sunyshore-city-day.wav
sunyshore-city-night=C:\\path\\to\\sunyshore-city-day.wav
victory-road=C:\\path\\to\\victory-road.wav
pokemon-league-day=C:\\path\\to\\pokemon-league-day.wav
pokemon-league-night=C:\\path\\to\\pokemon-league-day.wav
decisive-battle=C:\\path\\to\\decisive-battle.wav
elite-four-appears=C:\\path\\to\\elite-four-appears.wav
battle-elite-four=C:\\path\\to\\battle-elite-four.wav
victory-elite-four=C:\\path\\to\\victory-elite-four.wav
cynthia-theme=C:\\path\\to\\cynthia-theme.wav
battle-champion=C:\\path\\to\\battle-champion.wav
victory-champion=C:\\path\\to\\victory-champion.wav
hall-of-fame=C:\\path\\to\\hall-of-fame.wav
congratulations-hall-of-fame=C:\\path\\to\\congratulations-hall-of-fame.wav
ending-theme=C:\\path\\to\\ending-theme.wav
fight-area-day=C:\\path\\to\\fight-area-day.wav
fight-area-night=C:\\path\\to\\fight-area-night.wav
route-225-day=C:\\path\\to\\route-225-day.wav
route-225-night=C:\\path\\to\\route-225-night.wav
stark-mountain=C:\\path\\to\\stark-mountain.wav
battle-legendary=C:\\path\\to\\battle-legendary.wav
You should replace the paths with your own paths to the song files. The songs need to be in .wav format. As an alternative, you can also use youtube videos, but this is experimental and slightly unstable. However, it's probably better to experiment with youtube videos first to make sure everything works. If it does, you can then setup the .wav files. For youtube videos, you need to use the youtube URLs instead of the file URIs, like so:
twinleaf-town-day=https://www.youtube.com/watch?v=q3qGX4zr0YU
You need to fill this out for all the songs, but you can just use one or two and repeat across all of them to make sure the tool works. If it does work, you can then go fetch all the proper URLs.
The type of song list you provide needs to be specified using the -st property. The default is local, but you can also use youtube.
The remaining required options refer to the capture card. A capture card is seen as a camera by your computer. Each camera in your computer is assigned a number, starting at 0. If you have a webcam and a capture card attached to your computer, one of them will be camera 0 and the other will be camera 1. The tool needs to receive this number. The best way to find out the number is to just use all the possible numbers and check if the tool works. If it doesn't, you move on to the next number. So, if you have 2 cameras attached to your computer, you would try to run the tool with 0 and 1. The camera option is -d.
Since you will most likely be using some piece of software to record/stream your game, you might need to setup some kind of Virtual Camera. You only need this if your capture card can only be used by one application at a time (you should check if that's the case).
If you are using Streamlabs, you can use the Virtual Webcam feature:
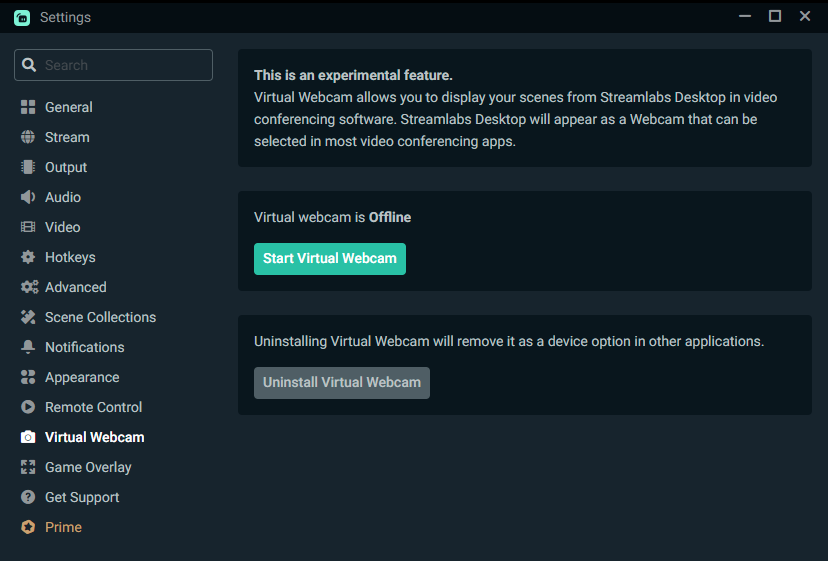
By clicking Start Virtual Webcam, Streamlabs will basically create another camera that your computer will recognize. This camera will output the content of your current scene. You can then use this virtual camera as input to the tool. Note that a virtual camera is a separate camera, which means that if you already had 2 physical cameras attached to your pc, you now have 3 total cameras (2 physical and 1 virtual). As such, in this scenario, we would now have 0, 1 and 2 as possible camera numbers.
If you are using OBS, there is also a virtual camera that you can use.
If you are not using Streamlabs or OBS, there are other solutions, but I have never tried them, so you'll have to explore them by yourself
Once you have this setup, you need to figure out the resolution and coordinates of the game window. The following options need to be set:
-
-w- The width of your camera (capture card/virtual camera). This will probably be 1920. -
-h- The height of your camera (capture card/virtual camera). This will probably be 1080.
In addition to these options, if you are using a virtual camera, you will probably also need to setup the resolution and position of the game window. This is only needed if your game window doesn't occupy the entire camera. For example, imagine I have the following scene on Streamlabs:
If I create a virtual camera with this scene, the camera will be 1920x1080, but the game window only occupies part of the camera (since I have splits on screen as well). In order for the tool to work, you need to provide the location of game window inside the camera, as well as its resolution. You do this with the following options:
-
-gw- The width of the game window. Defaults to the camera width. -
-gh- The height of the game window. Defaults to the camera height. -
-gx- The X coordinate of the game window. Defaults to 0. -
-gy- The Y coordinate of the game window. Defaults to 0.
You can find these on Streamlabs by right clicking the game window source and selecting Transform -> Edit Transform:

Now that we have figured out all the options to provide the tool, we can actually run it:
java -jar <jar-file> -d <device-number> -w <device-width> -h <device-height> -gw <game-width> -gh <game-height> -gx <game-offset-x> -gy <game-offset-y> -s <path-to-song-manifest> -st <song-manifest-type>
Here's an example (yours will probably be slightly different):
java -jar "C:\Users\furys\Documents\Speedrunning\BDSP AutoMusic\pokemon-bdsp-automusic-1.0.3.jar" -d 1 -w 1920 -h 1080 -gw 1534 -gh 863 -gx 386 -s C:\\Users\\furys\\Documents\\Java\\PokemonBDSPAutoMusic\\songManifest.properties -st local
When the tool opens, you should see a window like this:
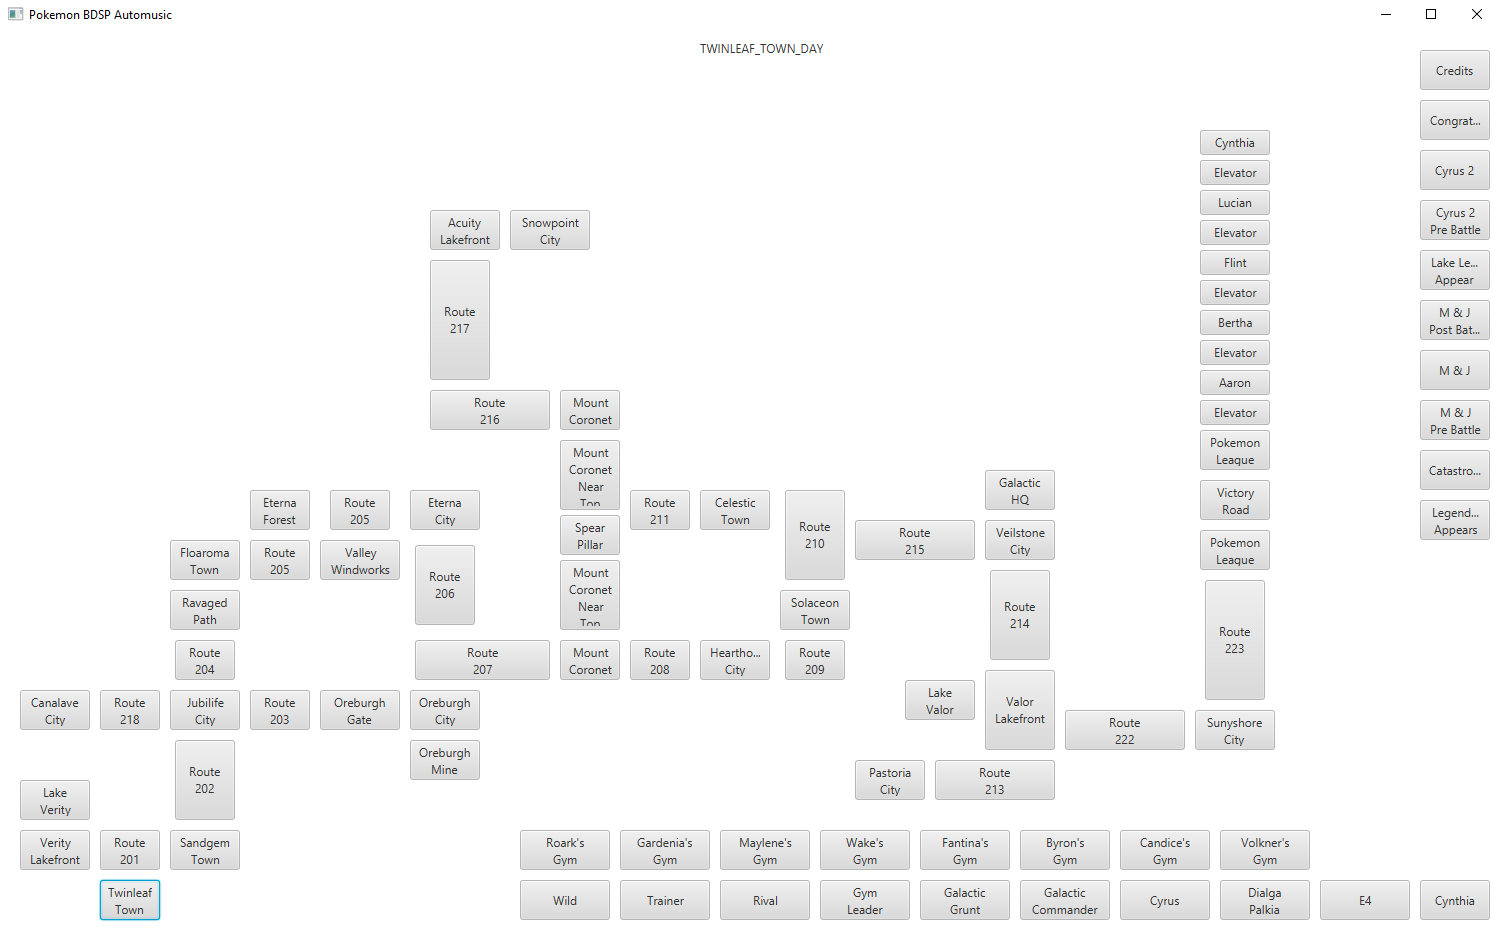
At the top you should see the current song being played (in this case it's Twinleaf Town, which is the first one). The rest of the screen has buttons for all the possible locations/states in the game. You can test the tool by opening your game in Twinleaf Town and walking up to Route 201. The song should change.
Note that each location/state can transition to a number of subsequent states. These transitions are tied to whatever is on screen. This means that even if you use one of the buttons to change the state, the state will still transition to the next ones in line if it identifies something on screen that matches a possible transition.