A collection of scripts to handle agent downloads, installs and upgrades.
Download these scripts, download the Java and Machine agents and then install the agents on your localhost.
Prerequisites:
- Email and Password for your AppDynamics.com account
- Your AppDynamics Controller host name, account name, and account access key
- "curl" command needs to be installed on your host
Open a terminal, copy and paste this multi-line command, and press enter. Follow the on-screen prompts, and you'll soon have a Java and Machine agent running on your local system.
curl -LOk https://github.com/derrekyoung/appd-agent-management/releases/download/latest/appd-agent-management.zip \
&& unzip appd-agent-management.zip -d AppDynamics \
&& cd AppDynamics \
&& chmod u+x *.sh \
&& /bin/bash ./newbies-start-here.sh- AppDynamics Agent Management
- About AppDynamics Agent Management
- Install/Upgrade Local Agent
- Install/Upgrade Agent on Remote Server(s)
- Download AppDynamics Software
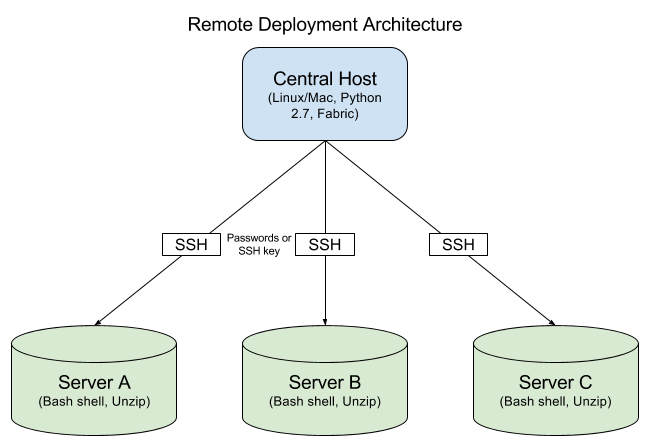
- Supported on Linux & OS X only. No Windows support
- Local & Remote installs: Unzip utility available on the destination servers
- Remote installs: Python 2.7 on the central distribution server
- Remote installs: Python Fabric on the central distribution server
- Install/upgrade the Java Agent
- Install/upgrade the Machine Agent
- Sync extensions after upgrade
- Sync properties for the Analytics agent (endpoint, account name, access key, proxy info) after upgrade
- Automatically start the Machine Agent after install/upgrade
- Install/upgrade the Database Agent
- Automatically start the Database Agent after install/upgrade
- Common
- Automatically set connection info: controller hostname, port, ssl enabled, account name, access key
- Sync controller-info.xml, custom-activity-correlation.xml, custom-interceptors.xml for all applicable agents
- Download any appdynamics software by passing in the download URL
Fork/clone this repository or download a full, zipped release.
Individual, direct downloads:
- download.sh or
curl -LOk https://raw.githubusercontent.com/derrekyoung/appd-agent-management/master/download.sh - local-agent-install.sh or
curl -LOk https://raw.githubusercontent.com/derrekyoung/appd-agent-management/master/local-agent-install.sh
Install a brand new agent or upgrade a new agent in place. Upgrades will sync existing configurations and settings. Operates on your local system.
NOTE: The install script will create a symlink that always points to the latest version of the agent. Configure the Java app server startup script to point to this symlink.
Usage: ./local-agent-install.sh -a=AppServerAgent-4.2.7.0.zip
- Download the latest release of this toolkit and unzip it to your
APPD_HOMEdirectory. - Download the agent from the download site or by using
download.sh. - (Optional) Manually create an agent config file under `HOME/conf/agent-configs/.
- Run
local-agent-install.sh.- Optionally pass in the archive name using
local-agent-install.sh -a=AppServerAgent-4.2.7.0.zip. You'll be prompted for the archive otherwise.
- Optionally pass in the archive name using
- The agent will be installed in the local directory under
HOME/agents/- For example, installing
AppServerAgent-4.2.7.0.zipwill result in a version directoryAPPD_HOME/agents/appserveragent-4.2.7.0/and a symlink namedAPPD_HOME/agents/appserveragentpointing to the version directory. (This symlink will be updated for the latest agent that you install of a given type.
- For example, installing
- Manually instrument your Java application server and include the javaagent config like so
-javaagent:APPD_HOME/agents/appserveragent/javaagent.jar
- Arguments are optional. You will be prompted for values otherwise. Optional command line arguments:
- -a|--archive= Agent archive
- -h|--appdhome= Remote AppDynamics home directory
- -c|--config= (optional) Agent properties configuration file
DEBUG_LOGS: set totrueto turn on verbose logging.
You can update agent configuration details (controller, access key, analytics endpoint, etc.) by passing in a properties file name. These files are under APPD_HOME/conf/agent-configs/.
A sample file is provided for you to update with your information. (Do not change the key names in the file.) You can create your own configuration files of any name to distinguish between different Controllers or different agent profiles.
Usage: ./local-agent-install.sh -a=AppServerAgent-4.2.6.0.zip -c=test-env
Example controller-info.xml properties:
controller-host=example.saas.appdynamics.com
controller-port=443
controller-ssl-enabled=true
account-name=my-account-dev
account-access-key=1234-asdf-1234-asdf-1234-asdf
sim-enabled=true
Example analytics-agent.properties properties:
analytics.agent.enabled=true
http.event.endpoint=https://analytics.api.appdynamics.com:443
http.event.accountName=global_accountName_asdfasdfasdfasdf
http.event.accessKey=1234-asdf-1234-asdf-1234-asdf
Operates on remote systems. Requires you to create and define a configuration environment. The environment config must be in a JSON file and named in the format of APPD_HOME/conf/remote-hosts/NAME_HERE.json.
For example, the Production environment might be defined in production.json. You'd then trigger this config in remote-agent-install.sh by passing in the -e=production argument or entering production in the interactive shell. See sample.json for
You must install Python Fabric on your management system (the system where you launch the script), but NOT on the remote systems. Communication to the systems has no external dependencies because all comms happen over SSH and Shell.
Test locally before deploying remotely.
Usage: ./remote-agent-install.sh -a=AppServerAgent-4.2.6.0.zip -h=/opt/AppDynamics/ -e=Production
- Download the latest release of this toolkit and unzip it to your
APPD_HOMEdirectory. - Learn how to do a local install by reading the docs above.
- Create an agent config file, as described above. Place this file under
APPD_HOME/conf/agent-configs/. - Create a remote hosts JSON file underneath
APPD_HOME/conf/remote-hosts/. Folllow the sample file, but see below for additional details. - Execute
./remote-agent-install.sh -a=AppServerAgent-4.2.6.0.zipand enter the name of your remote hosts and agent config file. (Only enter the names, without the extensions.) - If using password authentication, you'll be prompted to enter each unique password. Passwords are NOT saved to disk.
Arguments are optional. You will be prompted for values otherwise.
- Optional command line arguments:
- -e|--environment= Remote hosts environment configuration name
- -a|--archive= Path to agent archive to install
- -c|--config= (optional) Agent properties configuration file
DEBUG_LOGS: set totrueto turn on verbose logging.
You must define your remote servers and credentials in a config file. The file must be of the name HOME/conf/remote-hosts/NAME_HERE.json.
The configuration JSON file contains a few elements. It must be valid JSON so use a JSON validator like, http://jsonlint.com/.
Example:
{
   // REQUIRED A list of remote hosts. Can be in the format of plain hostnames or as username@HOSTNAME,
   // where you specify an explicit username to override the default username
    "hosts": [
        "root@server5.internal.mycompany.org"
        ,"appdynamics@server6"
        ,"ubuntu@server7.us"
        ,"jsmith@server8.co"
        ,"server9.example.com"
    ],

    // (optional) The default, implicit username for the remote hosts. Useful if all/most usernames will be
    // the same. Otherwise, specify the username as part of the hostname using the format username@HOSTNAME
    "user": "user1",

    // (optional) A list of SSH keys to access the remote hosts
    "key_filename": [
        "./my-key1.pem"
        ,"./my-key2.pem"
    ],

	// The remote home directory, where to install agents
	"appd-home": "/opt/AppDynamics"
}
- hosts: REQUIRED A list of remote hosts. They can be in the format of simple hostnames or as username@hostname where you specify an explicit username to override the default username.
- user: (optional) The default, implicit username for the remote hosts. Use this if all usernames will be the same. Otherwise, specify the username as part of the hostname using the format username@HOSTNAME. See
sample.jsonfor examples. - key_filename: (optional) A list of SSH keys to access the remote hosts.
- appd-home: Remote directory to install the agents.
- passwords: You will be prompted for passwords interactively. Do not enter them in your config JSON file.
http://www.fabfile.org/installing.html
- Ubuntu: sudo apt-get install fabric
- RHEL/CentOS: sudo yum install fabric
- Pip: sudo pip install fabric
It's best to install Fabric using one of the methods above. However, sometimes customers don't have access to download software. In that case, you can install Fabric offline.
- Determine the version of Python on the central, distribution server (2.6 or 2.7).
- Download Fabric and the dependencies on a machine that you control, with access to the internet. Make sure to have the matching version of Python (2.6 or 2.7).
./offline-pip.sh download fabricunder theAPPD_HOME/utils/directory. - Transfer the resulting archive to the central, distribution server that will push the agents. Place the tar archive under the
APPD_HOME/utils/directory. - Insall Fabric by running
./offline-pip.sh install fabric
Download AppDynamics software including agents and platform components. Pass in no arguments to be prompted for input.
Usage: ./download.sh
Optional arguments:
-e=|--email=  AppDynamics username
-p=|--password=  AppDynamics password
-v=|--version=  Version, default to the latest version
-t=|--type=  Type of software {database, java, machine, php, net, apache, analytics, mobile, cpp, controller, eum, events-service}
-o=|--os=  JVM type or OS type {sun, ibm, linux, windows, osx, android, ios}
-b=|--bitness=  Bitness {32, 64}
-f=|--format=  Format {zip, rpm}
-h|--help  Print usage