![]()
![]()
A Large Nano-Quadcopter Swarm.
The documentation is available here: http://crazyswarm.readthedocs.io/en/latest/.
Please start a Discussion for...
- Getting Crazyswarm to work with your hardware setup.
- Advice on how to use the Crazyswarm Python API to achieve your goals.
- Rough ideas for a new feature.
Please open an Issue if you believe that fixing your problem will involve a change in the Crazyswarm source code, rather than your own configuration files. For example...
- Bug reports.
- New feature proposals with details.
Author(s): Kaushik Balasundar (kbalasun@andrew.cmu.edu)
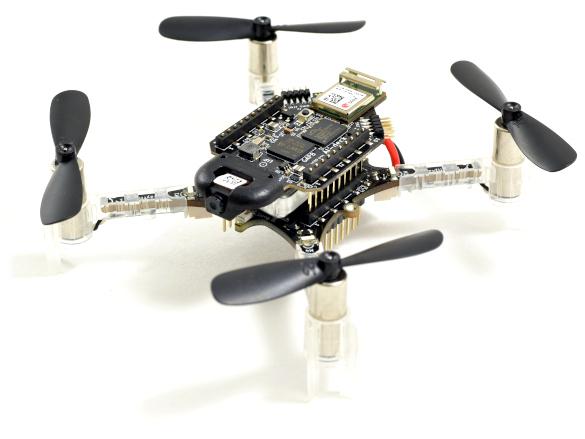
The crazyflie 2.1 is a minidrone designed by Bitcraze. The hardware assembly is quite straight-forward and should not take longer than 15 minutes. The documentation can be found here https://www.bitcraze.io/documentation/tutorials/getting-started-with-crazyflie-2-x/. The software setup assumes that you are using Ubuntu 20 and ROS Noetic.
Your host computer will communicate with the drone using the crazyflie Radio USB radio communication device. In order to use this, you will need to set USB permissions on linux. You can find the instructions for doing this here: https://www.bitcraze.io/documentation/repository/crazyflie-lib-python/master/installation/usb_permissions/
Using Crazyradio on Linux requires that you set udev permissions. See the cflib installation guide for more information. The documentation here is slightly different than the one above, but setup both files as instructed.
Once these are done, screw in the antenna into the USB dongle and then plug into the computer for the firmware upgrade.
-
First clone the following directory from source:
git clone https://github.com/bitcraze/crazyradio-firmware.git -
Once cloned, go into that directory:
cd crazyradio-firmware -
First Crazyradio has to be rebooted in USB bootloader mode. For this run the following:
python crazyradio-firmware/usbtools/launchBootloader.py -
Finally, to flash the firmware, run the following:
sudo python crazyradio-firmware/usbtools/nrfbootload.py flash prebuilt/cradio.bin -
You should see something like this as the output:
Found nRF24LU1 bootloader version 18.0
Flashing:
  Flashing 5810 bytes...
Flashing done!
Verifying:
  Reading cradio-pa-0.53.bin...
  Reading 5810 bytes from the flash...
Verification succeded!
Once this is done, you can move on to powering on the drone. When you power on the Crazyflie, all the propellers will spin in sequence. Make sure they all spin; if they don’t then check the motor connections.
-
The installation instructions for cfclient can be found here: https://www.bitcraze.io/documentation/repository/crazyflie-clients-python/master/installation/install/
-
In essence you need to do the following to have this installed in linux:
-
Setup the pre-requisites as follows:
sudo apt install git python3-pip libxcb-xinerama0 pip3 install --upgrade pip -
Install using Pypi:
pip3 install cfclient
-
If you are planning to do development with the cfclient, you need to install cfclient from source by following the instruction in the link referenced above.
After installing the python cf client, you can launch it as follows:
python3 -m cfclient.gui
Note: For this to work, you need a pyQT version >= pyqt5~=5.15.0. However, this will conflict with the function of ROS based rqt visualization tools. So install the former in a virtual environment.
- cfclient GUI userguide: https://www.bitcraze.io/documentation/repository/crazyflie-clients-python/master/userguides/userguide_client/#input-devices
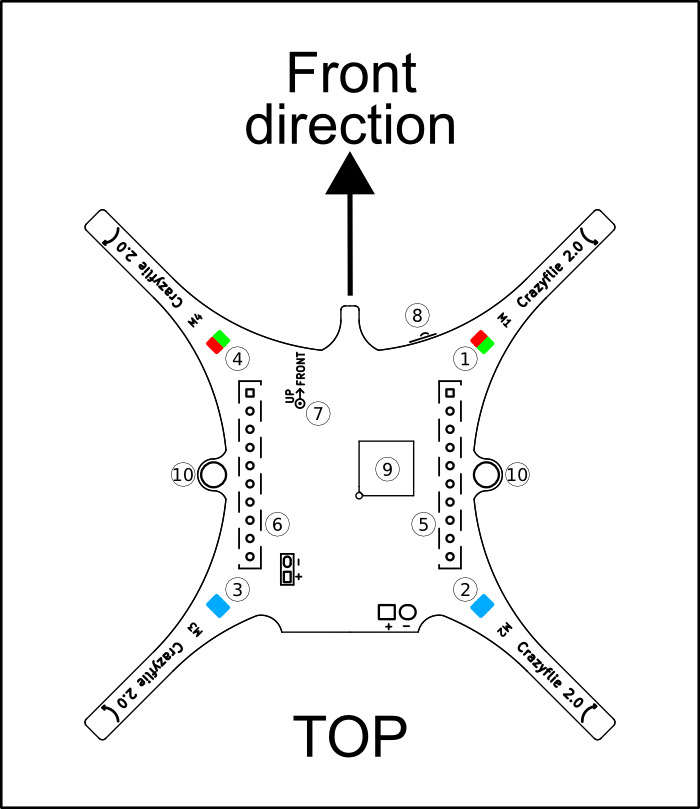
You also need to understand what the LEDs mean.
- Power on and all is good: The blue LEDs (2 and 3) are fully lit and the front right LED (1) is blinking red twice every second.
- Power on and all is good but sensors are not yet calibrated: The blue LEDs (2 and 3) are fully lit and the front right LED (1) is blinking red with 2 seconds interval. Put the Crazyflie 2.X on a level surface and keep it absolutely still to calibrate.
- Radio connected: The front left LED (4) is flickering in red and/or green.
- Battery low: The front right LED (1) is fully lit in red. It’s time to land and re-charge the battery.
- Charging: The back left blue LED (3) is blinking while the right back blue LED (2) is lit.
- Boot loader mode: The blue LEDs (2 and 3) at the back are blinking approximately once every second.
- Self test fail: The right front LED (1) is repeatedly blinking five short red pulses with a longer pause between groups.
-
Plug in your PS3 controller and the crazyradio PA dongle to the USB ports.
-
Open the cfclient as before:
python3 -m cfclient.gui -
Set the roll and pitch trim to zero
-
Turn on the Crazyflie drone by pressing the
ON/OFFbutton near the top right of the body. -
In the Crazyflie Client, press the 'Scan' button to set the Crazyradio PA as the client's interface.
- If the drone connected to the Crazyradio PA, it should be blinking red (about once every second).
-
Once the input device is connect, here's how to see what button does what. Connect the PS3to the Client by going to the dropdown menu
Input Device, and selecting Device > PS3 Controller. -
Go to Input device > Configure device mapping > Profile Name (at the bottom) > Load
- Once you load a profile, you can press buttons on the joystick and you should see the parameters updating live.
-
More info here: https://wiki.bitcraze.io/doc:crazyflie:client:pycfclient:index#input_devices
But in general, there's not a lot of info / explainers for how to fly with a joystick.
- You can make your own custom joystick configuration by clicking
- Connect the Crazyflie to the PC by hitting the "connect" Button.
- If the drone connected to the PC, you should be getting live IMU readings in the Crazyflie Client.
- Start Flying.
Note: If the console does not respond to the joystick's commands, you might need to first restart the joystick and then the GUI program.
The procedure is almost the same for using a PS4 or Xbox 360 controller.
TBD: Usage with a custom controller
Before you can start using the crazyflie drone, you need to upgrade its firmware. This can be done as follows:
To update the firmware in the Crazyflie 2.X do the following:
- Go to the menu Crazyflie->Bootloader
- Connect to the crazyflie in this dialog, if it is not already connected in the flighttab.
- Select the latest release from the drop down menu or select it if you have downloaded it from the Github release page.
- Click "Program" and wait for both the STM and NRF to be flashed.
- If your crazyflie has a lighthouse deck, the lighthouse deck fpga will be updated too (>= release 2021.03)
- Your crazyflie will automatically restart a couple of times.
- Do not touch or restart your crazyflie untill all flashing is done and you see "status: idle" at the bottom.
- To check the firmware version, under the View menu, open up Tabs->Console tab and look at the output when connecting to the Crazyflie 2.X.
If you accidently restarted your crazyflie during flashing or anything else happend which caused your crazyflie to not start up properly, follow the instructions for recovery mode.
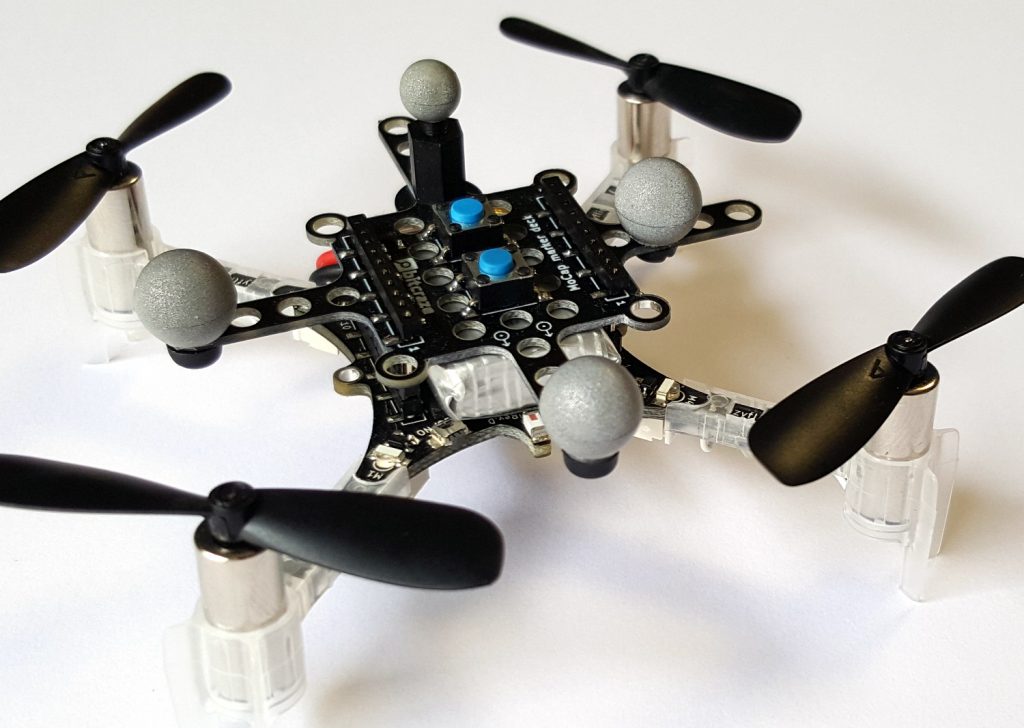
Before mounting any decks please ensure that the orientation of the extension decks are correct. Each extension deck has a marking that either has a circle with a dot at its center or a circle with a cross inside it. The former signifies that top facing portion of the deck and the latter signifies the bottom facing portion of the deck.
-
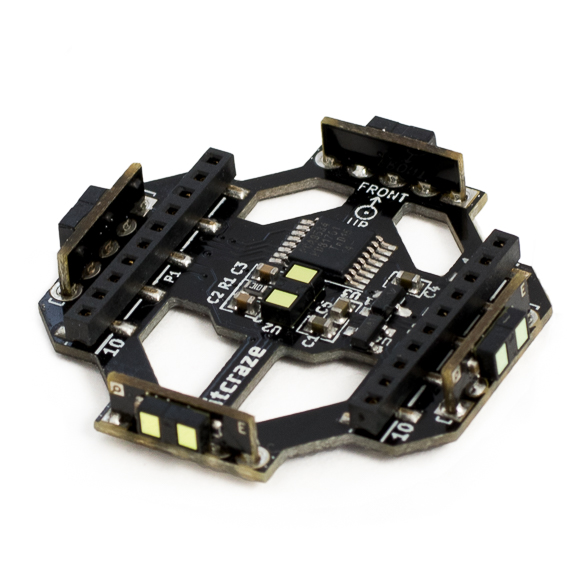
Mocap Marker Deck: This is an extension deck that allows the mounting of the mocap markers. The deck has M3 sized holes which is spaced on a 5mm grid. It also has space for adding two push buttons for starting demos etc. An example of this attached to the drone is as shown in the image below:
-
Multiranger Deck: The Multi-ranger deck gives the Crazyflie 2.X the ability to detect objects around it. This is done by measuring the distance to objects in the following 5 directions: front/back/left/right/up with mm precision up to 4 meters. It also allows to start working on environment-aware problems like Simultaneous Localization And Mapping (SLAM) algorithms.
-
Z-ranger Deck: The Z-ranger deck V2 uses a laser sensor to measure the distance to the ground. The deck enables the Crazyflie to automatically maintain a constant distance to the objects under it when flying in automatic mode. For more information on its setup, visit the
-
**AI Deck: ** The AI-deck 1.1 extends the computational capabilities and will enable complex artificial intelligence-based workloads to run onboard, with the possibility to achieve fully autonomous navigation capabilities. The ESP32 adds WiFi connectivity with the possibility to stream images as well as handling control.
-

-
Crazyswarm ROS package [1] is also integrated with optitrack, and the instruction for its setup can be found here: https://github.com/USC-ACTLab/crazyswarm and in the documentation: https://crazyswarm.readthedocs.io/en/latest/index.html
-
This seems to be the most active and up-to-date ROS package that supports these drones.
-
Installation (make sure you have all the dependencies installed. Follow instructions here: https://crazyswarm.readthedocs.io/en/latest/installation.html):
git clone https://github.com/USC-ACTLab/crazyswarm.git cd crazyswarm ./build.sh -
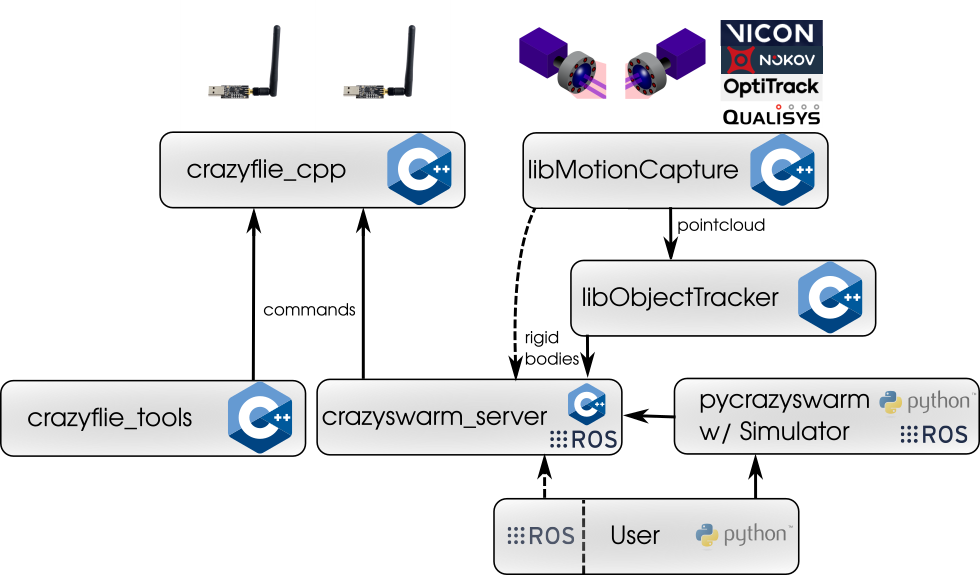
The crazyswarm ROS package has the following software architecture:
-
On a high level, the following are the functionalities of the various packages:
- crazyswarm_server: A centralized server that communicates with the motion capture and the crazyflie drones
- crazyflie_cpp: A library for low-level communication with the individual crazyflie drones.
- crazyflie_tools: Enables command-line tools with ROS
- pycrazyswarm: Simplified python backend which also hosts a simulation (only does kinematic visualization of the waypoints; no dynamics for performance reasons)
- libobjecttracker: A unified object tracking framework that supports multiple platforms (vicon, optitrack)
-
Attach the Mocap marker deck to the drone and create a unique configuration using the optitrack markers
-
Place the drone in the field of vision of the optitrack cameras
-
Using the Motiv software, create a rigid body using the detected markers
-
Name this rigid body cf1 for the 1st crazyflie drone. For the first CF, make sure that you set the streaming ID = 1. For the second CF, the streaming ID will be 2 and so on.
-
Make sure VRPN is enabled in the streaming, and the default address selected.
-
For a single CF on channel 80, the configuration and launch files need to be modified as follows:
crazyflies: - channel: 80 id: 1 initialPosition: [1.39293, -4.89388, 0.0690236] type: default -
Make sure that you set the motion_capture_type as "vrpn", and use the correct IP address in the "motion_capture_host_name" field. The object_tracking_type to be used will be "motionCapture". The launch files shown below reflect these changes:
#hover_swarm.launch

<?xml version="1.0"?>
<launch>
  <arg name="joy_dev" default="/dev/input/js0" />

  <rosparam command="load" file="$(find crazyswarm)/launch/crazyflieTypes.yaml" />
  <rosparam command="load" file="$(find crazyswarm)/launch/crazyflies.yaml" />

  <node pkg="crazyswarm" type="crazyswarm_server" name="crazyswarm_server" output="screen" >
    <rosparam>
      # Logging configuration (Use enable_logging to actually enable logging)
      genericLogTopics: ["log1"]
      genericLogTopicFrequencies: [10]
      genericLogTopic_log1_Variables: ["stateEstimate.x", "ctrltarget.x"]
      # firmware parameters for all drones (use crazyflieTypes.yaml to set per type, or
      # allCrazyflies.yaml to set per drone)
      firmwareParams:
        commander:
          enHighLevel: 1
        stabilizer:
          estimator: 2 # 1: complementary, 2: kalman
          controller: 1 # 1: PID, 2: mellinger
        ring:
          effect: 16 # 6: double spinner, 7: solid color, 16: packetRate
          solidBlue: 255 # if set to solid color
          solidGreen: 0 # if set to solid color
          solidRed: 0 # if set to solid color
          headlightEnable: 0
        locSrv:
          extPosStdDev: 1e-3
          extQuatStdDev: 0.5e-1
        kalman:
          resetEstimation: 1
      # tracking
      motion_capture_type: "vrpn" # one of none,vicon,optitrack,optitrack_closed_source,qualisys,vrpn
      object_tracking_type: "motionCapture" # one of motionCapture,libobjecttracker
      send_position_only: False # set to  S False to send position+orientation; set to True to send position only
      motion_capture_host_name: "192.168.50.100"
      # motion_capture_interface_ip: "" # optional for optitrack with multiple interfaces
      save_point_clouds: "/dev/null" # set to a valid path to log mocap point cloud binary file.
      print_latency: False
      write_csvs: False
      force_no_cache: False
      enable_parameters: True
      enable_logging: False
      enable_logging_pose: True
    </rosparam>
  </node>

  <node name="joy" pkg="joy" type="joy_node" output="screen">
    <param name="dev" value="$(arg joy_dev)" />
  </node>

  <node pkg="crazyswarm" type="crazyswarm_teleop" name="crazyswarm_teleop" output="screen">
    <param name="csv_file" value="$(find crazyswarm)/launch/figure8_smooth.csv" />
    <param name="timescale" value="0.8" />
  </node>

  <node name="rviz" pkg="rviz" type="rviz" args="-d $(find crazyswarm)/launch/test.rviz"/>

  <!-- <node pkg="rqt_plot" type="rqt_plot" name="rqt_plot_x" args="/cf2/log1/values[0]"/> -->
  <!-- <node pkg="rqt_plot" type="rqt_plot" name="rqt_plot_roll" args="/cf1/log1/values[2] /cf1/log1/values[3]"/> -->

</launch>
#mocap_helper.launch <?xml version="1.0"?> <launch> <node pkg="crazyswarm" type="mocap_helper" name="mocap_helper" output="screen" > <rosparam> # tracking motion_capture_type: "vrpn" # one of vicon,optitrack,optitrack_closed_source,qualisys,vrpn motion_capture_host_name: "192.168.50.100" #optitrack pc # motion_capture_interface_ip: "" # optional for optitrack with multiple interfaces </rosparam> </node> </launch> -
Launch VRPN to start streaming data to the linux machine from the optitrack camera as follows:
roslaunch crazyswarm mocap_helper.launch -
Once this is done, launch hove_swarm.launch as follows:
roslaunch crazyswarm hover_swarm.launch -
On RViz ensure that the positive direction of the x-axis is aligned with the front of the drone. Change orientation of the markers/drone to ensure that this is the case before running the hover script.
-
Find the initial location of the drone as follows:
rosrun tf tf_echo /world /cf1 -
Test the hover first on simulation by navigation to the /scripts directory as follows:
cd ~/crazyswarm/ros_ws/src/crazyswarm/scripts -
Run the hover script in simulation first:
python3 hello_world.py --sim -
Run the hover script on the real robot as follows:
python3 hello_world.py -
You can however place the drone in any orientation when running the hello_world.py script, and the drone should automatically align itself such that the x axis of the world and the x axis of the drone coincide.
-
When the drone crashes, you will need to restart the hover_swarm.launch launch file once again after rebooting the drone. You can reboot the drone by running the chooser.py script from the scripts directory. However, when running chooser.py, the crazyflies.yaml file gets overwritten with some other default values. This needs to be reverted. Although the initial position doesn't matter when you have unique marker configurations, the type needs to be 'default'. An example of the crazyflies.yaml file for one drone communicating on channel 80 is shown above. Make sure you restore it to the same format after running chooser.py.
-
Doing waypoint tracking using crazyswarm is straightforward once the hover functionality has been verified. You can do this as follows:
-
Launch VRPN to start streaming data to the linux machine from the optitrack camera as follows:
roslaunch crazyswarm mocap_helper.launch -
Once this is done, launch hove_swarm.launch as follows:
roslaunch crazyswarm hover_swarm.launch -
On RViz ensure that the positive direction of the x-axis is aligned with the front of the drone. Change orientation of the markers/drone to ensure that this is the case before running the hover script.
-
Navigate to the scripts folder and run waypoints_simple.py
roscd crazyswarm/scripts
python3 waypoints_simple.py
-
- Integrate the z ranger and test with the client to hold altitude.
- A black mat underneath the optitrack field of vision will be a good option to exercise. Prevents reflections from the surface and also reduces damage from the drone crashing.
- Crazyswarm ROS package by USC’s ACT lab: https://github.com/USC-ACTLab/crazyswarm
- Documentation: https://crazyswarm.readthedocs.io/en/latest/index.html
- Changing Crazyflie address using the Python client: bitcraze/crazyflie-clients-python#310
- Not able to run hello_world on real robot:
- Crazyflie Python API tutorial: https://www.bitcraze.io/documentation/repository/crazyflie-lib-python/master/user-guides/python_api/
- A comprehensive (unfortunately a bit outdated) user guide can be found here. This uses the deprecated crazyflie_ros package: https://act.usc.edu/publications/Hoenig_Springer_ROS2017.pdf
- Crazyflie python examples: https://github.com/bitcraze/crazyflie-lib-python
- USC-ACTLab#365 - integrate multi-ranger deck