DoPP2_RAG 项目维护指南

Live Demo | Online Install | User Guide | Developer Guide | Feedback | Contact


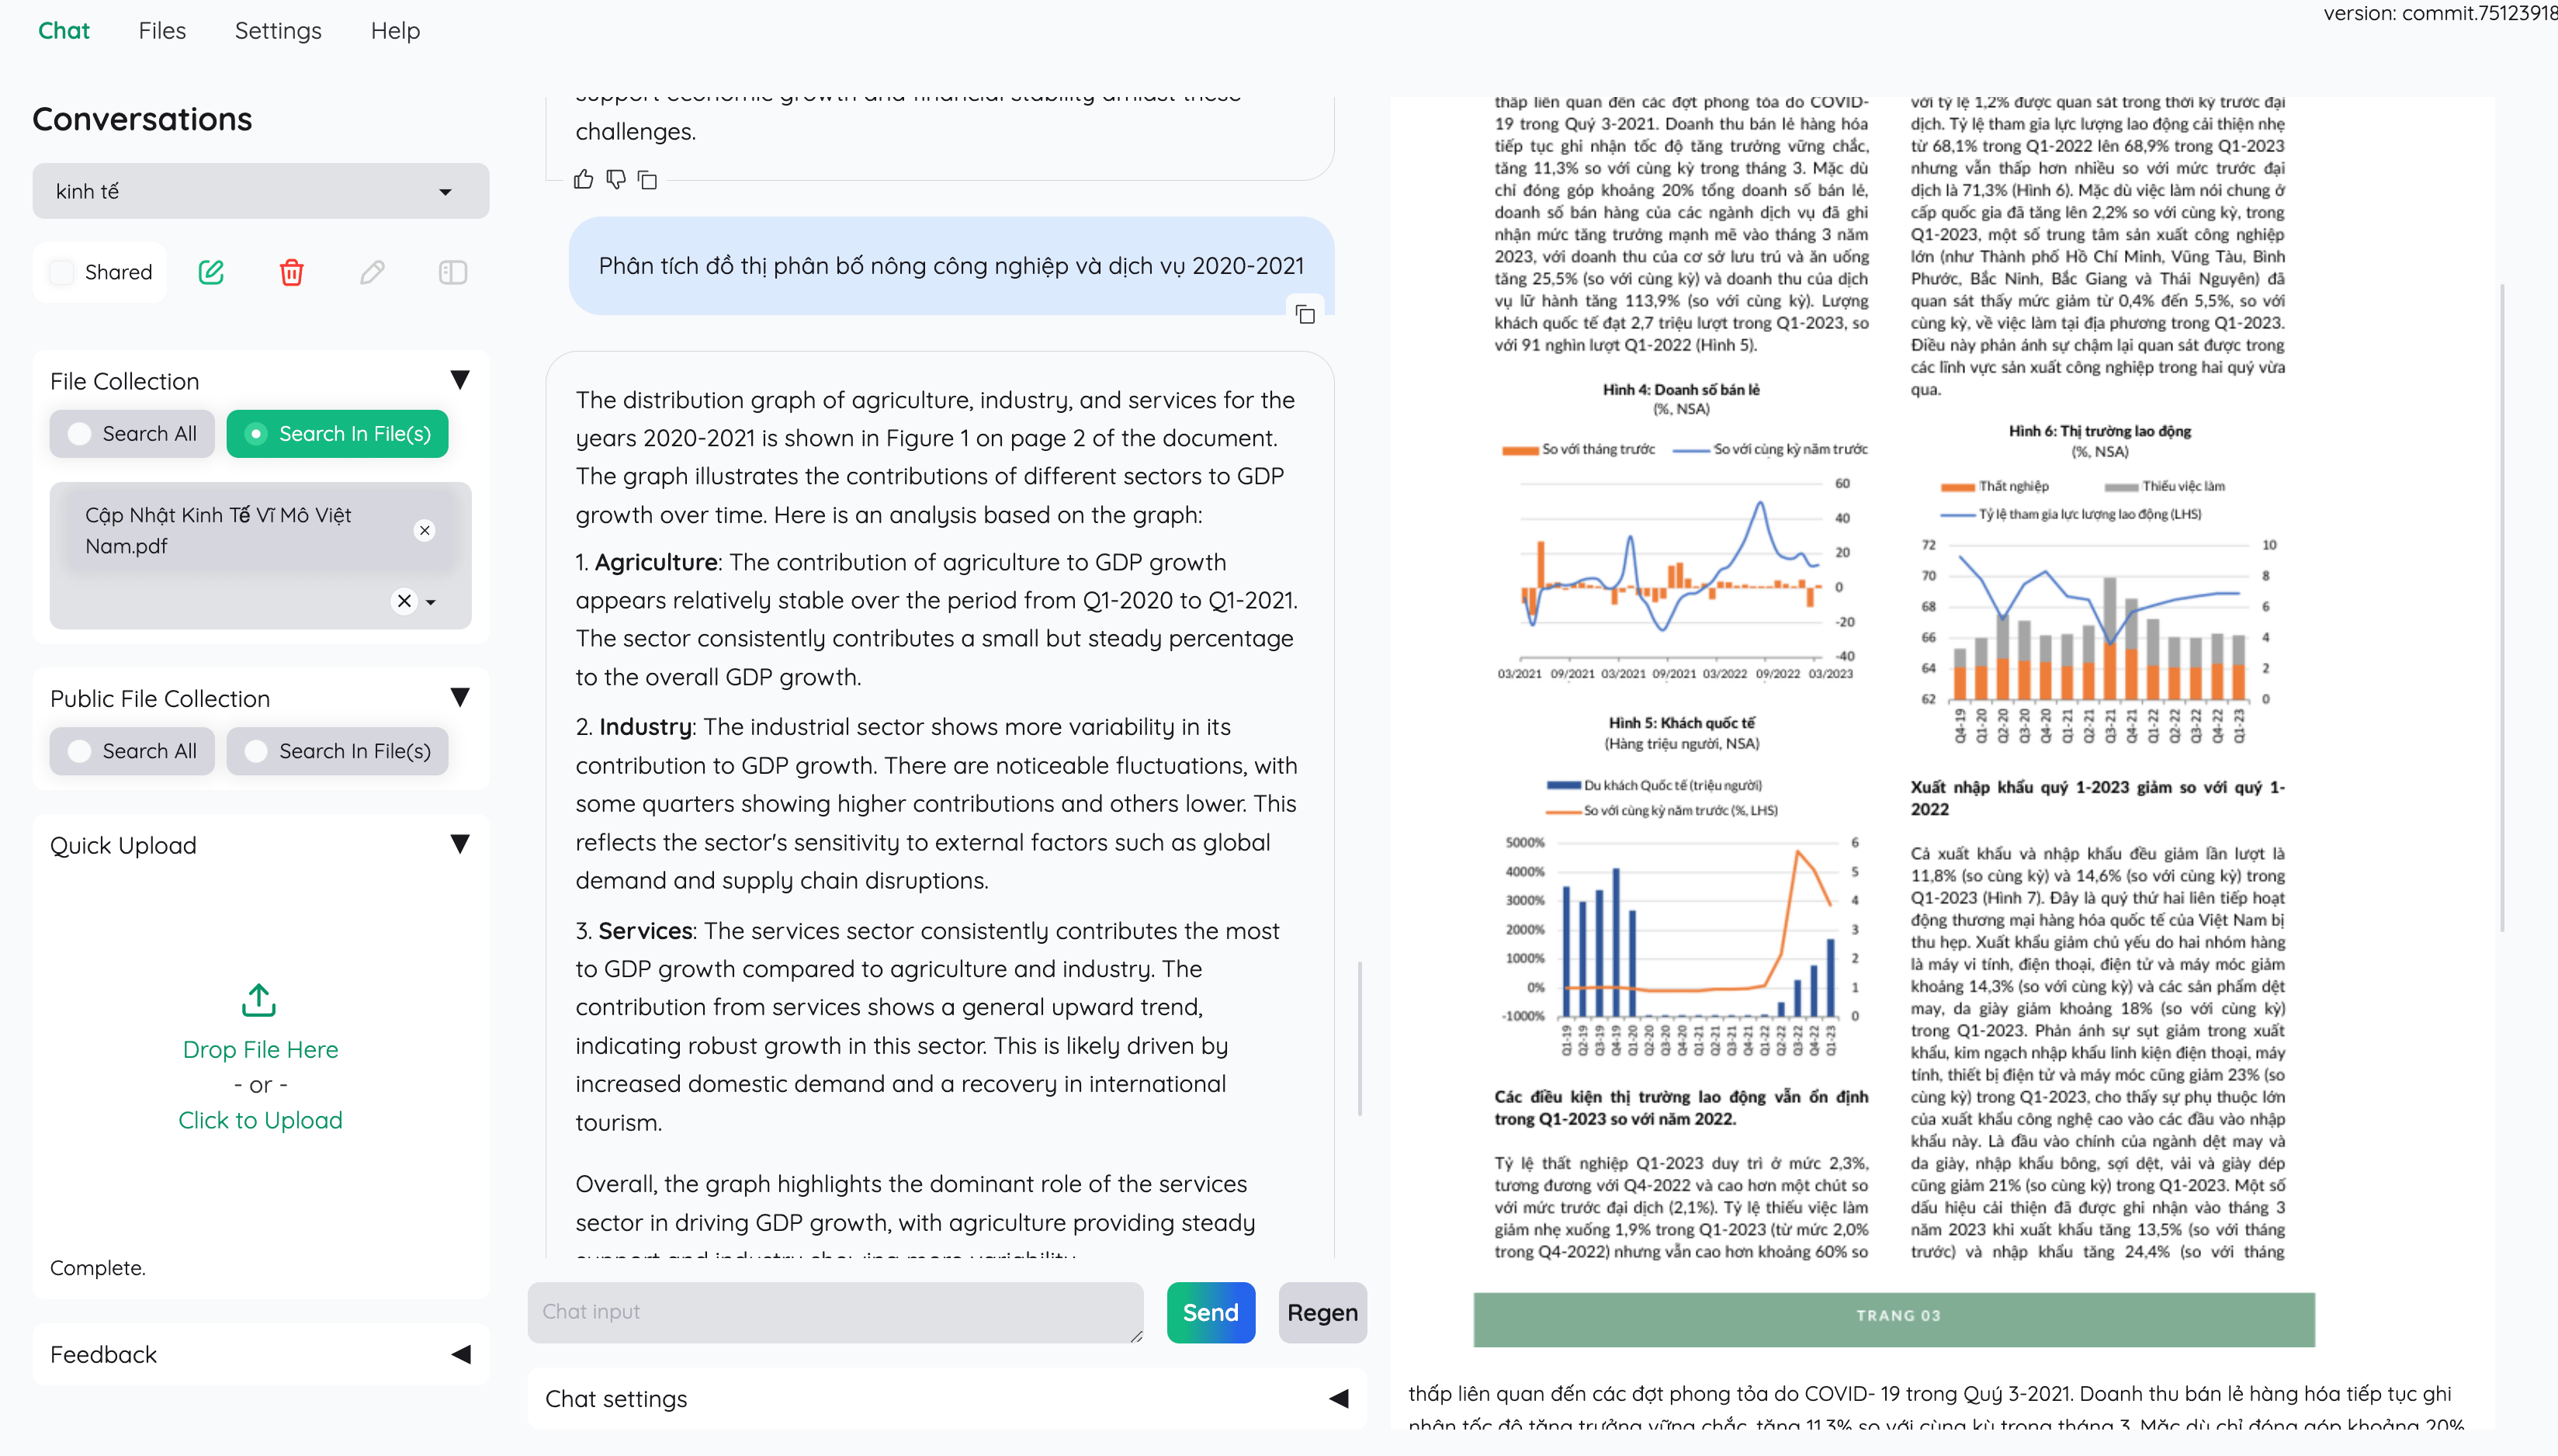
This project serves as a functional RAG UI for both end users who want to do QA on their
documents and developers who want to build their own RAG pipeline.
+----------------------------------------------------------------------------+
| End users: Those who use apps built with `kotaemon`.                       |
| (You use an app like the one in the demo above)                            |
|     +----------------------------------------------------------------+     |
|     | Developers: Those who built with `kotaemon`.                   |     |
|     | (You have `import kotaemon` somewhere in your project)         |     |
|     |     +----------------------------------------------------+     |     |
|     |     | Contributors: Those who make `kotaemon` better.    |     |     |
|     |     | (You make PR to this repo)                         |     |     |
|     |     +----------------------------------------------------+     |     |
|     +----------------------------------------------------------------+     |
+----------------------------------------------------------------------------+- Clean & Minimalistic UI: A user-friendly interface for RAG-based QA.
- Support for Various LLMs: Compatible with LLM API providers (OpenAI, AzureOpenAI, Cohere, etc.) and local LLMs (via
ollamaandllama-cpp-python). - Easy Installation: Simple scripts to get you started quickly.
- Framework for RAG Pipelines: Tools to build your own RAG-based document QA pipeline.
- Customizable UI: See your RAG pipeline in action with the provided UI, built with Gradio
.
- Gradio Theme: If you use Gradio for development, check out our theme here: kotaemon-gradio-theme.

-
Host your own document QA (RAG) web-UI: Support multi-user login, organize your files in private/public collections, collaborate and share your favorite chat with others.
-
Organize your LLM & Embedding models: Support both local LLMs & popular API providers (OpenAI, Azure, Ollama, Groq).
-
Hybrid RAG pipeline: Sane default RAG pipeline with hybrid (full-text & vector) retriever and re-ranking to ensure best retrieval quality.
-
Multi-modal QA support: Perform Question Answering on multiple documents with figures and tables support. Support multi-modal document parsing (selectable options on UI).
-
Advanced citations with document preview: By default the system will provide detailed citations to ensure the correctness of LLM answers. View your citations (incl. relevant score) directly in the in-browser PDF viewer with highlights. Warning when retrieval pipeline return low relevant articles.
-
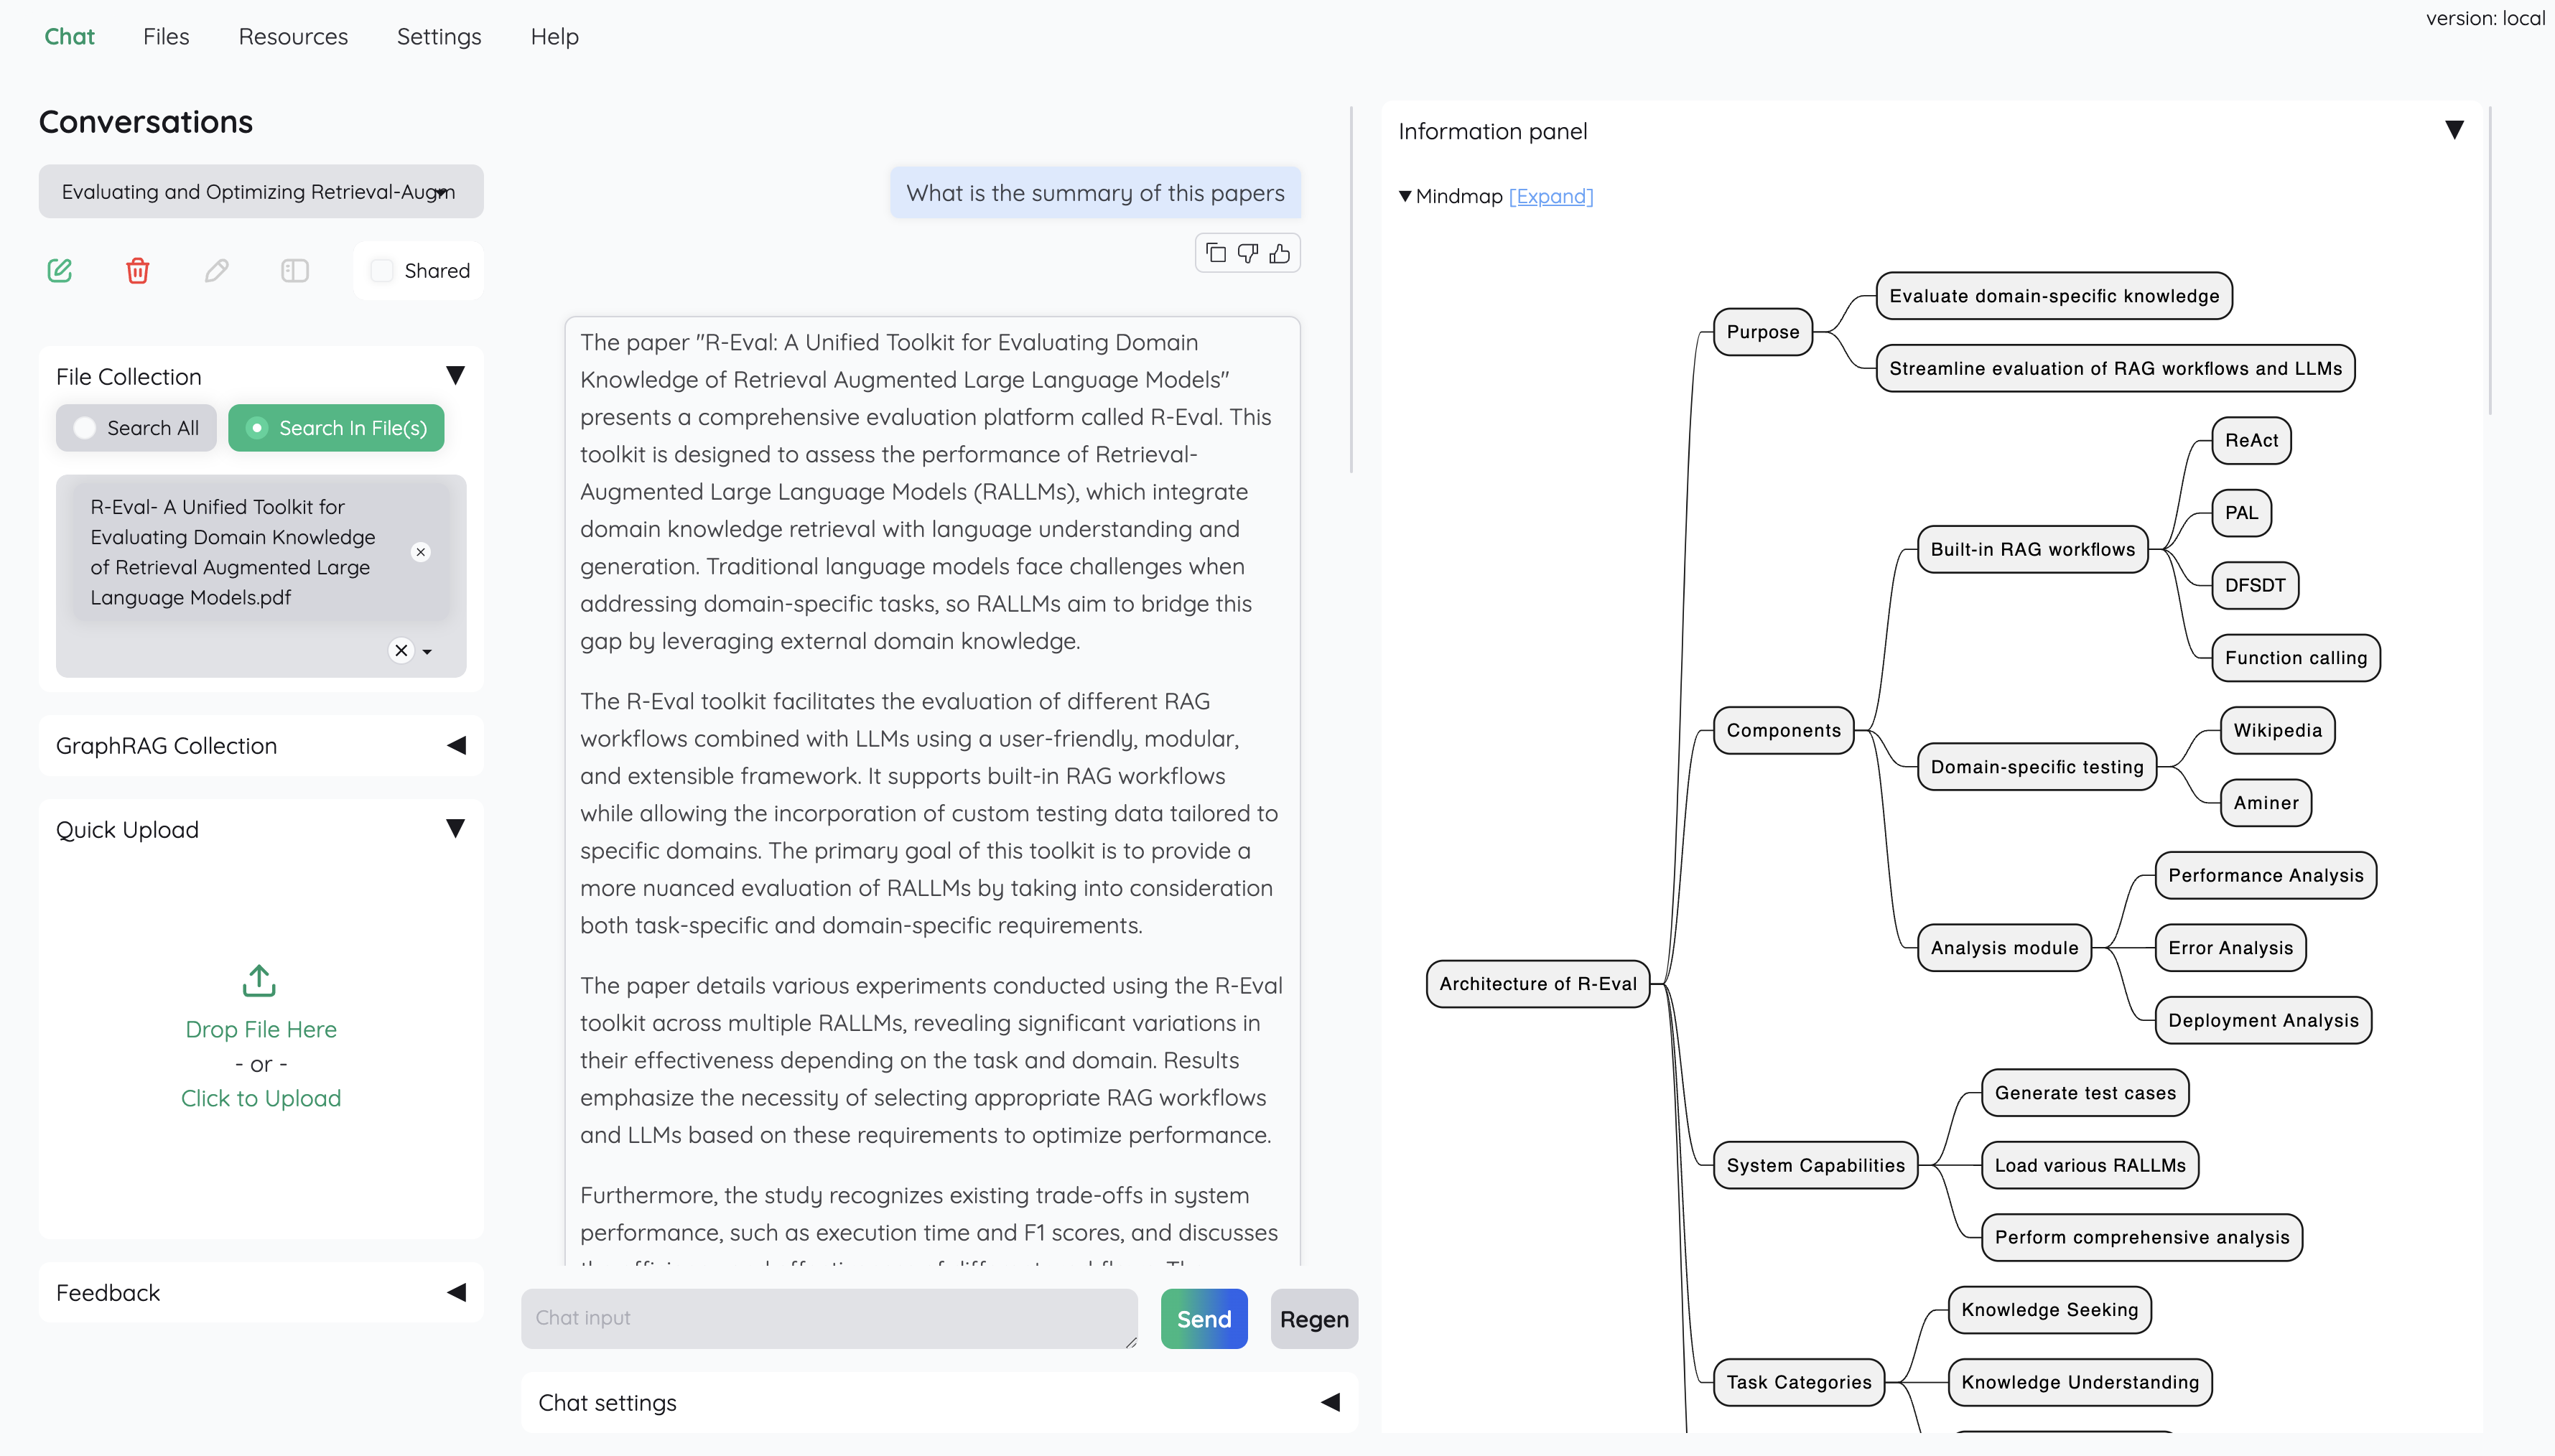
Support complex reasoning methods: Use question decomposition to answer your complex/multi-hop question. Support agent-based reasoning with
ReAct,ReWOOand other agents. -
Configurable settings UI: You can adjust most important aspects of retrieval & generation process on the UI (incl. prompts).
-
Extensible: Being built on Gradio, you are free to customize or add any UI elements as you like. Also, we aim to support multiple strategies for document indexing & retrieval.
GraphRAGindexing pipeline is provided as an example.
If you are not a developer and just want to use the app, please check out our easy-to-follow User Guide. Download the
.zipfile from the latest release to get all the newest features and bug fixes.
- Python >= 3.10
- Docker: optional, if you install with Docker
- Unstructured if you want to process files other than
.pdf,.html,.mhtml, and.xlsxdocuments. Installation steps differ depending on your operating system. Please visit the link and follow the specific instructions provided there.
- Clone and install required packages on a fresh python environment.
   # optional (setup env)

   conda create -n kotaemon python=3.10
   conda activate kotaemon


   # clone this repo

   git clone https://github.com/dingshengqin/PP2_RAG
   cd PP2_RAG

   pip install -e "libs/kotaemon[all]"
   pip install -e "libs/ktem"
If fails, you can add download source
   pip install -e "libs/kotaemon[all]" -i http://mirrors.aliyun.com/pypi/simple/ --trust mirrors.aliyun.com/pypi
   pip install -e "libs/kotaemon[all]" -i https://pypi.tuna.tsinghua.edu.cn/simple --trust pypi.tuna.tsinghua.edu.cn/simple
   pip install -e "libs/ktem" -i http://mirrors.aliyun.com/pypi/simple/ --trust mirrors.aliyun.com/pypi
   pip install -e "libs/ktem" -i https://pypi.tuna.tsinghua.edu.cn/simple --trust pypi.tuna.tsinghua.edu.cn/simple
- Create a
.envfile in the root of this project. Use.env.exampleas a template
The .env file is there to serve use cases where users want to pre-config the models before starting up the app (e.g. deploy the app on HF hub). The file will only be used to populate the db once upon the first run, it will no longer be used in consequent runs.
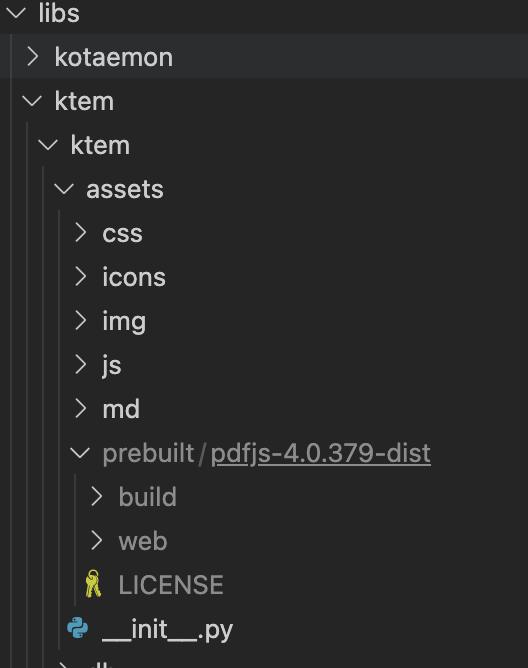
- (Optional) To enable in-browser
PDF_JSviewer, download PDF_JS_DIST then extract it tolibs/ktem/ktem/assets/prebuilt
- Start the web server:
shell python app.py
- The app will be automatically launched in your browser.
- Default username and password are both
admin. You can set up additional users directly through the UI.
- Check the
Resourcestab andLLMs and Embeddingsand ensure that yourapi_keyvalue is set correctly from your.envfile. If it is not set, you can set it there.
Note
Official MS GraphRAG indexing only works with OpenAI or Ollama API. We recommend most users to use NanoGraphRAG implementation for straightforward integration with Kotaemon.
Setup Nano GRAPHRAG
- Install nano-GraphRAG:
pip install nano-graphrag nano-graphraginstall might introduce version conflicts, see this issue- To quickly fix:
pip uninstall hnswlib chroma-hnswlib && pip install chroma-hnswlib - Launch Kotaemon with
USE_NANO_GRAPHRAG=trueenvironment variable. - Set your default LLM & Embedding models in Resources setting and it will be recognized automatically from NanoGraphRAG.
Setup MS GRAPHRAG
-
- *Non-Docker Installation*: If you are not using Docker, install GraphRAG with the following command:
-
```shell pip install graphrag future -
- *Setting Up API KEY*: To use the GraphRAG retriever feature, ensure you set the
GRAPHRAG_API_KEYenvironment variable. You can do this directly in your environment or by adding it to a.envfile. -
- *Using Local Models and Custom Settings*: If you want to use GraphRAG with local models (like
Ollama) or customize the default LLM and other configurations, set theUSE_CUSTOMIZED_GRAPHRAG_SETTINGenvironment variable to true. Then, adjust your settings in thesettings.yaml.examplefile.
See Local model setup.
-
By default, all application data is stored in the
./ktem_app_datafolder. You can back up or copy this folder to transfer your installation to a new machine. -
For advanced users or specific use cases, you can customize these files:
flowsettings.py.env
This file contains the configuration of your application. You can use the example here as the starting point.
Notable settings
# setup your preferred document store (with full-text search capabilities)
KH_DOCSTORE=(Elasticsearch | LanceDB | SimpleFileDocumentStore)


# setup your preferred vectorstore (for vector-based search)
KH_VECTORSTORE=(ChromaDB | LanceDB | InMemory | Qdrant)


# Enable / disable multimodal QA
KH_REASONINGS_USE_MULTIMODAL=True


# Setup your new reasoning pipeline or modify existing one.
KH_REASONINGS = [
    "ktem.reasoning.simple.FullQAPipeline",
    "ktem.reasoning.simple.FullDecomposeQAPipeline",
    "ktem.reasoning.react.ReactAgentPipeline",
    "ktem.reasoning.rewoo.RewooAgentPipeline",
]This file provides another way to configure your models and credentials.
Configure model via the .env file
-
Alternatively, you can configure the models via the
.envfile with the information needed to connect to the LLMs. This file is located in the folder of the application. If you don't see it, you can create one. -
Currently, the following providers are supported:
- OpenAI
In the .env file, set the OPENAI_API_KEY variable with your OpenAI API key in order
to enable access to OpenAI's models. There are other variables that can be modified,
please feel free to edit them to fit your case. Otherwise, the default parameter should
work for most people.
shell OPENAI_API_BASE=https://api.openai.com/v1 OPENAI_API_KEY=<your OpenAI API key here> OPENAI_CHAT_MODEL=gpt-3.5-turbo OPENAI_EMBEDDINGS_MODEL=text-embedding-ada-002
- Azure OpenAI
For OpenAI models via Azure platform, you need to provide your Azure endpoint and API key. Your might also need to provide your developments' name for the chat model and the embedding model depending on how you set up Azure development.
shell AZURE_OPENAI_ENDPOINT= AZURE_OPENAI_API_KEY= OPENAI_API_VERSION=2024-02-15-preview AZURE_OPENAI_CHAT_DEPLOYMENT=gpt-35-turbo AZURE_OPENAI_EMBEDDINGS_DEPLOYMENT=text-embedding-ada-002
-
Local Models
-
Using
ollamaOpenAI compatible server: -
Install ollama and start the application.
-
Pull your model, for example:
shell ollama pull llama3.1:8b ollama pull nomic-embed-text
- Set the model names on web UI and make it as default:
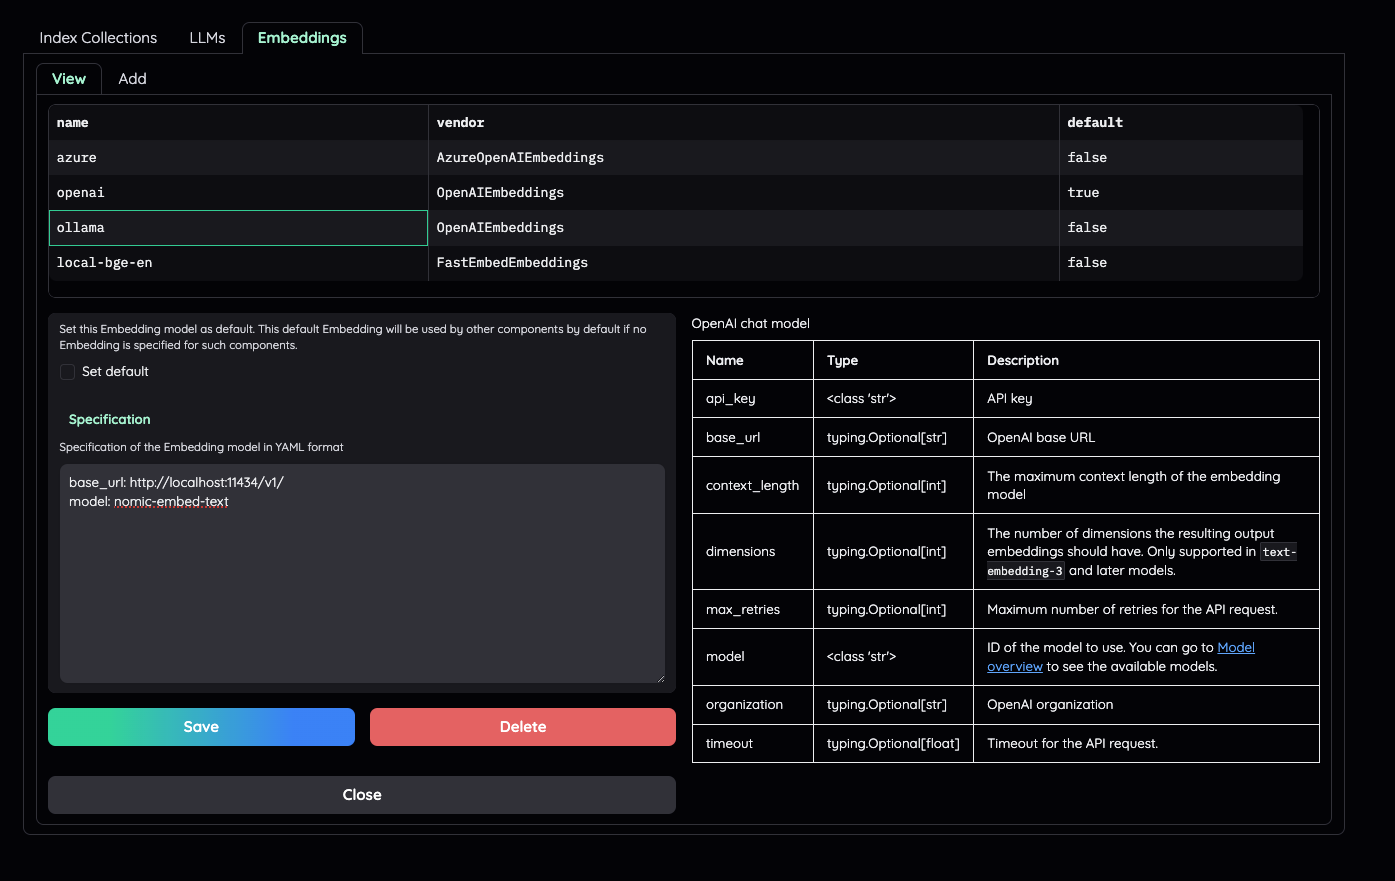
- Using
GGUFwithllama-cpp-python
You can search and download a LLM to be ran locally from the Hugging Face Hub. Currently, these model formats are supported:
- GGUF
You should choose a model whose size is less than your device's memory and should leave about 2 GB. For example, if you have 16 GB of RAM in total, of which 12 GB is available, then you should choose a model that takes up at most 10 GB of RAM. Bigger models tend to give better generation but also take more processing time.
Here are some recommendations and their size in memory:
- Qwen1.5-1.8B-Chat-GGUF: around 2 GB
Add a new LlamaCpp model with the provided model name on the web UI.
- Check the default pipeline implementation in here. You can make quick adjustment to how the default QA pipeline work.
- Add new
.pyimplementation inlibs/ktem/ktem/reasoning/and later include it inflowssettingsto enable it on the UI.
- Check sample implementation in
libs/ktem/ktem/index/file/graph
以下内容默认您在WSL-Ubuntu 已经完成以下配置
- git安装
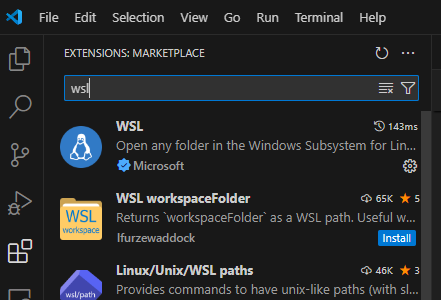
- vs code安装
- anaconda安装
- VPN 安装
- firefox浏览器安装
进入Ubuntu

  # optional (setup env)

   conda create -n kotaemon python=3.10
   conda activate kotaemon


   # clone this repo

   git clone https://github.com/dingshengqin/PP2_RAG
   cd PP2_RAG

   pip install -e "libs/kotaemon[all]"
   pip install -e "libs/ktem"
如果失败,可以添加源
   pip install -e "libs/kotaemon[all]" -i http://mirrors.aliyun.com/pypi/simple/ --trust mirrors.aliyun.com/pypi
   pip install -e "libs/kotaemon[all]" -i https://pypi.tuna.tsinghua.edu.cn/simple --trust pypi.tuna.tsinghua.edu.cn/simple
   pip install -e "libs/ktem" -i http://mirrors.aliyun.com/pypi/simple/ --trust mirrors.aliyun.com/pypi
   pip install -e "libs/ktem" -i https://pypi.tuna.tsinghua.edu.cn/simple --trust pypi.tuna.tsinghua.edu.cn/simple
-
从Windows 文档系统进入/home/dshengq/github/PP2_RAG
-
右击——选择“Open Git Bash here”
-
输入以下代码,地址改成自己的
git config --global --add safe.directory '%(prefix)///wsl.localhost/Ubuntu-20.04/home/dshengq/github/PP2_RAG' -
git 常规操作
git checkout -b ding # 注意换成自己的branch名称 -
打开vs code,点击左下角图标,进入WSL-Ubuntu
-
任意更改一个文件
-
回到git bash界面
-
输入以下命令
git add . # 把所有更改stage掉 git commit -m "change comment" git push origin ding:ding #注意换成自己的branch名称 ,后面的push只需要git push origin ding -
浏览器进入github项目地址,compare& merge 到main分支
-
注意点:
- 每次push完之后,vscode里面的push状态并不能更新,重新关闭打开后才能同步最新的更改状态监控,  不着急的话等一会也能同步
- 我没有能够在vs code的terminal测试成功git push,也许其他人可以,我目前只能从git bash去push
- 我一般会在vs code的terminal输入: cd /home/dsheng/github/PP2_RAG,这样感觉不容易出错
- 可以运行 python app.py了,进入下一步
备注:
链接我随便搜的教程,大差不差,供参考
在powershell里面输入
netsh interface portproxy add v4tov4 listenaddress=0.0.0.0 listenport=7860 connectaddress=172.27.235.43 connectport=7860
New-NetFirewallRule -DisplayName "WSL" -Direction Inbound -InterfaceAlias "vEthernet (WSL)" -Action Allow
ip 172.27.235.43 地址通讯在ubuntu查询
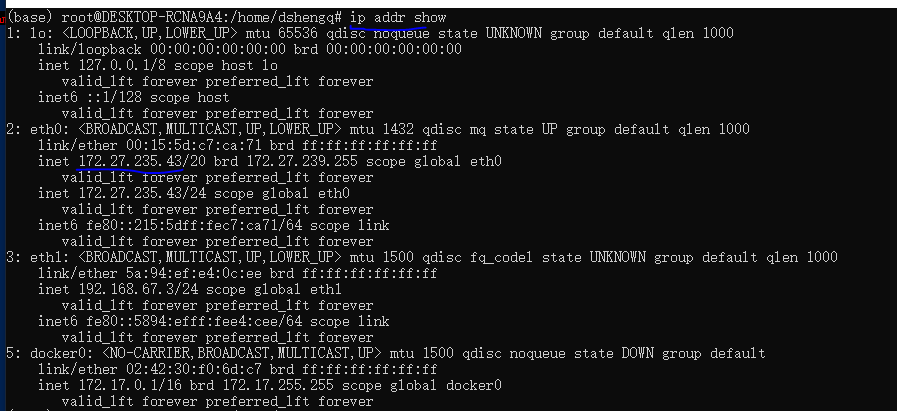
进入windows浏览器,输入 xxx.xxx.xxx.xxx:7860, ip地址查询如下

-
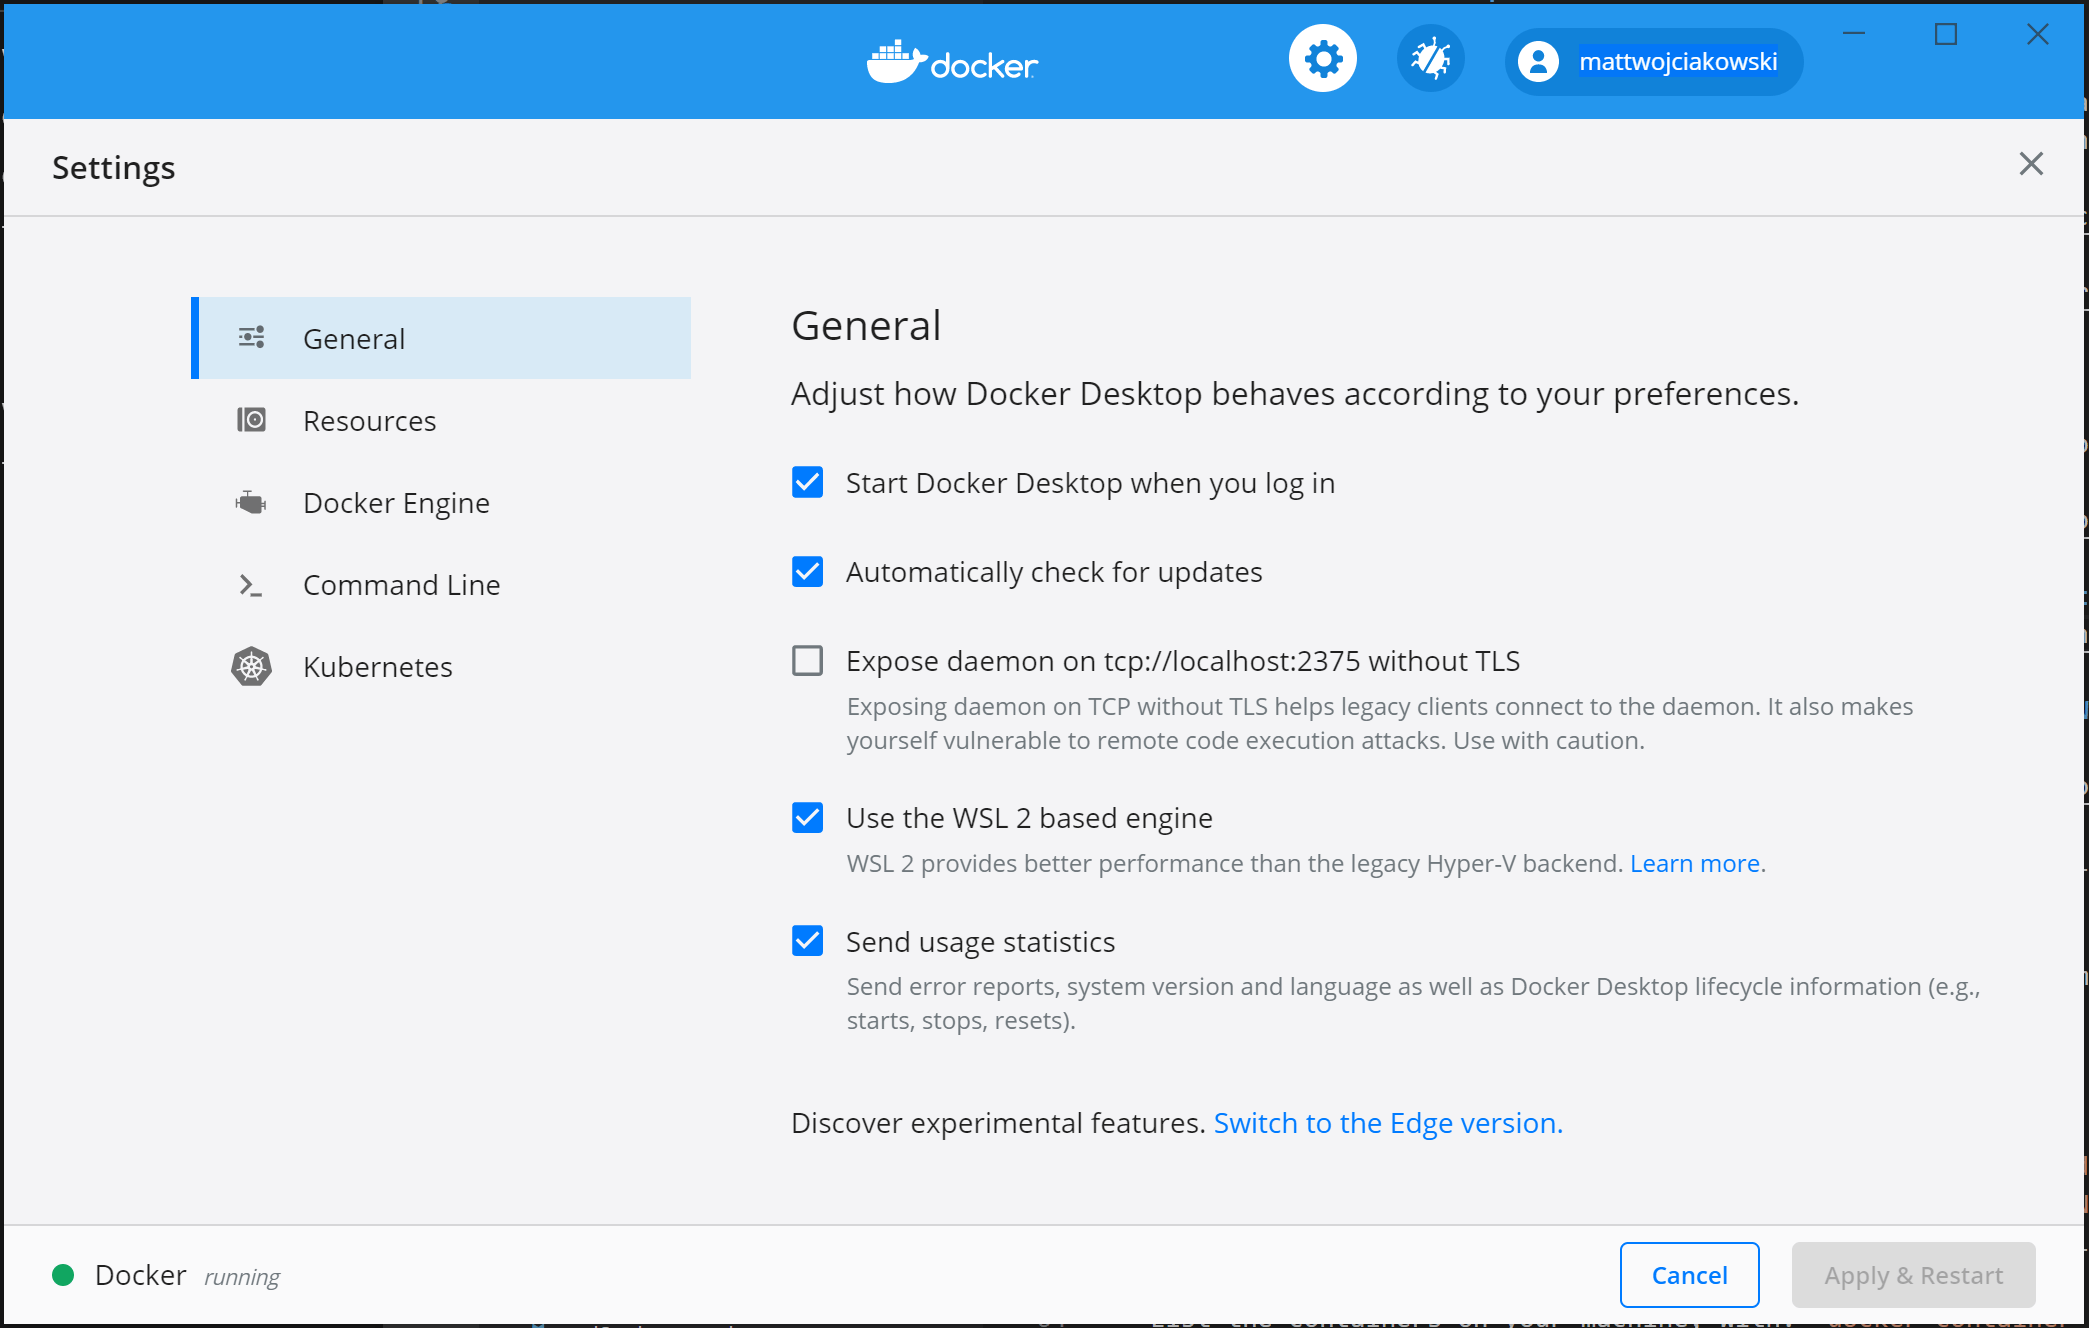
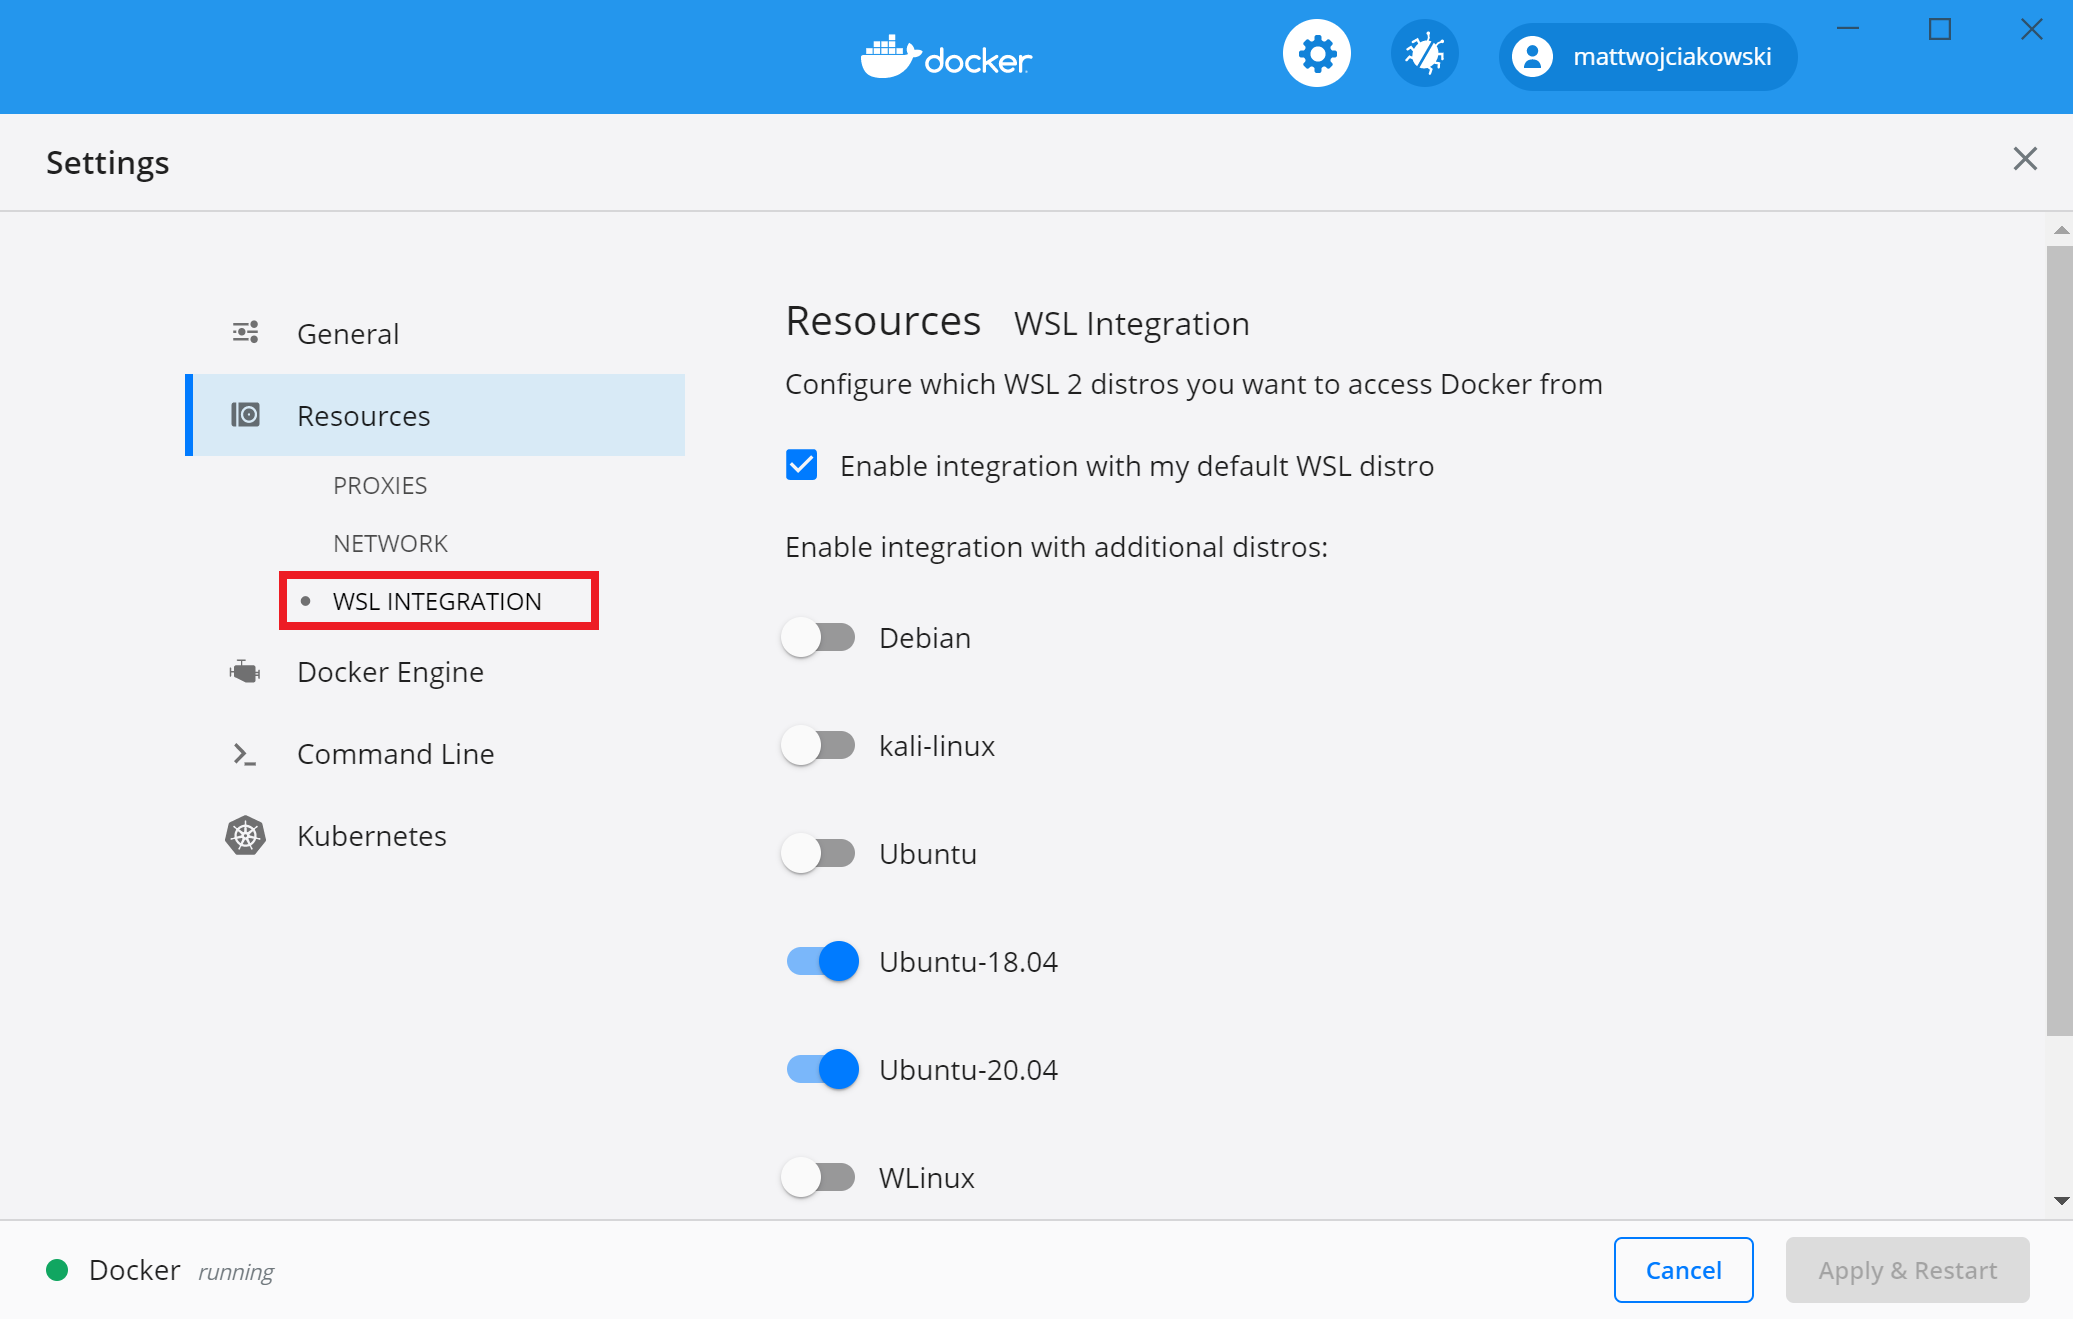
下载 Docker Desktop 并按照安装说明进行操作。
-
确保在“设置”>“常规”中选中“使用基于 WSL 2 的引擎”。
-
通过转到“设置”>“资源”>“WSL 集成”,从要启用 Docker 集成的已安装 WSL 2 发行版中进行选择
(1)添加Docker存储库
Docker存储库包含Docker软件包,您需要将其添加到系统中。可以使用以下命令:
sudo apt-get update
sudo apt-get install apt-transport-https ca-certificates curl gnupg-agent software-properties-common
curl -fsSL https://download.docker.com/linux/ubuntu/gpg | sudo apt-key add -
sudo add-apt-repository "deb [arch=amd64] https://download.docker.com/linux/ubuntu $(lsb_release -cs) stable"
(2)安装Docker
安装最新版本的Docker Engine和containerd。可以使用以下命令:
sudo apt-get update
sudo apt-get install docker-ce docker-ce-cli containerd.io
(3)验证Docker是否安装成功
sudo docker run hello-world
此处执行这个命令是会报错的,错误信息如下
docker: Cannot connect to the Docker daemon at unix:///var/run/docker.sock. Is the docker daemon running?.
See 'docker run --help'.
原因是wsl2不支持systemctl命令,而是支持systemed命令
所以需要执行如下命令先启动docker
service docker start
注意点:
最后一行sudo service docker start改成sudo systemctl restart docker
创建目录
mkdir /home/username/.cache/huggingface/data
cd /home/username/.cache/huggingface
下载镜像,大概率下载不下来
model=BAAI/bge-reranker-large

volume=$PWD/data

docker run --gpus all -p 8080:80 --name TEI  -v $volume:/data --pull always ghcr.io/huggingface/text-embeddings-inference:86-1.5 --model-id $model

如果没有权限尝试
sudo docker run --gpus all -p 8080:80 TEI -v $volume:/data --pull always 	ghcr.io/huggingface/text-embeddings-inference:86-1.5 --model-id $model
下载的内容copy到以下目录,注意onnx的要放到onnx文件夹里面
home\username\.cache\huggingface\data\models--BAAI--bge-reranker-large\snapshots\55611d7bca2a7133960a6d3b71e083071bbfc312
重新docker run
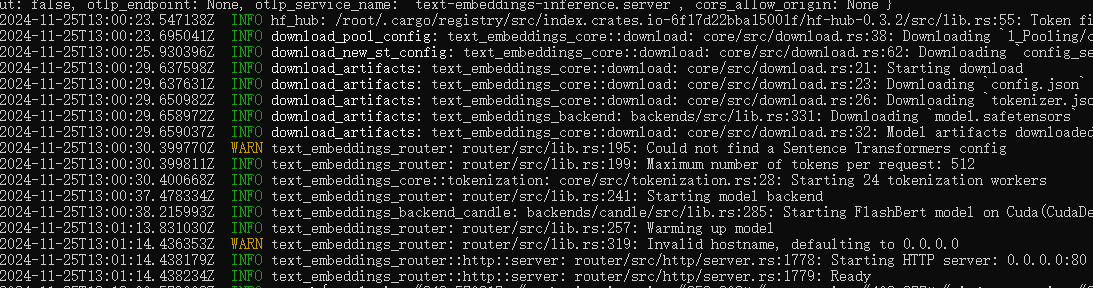
docker run --gpus all -p 8080:80 --name TEI -v $volume:/data --pull always ghcr.io/huggingface/text-embeddings-inference:86-1.5 --model-id $model
出现这个说明部署成功了
测试
curl 127.0.0.1:8080/rerank -X POST -d '{"query":"What is Deep Learning?", "texts": ["Deep Learning is not...", "Deep learning is..."], "raw_scores": false}' -H 'Content-Type: application/json'
Stop和重启容器
# 删除容器
docker rm -f TEI
# 下次重启容器
docker start TEI
# 或者
docker ps -a
# 找到TEI的容器ID然后
docker start <容器ID>
model=BAAI/bge-reranker-large

volume=$PWD/data

docker run --gpus all -p 8080:80 --name TEI  -v $volume:/data --pull always ghcr.io/huggingface/text-embeddings-inference:86-1.5 --model-id $model

如果没有权限尝试
sudo docker run --gpus all -p 8080:80 -v $volume:/data --pull always 	ghcr.io/huggingface/text-embeddings-inference:86-1.5 --model-id $model
endpoint_url: http://localhost:8080/rerank

Bug:docker: Error response from daemon: could not select device driver "" with capabilities: gpu.
How can I use Docker without sudo?
Docker-credential-desktop.exe executable file not found in $PATH using wsl2
docker build -t pp2_rag:0.0.1 .