This is a starter Electron application that is great for beginners who want to get started with Electron development. It includes the following features:
- Improved security codes
- Ready IPC communication setup
- Material Icons library
- Bulma.css framework
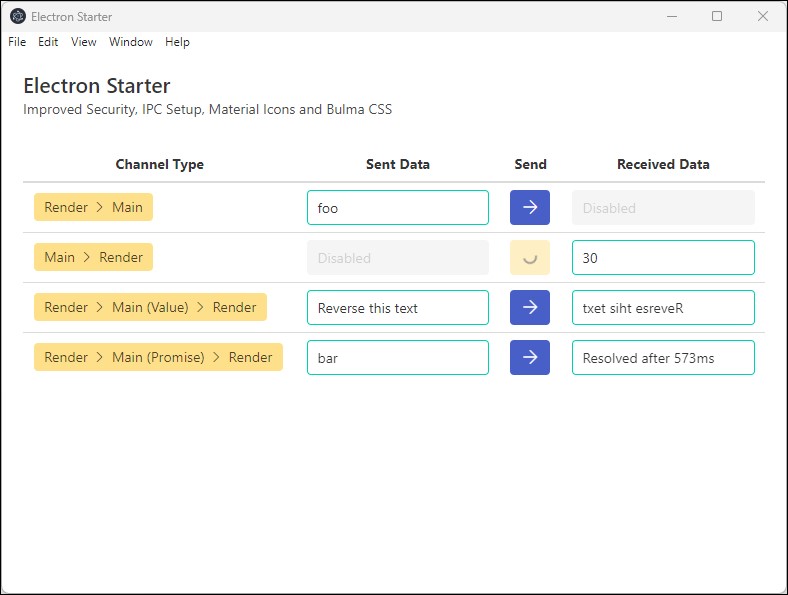
Here are some screenshots of the Electron Starter:
To get started with this application, simply clone the repository and run the following commands:
git clone https://github.com/ermjs/Electron-Starter.git
cd Electron-Starter
npm install
npm start
This will install all the necessary dependencies and start the application.
This application includes improved security codes to help keep your application secure.
In main.js file check for nodeIntegration and contextIsolation properties.
Search these settings for better understanding about Electron security.
The application also includes a ready IPC communication setup, which makes it easy to communicate between the main process and the renderer process.
Check channels in main.js, preload.js and renderer.js these communication technique will lead you to use correct way of understanding IPC communication.
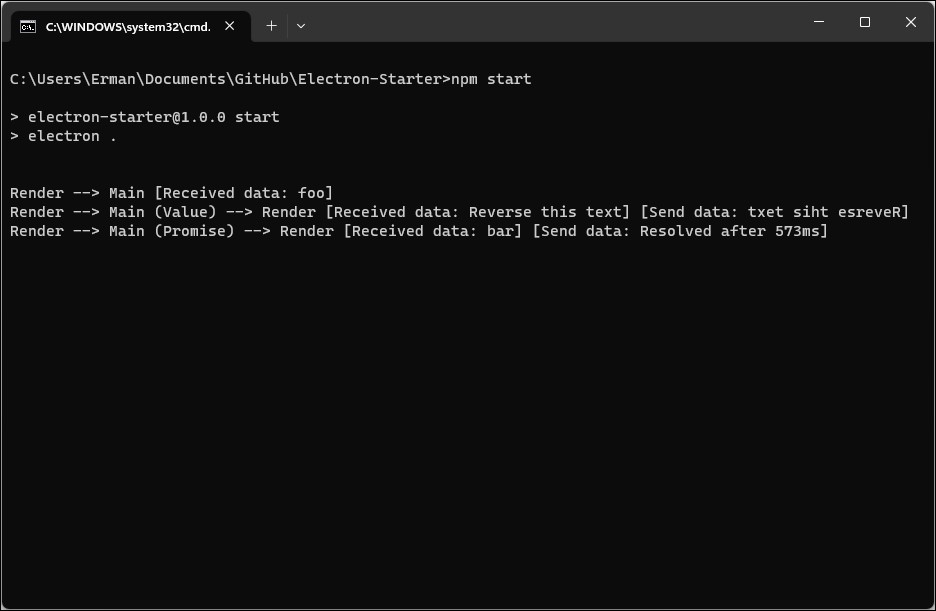
There are 4 different ways to communicate renderer.js with main.js.
- Renderer to Main
// renderer.js
window.ipcRender.send('channel-1', data); // Data is optional.

// main.js
ipcMain.on('channel-1', (event, data) => { console.log(data); });- Main to Renderer
// main.js
mainWindow.webContents.send('channel-2', data); // Data is optional.

// renderer.js
window.ipcRender.receive('channel-2', (data) => { console.log(data); });- Renderer to Main (Value) return to Renderer
// renderer.js
window.ipcRender.invoke('channel-3', data).then((result) => { console.log(result); });

// main.js
ipcMain.handle('channel-3', (event, data) => { return data; });- Renderer to Main (Promise) return to Renderer
// renderer.js
window.ipcRender.invoke('channel-4', data).then((result) => { console.log(result); });

// main.js
ipcMain.handle('channel-4', async (event, data) => {
  const myPromise = new Promise((resolve, reject) => {
    setTimeout(() => {
      resolve({test: 'foo'});
    }, 300);
  });
  return await myPromise.then((result) => { return result; });
});
As a final step you will need to configure preload.js file. It is a great way to use White-listed channels for ease of use of IPC.
// preload.js

// Import the necessary Electron components
const contextBridge = require('electron').contextBridge;
const ipcRenderer = require('electron').ipcRenderer;

// White-listed channels
const ipc = {
  // From render to main
  'render': {
    'send': [
      'channel-1'
    ],
    // From main to render
    'receive': [
      'channel-2'
    ],
    // From render to main and back again
    'sendReceive': [
      'channel-3',
      'channel-4'
    ]
  }
};

// Exposed protected methods in the render process
contextBridge.exposeInMainWorld(
  // Allowed 'ipcRenderer' methods
  'ipcRender', {
    // From render to main
    send: (channel, args) => {
      let validChannels = ipc.render.send;
      if (validChannels.includes(channel)) {
        ipcRenderer.send(channel, args);
      }
    },
    // From main to render
    receive: (channel, listener) => {
      let validChannels = ipc.render.receive;
      if (validChannels.includes(channel)) {
        // Deliberately strip event as it includes `sender`
        ipcRenderer.on(channel, (event, ...args) => listener(...args));
      }
    },
    // From render to main and back again
    invoke: (channel, args) => {
      let validChannels = ipc.render.sendReceive;
      if (validChannels.includes(channel)) {
        return ipcRenderer.invoke(channel, args);
      }
    }
  }
);The Material Icons library is included in this application, which makes it easy to add icons to your application.
Check <span class="material-symbols-rounded">navigate_next</span> usage in index.html.
Go to Material Icons page for more icons.
The Bulma.css framework is also included in this application, which provides a great starting point for building responsive and modern user interfaces.
I strongly recommend to use Electron Forge for packaging.
Install Electron Forge.
npm install --save-dev @electron-forge/cliImporting an Existing Project.
npm exec --package=@electron-forge/cli -c "electron-forge import"After installation Electron Forge will update package.json file.
When you type npm start, Electron Forge Start will start, not Electron.
So I separate Electron Start from Electron Forge Start.
Call npm start for Electron start.
Call npm run start-forge for Electron Forge start.
// package.json
{
  "name": "Electron-Starter",
  "version": "1.0.0",
  "description": "",
  "main": "main.js",
  "author": "erman999",
  "license": "MIT",
  "scripts": {
    "start": "electron .", // Here
    "start-forge": "electron-forge start", // and here
    "package": "electron-forge package",
    "make": "electron-forge make"
  },
  "devDependencies": {
    "@electron-forge/cli": "^6.4.2",
    "@electron-forge/maker-deb": "^6.4.2",
    "@electron-forge/maker-rpm": "^6.4.2",
    "@electron-forge/maker-squirrel": "^6.4.2",
    "@electron-forge/maker-zip": "^6.4.2",
    "@electron-forge/plugin-auto-unpack-natives": "^6.4.2",
    "electron": "^26.0.0"
  },
  "dependencies": {
    "electron-squirrel-startup": "^1.0.0",
  }
}
Electron forge will also create forge.config.js file for packaging configurations. Here is an example usage of config file.
packagerConfig.icon doesn't require file extension. Electron will automatically package your app with correct icon format.
// forge.config.js
module.exports = {
  packagerConfig: {
    asar: true,
    name: 'Electron Starter',
    productName: 'Electron Starter',
    executableName: 'Electron Starter',
    ignore: ['./folderName'],
    extraResource: ['./folderName'],
    icon: './img/icons/icon'
  },
  rebuildConfig: {},
  makers: [
    {
      name: '@electron-forge/maker-squirrel',
      config: {
        setupIcon: './img/icons/icon.ico'
      },
    },
    {
      name: '@electron-forge/maker-zip',
      platforms: ['win32', 'darwin'],
    },
    {
      name: '@electron-forge/maker-deb',
      config: {},
    },
    {
      name: '@electron-forge/maker-rpm',
      config: {},
    },
  ],
  plugins: [
    {
      name: '@electron-forge/plugin-auto-unpack-natives',
      config: {},
    },
  ],
};
When distributing a package for Windows it's recommend to use Squirrel.Windows (which gives you YourApp Setup.exe executable).
Install Electron Squirrel.
npm install electron-squirrel-startupAlso add below line to very top of main.js file. I usually add after declaring app constant.
// main.js
if (require('electron-squirrel-startup')) app.quit();
Top of main.js file should look like this.
// main.js
const { app, BrowserWindow, ipcMain } = require('electron');
const path = require('node:path');

// *** Here ***
if (require('electron-squirrel-startup')) app.quit();
If you don't add this line to your main.js file. Your app will start during installation and you will probably see some errors. This piece of code prevents users to see some kind of weird errors.
After you finish configuration. Run npm run make to create your packages.
You will see created packages in out folder.
Neither Electron nor Squirrel have uninstaller.
Best option is to use Windows native uninstaller.
It's usually called as Program and Features and for newer Windows versions it's under Settings -> Apps -> Installed Apps.
After you uninstall your application some files will still remain in AppData folder.
You can find exact addresses for remaining files below.
C:\Users\<YOUR_USER>\AppData\Local\electron_starter
C:\Users\<YOUR_USER>\AppData\Roaming\electron-starter
You need to define Menu and Tray objects like below.
// main.js
const { app, BrowserWindow, ipcMain, Menu, Tray } = require('electron');
Prevent window from closing when close button clicked.
Add below close event listener to createWindow function after you declare mainWindow object.
// main.js

function createWindow () {
  mainWindow = new BrowserWindow({...});
  // ...

  // Here
  mainWindow.on('close', function (event) {
    event.preventDefault();
    mainWindow.hide();
  });

}
Declare a global tray variable.
// main.js
let tray = null;
Then add below code in app.whenReady function.
// main.js

app.whenReady().then(() => {

  // Create Tray object
  tray = new Tray(path.join(__dirname, 'node.ico'));
  // Prepare context menu
  const contextMenu = Menu.buildFromTemplate([
    { label: 'Show App', click:  function() {
      mainWindow.show();
    } },
    { label: 'Quit', click:  function() {
      mainWindow.destroy();
      app.quit();
    } }
  ]);
  // Change here as you wish
  tray.setToolTip('This is Electron Starter');
  // Set tray context menu
  tray.setContextMenu(contextMenu);

  // Other codes...
});In order to start app on system startup, add below code after app declaration.
app.setLoginItemSettings({
  openAtLogin: true
});
Windows -> If users don't want app to start on system startup, they can disable it from Task Manager -> Startup Apps.
However, this operation won't delete created registy from the system.
So, if you don't event want to see it on the Startup Apps list, check below registry addresses and delete related registy.
Press Win + R and type regedit and click OK button.
HKEY_CURRENT_USER\SOFTWARE\Microsoft\Windows\CurrentVersion\Run
HKEY_LOCAL_MACHINE\SOFTWARE\Microsoft\Windows\CurrentVersion\Run
HKEY_CURRENT_USER\SOFTWARE\WOW6432Node\Microsoft\Windows\CurrentVersion\Run
HKEY_LOCAL_MACHINE\SOFTWARE\WOW6432Node\Microsoft\Windows\CurrentVersion\Run
ie4uinit.exe -show
If you find any issues with this application or would like to contribute, please feel free to submit a pull request or open an issue.
This application is licensed under the MIT License. See the LICENSE file for more information.
This application was inspired by electron-quick-start.