MoPat Admin instructions
- Registration
-
MoPat Functions
- Questionnaires
- Mapping
- Scores
- Bundles
- Manage clinics
- Users
- Surveys
- Edit scheduled encounter
- Execute survey
- Statistics
- Configuration
Registration is required for login, which is sent out by the Admin team with an invitation.
Below you can see the MoPat start page. Here you can change the user language (1) (German, English, Spanish) and resend a forgotten password (2). You can also log in here (3) after entering your user data. By clicking on the information icon (4), you can view information on support and the legal notice.


- Click on "Questionnaires"(1) to open a new tab with the menu item "Manage questionnaires"(2).

- To create a new questionnaire, click on "Add questionnaire" at the bottom left.
-
 To edit a questionnaire, you can either click on the pencil under "Actions", on the name of the questionnaire or on the flag of the display name.
 -
 Click on the List button of the "Actions" to edit the questions of a questionnaire.
 -
 Clicking on the share button under "Actions" takes you to the editing of the Export-Templates.
 -
 Clicking on the plus under "Actions" takes you to the editing of the scores.
 -
 If you move the cursor over the download symbol under "Actions", a drop-down menu opens, which provides various options for exporting metadata.
 -
 Click on the paper bin under "Actions" to delete the questionnaire.

Click on "Questionnaires" (1) to open a new tab with the menu item "Import questionnaire" (2). This menu item takes you to the "Import questionnaire from file" view.

- By clicking on "Browse", a file can now be selected from the computer and saved on the server with "Upload & import" (3).
- You can use the "URL" input field to enter a specific URL for a FHIR questionnaire and then click on "Upload & Import" (3) to import the questionnaire.
All fields marked with a red * must be completed.

- A new language can be assigned to the questionnaire by clicking on "Add language". to the questionnaire. This must be done if you want to offer a multilingual questionnaire.
- Existing languages can be found in this field. If you click on the small white trash bin symbol for an existing language, this language will be deleted from the questionnaire.
- The name identifies the form name. Questionnaires cannot have the same name.
- A logo for the questionnaire can be selected and uploaded using the "Browse" button.
- Enter a questionnaire description here.
- Under "Display name", the display names are entered one after the other in all the languages set up in separate text windows.
- A separate welcome text can be selected in each language.
- A final text can also be inserted in any language.
By clicking on the "![]() " to the right of the headings of the text fields of the display name, welcome text or final text, the display of the text fields can be hidden and shown again by clicking on the "
" to the right of the headings of the text fields of the display name, welcome text or final text, the display of the text fields can be hidden and shown again by clicking on the "![]() ". When minimised, the labels are coloured differently. Green means that the corresponding text field is already filled in, yellow means that the input field is empty.
". When minimised, the labels are coloured differently. Green means that the corresponding text field is already filled in, yellow means that the input field is empty.
The changes can be saved by clicking on the "Save" (9) button. If the centre "Save and edit questions"(10) button is selected, you will be taken directly to the to Editing/creating the questions of a questionnaire.

- Click on the blue "Add question" button at the bottom left of the page to add a new question.
-
The question can be edited by clicking on the flag (6) or the edit button (2).
- As in the questionnaires, several languages can be assigned to each question. Please note that one language should be available for all questions in order to be able to use the form in all languages afterwards. If you move the cursor over a flag, the question text appears in the corresponding language.
-
 By clicking on the second button in the "Actions" column, an exact copy of the question is created and attached to the questionnaire. You are immediately taken to the "edit questions" view, in which all the entries of the duplicated question have been initially adopted, but can also be edited.
 -
 Click on the third button in the "Actions" column to add and edit conditions (see: Conditions of question).
 -
A question can be removed from the questionnaire by clicking on the paper bin. All subsequent questions move up one place in the numbering.
- The column "Question is initially activated" shows whether a question is present in the questionnaire from the start or not. This option is selected from the start, but can be switched off (useful for conditions when questions should only be displayed after a specific answer to a previous question has been selected).
- The column "Question must be answered" shows whether a hint is given if the question has not been answered.
Each question initially has the same structure:

- You can add as many languages as you like for each question. As described above, it is advisable to provide the same languages for each question in order to be able to use the form in this language.
- The question type determines the type of answer options. The different types are explained in detail in the following section.
- A separate text field appears for each language added, in which the question text is written. The height of each text field can be adjusted by clicking on the bottom edge of the field and dragging the cursor up or down. The content of the question/info text should be the same in every language.
- If an extra note is to be displayed for answering this question if it has not been answered, a tick can be placed here. As a result, this question appears at the end of the questionnaire in the completeness check and can still be answered there.
- If the question should only be displayed if a certain condition is met (e.g. a certain answer was selected in a previous question), then this selection can be removed. This means that this question is not displayed by default in a survey, but only under certain conditions (see: Conditions).
The different question types are described below using the numbering in the overview under "Edit/Create questions in a questionnaire" and the different structures of the answers are described. Depending on the selected type, the corresponding tab for editing the answers opens in the lower section of the "Edit question" window.
An info text is not a real question, but simply displays the text entered. Therefore, this question type does not contain any answer options:

Display of the info text in a survey:

A question of the "Free text" type is structured in exactly the same way as a question of the "Info text" type. However, you do not enter a simple text that is displayed, but a question that the user should answer in a text field.

View of the free text question in a survey:
A question of the type "multiple choice" has the advantage that not only one, but several answers can be selected. For example, you can ask respondents to select their favourite days of the week. The possible answers would then be the days of the week, from which you have to select one (2) if you only have one favourite day, or you can select any (3) if you like every day:
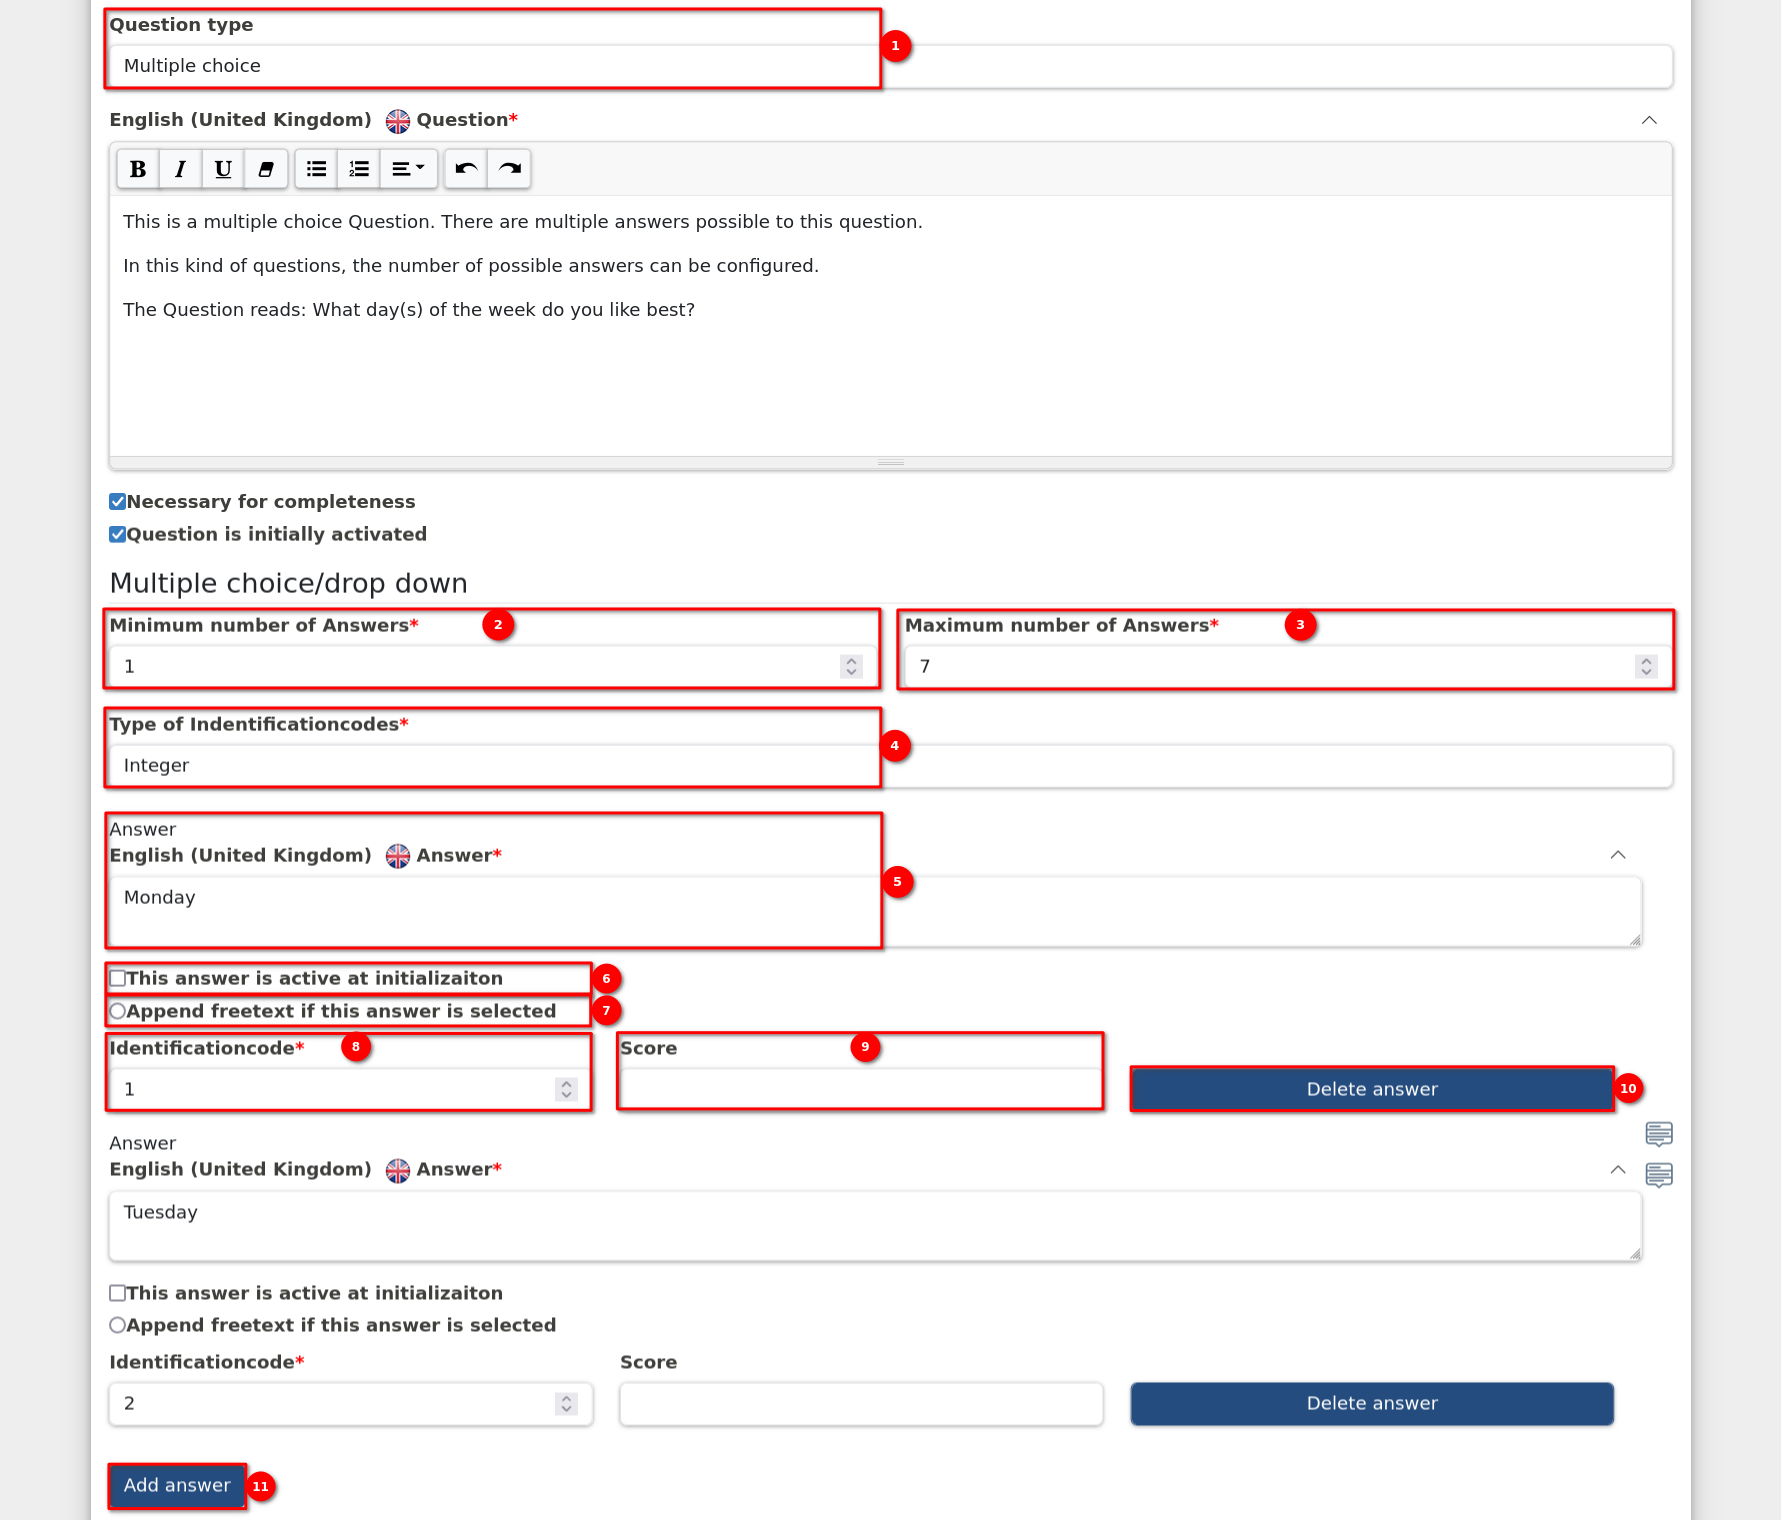
- Under Question type, "Multiple choice" must be selected.
- The minimum number of answers that must be selected must be specified here.
- The maximum number of answers that can be selected must be specified here, whereby this value must be less than or equal to the total number of answers added and greater than or equal to the value of the minimum answers.
- Select the appropriate type (Integer, Float, or String) to uniquely identify each answer option for mapping purposes.
- An answer text must be provided for each answer in each added language.
- If you only want to display an answer option under certain conditions, the checkbox must be unchecked. This means that it is not displayed directly, but must first be made visible by certain conditions (see: Conditions).
- An answer can be selected which activates a free text field for additional information as soon as it is selected in the survey. The answer is always displayed as the last answer in the survey.
- Enter the identification code corresponding to each answer option based on the selected type.
- A score can be specified for each answer, which is counted in the score calculation.
- If this button is clicked, the answer is deleted from the question.
- If you add a new answer, the answer text of the previous answer is copied and can then be changed.
View of multiple choice with additional answer option in a survey:
Slider questions are useful when a question is about subjective perception. For example, the question "How do you like MoPat2?". The scale could go from 0 to 5, with 0 being "I don't like it at all" and 5 being "I like it a lot":

- Under Question type, "Slider" must be selected.
- The orientation of the slider is set to horizontal by default. To align it vertically, a tick must be placed here.
- The minimum value of the scale must be entered here.
- The maximum value of the scale must be specified here.
- The step size in which the slider can be set must be specified here.
- It is possible to display font icons above the slider to increase comprehensibility of the question. To activate them, a tick must be placed here.
 6. By selecting ‘Show icons above the slider’, a new section appears.
a. In this section, you can specify the number of symbols to be displayed.
b. Once the number of symbols has been defined, the corresponding symbols appear above the slider.
c. Clicking on an icon (b) opens a selection box to select different icons. - If the current value is to be displayed while the slider is being moved, a tick must be placed here.
- If you want to specify the minimum of the scale more precisely, you can insert a short description in this text field. It is displayed next to the minimum position of the slider.
- If you want to specify the maximum of the scale more precisely, you can insert a short description in this text field. It is displayed next to the maximum position of the slider.
View of the slider in a survey:
Questions of the type "Numbered checkboxes" are comparable to questions of the type "Slider". The difference is that in the former, the scale is not represented by a slider, but by several numbered boxes from which you can select one.

- Under Question type, "Numbered checkboxes" must be selected.
- The alignment of the checkboxes is set to horizontal by default. To align them vertically, a tick must be placed here.
- The minimum value of the scale must be entered here.
- The maximum value of the scale must be specified here.
- The step sizes in which the checkboxes are to be created must be specified here.
- If you want to specify the minimum of the scale in more detail, you can insert a short description in this text field. It is displayed next to the minimum checkbox of the scale.
- If you want to specify the maximum of the scale more precisely, you can insert a short description in this text field. It is displayed next to the maximum checkbox of the scale.
View of the numbered checkboxes in a survey:
Questions of the type "Numbered checkboxes + free text" are almost identical to questions of the type "Numbered checkboxes". However, in addition to the scale, a free text window is displayed in which additional information can be written.

- For a numbered checkbox with free text, the scale cannot be displayed vertically.
- A heading can be specified for the free text field so that it is recognisable which information is to be written in the field.
View of the numbered checkboxes with free text in a survey:
Questions of the type "Date" are suitable for data queries of any kind.

- Under Question type, "Date" (1) must be selected.
- The selection range of the date can also be restricted to an earliest date.
- The selection range of the date can also be restricted to a latest date.
View of the date question in a survey:
A question of the type "Number input" is suitable for all types of number queries.

- Under Question type, "Number input" must be selected.
- The number entry can be restricted to a minimum number.
- The number input can be restricted to a maximum number.
- The step size in which the numbers can be entered can be defined. Please note that the maximum must always be divisible by the step size.
View of the number input entry in a survey:
Questions of the "picture" type are suitable for having the patient use a picture to show where he/she has complaints or similar.
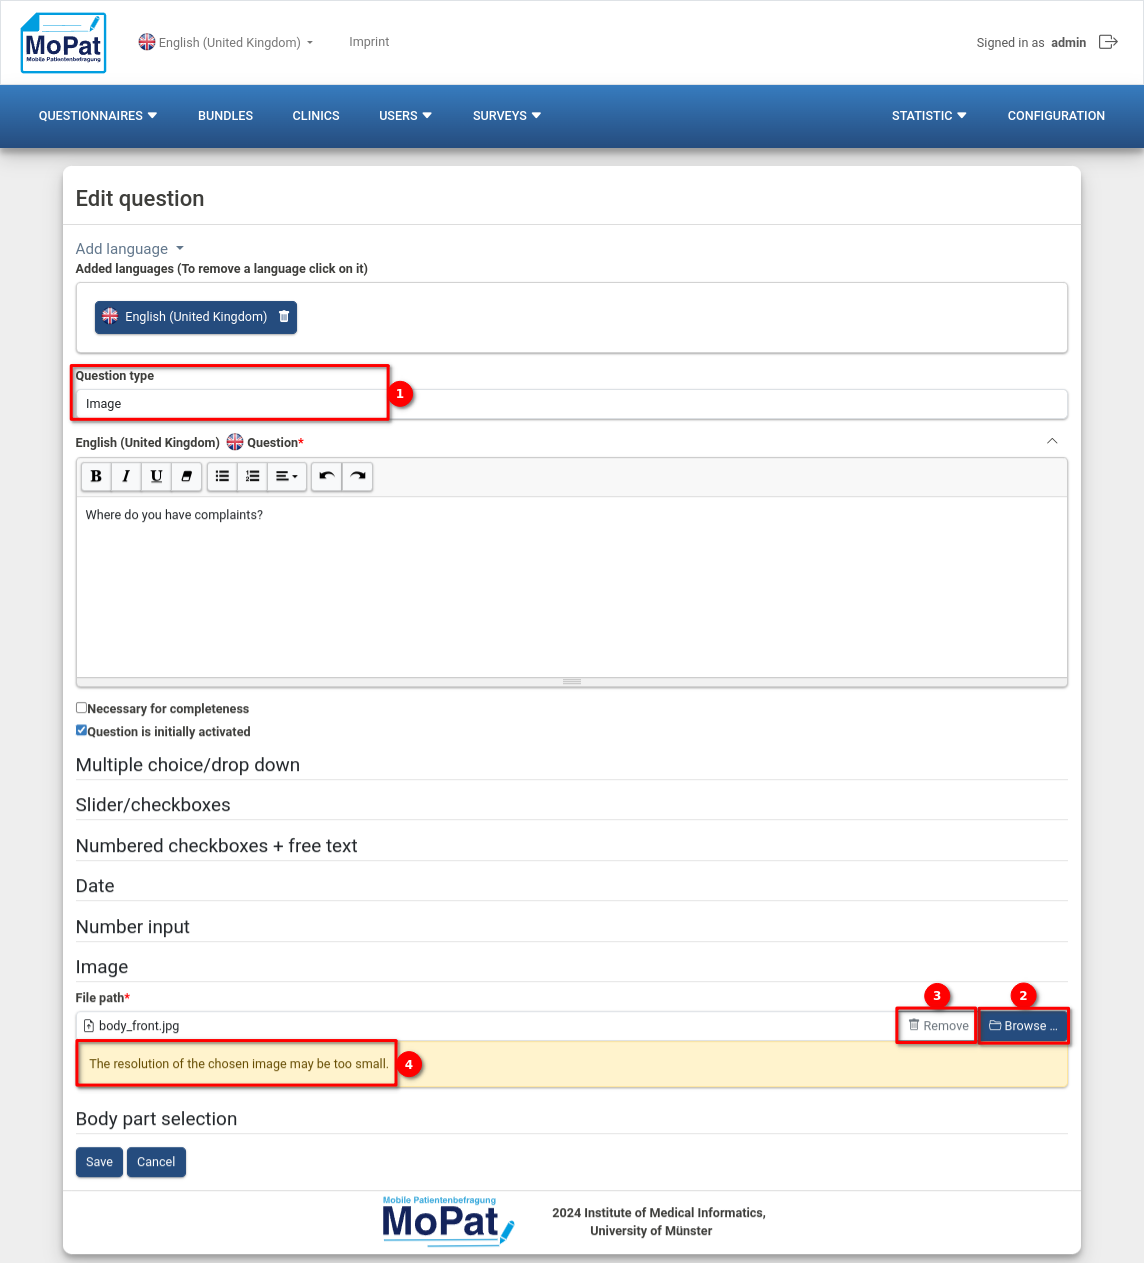
- Select "Image" under Question type.
- Click on the "Browse" button to select the desired image in its directory. Possible file formats are: .jpg, .jpeg and .png. Please note that the image must be available in a sufficient resolution (400 x 300), otherwise the display may be unclear.
- If the selected image has a resolution lower than 400 x 300 px, this warning is displayed.
View of the "Image" question in a survey:
- The colour of each marker can be set to black or white.
- Click on the image to mark the selected point.
- The arrows can be used to delete the last markers set or restore the last deleted markers.
For questions of the type "Body part selection", predefined body regions can be selected from two different images, the front and back of a body, when the question is created. These selected body regions are then available for selection in the survey; the other regions cannot be selected.

- Under Question type, "Select body region" must be selected.
- Here you can select whether only the front, only the back or both sides of the body should be displayed.
- The minimum number of body regions to be selected must be specified here
- The maximum number of body regions that can be selected must be specified here, whereby this value must be less than or equal to the total number of predefined selected body regions and greater than or equal to the value of the minimum body regions.
- Click on the predefined body regions in the image to select or deselect them.
- This button deselects all selected body regions.
- This button selects all body regions in the image.
View of the "Select body regions" question in a survey:
The "Barcode" question in the survey offers the option of scanning a barcode, QR code or data matrix using a camera on the device and saving the content as text. If the device used does not have a camera or WebRTC is not supported, a free text field is displayed for manual input.
- Only the question type "Barcode" must be selected and a question text must be specified. Other attributes are not required.
View of the "barcode" question in a survey:
If a barcode is recognised, this code is entered in the text field, as shown here:
As explained under "5th Editing/creating the questions of a questionnaire" , you can access the conditions via the actions of a question in the Editing/creating the questions of a questionnaire. You can only define conditions for questions of the types "Multiple choice", "Slider" or "Numbered checkboxes". If conditions already exist, this is also displayed when editing the questions, as all associated conditions are automatically deleted when such a question is deleted. Firstly, all existing conditions for the question are displayed in an overview:

- All conditions are displayed here that have an effect on whether one of the following questions is displayed or not.
- All conditions are displayed here that have an effect on whether a specific answer to a subsequent question is displayed or not.
- All conditions are displayed here that have an effect on whether the subsequent questionnaire is displayed or not.
- A condition can be edited or deleted here.
- A new condition can be created by clicking on "Add condition".
- Click on "Back to questionnaire" to return to the Overview of all questions in the questionnaire.

If you add a new condition or want to edit an existing condition, the following settings window opens:
- The type of question being edited is displayed here.
- The answer to which the condition is to be linked is selected in this selection list.
- You must then select whether the condition relates to a subsequent question or an answer to a subsequent question (in this case answer).
- The question whose answer is to be displayed or not is now determined.
- Then the exact answer is specified.
- Finally, specify whether the answer is to be displayed (if it is initially deactivated) or hidden so that it can no longer be selected.
- If there is another subsequent question in the questionnaire, this can also be added as a target via this button.
- Click on "Save" to add the created condition or click on "Cancel" to discard it.
The metadata export is accessed via the Questionnaires - Overview. Simply move the cursor over the download symbol and a drop-down menu will open:

- click on "FHIR" to download the questionnaire in the Fast Healthcare Interoperability Resources Standard.
- click on "MoPat" to download the questionnaire in the internal MoPat format. This is useful if you want to add a questionnaire from one MoPat database to another.
- click on "ODM" to download the questionnaire as an Operational Data Model, converting the multiple choice questions to simple choice questions where only one answer can be selected.
- by clicking on "ODM Export Template", the questionnaire is also downloaded in ODM format. However, all multiple choice questions are changed so that each answer option is converted into a separate yes-no question (boolean). In addition, the downloaded template is uploaded directly as an export template for the questionnaire in question and automatically mapped (see: Mapping).
- click on "PDF" to download the questionnaire in PDF format.
The mapping settings can be found in the overview of all questionnaires by clicking on the third button "![]() " under Actions. An automatically generated export template is already available here for imported questionnaires. Templates can also be uploaded independently.
" under Actions. An automatically generated export template is already available here for imported questionnaires. Templates can also be uploaded independently.

- The type of export template is displayed in the "Type" column. The different types are: "ORBIS", ODM, HL7v2, FHIR" and "REDCap".
- The name of the export template selected during import is displayed here.
- The file name is derived from the internal ID of the template and the original file name. 2
- The original file name of the export template that was uploaded is displayed here.
-
 The assignments of an export template can be edited here.
 -
A template can be deleted here.
- Click on "Upload template" to upload and use a saved template. The type of template must be specified, a desired name entered and the file to be uploaded selected.
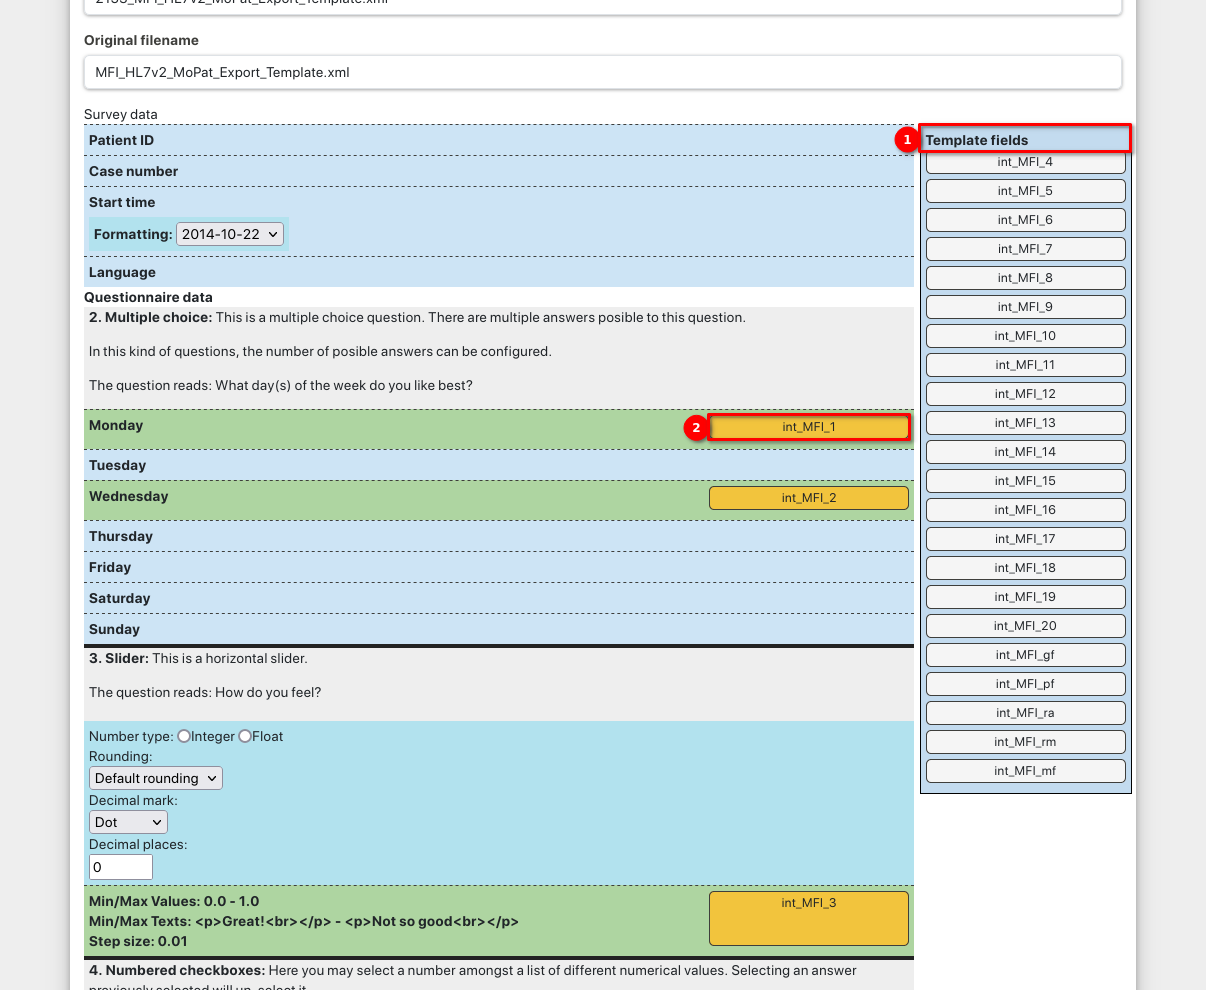
The template fields (1) can be dragged and dropped into the appropriate answers (2). Already mapped answers are displayed in green and you can see the yellow export field at the end of the line.
As already described in the overview of all questionnaires, point 5, you can edit different scores for each questionnaire. If you click on the button "![]() " under Actions, you will be taken to the:
" under Actions, you will be taken to the:

A new score can be added under (1), whereas an existing score can be edited with ![]() (2). Each score can be deleted by clicking on the
(2). Each score can be deleted by clicking on the ![]() .
.
Unary operator evaluate exactly one input. In MoPat2 there are the following unary operators: -value of the question (returns the score value of the given answer) -value (a fixed value can be entered)
Binary operators take two inputs and calculate the score from them. In MoPat2 there are the following binary operators:
- + (adds two values)
- - (subtracts one value from the other)
- * (multiplies two values)
- / (divides one value by the other)
- > (checks whether one value is greater than another)
- >= (checks whether one value is greater than or equal to another)
- < (checks whether one value is less than another)
- <= (checks whether one value is less than or equal to another)
- == (checks whether both values are equal)
- ! = (checks whether the values are not equal)
Multi operators accept any number of inputs and calculate the score from them. In MoPat2 there are the following multi operators:
- Sum of (adds up several values)
- Count (counts how often the Boolean value "true" occurs)
- Average (calculates the average of the values, here you can specify how many values may be missing for the calculation)
- Maximum of (searches for the maximum of the values)
- Minimum of (searches for the minimum of the values)

Several operators are available for the score calculation. The representation of a simple sum score is described here as an example:
- The name of the score is specified here.
- To create a sum, select "Sum of" in the first drop-down menu.
- In the second drop-down menu, select the "Value of the question", for example.
- Then select the relevant question. On the far left is a number with a colon that indicates how many questions are involved. This is followed by the question text. Steps 1 - 4 can be repeated as often as required by clicking on the blue "+".
- The blue "-" can be used to remove the previous operand.
- A new operator can be added with the blue "+", which in turn can be composed of different operators.
If you want to test a questionnaire or release it for use, it must be assigned to a questionnaire bundle.
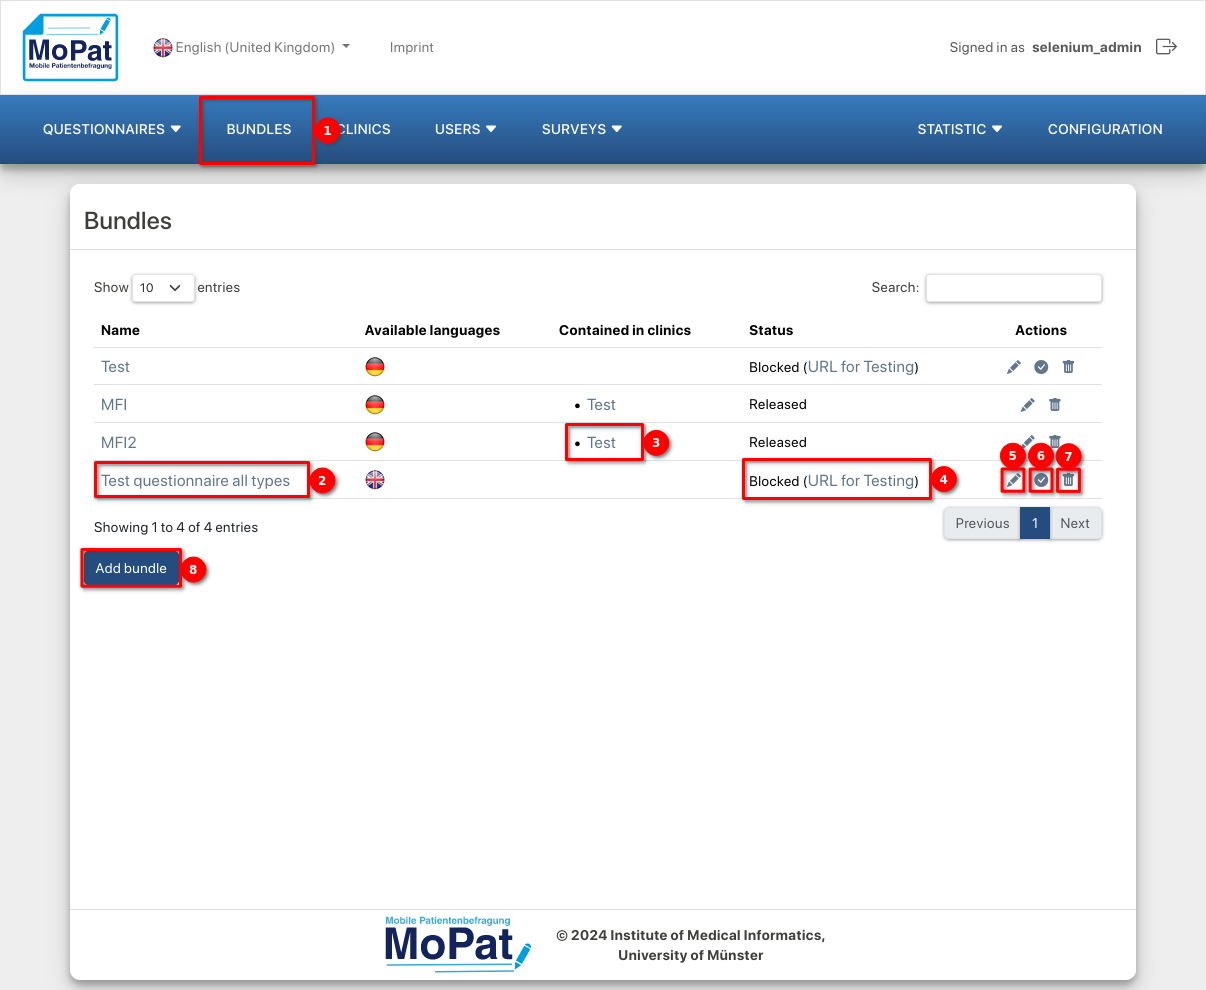
- Click on "Bundles" to access an overview of all existing questionnaire bundles.
- Click on the name of a bundle to edit it.
- This column shows which clinics the bundle has already been assigned to.
- The status indicates whether a bundle is released for use or whether it is still blocked for test purposes. If it is blocked, you can open it in a new tab via the "URL for testing" link and test the questionnaires it contains.
-
The pencil can also be used to edit the bundle.
-
 This button can be used to release a blocked bundle or block a released bundle
  .
. -
The bundle can be deleted via the paper bin.
- You can also add a completely new questionnaire bundle.
As with creating and editing a questionnaire, you can also add languages to questionnaire bundle and formulate the name, description, welcome and end texts (see: Adding/editing questionnaires). The following settings are also available:
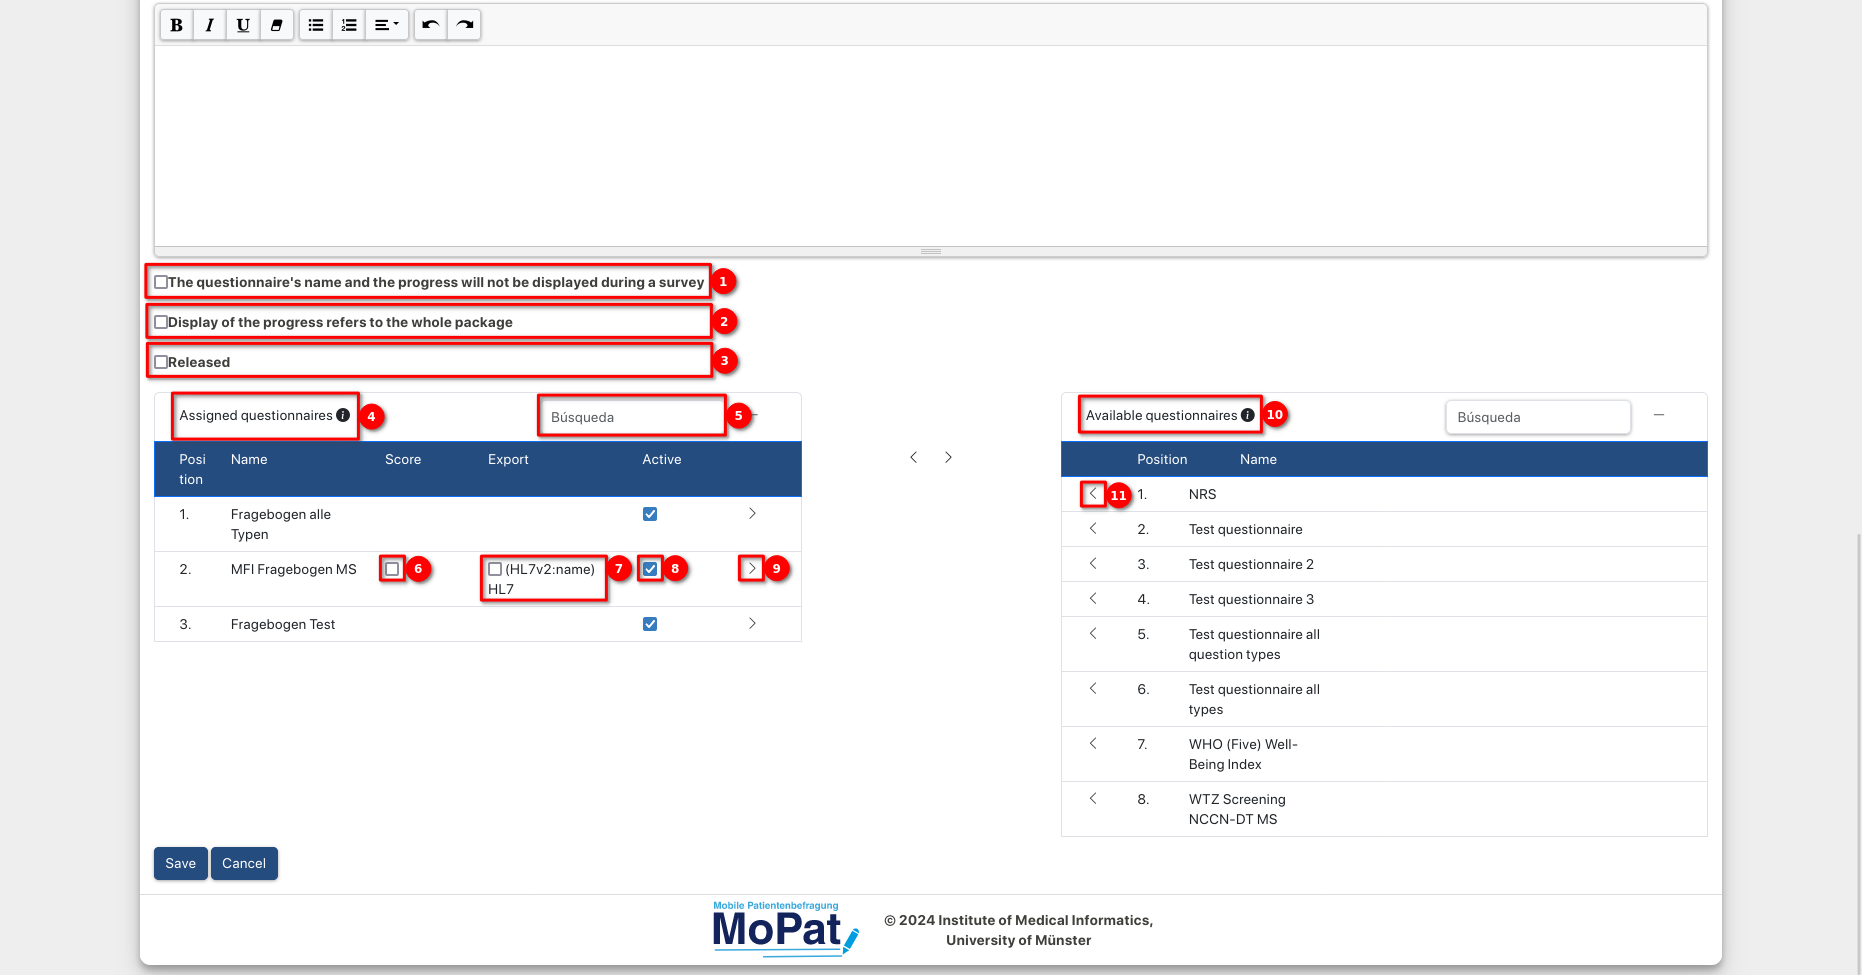
- When conducting a survey, the name and progress of the questionnaire can be displayed.
- If a tick is placed here, the progress displayed during the surveys is not shown for the current questionnaire, but for the entire questionnaire bundle.
- A questionnaire bundle can initially remain blocked for test purposes or be initially released for use.
- All questionnaires assigned to this bundle are displayed in this overview.
- The overview can also be searched for specific questionnaires.
- In the "Score" column, the score overview can be activated for each questionnaire (see ).
- Under "Export", the export template to be used can be selected for each questionnaire, if available (see: Export templates - Overview).
- A questionnaire in the questionnaire bundle can be initially activated or deactivated here.
- You can remove a questionnaire from the questionnaire bundle.
- All questionnaires that can be assigned to the bundle are displayed in this overview.
- The arrow is used to assign the questionnaire to the bundle.
Before a questionnaire can be completed by a user, the questionnaire must first be assigned to a questionnaire bundle (see: 11th in Add/edit questionnaire bundle) and this bundle must in turn be assigned to a clinic to which the user also belongs.

- Click on "Clinics" to access the overview of all existing clinics.
- Click on the name of a clinic to edit it.
-
Also by clicking on the pencil.
-
A clinic can be deleted by clicking on the bin.
- You can also add a new clinic.

- Every clinic needs a name
- and a description.
- The e-mail address of a contact person at the clinic can be entered.
- All questionnaire bundles assigned to this clinic are listed in this overview.
- The assignment of a questionnaire bundle to a clinic can be can be cancelled here.
- All questionnaire bundles that can be assigned to the clinic are listed in this overview.
- A specific questionnaire can be assigned to the clinic here.
- Users can also be assigned to a clinic. All users assigned to the clinic are listed here. Only users of a clinic can answer the questionnaires of this clinic.
- This assignment can be cancelled by clicking on the left arrow.
- All users who can be assigned to the clinic are listed here.
- A specific user can be assigned to the clinic by clicking on the right arrow.

- To access the overview of all users, click on "Users"(1) and then on "Manage users"(2) in the drop-down menu.
- In the drop-down menu under "Send email to all users", an editor opens where you can formulate an email with a subject and text that will be sent to all users.
- Here you get to the overview of all invitations.
-
 Individual users can be blocked but not deleted.
 - The clinic rights can be managed for each user.
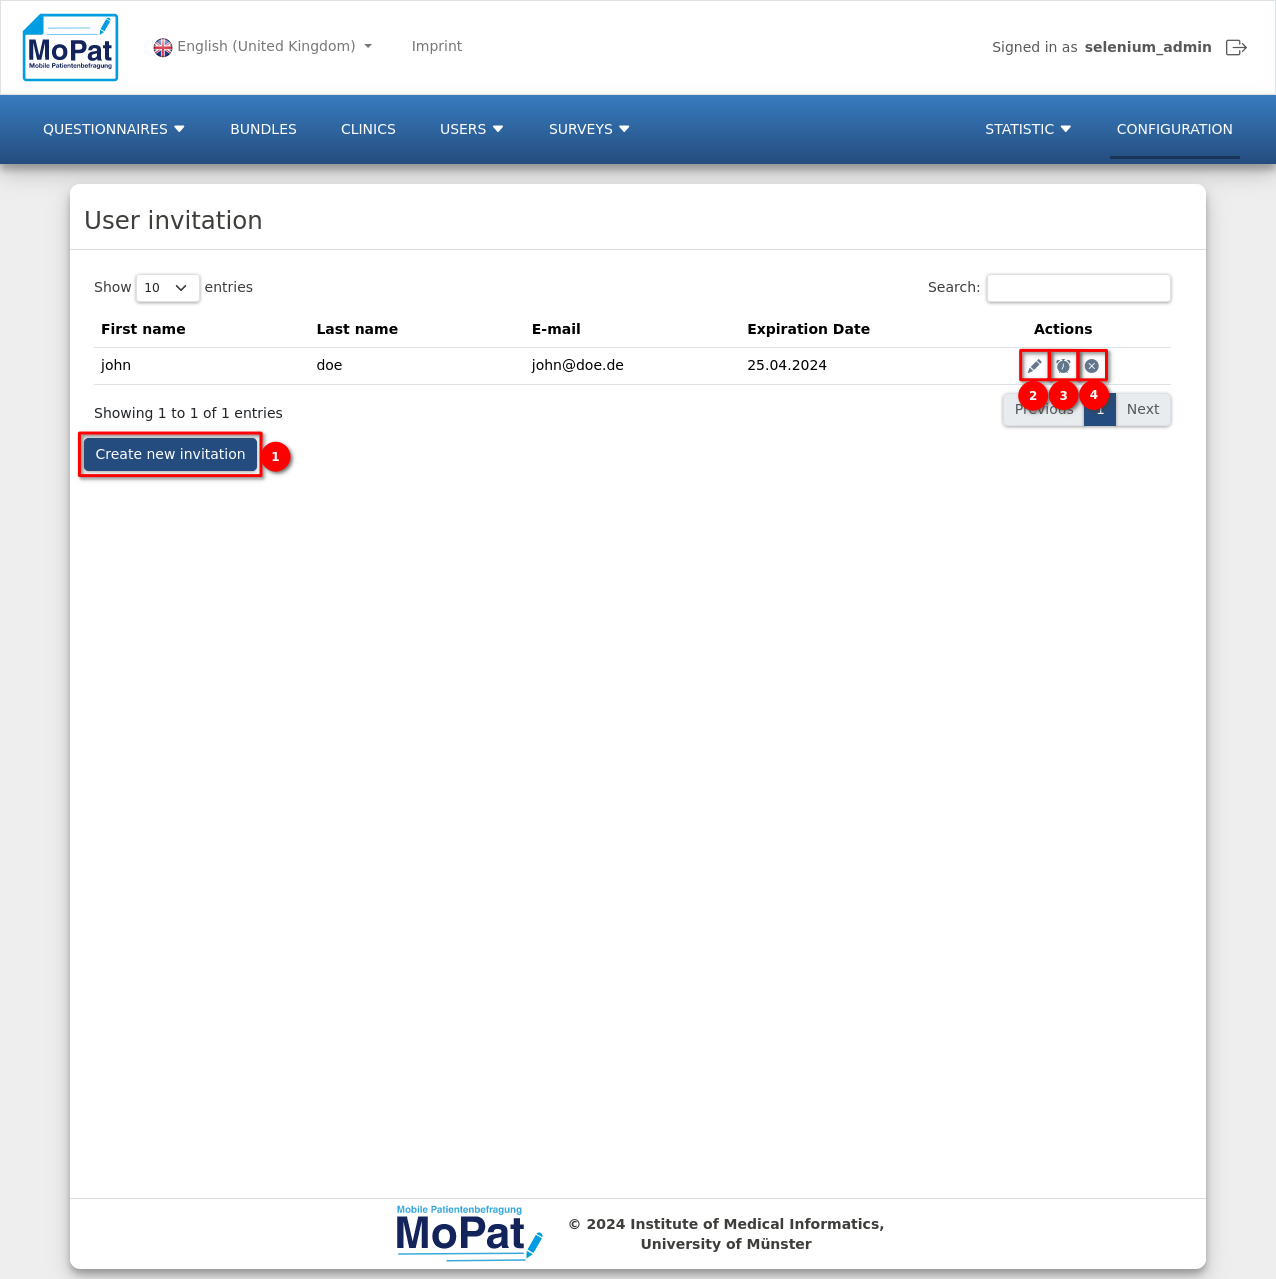
- Create a new invitation. First name, surname, email address, the user's role and clinic rights are defined there. The link is valid for one week.
-
Click on the pencil to change the entries again.
-
 The invitation email is sent again by clicking on the clock. The link contained is valid again for one week.
 -
The invitation is cancelled via the cross.
In order to be able to conduct surveys, questionnaires must already exist and be assigned to a questionnaire bundle. In addition, the questionnaire bundle and the user must be assigned to a clinic.

- To access the overview of all encounters, click on "Surveys"(1) and then on "Manage surveys"(2) in the drop-down menu.
- You can schedule survey series (one-off, weekly, monthly or at user-defined intervals).
- You can also execute out a survey.
- All existing surveys are displayed under the ‘All surveys’ tab.
- Alternatively, ‘All scheduled Encounters’ can also be displayed.
- Each survey is assigned its own case number or pseudonym so that it is not possible to directly identify the user who executed the survey.
- The questionnaire bundle for each survey is displayed.
- The start date indicates the exact date on which the survey was started.
- The end date indicates when the survey was completed.
- The exports indicate how many exports are assigned to a survey (right-hand figure) and how many of these have already been carried out (left-hand figure).
-
 All exports carried out to date can also be displayed.

- Case number, questionnaire bundle, start date and end date show the same things as described under ‘All Encounters’. However, the start date and end date no longer refer to a single survey, but to the planned survey series.
- The e-mail address to which the link for the survey is sent is displayed here.
- The survey type indicates whether a survey is to be executed only once or several times at regular intervals.
- If the notification e-mail has already been sent, the details of the previous and current survey can be viewed by clicking on the ‘+’. Click on the ‘+ ’ again to hide them again.
- These details include the start times of the individual surveys in a survey series.
- The end date is also displayed for each completed survey in a survey series.
- The exports indicate how many exports are assigned to a survey (right-hand figure) and how many of them have already been executed (left-hand figure).
- Here you can see when the last reminder e-mail was sent.
-
 This action can be used to deactivate the reminder emails for the patient.
 -
The delete function is available for survey series to which no surveys have yet been assigned.
-
This warning triangle indicates that the survey series has already been cancelled.
-
 The clock means that you have sent the patient a reactivation email and are waiting for their response.
 -
 The paper aeroplane indicates that the patient has deactivated the reminder mails and can be asked once to reactivate the reminder mails for the survey series.
 -
The x symbol cancels a survey series. This means that no further surveys are created and no more reminder emails are sent.
-
 If the survey series has not yet been completed, you can resend the reminder mail with the letter.
 -
The clipboard copies the link of the associated survey to the clipboard
-
 The start button reactivates the reminder e-mails for the patient if they have not been deactivated by the patient.
 -
All associated exports can be displayed with the eye.
If you select a completed survey in the menu and click on the eye, the following window opens the following window opens:

- The specified case number is displayed here.
- The start date of the survey is also shown.
- As well as the date on which the survey was completed.
- All questionnaires that are part of the survey are listed under ‘Assigned questionnaires’. If export templates exist for the questionnaires, these are also displayed, with an additional indication of whether they have already been exported. If this is the case, the exact time of the export is displayed.
- By clicking on ‘Export’, a manual export is carried out.
Survey series can be planned in such a way that certain questionnaires are carried out at regular intervals or or even once by a specific user:

- Firstly, a case number is specified under which this survey (series) can be identified.
- Under ‘Bundle’, the bundle to be completed by the patient must be selected.
- In order for the patient to receive the request for the survey at all, the patient's e-mail address must also be entered.
- Optionally, an e-mail address can also be selected for queries from the patient.
- Under ‘Survey type’ you can select whether the survey should be carried out only once, weekly, monthly or multiple times with a specially defined period between the surveys.
- The date indicates when the survey (series) should start and when the first notification is sent to the patient.
- If the survey type ‘Multiple times’ is selected, the time interval between the individual surveys can be specified here.
- The end date specifies the time until which the survey series should run.
- The language can be changed to the desired language of the patient, if this is available.
- Finally, you can enter a personal message, which will be inserted in the e-mail that the patient receives at the start of the survey (series).
Once all input fields of the form have been filled in correctly, the survey series can be created by clicking the ‘Save’ button at the bottom of the page. The creation of the pseudonym is optional. The patient will receive an e-mail on the corresponding start date.

- The first link leads to the start of the survey.
- Furthermore, the dates are displayed on which further surveys will follow.
- The second link can also be used to deactivate the deactivate the reminder emails.

To execute a survey, click on "Surveys"(1) and then on "Execute survey"(2) in the drop-down menu.

- As on the MoPat start page, the language can be customised in German, English or Spanish.
- If you click on "Administration", you will be taken to the administration area, provided you are authorised to do so.
There are three different tabs in the case number search:

- Clicking on "Registration" takes you to the corresponding area.
-
 By clicking on this button, the camera input opens and a barcode can be scanned. barcode can be scanned, the content of which is used as the case number.
 - To register, all you have to do is enter a case number and register it.
- Once you have done this, you can then proceed to the questionnaire bundle selection can be accessed.

- Clicking on "Determine patient data autom." takes you to the corresponding area.
-
Clicking on this button opens the camera input and a barcode can be scanned, the content of which is used as the case number and automatically determines the patient data matching this case number.
- To automatically determine patient data, first enter a case number and then click on "Search case number".
- The first name, last name, date of birth and gender of the patient to whom the case number is assigned are then displayed.
- If you want to execute a survey under this case number, click on "Show bundles" and can now select a questionnaire bundle.

- Clicking on "Pseudonymization" takes you to the corresponding area.
- To generate a pseudonym, you must first enter the first name,
- The last name
- And the patient's date of birth.
- Click on "Generate pseudonym" to display the generated pseudonym.
- Here too, you can then select a questionnaire bundle that you would like to carry out by clicking on he "Show bundles" button.

- All available questionnaire bundles for the user are listed here
- The available languages for the selected questionnaire bundle are displayed here
- If available, the incomplete questionnaires for this user in the selected language are listed here.
- This button takes you back to the case number entry.
- Use this button to start the new survey or continue an incomplete survey.

- All completed questionnaires are listed here.
- For each questionnaire, the number of questions marked as ‘Necessary for completeness’ when the questionnaire was created is displayed.
- For each questionnaire, it also shows how many of the questions that were not required were answered in full.
- If the display of scores has been activated for a questionnaire (see Add/edit questionnaire bundle), all scores of each contained questionnaire and their value are displayed here.
- The displayed data from point 4 can be exported via a data matrix.
- Once you have finished, you can exit the application via this button and return to the login screen.

- To access the overall statistics, click on "Statistics"(1) and then on "Statistics"(2) in the drop-down menu.
- Calling up the sub-item "One-off statistics" allows the user to call up specific statistics on individual questionnaires or patients.
- the start
- And here the end of the period whose statistics are to be displayed.
- The number of days indicates how many days should be displayed within this period.
- click on "Calculate" to update the display based on the entries.
- The statistics can also be exported as an MS Excel document.
Three different statistics can always be calculated simultaneously:

- To access the One time statistics, click on "Statistics"(1) and then on "One time statistics"(2) in the drop-down menu.
- The first statistic generally calculates how often the selected questionnaire bundle was completed in a certain period of time. The questionnaire bundle is selected first.
- The period is then specified with the start and end date.
- The second statistic calculates how many questionnaires a particular patient has completed in a selected period. The patient is selected first.
- The period is then also specified with the start and end date.
- The third and final statistic calculates how often a selected patient has completed a specific questionnaire bundle in a certain period of time. The patient is selected first.
- Then the questionnaire bundle is selected.
- Finally, the time period with start and end date is specified again.

- Click on Configuration to access the configurations

- Specification of the standard language.
- Selection of the logo.
- Specify the type of case number when entering the case number. Here you can set whether a number or a text should be entered as the case number. The "Number" setting on the Ipad immediately switches to the "Numbers and characters" keyboard.
- This is the file path in which the uploads, such as the export templates, are saved.
- Specification of the base URL.

- activation of the authentication.
- enter the URL for the Active Directory.
- specifying the domain for the Active Directory.
- setting the default language in which emails are sent to users.
- telephone number of the support for the Active Directory.

- If this is activated, the user can search for patient master data in the Krankenhausinformationssystem (KIS) using the case number entered.
- Enable user-toggle for patient data lookup. When on, users can search patient master data by case number in the Krankenhausinformationssystem (KIS).
- The patient data to be inserted is defined here:
 a. A randomised patient is created.
b. The real patient data from the HIS is implemented.
c. No data is preset: this must be created yourself. - Defines the host for the HL7v22PatientInformationRetriever.
- Specifies the port for the HL7v22PatientInformationRetriever.
- If this is activated, a patient can be registered by entering an identifier.
- Activates the option to determine a pseudonym using patient master data.
- Specifies the URL of the pseudonymisation server.
- Defines the API key of the pseudonymisation server.

- The basic OID for the metadata export is entered here.
- The URL of the ODMToPDF converter for the metadata export can be specified here.
- The URI for the FHIR System namespaces.

- The name of the HL7 export can be entered here again.
- Another export can be set up using the plus sign.
- The file-based HL7 export is switched on with a tick.
- The export path for the file-based export is specified in this text window.
- You can set whether the export is sent to the communication server.
- The settings with which the HL7 export takes place follow.
- Activate TLS encryption for HL7 exports and upload a valid certificate for client verification and message encryption.
- Activate client authorization using a certificate, upload a valid Client PKCS archive (.p12 file), and enter the corresponding password for authentication.

- The name of the ODM export can be entered here again.
- As above, further ODM exports can also be created here.
- Tick the box to activate the file-based ODM export.
- In this text field, the export path for ODM exports is specified in which an export copy is saved on the server.
- The external export can be activated, which can forward the export file to a REST interface.
- You can set whether the export is sent to the communication server.
- The settings with which the HL7 export takes place follow.

- The name of the FHIR export can be entered here again.
- As above, further FHIR exports can also be created here.
- Tick the box to activate the file-based FHIR export.
- In this text field, the export path for FHIR exports is specified in which an export copy is saved on the server.
- Activate this option to send the FHIR export to a communication server. If activated, the URL of the REST interface for the FHIR export or the URL of the communication server can be entered in the corresponding field.

- The name of the REDCap export can be entered here again.
- As above, further REDCap exports can also be created here.
- Tick the box to activate the file-based REDCap export.
- In this text field, the export path for REDCap exports is specified in which an export copy is saved on the server.
- Activate this option to send the REDCap export to a REST interface. If activated, you can enter the URL and API token for the REST interface.

- The time (in ms) after which completed surveys are deleted is specified here. If -1 is entered, deletion is deactivated.
- The time (in ms) after which uncompleted surveys are deleted is specified here. If -1 is entered, deletion is deactivated.
- The time (in ms) after which the patients' e-mail addresses are deleted after they have completed their surveys is specified here. If -1 is entered, deletion is deactivated.
- The time (in ms) after which completed survey series are deleted is specified here. If -1 is entered, deletion is deactivated.
- The time (in ms) after which incomplete survey series are deleted is specified here. If -1 is entered, deletion is deactivated.

- The mailing system can be activated here.
- Next, the host and port of the mailing system must be entered.
- Then enter the user and password of the mailing system, although these are only updated after the server has been restarted.
- The sender from which emails are sent is specified here.
- Finally, declare the signature of sent e-mails and specify the displayed e-mail address and a telephone number.

Enter the e-mail address (1) and telephone number (2) of the support team to be displayed in the MoPat tool under "Support".