Welcome to the AlwaysSaved Embedding Service — the user-facing web app that powers your private, searchable knowledge base for long-form media. Built to deliver fast, intelligent, and intuitive experiences, this interface lets users upload, explore, and query their personal content with ease.
This is the repository for the Embedding Service - Step 5 of the App Flow and the data storage layer of the AlwaysSaved ML/AI Pipeline.
For more information about What is AlwaysSaved and its Key Features, refer to the AlwaysSaved Frontend README.
- 3rd Party Services Needed
- Environment and AWS Systems Manager Parameter Store Variables
- Starting the App
- File Structure and Text Vectorizing Flow
- AlwaysSaved System Design / App Flow
As a friendly reminder from the AlwaysSaved Extractor Service, the following AWS Resource should have already been setup for the Embedding Service to work properly:
- An Amazon Simple Queue Service
Embedding Queuethat theEmbedding Serviceuses to get payloads sent from theExtractor Serviceto start the data embedding part of the ML/AI Pipeline (see Steps 5-6 of System Design Diagram).
If you haven't created it yet in the AlwaysSaved Frontend, you'll need to set up a Qdrant Vector Database (DB).
Your newly created Qdrant DB's URL and API Key will be saved in the AWS Parmeter Store (see next section).
In order to setup the app for local development, you'll need to create a .env file at the root of this repo and prefill all the required Environment Variables as shown below:
AWS_REGION=us-east-1
AWS_BUCKET=alwayssaved

PYTHON_MODE=development

EMBEDDING_MODEL=multi-qa-MiniLM-L6-cos-v1

QDRANT_COLLECTION_NAME=alwayssaved_user_files

[email protected]
For both development and production, there are a lot of variables that we couldn't store in the .env file, so we had to resort to using the AWS Systems Manager Parameter Store ahead of time in order to get the app functioning.
The following variable keys have their values stored in the Parameter store as follows:
/alwayssaved/EMBEDDING_PUSH_QUEUE_URL


/alwayssaved/QDRANT_URL

/alwayssaved/QDRANT_API_KEY


/alwayssaved/MONGO_DB_USER

/alwayssaved/MONGO_DB_PASSWORD

/alwayssaved/MONGO_DB_BASE_URI

/alwayssaved/MONGO_DB_NAME

/alwayssaved/MONGO_DB_CLUSTER_NAME
If you already setup your MongoDB Cluster and s3 Bucket by setting up the AlwaysSaved Frontend, adding those values in the AWS Parameter Store should be easy.
Make sure that the Embedding Queue URL gets saved under /alwayssaved/EMBEDDING_PUSH_QUEUE_URL.
Last but not least, make sure that you save the Qdrant DB URL and API Key in the Parameter Store with the /alwayssaved/QDRANT_URL and /alwayssaved/QDRANT_API_KEY key names respectively.
We need to use a virtual environment (we use the Pipenv virtualenv management tool) to run the app.
Navigate to the root of the project folder in your computer. Open 2 separate terminal windows that both point to the root of the project. In one of those terminal windows run the following commands:
Create and enter the virtual environment:
$ pipenv --python 3.11
Enter the virtual environment:
$ pipenv shell
Install the dependencies in the Pipfile:
$ pipenv install
Start the Embedding Service at the root service.py file:
$ python3 service.py
/
|
|___/services
|    |
|    |
|    |__/aws
|    | |
|    | |__s3.py
|    | |
|    | |__ses.py
|    | |
|    | |__sqs.py
|    | |
|    | |__ssm.py
|    |
|    |__/embedding
|    |
|    |__/qdrant
|    |
|    |
|    |
|    |
|    |
|    |__/utils
|      |
|      |__/mongodb
|      |
|      |__/types
|
|
|
|__service.py
With the Embedding Service, we've reached the data chunking and vector database storage phase of the AlwaysSaved ML/AI Pipeline (see Steps 5-6 of System Design Diagram).
You'll recall from the Extractor Service that for every video file that was sent to the service, a transcript of the video was generated and saved to s3.
At the start of the Embedding Service in the service.py file, we dequeue that latest SQS Message from the Embedding Queue and the message has the following shape:
  {
      note_id: string;
      file_id: string;
      user_id: string;
      transcript_s3_key: string;
  }
The idea is that for every message we dequeue from the Embedding Queue, we:
- Download the transcript from s3 that was generated in the
Extractor Serviceusing thetranscript_s3_key; - Chop the entire transcript into smaller individual text segments that we call
"chunks"; - Using the
EMBEDDING_MODELwe downloaded for this app, we use the model to convert each text"chunk"into a special list of numbers called a"vector embedding"; and - Finally, we attach some metadata (including the original language text chunk) to each
"vector embedding"and upload it to our Qdrant Vector DB.
Using a trained embedding model to convert human language text into a list of "vector embedding" numbers is the secret sauce that allows an LLM to efficiently search for and retrieve the most relevant pieces of information.
When a user asks an LLM a question, that human language question goes through the same chunking and "vector embedding" flow so that a comparison can be made between the user's question and all the "vector embedding" data points in the Vector DB that are close to what the user is asking.
It's those similar vector embedding points (along with the original language text chunk) that gets sent back the LLM Service LLM Service where the LLM can then generate an appropriate response to the User's question because all the relevant data was found (see Step 7 of the System Design Diagram).
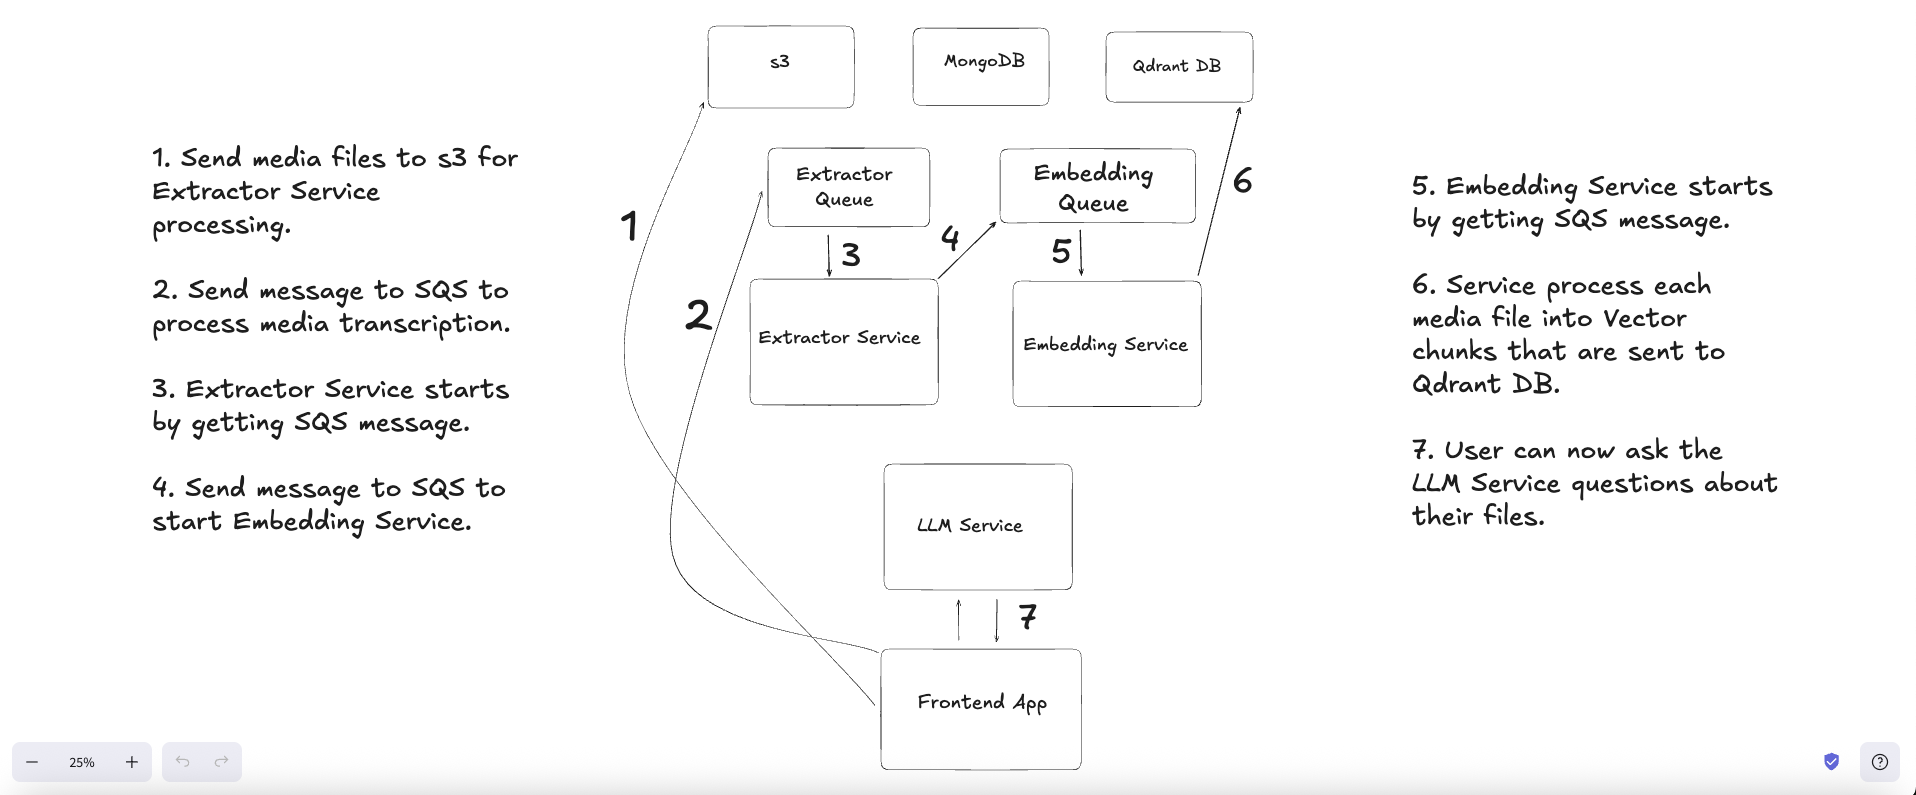
Above 👆🏽you will see the entire System Design and App Flow for Always Saved.
If you need a better view of the entire screenshot, feel free to download the Excalidraw File and view the System Design document in Excalidraw.
Jaime Mendoza https://github.com/jaimemendozadev