This repository contains the binary files and some instructions for improving the old Anet A8 with new electronic components, in this case with the board KMS Tinybee. This board uses the esp32 controller.
The reason why I did this improvement is that the original board got damaged. But also because in the past I had many inconvenience with it, for example, I had many problems of overheating.
I used the following hardware to improve the old anet A8 problems.
- Original Anet A8 hardware (motors, cables and so on).
- Four drivers (A4988 or TMC2209) - I used TMC2209 (comes with the board when you buy it)
- Board KMS TinyBee V1 and drivers (https://es.aliexpress.com/item/1005003822446877.html?spm=a2g0o.order_list.order_list_main.29.1875194dE3BpYl&gatewayAdapt=glo2esp).
- Low noise extruder fan (12V) (https://es.aliexpress.com/item/4001177586848.html?spm=a2g0o.order_detail.order_detail_item.13.748d39d3o8vp3N&gatewayAdapt=glo2esp)
- Two fans (12V) for electronics (https://es.aliexpress.com/item/1005004526691880.html?spm=a2g0o.order_detail.order_detail_item.10.748d39d3o8vp3N&gatewayAdapt=glo2esp).
- Screen MKS Mini12864 V3.
- 3D printed case (I will probably design it in the future).
- 3D touch sensor and 3D printed support (I will probably design it in the future).
Additional hardware (optional):
- New extruder MK8 (https://es.aliexpress.com/item/32927939042.html?spm=a2g0o.order_detail.order_detail_item.16.748d39d3o8vp3N&gatewayAdapt=glo2esp).
- Put the drivers in the board.
You can use the A4988 or the TMC2209, but I recommend to use the TMC if want to print at night, because they are very silent. Be careful with the orientation of the drivers, if you put them if the wrong direction you might burn your drivers and board. Put then as you can see in the folloing photo (note: for the A4988 the potenciometer should be at the top).

All the dip switches should be in the on position. In case you do not know much about electronics, the dip switch is the red switches under the driver, they are used to determine the steps behavior of the motor. For A4988 or TMC2209 they can be as shown in the following photo (all in on position).

- Ajust the drivers current
Depending on which drivers you used, you need to set the current for the motors. It varies depending on the driver, for example, nowadays there are also drivers that can be set by software. But, here I am going to tell what worked for me with the hardware mentioned. In my case I used the TMC2209, so we need to adjust the included potenciometer until we get the desired voltage. The voltage should be measured as shown in the following image.
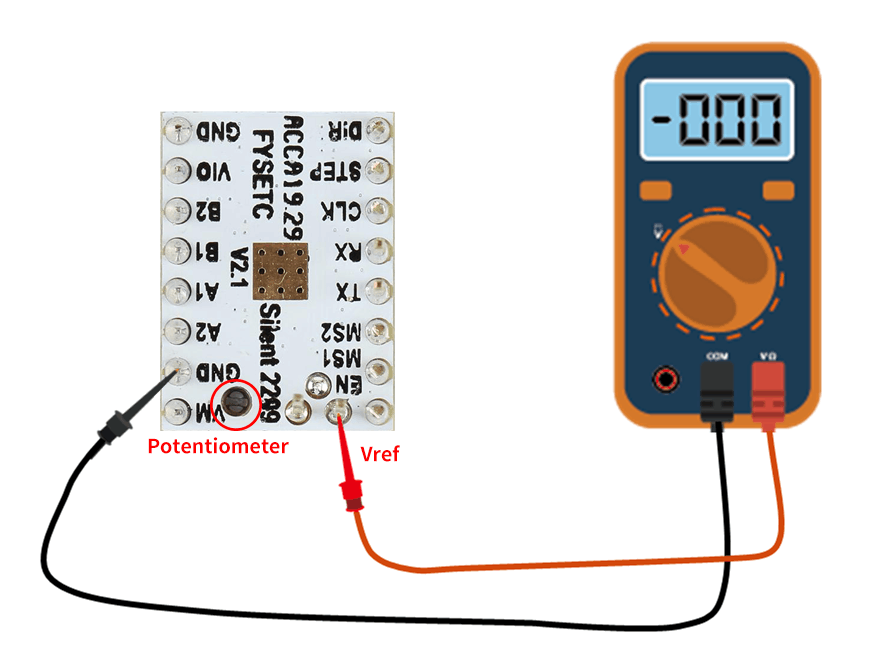
In the first time, I adjusted the voltage to 0.9 volts, however, the motors got very hot. Then, I used a voltage of 0.6 volts and they worked fine and cold. To keep this simple, I will not explain in details why is this number fine, but if you want to know, see this: How to call Vref
- Update the firmware (Marlin) by OTA
A advange of the MKS board is that it has OTA. So, you can send directly the bin file by WiFi.
Paso 1: Connect your computer to the printer WiFi access point.
The password is 12345678
Paso 2: Open the IP in the browser.
In the screen of the printer should appear an IP address. With this address you can open the platform where you can control the printer and, in this case, upload the new firmware with the correct configurations for the Anet A8.
Probably you will get an error the first time. To solve this you just need to upload this file: HTML file
Paso 3: Upload new firmware
Go to the last window of the platform and select the yellow button to upload the new bin fie (new firmware). For example, the following is a bin that have the basic configurations to be able to use the printer: Basic bin
- Change the hotend fan
Original hotend fan of the Anet is very noisy, so I think a replacement can be a very valuable upgrade for this machine. The mentioned in the materials list are very silent.
If you want to use the origianl fans, be careful with the fans when connecting them to this board, because the original fans of the Anet have inverted the polarity of the cables. So, you have to modify the connector if you want to use them.
- Add 3Dtouch sensor for automatic calibration
(Future improvement...)
- Add a case for the board
(Future improvement...)