-
단일 프로젝트 환경 에서 서로 다른 Region 에 있는 두 GKE 클러스터
# CLUSTER-1
export PROJECT_1=kiwonlee-appmod-sandbox
export CLUSTER_1=multi-cluster-demo-us
export LOCATION_1=us-central1-c

# CLUSTER-2
export PROJECT_2=kiwonlee-appmod-sandbox
export CLUSTER_2=multi-cluster-demo-asia
export LOCATION_2=asia-northeast1-c

# namespace for application deploy
export NAMESPACE=whereami
-
GKE 클러스터 생성 ${CLUSTER_1}
- 클러스터 생성 시, ASM 설치를 위한 클러스터 요구 사항 참조 (Workload Identity, vCPU 4개 이상인 머신, 클러스터에 최소 8개의 vCPU 등)
gcloud container clusters create ${CLUSTER_1} \ --project=${PROJECT_1} \ --zone=${LOCATION_1} \ --machine-type=e2-standard-4 \ --num-nodes=3 \ --workload-pool=${PROJECT_1}.svc.id.goog -
생성한 클러스터의 인증정보와 엔드포인트 정보를 kubeconfig에 업데이트
gcloud container clusters get-credentials ${CLUSTER_1} \ --project=${PROJECT_1} \ --zone=${LOCATION_1} export CTX_1="gke_${PROJECT_1}_${LOCATION_1}_${CLUSTER_1}" -
namespace 생성, 애플리케이션 (whereami) 배포
- 두 클러스터에 동일한 namespace를 생성하고, 동일 namespace 에 애플리케이션을 배포함. Namespace sameness
kubectl create --context=${CTX_1} namespace ${NAMESPACE} kubectl --context=${CTX_1} apply -f ./kube/whereami.yaml --namespace ${NAMESPACE} -
배포한 애플리케이션 동작 테스트
모든 트래픽은 클러스터 내의 Pod로만 전달됨
$ kubectl get po,svc --context=${CTX_1} --namespace ${NAMESPACE}
NAME                                       READY   STATUS        RESTARTS   AGE
pod/whereami-deployment-86bc7496d8-86pxc   1/1     Running   0          6m34s
pod/whereami-deployment-86bc7496d8-9dffb   1/1     Running   0          29m

NAME                       TYPE        CLUSTER-IP    EXTERNAL-IP   PORT(S)   AGE
service/whereami-service   ClusterIP   10.24.8.127   <none>        80/TCP    76s

$ kubectl --context=${CTX_1} --namespace ${NAMESPACE} exec pod/whereami-deployment-86bc7496d8-9dffb -it -- /bin/sh
$ curl whereami-service.whereami.svc.cluster.local
{
  "cluster_name": "multi-cluster-demo-us",
  "host_header": "whereami-service.whereami.svc.cluster.local",
  "pod_name": "whereami-deployment-86bc7496d8-86pxc",
  "pod_name_emoji": "🇹🇴",
  "project_id": "kwlee-goog-sandbox",
  "timestamp": "2022-04-28T05:36:20",
  "zone": "us-central1-c"
}
$ curl whereami-service.whereami.svc.cluster.local
{
  "cluster_name": "multi-cluster-demo-us",
  "host_header": "whereami-service.whereami.svc.cluster.local",
  "pod_name": "whereami-deployment-86bc7496d8-9dffb",
  "pod_name_emoji": "👨⚖️",
  "project_id": "kwlee-goog-sandbox",
  "timestamp": "2022-04-28T05:36:21",
  "zone": "us-central1-c"
}
-
GKE 클러스터 생성 ${CLUSTER_2}
gcloud container clusters create ${CLUSTER_2} \
 --project=${PROJECT_2} \
 --zone=${LOCATION_2} \
 --machine-type=e2-standard-4 \
 --num-nodes=3 \
 --workload-pool=${PROJECT_2}.svc.id.goog
gcloud container clusters get-credentials ${CLUSTER_2} \ --project=${PROJECT_2} \ --zone=${LOCATION_2} export CTX_2="gke_${PROJECT_2}_${LOCATION_2}_${CLUSTER_2}"kubectl create --context=${CTX_2} namespace ${NAMESPACE} kubectl --context=${CTX_2} apply -f ./kube/whereami.yaml --namespace ${NAMESPACE} -
배포한 애플리케이션 동작 테스트
모든 트래픽은 클러스터 내의 Pod로만 전달됨
$ kubectl get po,svc --context=${CTX_2} --namespace ${NAMESPACE}
NAME                                       READY   STATUS    RESTARTS   AGE
pod/whereami-deployment-86bc7496d8-m2knq   1/1     Running   0          21m
pod/whereami-deployment-86bc7496d8-xlsxh   1/1     Running   0          8m40s

NAME                       TYPE        CLUSTER-IP    EXTERNAL-IP   PORT(S)   AGE
service/whereami-service   ClusterIP   10.88.11.39   <none>        80/TCP    20s

$ kubectl --context=${CTX_2} --namespace ${NAMESPACE} exec pod/whereami-deployment-86bc7496d8-m2knq -it -- /bin/sh
$ curl whereami-service.whereami.svc.cluster.local
{
  "cluster_name": "multi-cluster-demo-asia",
  "host_header": "whereami-service.whereami.svc.cluster.local",
  "pod_name": "whereami-deployment-86bc7496d8-xlsxh",
  "pod_name_emoji": "💑🏾",
  "project_id": "kwlee-goog-sandbox",
  "timestamp": "2022-04-28T05:39:37",
  "zone": "asia-northeast1-c"
}
$ curl whereami-service.whereami.svc.cluster.local
{
  "cluster_name": "multi-cluster-demo-asia",
  "host_header": "whereami-service.whereami.svc.cluster.local",
  "pod_name": "whereami-deployment-86bc7496d8-m2knq",
  "pod_name_emoji": "👨🏾⚕️",
  "project_id": "kwlee-goog-sandbox",
  "timestamp": "2022-04-28T05:39:38",
  "zone": "asia-northeast1-c"
}
-
download asmcli to install ASM
curl https://storage.googleapis.com/csm-artifacts/asm/asmcli_1.13 > asmcli chmod +x asmcli -
install ASM to ${CLUSTER_1}. macOS isn't supported for installation ASM Also, the ingress gateway is not installed now.
./asmcli install \ --project_id ${PROJECT_1} \ --cluster_name ${CLUSTER_1} \ --cluster_location ${LOCATION_1} \ --output_dir ./anthos-service-mesh \ --enable_all \ --ca mesh_ca -
install ASM to ${CLUSTER_2}.
./asmcli install \ --project_id ${PROJECT_2} \ --cluster_name ${CLUSTER_2} \ --cluster_location ${LOCATION_2} \ --output_dir ./anthos-service-mesh \ --enable_all \ --ca mesh_ca -
export REVISION=$(kubectl get deploy -n istio-system -l app=istiod -o jsonpath={.items[*].metadata.labels.'istio\.io\/rev'}'{"\n"}') ## REVISION=asm-1132-2 kubectl --context=${CTX_1} label namespace ${NAMESPACE} istio-injection- istio.io/rev=${REVISION} --overwrite kubectl --context=${CTX_1} rollout restart deployment whereami-deployment --namespace ${NAMESPACE} kubectl --context=${CTX_2} label namespace ${NAMESPACE} istio-injection- istio.io/rev=${REVISION} --overwrite kubectl --context=${CTX_2} rollout restart deployment whereami-deployment --namespace ${NAMESPACE} -
Envoy Proxy 설치 확인
각 pod 마다 container 가 2개씩 (main container + sidecar) 생성된 것 확인
$ kubectl get po,svc --context=${CTX_1} --namespace ${NAMESPACE}
NAME                                       READY   STATUS    RESTARTS   AGE
pod/whereami-deployment-5755d8b68b-kx4ss   2/2     Running   0          2m9s
pod/whereami-deployment-5755d8b68b-kxzzx   2/2     Running   0          2m12s

$ kubectl get po,svc --context=${CTX_2} --namespace ${NAMESPACE}
NAME                                       READY   STATUS    RESTARTS   AGE
pod/whereami-deployment-764cbfccdb-dw8ct   2/2     Running   0          2m2s
pod/whereami-deployment-764cbfccdb-vlzfg   2/2     Running   0          2m12s
-
- gateway 는 기본 설치가 아니기 때문에 ASM설치 이후, 별도 설치해야 함
- 설치 모범 사례 참조
export GATEWAY_NAMESPACE=istio-ingress

kubectl create namespace ${GATEWAY_NAMESPACE} --context=${CTX_1}
kubectl --context=${CTX_1} label namespace ${GATEWAY_NAMESPACE} istio-injection- istio.io/rev=${REVISION} --overwrite

kubectl apply --context=${CTX_1} -n ${GATEWAY_NAMESPACE} -f ./anthos-service-mesh/samples/gateways/istio-ingressgateway
Output
$ kubectl --context=${CTX_1} -n ${GATEWAY_NAMESPACE} get po,svc NAME READY STATUS RESTARTS AGE pod/istio-ingressgateway-66d9b945dc-46852 1/1 Running 0 31s pod/istio-ingressgateway-66d9b945dc-ftn8z 1/1 Running 0 31s pod/istio-ingressgateway-66d9b945dc-kfnsv 1/1 Running 0 31s NAME TYPE CLUSTER-IP EXTERNAL-IP PORT(S) AGE service/istio-ingressgateway LoadBalancer 10.24.1.196 34.132.129.229 15021:30640/TCP,80:30051/TCP,443:31968/TCP 35s -
Gateway, VirtualService 정의
$ kubectl --context=${CTX_1} apply -f ./kube/asm-nw-ingress.yaml --namespace ${NAMESPACE} $ kubectl --context=${CTX_1} --namespace ${NAMESPACE} get gateway,virtualservice NAME AGE gateway.networking.istio.io/whereami-gateway 49s NAME GATEWAYS HOSTS AGE virtualservice.networking.istio.io/whereami-vs ["whereami-gateway"] ["*"] 46s -
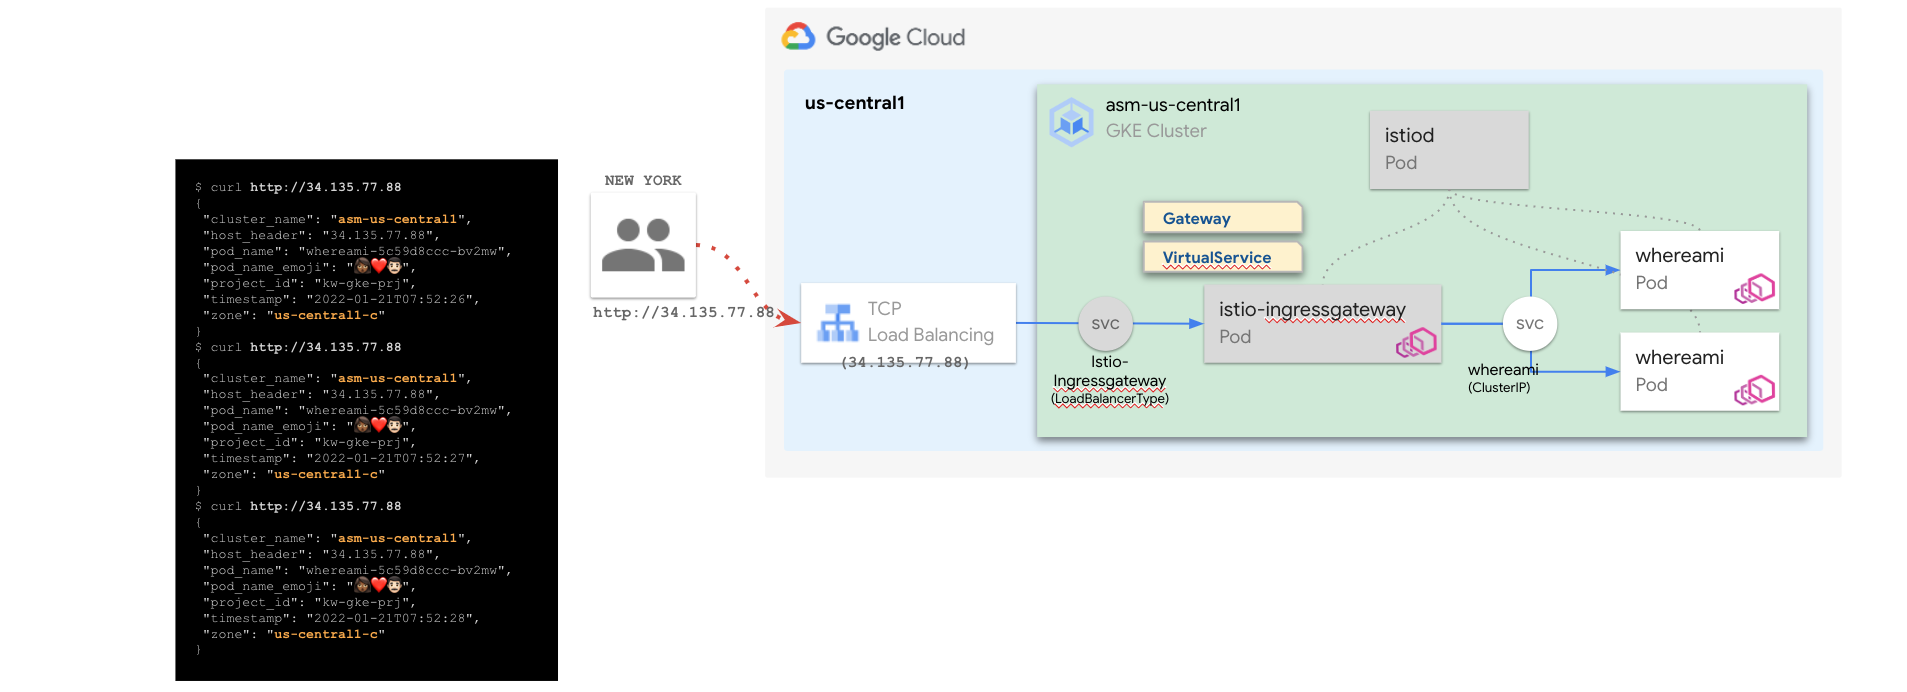
istio-ingressgateway 의 EXTERNAL-IP(L4 LoadBalancer)로 호출 확인 (34.132.129.229)
모든 트래픽은 클러스터 내의 Pod로만 전달됨,단 외부에서도 호출 가능
$ curl 34.132.129.229
{
  "cluster_name": "multi-cluster-demo-us",
  "host_header": "34.132.129.229",
  "pod_name": "whereami-deployment-5755d8b68b-kxzzx",
  "pod_name_emoji": "⏹",
  "project_id": "kwlee-goog-sandbox",
  "timestamp": "2022-04-28T06:22:41",
  "zone": "us-central1-c"
}
$ curl 34.132.129.229
{
  "cluster_name": "multi-cluster-demo-us",
  "host_header": "34.132.129.229",
  "pod_name": "whereami-deployment-5755d8b68b-kx4ss",
  "pod_name_emoji": "😅",
  "project_id": "kwlee-goog-sandbox",
  "timestamp": "2022-04-28T06:22:43",
  "zone": "us-central1-c"
}
$ curl 34.132.129.229
{
  "cluster_name": "multi-cluster-demo-us",
  "host_header": "34.132.129.229",
  "pod_name": "whereami-deployment-5755d8b68b-kxzzx",
  "pod_name_emoji": "⏹",
  "project_id": "kwlee-goog-sandbox",
  "timestamp": "2022-04-28T06:22:47",
  "zone": "us-central1-c"
}
$ curl 34.132.129.229
{
  "cluster_name": "multi-cluster-demo-us",
  "host_header": "34.132.129.229",
  "pod_name": "whereami-deployment-5755d8b68b-kx4ss",
  "pod_name_emoji": "😅",
  "project_id": "kwlee-goog-sandbox",
  "timestamp": "2022-04-28T06:22:51",
  "zone": "us-central1-c"
}
-
두 클러스터를 단일 Anthos Service Mesh에 결합 하고 클러스터 간 부하 분산을 사용 설정
-
function join_by { local IFS="$1"; shift; echo "$*"; }
ALL_CLUSTER_CIDRS=$(gcloud container clusters list --project $PROJECT_1 --format='value(clusterIpv4Cidr)' | sort | uniq)
ALL_CLUSTER_CIDRS=$(join_by , $(echo "${ALL_CLUSTER_CIDRS}"))
ALL_CLUSTER_NETTAGS=$(gcloud compute instances list --project $PROJECT_1 --format='value(tags.items.[0])' | sort | uniq)
ALL_CLUSTER_NETTAGS=$(join_by , $(echo "${ALL_CLUSTER_NETTAGS}"))
gcloud compute firewall-rules create istio-multicluster-pods \ --allow=tcp,udp,icmp,esp,ah,sctp \ --direction=INGRESS \ --priority=900 \ --source-ranges="${ALL_CLUSTER_CIDRS}" \ --target-tags="${ALL_CLUSTER_NETTAGS}" --quiet -
./asmcli create-mesh \ ${PROJECT_1} \ ${PROJECT_1}/${LOCATION_1}/${CLUSTER_1} \ ${PROJECT_2}/${LOCATION_2}/${CLUSTER_2} -
구성 확인
$ gcloud container hub memberships list
NAME: multi-cluster-demo-us
EXTERNAL_ID: 43f55ae6-fc47-4fa6-b144-dabd47452d9a

NAME: multi-cluster-demo-asia
EXTERNAL_ID: 461327dc-8ab5-474b-afa5-ea182c502e8c
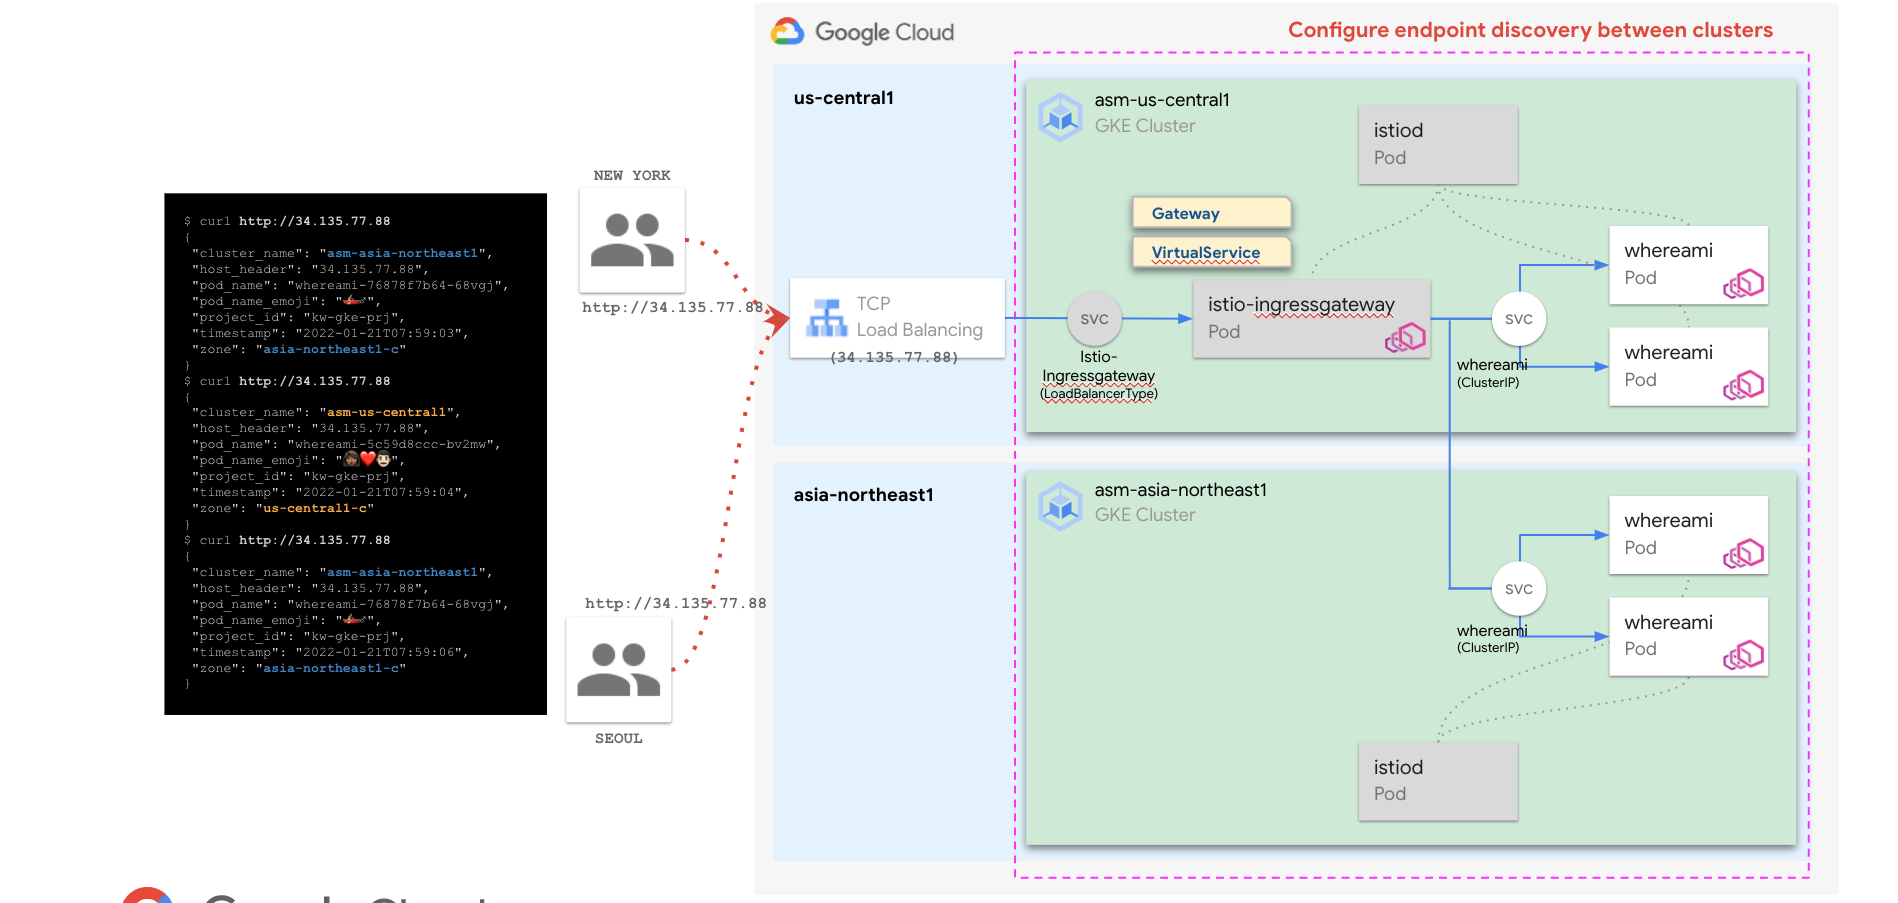
모든 트래픽은 단일 메시로 설정한 두 클러스터 ${CLUSTER_1} 괴 ${CLUSTER_2}의 Pod로 전달됨
$ curl http://34.132.129.229/
{
  "cluster_name": "multi-cluster-demo-us",
  "host_header": "34.132.129.229",
  "pod_name": "whereami-deployment-5755d8b68b-kxzzx",
  "pod_name_emoji": "⏹",
  "project_id": "kwlee-goog-sandbox",
  "timestamp": "2022-04-28T06:37:06",
  "zone": "us-central1-c"
}
$ curl http://34.132.129.229/
{
  "cluster_name": "multi-cluster-demo-asia",
  "host_header": "34.132.129.229",
  "pod_name": "whereami-deployment-764cbfccdb-vlzfg",
  "pod_name_emoji": "🧑🏽✈",
  "project_id": "kwlee-goog-sandbox",
  "timestamp": "2022-04-28T06:37:08",
  "zone": "asia-northeast1-c"
}
$ curl http://34.132.129.229/
{
  "cluster_name": "multi-cluster-demo-us",
  "host_header": "34.132.129.229",
  "pod_name": "whereami-deployment-5755d8b68b-kx4ss",
  "pod_name_emoji": "😅",
  "project_id": "kwlee-goog-sandbox",
  "timestamp": "2022-04-28T06:37:10",
  "zone": "us-central1-c"
}
$ curl http://34.132.129.229/
{
  "cluster_name": "multi-cluster-demo-asia",
  "host_header": "34.132.129.229",
  "pod_name": "whereami-deployment-764cbfccdb-vlzfg",
  "pod_name_emoji": "🧑🏽✈",
  "project_id": "kwlee-goog-sandbox",
  "timestamp": "2022-04-28T06:37:12",
  "zone": "asia-northeast1-c"
}
-
export GATEWAY_NAMESPACE=istio-ingress

kubectl create namespace ${GATEWAY_NAMESPACE} --context=${CTX_2}
kubectl --context=${CTX_2} label namespace ${GATEWAY_NAMESPACE} istio-injection- istio.io/rev=${REVISION} --overwrite

kubectl apply --context=${CTX_2} -n ${GATEWAY_NAMESPACE} -f ./anthos-service-mesh/samples/gateways/istio-ingressgateway
Output
$ kubectl --context=${CTX_2} -n ${GATEWAY_NAMESPACE} get po,svc NAME READY STATUS RESTARTS AGE pod/istio-ingressgateway-66d9b945dc-hlw7q 1/1 Running 0 8s pod/istio-ingressgateway-66d9b945dc-jlmtg 1/1 Running 0 8s pod/istio-ingressgateway-66d9b945dc-lnjxv 1/1 Running 0 8s NAME TYPE CLUSTER-IP EXTERNAL-IP PORT(S) AGE service/istio-ingressgateway LoadBalancer 10.88.5.210 35.200.122.133 15021:32628/TCP,80:32344/TCP,443:32249/TCP 8s -
Gateway, VirtualService 정의
$ kubectl --context=${CTX_2} apply -f ./kube/asm-nw-ingress.yaml --namespace ${NAMESPACE} $ kubectl --context=${CTX_2} --namespace ${NAMESPACE} get gateway,virtualservice NAME AGE gateway.networking.istio.io/whereami-gateway 49s NAME GATEWAYS HOSTS AGE virtualservice.networking.istio.io/whereami-vs ["whereami-gateway"] ["*"] 46s -
istio-ingressgateway 의 EXTERNAL-IP(L4 LoadBalancer)로 호출 확인 (35.200.122.133)
$ curl 35.200.122.133
{
  "cluster_name": "multi-cluster-demo-us",
  "host_header": "35.200.122.133",
  "pod_name": "whereami-deployment-5755d8b68b-kx4ss",
  "pod_name_emoji": "😅",
  "project_id": "kwlee-goog-sandbox",
  "timestamp": "2022-04-28T07:39:46",
  "zone": "us-central1-c"
}
$ curl 35.200.122.133
{
  "cluster_name": "multi-cluster-demo-asia",
  "host_header": "35.200.122.133",
  "pod_name": "whereami-deployment-764cbfccdb-vlzfg",
  "pod_name_emoji": "🧑🏽✈",
  "project_id": "kwlee-goog-sandbox",
  "timestamp": "2022-04-28T07:39:48",
  "zone": "asia-northeast1-c"
}
$ curl 35.200.122.133
{
  "cluster_name": "multi-cluster-demo-asia",
  "host_header": "35.200.122.133",
  "pod_name": "whereami-deployment-764cbfccdb-dw8ct",
  "pod_name_emoji": "🤦🏾",
  "project_id": "kwlee-goog-sandbox",
  "timestamp": "2022-04-28T07:39:48",
  "zone": "asia-northeast1-c"
}
$ curl 35.200.122.133
{
  "cluster_name": "multi-cluster-demo-asia",
  "host_header": "35.200.122.133",
  "pod_name": "whereami-deployment-764cbfccdb-dw8ct",
  "pod_name_emoji": "🤦🏾",
  "project_id": "kwlee-goog-sandbox",
  "timestamp": "2022-04-28T07:39:49",
  "zone": "asia-northeast1-c"
}
-
fleet 에 이미 등록했기 때문에, fleet 에 클러스터 등록 은 skip
- 정상 등록 여부만 아래에서 확인
$ gcloud container hub memberships list --project=${PROJECT_1} NAME: multi-cluster-demo-us EXTERNAL_ID: 43f55ae6-fc47-4fa6-b144-dabd47452d9a NAME: multi-cluster-demo-asia EXTERNAL_ID: 461327dc-8ab5-474b-afa5-ea182c502e8c -
$ gcloud beta container hub ingress enable --config-membership=${CLUSTER_1}
$ gcloud beta container hub ingress update

$ gcloud beta container hub ingress describe
createTime: '2021-08-19T07:28:13.980348616Z'
membershipStates:
  projects/852689693404/locations/global/memberships/asm-multi-neg-1:
    state:
      code: OK
      updateTime: '2022-04-28T08:06:12.073973312Z'
  projects/852689693404/locations/global/memberships/asm-multi-neg-2:
    state:
      code: OK
      updateTime: '2022-04-28T08:06:12.073974684Z'
name: projects/kwlee-goog-sandbox/locations/global/features/multiclusteringress
resourceState:
  state: ACTIVE
spec:
  multiclusteringress:
    configMembership: projects/kwlee-goog-sandbox/locations/global/memberships/asm-multi-neg-1
state:
  state:
    code: OK
    description: Ready to use
    updateTime: '2022-04-28T08:05:01.291033008Z'
updateTime: '2022-04-28T08:06:22.733507873Z'
만약 AVMBR111 에러 발생 시, 해당 링크 참조
-
MCS 생성
- ConfigCluster 에 MCS 를 생성하면, fleet 에 등록된 클러스터들에 Headless Service 가 생성
$ kubectl apply -f ./kube/mcs.yaml --context=${CTX_1} --namespace=${NAMESPACE} multiclusterservice.networking.gke.io/mcs-for-asm-ingressgateway created kubectl --context=${CTX_1} get mcs --namespace=${GATEWAY_NAMESPACE} NAME AGE mcs-for-asm-ingressgateway 15s $ kubectl --context=${CTX_1} --namespace=${NAMESPACE} get svc NAME TYPE CLUSTER-IP EXTERNAL-IP PORT(S) AGE istio-ingressgateway LoadBalancer 10.76.6.163 34.69.217.99 15021:32737/TCP,80:31856/TCP,443:31521/TCP 19m mci-mcs-svc-6v1bymw1gtk1xw8k ClusterIP None <none> 15021/TCP,80/TCP,443/TCP 39s whereami-service ClusterIP 10.76.9.249 <none> 80/TCP 51m $ kubectl --context=${CTX_2} --namespace=${NAMESPACE} get svc NAME TYPE CLUSTER-IP EXTERNAL-IP PORT(S) AGE istio-ingressgateway LoadBalancer 10.96.12.66 35.243.92.154 15021:32620/TCP,80:32518/TCP,443:32409/TCP 8m55s mci-mcs-svc-6v1bymw1gtk1xw8k ClusterIP None <none> 15021/TCP,80/TCP,443/TCP 51s whereami-service ClusterIP 10.96.9.147 <none> 80/TCP 41m -
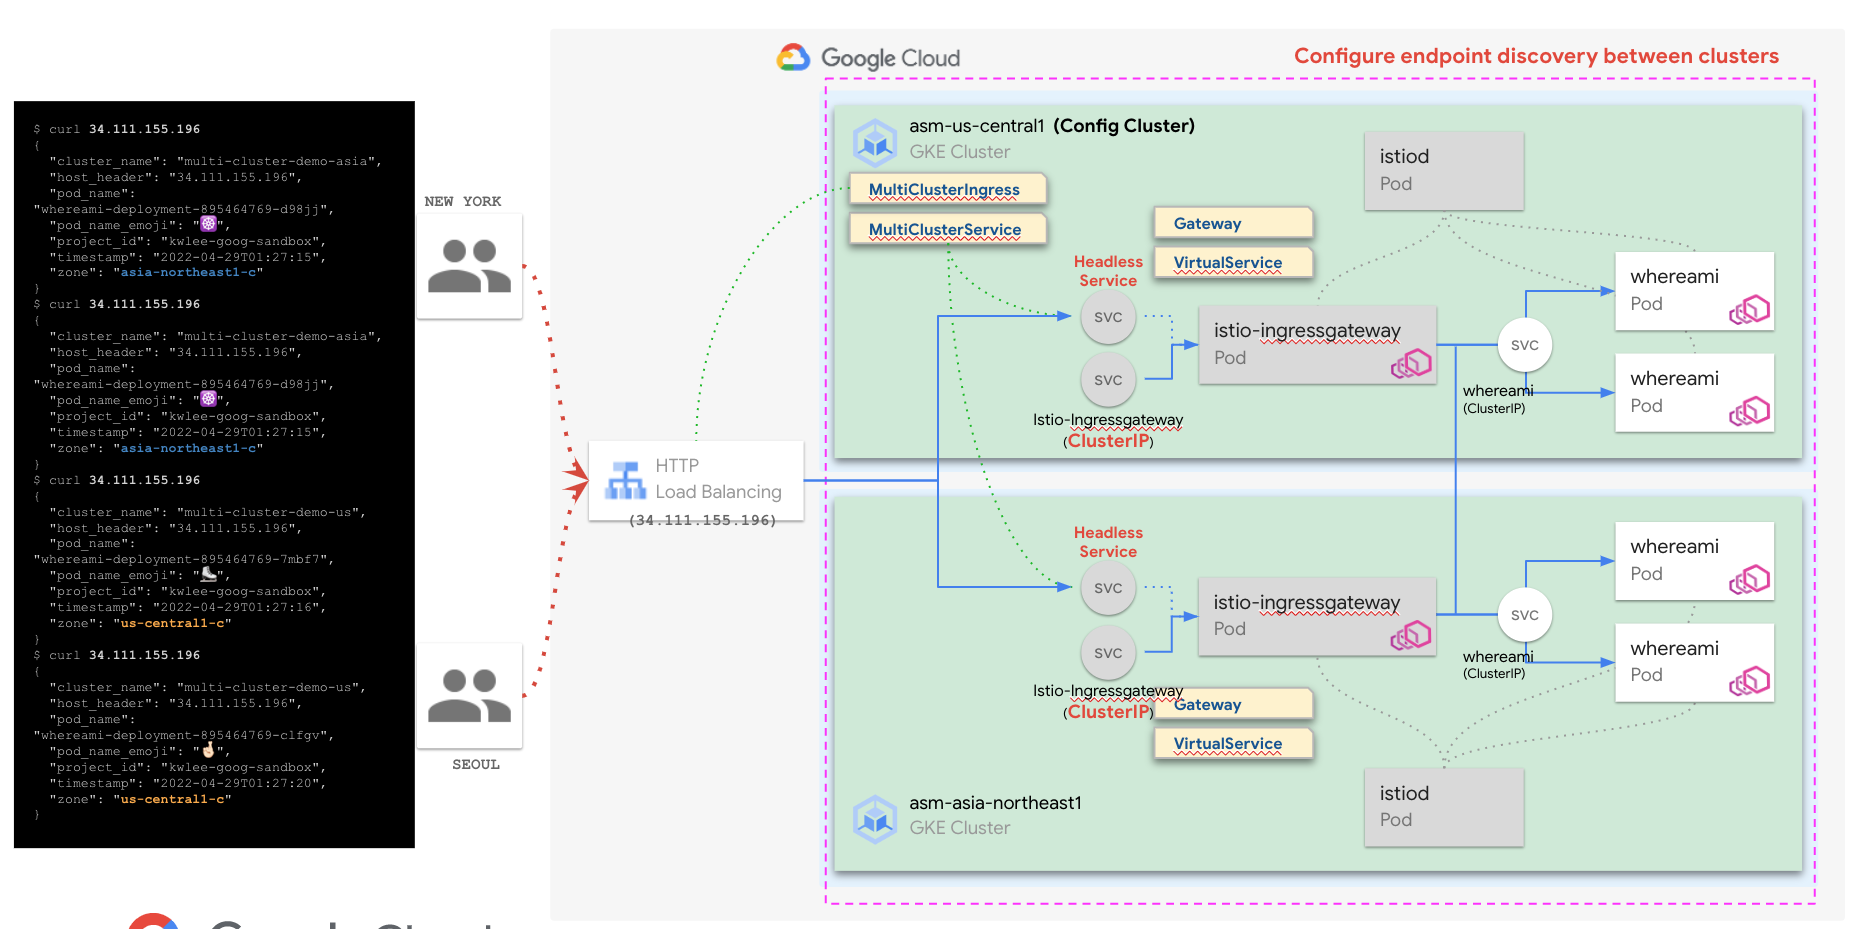
MCI 생성
$ kubectl apply -f ./kube/mci.yaml --context=${CTX_1} --namespace=${NAMESPACE}
multiclusteringress.networking.gke.io/mci-for-asm-ingressgateway created

$ kubectl --context=${CTX_1} --namespace=${NAMESPACE} describe mci mci-for-asm-ingressgateway | grep VIP
     f:VIP:
  VIP:        34.111.155.196
$ curl 34.111.155.196 { "cluster_name": "multi-cluster-demo-asia", "host_header": "34.111.155.196", "pod_name": "whereami-deployment-895464769-d98jj", "pod_name_emoji": "☸️", "project_id": "kwlee-goog-sandbox", "timestamp": "2022-04-29T01:27:15", "zone": "asia-northeast1-c" } $ curl 34.111.155.196 { "cluster_name": "multi-cluster-demo-asia", "host_header": "34.111.155.196", "pod_name": "whereami-deployment-895464769-d98jj", "pod_name_emoji": "☸️", "project_id": "kwlee-goog-sandbox", "timestamp": "2022-04-29T01:27:15", "zone": "asia-northeast1-c" } $ curl 34.111.155.196 { "cluster_name": "multi-cluster-demo-us", "host_header": "34.111.155.196", "pod_name": "whereami-deployment-895464769-7mbf7", "pod_name_emoji": "⛸️", "project_id": "kwlee-goog-sandbox", "timestamp": "2022-04-29T01:27:16", "zone": "us-central1-c" } $ curl 34.111.155.196 { "cluster_name": "multi-cluster-demo-us", "host_header": "34.111.155.196", "pod_name": "whereami-deployment-895464769-clfgv", "pod_name_emoji": "🤞🏻", "project_id": "kwlee-goog-sandbox", "timestamp": "2022-04-29T01:27:20", "zone": "us-central1-c" }
기본적으로 HTTP Load Balancing 로 들어오는 요청은 클라이언트와 가장 가까운 PoP(GFE) 을 통해 가까운 지역의 클러스터로 들어감. 현재 구성에서도 동일하지만, 클러스터 내부의 MultiClusterMesh 설정으로 인해 클라이언트 위치와 관계 없이 트래픽이 두 클러스터로 부하 분산됨 multicluster mesh 를 설정하지 않으면, 단일 클러스로만 트래픽 전달됨..
필요 시, istio-ingressgateway 의 Service Type 을 clusterip 로 변경하면, 기존 생성한 L4 를 통한 외부 접근을 막을 수 있음.
$ kubectl --context=${CTX_1} --namespace=${NAMESPACE} get svc
NAME                           TYPE        CLUSTER-IP    EXTERNAL-IP   PORT(S)                    AGE
istio-ingressgateway           ClusterIP   10.76.6.163   <none>        15021/TCP,80/TCP,443/TCP   88m
mci-mcs-svc-6v1bymw1gtk1xw8k   ClusterIP   None          <none>        15021/TCP,80/TCP,443/TCP   69m
whereami-service               ClusterIP   10.76.9.249   <none>        80/TCP                     121m

$ kubectl --context=${CTX_2} --namespace=${NAMESPACE} get svc
NAME                           TYPE        CLUSTER-IP    EXTERNAL-IP   PORT(S)                    AGE
istio-ingressgateway           ClusterIP   10.96.12.66   <none>        15021/TCP,80/TCP,443/TCP   78m
mci-mcs-svc-6v1bymw1gtk1xw8k   ClusterIP   None          <none>        15021/TCP,80/TCP,443/TCP   69m
whereami-service               ClusterIP   10.96.9.147   <none>        80/TCP                     110m
admin_@cloudshell:~/multi-cluster-with-asm (kwlee-goog-sandbox)$